Lapping paste
During operation, it is applied to the edge of the valve and serves as fine sandpaper that rubs the valve into its seat.
There are many options for lapping paste. For example, such as in the picture in the form of valves. It should be chosen based on your finances and preferred manufacturer. The lapping paste differs in the degree of processing: from coarse-grained (for initial processing) to fine-grained (for final processing). The latter is recommended by engine repair specialists, because... the process will go faster with it. Everything depends not on the paste itself, but on the condition of the valves and chamfers and the correctness of the process. For some, a regular tube for 100 rubles will do, but for others, give them only a professional one.
If you do it yourself, it’s better to start with regular lapping paste, not the most expensive one. If something goes wrong, then buy the necessary one in the process.
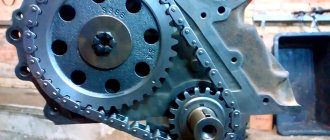
"Sharoshka" for removing metal
This tool is used to restore valve seats.
It represents a valve seat attachment made to fit the shape of the valve seat. It is usually fixed in a drill like a drill and is small in size. Do you need cutters? We look at the saddles that are pressed into the head. If they are not damaged, then you can start grinding in, but if they are damaged (by burnout), then you need to treat them with special cutters. In general, the technology is as follows - first it is better to change the valve guides, then grinding in.
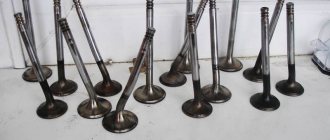
New valves
They are not always needed. If you find that the valves are somewhat bent, then trying to straighten them will lead to nothing except wasted effort and time. A better idea would be to head to the store and purchase a new set of valves for the engine.
When replacing valves, pay attention to quality. Their height must be the same; marks and roughness are not allowed on the rods, ends and working sealing chamfers. It is better to polish the rods to a mirror shine before installation. It is also worth polishing the plane of the plate and the “black” neck of the valve, so it will heat up less and become overgrown with soot. Do not touch the sealing chamfer, you just need to rub it against the seat.
Tool
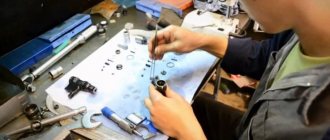
You can use a drill and a rubber hose for this purpose. The process is as follows: we put a hose on the drill (you can use a drill, and fasten it with clamps), and put the engine valve on this hose (we fix it with clamps) with lapping paste applied.
Next, insert the valve into the seat and begin the grinding process. The main thing is not to give maximum speed to the drill; the process should occur at low speeds (400-500 rpm). If the speed is higher, there is a risk of overheating the valve seats or belts. Also, there is no need to make circular movements, but rather imitate the operation of the valve back and forth. This method is not very good and takes a lot of time.
Valve lapping process
There are two types of defects in valves and seats: the working chamfers are covered with shells and carbon deposits, but have the correct shape; the working chamfers are covered with shells and carbon deposits, but their correct conical shape is disrupted - a stepped surface has formed on them, and the conical chamfer is rounded.
In the first case, it is enough to grind the valve; in the second, before grinding, the working chamfer is turned on a lathe, and the valve seat is processed with conical cutters. They grind in using a drill, when rotated the valve automatically turns in one direction or the other and gradually rotates in a circle. You can do it with a hand drill or screwdriver, but it will take longer.
A layer of valve lapping paste is applied to the valve chamfer and seat for rough lapping. The valve is rotated 120° and in the opposite direction by lightly pressing the valve head.
Video - how to do it yourself
Quality Control Methods
To find out whether the grinding has been completed or not, pay attention to the surface of the valve - a gray track about two millimeters wide is formed on it. If there is one, then the grinding process is complete.
Device for grinding valves on a drill
An operation such as valve grinding is included in the list of works for engine overhaul.
It is aimed at ensuring that the valve plate fits as tightly as possible to the seat, thereby minimizing the possibility of fuel leaking into the cylinders or exhaust gas breakthrough. After long-term use of the vehicle, carbon deposits on the surfaces of the valve and seat chamfers, microcracks and scuffs appear.
As a result, the contact patch between the surfaces decreases, the valve does not fit tightly to the seat, which is why it begins to leak and the engine’s compression decreases.
To remove carbon deposits, shells, and scuffs, valve lapping is used, as a result of which the contact patch between the valve and the seat is restored.
In addition to performing this operation as part of a major overhaul, valve grinding is carried out in a number of cases.
So, these works are carried out:
- If the valve or seat burns;
- When the valve disc burns out;
- When replacing them in case of damage, in general, whenever problems arise with these elements.
Required valve lapping tool
The work of grinding valves is not particularly difficult, but it takes a long time to complete, especially if you do it yourself.
It is impossible to perform them on a car; you will have to partially disassemble the power plant, namely remove the cylinder head.
Therefore, when deciding to grind the valves, you should immediately take care of having a new cylinder head gasket.
The tools you will need to perform this operation are:
- Set of keys and sockets;
- Device for desiccation of valves;
- Device for performing grinding;
- Grinding pastes;
- Rags;
- Kerosene.
Tools for performing work, lapping pastes
Let's go through the valve accessories.
There are special tools for removing the crackers that hold the valve head in the seat plate.
There are many designs, we won’t describe them all. Let us only note that they all operate on the same principle.
With this device, the valve springs are compressed, the valve mounting plate moves down, releasing the crackers, and they are removed.
But you can do it in a simple way. You will need a piece of tube with a diameter slightly smaller than the mounting plate.
This tube is placed on a plate and hit sharply with a hammer. Due to the impact, the springs are compressed, the plate sags and the crackers jump out.
In this case, it is better to cover the hole on the side on which the blow will be struck with something so that the crackers do not fly out through it.
Now about the lapping device.
It can be purchased, usually such a device consists of a nut clamp, a rod and a wrench.
But you can do it yourself. To do this, you will need a rod with a diameter equal to the diameter of the valve. A knob is welded to it to form a T-shaped structure.
On the other side of the knob, a piece of rubber tube is placed on the rod.
1 – metal rod with a diameter of 5 – 8 mm, depending on the diameter of the valve stem, 2 – rubber tube, 3 – clamp clamps.
The inner diameter of the tube must be chosen so that it fits tightly onto the rod.
You will also need another clamp; it will clamp the edge of the rubber tube, which will be placed on the valve stem.
To grind valves with your own hands, tools alone are not enough, since this operation is performed using special pastes.
They are not difficult to find; you can buy both cheap lapping pastes and very expensive ones.
For lapping, it is better to purchase kits consisting of two pastes or just two pastes - for primary roughing and for secondary finishing.
You may also need to use a cutter. It is a conical head for a drill with metal cutters inserted into it.
Use it to treat the damaged surface of the saddle.
Valve lapping process
First, remove the head from the engine. Next, the camshaft, adjusting washers or hydraulic compensators are removed from the head.
The next step is desiccation of the valves. To do this, either a device is used, or they are knocked out with a spacer.
After this, the mounting plates and springs are removed. The valve itself is removed from the head to assess its condition and the condition of the seat.
If it has no signs of burning and its rod is not bent, then it is not necessary to change it; it will be suitable for further use.
The saddle also needs to be inspected for signs of burning. If there are traces of burning of the seat, its surface is first treated with a rolling cutter.
After making sure that there is no burning on the surfaces, the grinding process begins.
To do this, apply a little initial processing paste to the valve chamfer.
Next, it is put in place, and a lapping device is put on its rod. If it is homemade, then the rubber tube on the rod must be clamped with a clamp.
Then the valve is pressed against the seat using the device and grinding begins.
To do this, turn the valve 180 degrees using the knob, and then turn it in the opposite direction. These movements are used to perform grinding.
It takes approximately 5-7 minutes to treat the surface with one type of paste. time.
The valve position changes periodically. That is, it needs to be turned approximately 90 degrees. from the extreme position when grinding in, after which the process continues again with turning it 180 degrees. and return back.
It is not advisable to mechanize the process by using a drill with an attachment on the valve stem.
Drills usually have high speeds, so when grinding with them there is a possibility of overheating the valve seat and chamfer.
In this case, a screwdriver is better. But the circular motion that will be provided by a drill or screwdriver is not recommended during lapping; this operation is best performed by half-turning the valve and then turning it in the opposite direction, that is, manual lapping.
After grinding in with roughing paste, the surfaces are thoroughly cleaned with a rag to remove any remaining paste.
Then finishing paste is applied to the valve chamfer and the grinding process is repeated.
A successful result of the grinding-in will be a uniform gray matte color of the ground surfaces without any traces of holes or scratches.
So, one by one, grind all the valves, both intake and exhaust. There is no particular difference in which car engine this operation is performed on.
The valve grinding process is the same for both VAZ-2106 and VAZ-2109 and later models.
The difference in the complexity of the work for these cars can only be the process of removing the cylinder head, preparing for lapping, and the ease of access to the valves due to the slightly different shapes of the cylinder head.
Checking the quality of lapping
After grinding in all valves, it is recommended to check the tightness of their fit to the seats.
To do this, you first need to install all the valves in place, install the springs with mounting plates and dry them.
Tools for performing work, lapping pastes
Let's go through the valve accessories.
There are special tools for removing the crackers that hold the valve head in the seat plate.
There are many designs, we won’t describe them all. Let us only note that they all operate on the same principle.
With this device, the valve springs are compressed, the valve mounting plate moves down, releasing the crackers, and they are removed.
But you can do it in a simple way. You will need a piece of tube with a diameter slightly smaller than the mounting plate.
This tube is placed on a plate and hit sharply with a hammer. Due to the impact, the springs are compressed, the plate sags and the crackers jump out.
In this case, it is better to cover the hole on the side on which the blow will be struck with something so that the crackers do not fly out through it.
Now about the lapping device.
It can be purchased, usually such a device consists of a nut clamp, a rod and a wrench.
But you can do it yourself. To do this, you will need a rod with a diameter equal to the diameter of the valve. A knob is welded to it to form a T-shaped structure.
On the other side of the knob, a piece of rubber tube is placed on the rod.
1 – metal rod with a diameter of 5 – 8 mm, depending on the diameter of the valve stem, 2 – rubber tube, 3 – clamp clamps.
The inner diameter of the tube must be chosen so that it fits tightly onto the rod.
You will also need another clamp; it will clamp the edge of the rubber tube, which will be placed on the valve stem.
Pastas.
For grinding valves, devices alone are not enough, since this operation is performed using special pastes.
They are not difficult to find; you can buy both cheap lapping pastes and very expensive ones.
For lapping, it is better to purchase kits consisting of two pastes or just two pastes - for primary roughing and for secondary finishing.
You may also need to use a cutter. It is a conical head for a drill with metal cutters inserted into it.
Use it to treat the damaged surface of the saddle.
How to grind valves with your own hands?
To grind the valves, you don’t have to take your car to a repair shop for a long time, and hope that the craftsmen will do everything perfectly, and not carelessly.
You can do this procedure yourself if you have the desire and the necessary tools. Moreover, the majority of real car enthusiasts prefer to do repairs and adjustments of mechanisms (units) with their own hands.
This guarantees the quality of work and gives moral satisfaction to the driver.
What is valve lapping and why is it needed?
Most domestic cars, especially the old model, 1970–1991, have four-cylinder, eight-valve engines. That is, each cylinder has two valves - an intake valve, which admits the combustible mixture into the combustion chamber, and an exhaust valve, which discharges spent exhaust gases into the manifold.
https://www.youtube.com/watch?v=laVw74d2lmY
A car valve looks like a nail with a wide head, with which it plugs the hole in the combustion chamber. The cap, or more correctly, the valve plate, fits its edge (chamfer) tightly to the seat - the edge of the hole in which it is installed. The cleaner and smoother the edges of the plate and seat, the better the valve closes the hole, which means the engine power, without loss, is directed to the movement of the pistons.
Over time, the edges of the plate and seat become covered with soot and carbon deposits, which violates the tightness of the combustion chamber. This negatively affects engine power and efficiency and increases oil consumption.
If you do not clean the valves regularly, then the hot exhaust gases will sooner or later melt the plate itself, rendering the valves unusable, and consequently the entire engine.
Since the procedure for removing the engine head is quite labor-intensive, it makes sense to combine the work carried out on its components and parts. For example, when replacing the engine head gasket, you can at the same time change the oil rings on the pistons and clean the valves.
The need for cleaning is difficult to determine visually, but there is an easy way to understand how necessary it is. You need to pour kerosene or gasoline into the combustion chambers, directly onto the valve plates, and leave them like that for 12 hours. If the liquid leaks out during this time, it means that it has leaked between the plate and the seat, which means cleaning and grinding are necessary.
In general, it is believed that valves need to be cleaned and ground in every 50,000 km . But this figure is also inaccurate, since the manner in which the engine is used plays a role, because it can operate under strong, sporting loads, or maybe in a gentle mode on good, clean fuel.
What is needed for grinding in?
You can grind valves in several ways, depending on the one you choose, you will need the appropriate tool. This can be a regular electric drill, a special pneumatic tool, or a hand cutter. Accordingly, you will need a special lapping paste, the composition of which is similar to what is used by jewelers for grinding metals.
Grinding methods
There are several grinding methods. Each has its own characteristics, which are described below.
Hand cutters
A hand cutter is a stick with a suction cup at the end. The procedure is as simple as starting fire. The rubber suction cup is installed on the valve plate, the chamfer of the plate and the seat are pre-treated with a special lapping paste, and the rotation of the strip between the palms begins - left, right. A normal valve usually takes from 15 to 20 minutes.
This method is used by true connoisseurs of rare cars, receiving moral pleasure from this process. With this grinding method, it is impossible to damage the plate itself, the valve stem or seat. Visually, after processing, the chamfer of the plate becomes matte, like the saddle.
Machine tools
There are special mobile machines for lapping valves. They are used by professional car mechanics in their workshops. These are devices of type: VM1150, VM1200, VM1350, VM1500 or VM1600.
They differ in the size of the plates being processed and the depth of immersion. There are also special stands for lapping valves, type R-23.
74, they are capable of processing 8 valves at once, and are designed for a wide variety of car models - from cars to heavy trucks.
Workbench and tube with T-handle
A tube with a T-handle is another device used for gently grinding in the valves of vintage cars. In this case, at the end of the tube there is a mount for the rod, and the handle rotates the valve in the seat. The method does not tolerate haste and force. It removes a minimal layer from the fragile and thin valve plate. But this method takes quite a lot of time.
Using a drill
Using an electric drill is the most controversial method among professional auto repairmen. With this method, the valve stem is clamped into the drill chuck itself or through a flexible rubber hose.
The drill must be reversible, with the ability to rotate the rod in both directions at ultra-low speeds. Undoubtedly, this method significantly reduces the grinding time - one valve takes from 1 to 2 minutes.
But there is a risk of scratching the plate or seat, leaving deep scratches on them, or even breaking the valve stem.
Important! Grinding in with an electric drill can only be carried out by professionals who can determine the quality by eye and have a steady hand accustomed to working with this tool.
What lapping paste should I use?
At the dawn of the automotive industry, dust from diamond wheels mixed with engine oil was used to grind valves. Today, these mixtures are replaced by a variety of grinding pastes. They differ in the content of abrasive elements, fraction sizes and, accordingly, price.
The paste is selected depending on the degree of contamination, quality and grade of valve metal, year of manufacture and engine model. The grinding method – manual or mechanical – also matters.
An important factor in choosing a paste is the experience of the master . For example, a beginner using coarse paste can easily damage a valve or seat. Therefore, for novice craftsmen, it is recommended to use a fine-grained paste, while grinding in with this product will take more time.
Automotive stores sell coarse-grained paste called “Classic” or “Diamond” for initial lapping. For final grinding, FABO paste is used - a finishing anti-friction, non-abrasive treatment. This paste is sold in a set of two tubes, with large fractions and a grinding one.
There are also multifunctional pastes such as ABRO Grinding Paste GP-201. It can not only grind valves, but also clean rust from metal parts and even be used to sharpen cutting tools, such as planes. Its price is much lower than the special “FABO”, so, as they say, it will come in handy on the farm.
“PERMATEX” or “Done Deal” pastes are also used for polishing chrome parts, since they do not contain technical diamond, but silicon carbide.
Important! Before buying a paste, you need to carefully read its composition and range of applications.
If the repair finds the driver without paste, and it is impossible to postpone the grinding - the engine has already been disassembled, you can mix abrasive removed from ordinary, fine sandpaper with oil, and for final polishing use the paste of the State Optical Institute or better known as GOI paste.
Cone for removing excavation
This tool is used to restore valve seats. To determine whether you need to use a roller cutter or can do without it, you should inspect the saddles. They can be covered with soot and shells, but if the chamfers have the correct conical shape, you can immediately proceed to lapping; otherwise, if the chamfers are rounded or have steps on them, you will need to give them the correct shape using a cutter.
Article on the topic: Replacing valve stem seals: main signs of wear, replacement procedure
Since the shapes and sizes of the seats on different heads are different (for example, for the VAZ-2106 and VAZ-2109), you need to select the appropriate tool. Seats can be processed manually or, to save time, using a drill. To do this, the cutter is fixed in the chuck, like a regular drill, and under its influence the surface layer of metal is removed. The signal to stop removing the excavation is the appearance of a shiny, even circle, the shape corresponding to the valve plate.
In the video you can see how the saddles are processed with a rolling cutter.
Drill attachment for lapping valves
Having a professional tool at home makes it possible to do the job without involving specialists.
But will factory quality always be adequate? In some cases, it is much more practical to make the structure yourself.
One of the original and practical devices is a homemade drilling machine made from a steering rack.
At first glance, it seems that purchasing a ready-made stand for installing a drill would be the best option.
However, in most cases, factory models have large backlash, which makes it impossible to accurately drill small holes up to 4 mm.
This is why professionals prefer to make the frame themselves.
Factory rack
The problem is saving on consumables - the desktop is light in weight, and the stand is not rigid enough.
As an alternative to an expensive professional drilling machine, it is proposed to make a base from scrap materials, and use a powerful drill (from 1.5 kW) as electrical equipment.
Even at the stage of drawing up a diagram, you may encounter the following problems:
- Making a mechanism for raising (lowering) a drill. The best option is to install a steering column from a passenger car.
- The base and stand for attaching the column are made of thick-walled rolled metal - channels, corners of sheet iron. The greater the mass of the machine, the better it will compensate for vibration.
- If you don’t have a drill, you can make a drilling mechanism from any suitable electric motor. Most often, power units from washing machines are used for this. Pulleys for creating a belt drive are also selected from scrap materials.
All these issues can be solved if you apply a professional approach to each stage of manufacturing a drilling machine from a steering rack.
Its design is relatively simple, but to reduce labor intensity and achieve good workmanship, it is recommended to adhere to a certain design.
Making a machine
Homemade machine
The first step is to find the steering rack.
It is best to use a part from a VAZ 2108, as it is characterized by simplicity of design and a long service life without repairs.
Since a new rack will cost quite a lot (up to 3,500 rubles), most often they buy used ones.
Selection of rack and its modernization
After purchasing it, preventive maintenance should be performed.
For good operation of the drilling machine, it is necessary to ensure smooth operation.
Therefore, in addition to mandatory cleaning of debris, it is often necessary to replace some components:
- Checking the condition of the gearbox. If necessary, replace faulty elements.
- The support sleeve must not have surface damage - chips, cracks, etc. This is controlled before purchase.
A protective layer of paint is applied to the body. Attention - it should not get inside the column. This may cause it to break or require significant effort when moving the rod.
Manufacturing of the frame and installation
Drill lock
The machine body is made according to the dimensions of the column and drill. The optimal size of the work table is 30*20 cm. A platform is attached on top of it, on which the parts for drilling will be located.
Particular attention should be paid to the design for fixing the drill. It is installed on the steering rod in those places where there are mounting bolts.
If you couldn’t find (make it yourself) a similar design, you can order it.
To do this, it is recommended to draw up at least a simple drawing and give it to the master along with the finished column.
Jack machine
The stand can be made from a U-shaped metal profile 30*60*30. It is welded to a steel sheet whose thickness is at least 2 mm.
To increase rigidity, additional ribs can be installed between these elements. The finished structure must be stable.
It is best to make holes on the sheet for attaching to the desktop.
The height of the stand should be 5-7 cm greater than the length of the column. The stroke of the rod must be taken into account. For the VAZ-2108 model it is 210 mm.
For greater comfort when working with a drilling machine, you should consider a system for turning on (off) the drill. The circuit may consist of a socket and a switch.
To do this, the design of the drill must include a mechanism for fixing the start button.
Otherwise, you will have to fix the button all the time, which will be extremely inconvenient.
In addition to the steering column, a mechanical jack can be used as a mechanism for lowering the drill. But such a design has an uneven move, which affects the quality of work.
How to make a homemade drilling machine from a steering rack?
If you have the necessary list of tools and devices at home, you can do a whole host of necessary technological operations. However, often buying a factory copy is extremely illogical.
One of the realistic options is a DIY steering rack drilling machine. This way, you will not only be able to save financial assets, but also learn how to make the right equipment for your specific needs.
List of tools:
- Set of wrenches;
- Welding machine;
- Grinder for metal;
- Grinder (to remove metal burrs);
- Hammer.
Features and nuances of manufacturing
The main task seems to be the correct selection of component parts.
To analyze the best way to manufacture a given machine, it is necessary to know the advantages and disadvantages of factory copies in order to avoid them, if possible, in the process of manufacturing your own equipment.
One of the biggest drawbacks in the operation of “conveyor” drilling machines is the huge backlash. Because of this reason, it is not possible to make a hole with a diameter of 4 millimeters or less.
This is due to the rather light weight of the entire installation, which does not have the ability to compensate for the vibration that appears during the operating moments of the power unit. Upgrading a machine may result in its incorrect operation and, as a result, its rapid breakdown.
To design a drilling unit, you need to think about the following points:
- A mechanism for changing the position of the working components of a machine. An alternative solution is to use a steering rack in the design. Also, this component will be very useful if there is a need to apply a strong clamping force to the processed semi-finished product at the time of processing.
- Support table top and stand for fastening the working unit. The main characteristics when choosing components for the manufacture of these parts are strength and fairly impressive weight. It is best to use U-shaped channels. Rolled steel sheets are most often used for the base.
- Power unit. To design drilling equipment with your own hands, the choice often falls on electric drills. As an alternative, you can consider a system consisting of several pulleys and an electric motor.
Drilling machine from a steering rack: step-by-step instructions
From the very beginning of design, he makes a choice regarding the most optimal type of steering rack.
Further, depending on its dimensions, technical documentation of all equipment will be compiled.
The main thing that you need to pay special attention to is that this critical component is not chipped or has a large number of surface flaws.
Valve repair and maintenance tools
The tool for repairing and servicing valves in the engine gas distribution system is a special tool. equipment. Such work is mainly carried out by professionals or car enthusiasts with experience, because the valves are located directly in the car engine, so getting to them will require a lot of work. Incorrect or poor-quality repair of the gas distribution mechanism (GRM) can lead to even greater costs and repeated engine repairs. Also, some work, in principle, cannot be done without the use of special tools, even on old, structurally simple engines, what can we say about modern cars?!
This group of tools includes:
- Valve depressurizers (including those with the ability to depressurize the valve without removing the engine block head)
- Manual valve grinding, as well as pneumatic valve grinding machines
- Pliers and kits for replacing valve stem seals
- Tools for removing and installing valve cotters
- Devices for replacing hydraulic compensators
- Engine valve pliers
- Spark plug adapters for compressed air
- Brushes for cleaning valves, as well as blades for cleaning the surface of the cylinder head, cylinder block and valve cover
- Countersink sets for boring valve seats
- Replacement attachments for manual and pneumatic valve lapping
- Tool for working with truck valves
If you pay attention to the list and variety of tools for repairing and servicing engine valves, it becomes clear how complex and labor-intensive this work is, requiring not only an experienced craftsman, but also professional, high-quality tools. In most cases, such work is carried out during an engine overhaul, often when the timing chain or timing belt breaks (when the valves bend), less often when removing or replacing camshafts or valve stem seals.
Having the appropriate special tools in your arsenal can provide quick and high-quality engine repairs. A large range of products allows you to select devices suitable for repairing both gasoline and diesel engines, old classic cars and modern high-tech models. For the most part, the tools of this group are presented as universal, but there are also tools for specific brands and models of cars from Japanese, Korean, German, American and French manufacturers. For this reason, many professional service stations or specialized workshops have in their arsenal various types of desiccants, lapping tools, pliers and other tools.
Valve lapping
Table 1. Micropowders
| Grit designation | Grain sizes, microns |
| M40 | 28…40 |
| M28 | 28…20 |
| M20 | 20…14 |
| M14 | 14…10 |
| M10 | 10…7 |
| M7 | 7…5 |
| M5 | 5…3 |
Less labor-intensive check of valve tightness “on a pencil”. Using a soft pencil, apply 6...8 radial lines to the valve chamfer. Having installed the valve, press on its plate and turn it slightly in both directions. If the grinding is normal, the lines will be erased
valve, lapping
Lapping valves: methods and devices
Catalog of special tools Devices for grinding valves in the GarageTools assortment.
We compared the four most popular devices for grinding in internal combustion engine valves. We tell and show!
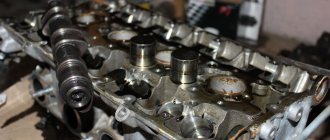
Preparations for testing are underway. We are waiting for the cylinder head.
The cylinder head from BMW was used as a test subject.
All participants along with the cylinder head (list below, from left to right) Devices for grinding in engine valves participating in the comparison:
- Electric drill. Grinding valves with a drill is a technology that causes the greatest amount of controversy regarding its correct use.
- DIY valve grinding device.
- Pneumatic tools for grinding valves by rotating.
- Pneumatic machine for grinding valves by tapping.
Which of these devices is faster, more efficient, more profitable, more correct - better than all the others? Which valve lapping should I choose? Now we will find out.
Method number 1: using a drill
The drill method has become widespread due to the previously missing tool for grinding.
First, select a suitable hose size
One end is attached to the valve stem (rod), the other - to a drill.
The required amount of lapping paste is applied to the valve and seat, and the valve is installed in its place in the cylinder head.
If a suction cup is used, it is installed on the valve plate.
There are recommendations according to which the tool must operate at low speeds - preference should be given to a low-speed drill or screwdriver. Release the trigger of the drill when the valve comes into contact with the seat; the contact should be made when resetting. There is no need to apply any effort, this significantly increases the risk of improper grinding.
Grinding the valve to the seat using an electric drill. Useful advice. It is very important to use a minimum amount of lapping paste. The paste itself can be different - with large and fine abrasives. Diamond is most often used. For proper grinding, use pastes of different grain sizes and start with abrasive for rough processing. After lapping, be sure to rinse off the lapping paste and clean the parts. Getting abrasive paste into the cylinder head and engine is unacceptable! This will lead to destruction of parts and expensive repairs.
When grinding with a drill, experience is key. Without the necessary skills, it is very easy to get grooves and risks or to displace the contact patch of the valve with the seat. All this leads to a very quick breakdown.
Professionals often agree that using a drill is acceptable, but wrong. We support this opinion and look at the drill with distrust
The main advantage of the method: high grinding speed.
Method No. 2: manual grinding of car valves
Manual grinding is an old-fashioned method, carried out using a suction cup. As with a drill, the experience of the person performing the procedure is very important.
Please note that specialized stores sell manual tools for grinding valves, which consist of a wooden rod and a set of suction cups
Grinding in valves with your own hands is inconvenient and tedious, it takes a lot of time - on average, 15 - 20 minutes per valve. The risk of spoiling something or doing it wrong is minimal, but it is present.
At the 12th minute of the manual test, for some reason we felt like this
Main advantage: low cost of manual valve grinding tools.
Method No. 3: pneumatic tools for grinding valves by rotation
A pneumatic machine is an automated, simplified and greatly accelerated method of manual grinding. The motor is connected to a pin, which is driven by the energy of compressed air.
To operate, you will need a connection to a compressed air source.
A suitable sized suction cup is installed on the pin, which is then attached to the valve plate.
The kit usually includes a whole set of suction cups of various sizes.
Under the influence of compressed air, the engine provides a reciprocal rotational movement of the pin with a suction cup, as a result of which the valve also rotates - grinding occurs. Before changing the direction of rotation, the valve has time to rotate approximately 75 degrees.
This is the easiest and most affordable way to grind a valve, which does not require any special skills. The device itself controls the angle and speed of rotation, which are optimal. The operating speed is even higher than that of a drill - just a few minutes are enough to grind one valve.
We also note that the valve grinding kit we tested has very convenient packaging for storage - a plastic shockproof case. This can be an additional advantage, for example, for use in a car service center.
The main advantages: very high speed, simplicity and ease of use, no skill requirements and obviously guaranteed quality.
Method No. 4: pneumatic machine for grinding valves by tapping
The fundamental difference between this and the previous device is the grinding method. Using this machine, the valve is ground in not by rotating, but by tapping, which imitates real engine operation.
One of the suction cups of the set is installed on the rod of the device, which is then fixed on the valve plate. The tool is equipped with a wheel for adjusting the speed of rotation. Grinding is carried out by repeating the reciprocating movements of the valve many times.
The pneumatic tapping machine has minimum requirements for using skills. In the absence of experience, training occurs directly on the job, in the very first minutes. Also, the device completely eliminates the risk of damaging parts and spoiling anything.
Main advantages: obviously guaranteed quality, the most accurate grinding due to simulating the operation of a valve in an engine.
Is it interesting to see not pictures, but videos of pneumatic machines in operation? Welcome to our channel about professional tools and auto repair on.
Summary table, results and conclusions
For an objective comprehensive assessment of each method, we selected six parameters that are of greatest importance:
- Speed.
- Ease of use. This parameter also affects the overall speed of operation.
- No requirements for experience or skills. The higher the rating, the easier it is for the user to properly grind the valve.
- No risks. The higher the score, the less likely it is to do something wrong or spoil parts.
- Lapping quality. The higher the score, the more accurately the operation was performed.
- Price. The lower the costs for one method or another, the higher the score.
ParameterDrillHand-held devicePneumatic machine, rotationPneumatic machine, tapping
| Speed | 8 | 1 | 9 | 7 |
| Ease of use | 3 | 1 | 10 | 8 |
| No special skill required | 1 | 2 | 10 | 7 |
| No risks | 1 | 4 | 10 | 10 |
| Quality | 4 | 4 | 8 | 10 |
| Price | 7 | 10 | 1 | 3 |
| Final result | 24 | 22 | 48 | 45 |
As can be seen from the table, special pneumatic devices for lapping are significantly superior to the manual method and drill. If we ignore the cost parameter and look only at quality indicators, then both methods lose to pneumatic machines with destruction.
Outstanding performance and the highest final score based on test results for the rotary valve lapping machine. None of the participants managed to score the maximum number of points - well, there is no instrument that is ideal in everything. The places were distributed as follows:
Last place, 22 points - the manual method, which is predictably behind all the others. Currently, valves are ground in manually either for pleasure from the process (yes, this happens) or in the absence of access to a modern tool.
Second to last place, 24 points - drill. Despite the high speed of operation, the drill is only a few points ahead of the manual method. First of all, this is due to the high risks of improper grinding and damage to parts, as well as increased requirements for special skills.
Second place, 45 points - tapping machine. Slightly inferior to first place, but it provides the most accurate and correct valve lapping.
First place, 48 points - spinning machine. It leads in almost all indicators and is the optimal solution for grinding in.
The following equipment was used for testing:
At GarageTools you can buy professional equipment for lapping valves. See our catalog for prices and detailed specifications.
Valve grinder users
Pneumatic devices for grinding valves will primarily be of interest to employees of car service centers. The equipment significantly reduces the time spent on cylinder head repairs and improves the quality of lapping. In our practice, not a single master who has tested a professional tool in work has returned to the manual method or drill.
The low price of the tool makes it also available for private use. If you want to carry out the valve grinding yourself, rather than entrust this operation to a third-party service, the device will be the optimal solution.
Lapping tool
A device for grinding valves can be made from a drill, a drill bit, a hose and two clamps. A drill is clamped into the drill chuck, one end of the hose is put on it and tightened with a clamp. The other end of the hose is put on the valve stem, inserted into place.
As an alternative, a special suction cup can be used, which is clamped with one end into the drill chuck and the other is attached to the valve plate. When purchasing, you should check it, pay attention to the quality of the material from which the suction cup is made, since a low-quality device will constantly come off, and the work will become much more difficult.
After this, all that remains is to apply the lapping paste, and you can begin the process. The grinding in of valves and seats must be carried out in compliance with the following conditions:
- rotation speed of the drill chuck is not higher than 500 rpm. to avoid overheating of valve seats and belts;
- grinding is carried out in both directions (the operation of the gas distribution mechanism is simulated).
Article on the topic: Which crankcase protection to choose, which one is better and is it necessary?