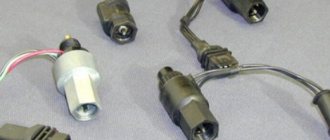
Priora
When is it time to change the Priora timing belt? As on other cars, on Priora the timing belt-ring is a flexible connection that controls gas distribution in the internal combustion engine. To calculate the replacement period, they find out the mileage of the car in km, the operating features of the part, and are based on the principles of its operation.
Priora is a special car. In principle, this can be said about almost every car brand, thereby highlighting its characteristic features.
Priora timing belt
So, Priora refers to cars equipped with DOHC engines. In other words, such engines have two camshafts, each of which is responsible for separate valve banks. Another feature: the valves are actuated using pushers, which is regarded by experts as an advantage, since power delivery becomes better.
Article on the topic: When the ignition is turned on, the battery (generator) lamp does not light up
The Priora timing belt ring is a product made from rubber material. It has serrations along its inner edge.
When choosing a belt for a Priora, you should always check the quality of the product with your own hands. It will be useful to do this: compress the outer surface of the belt and check whether there are longitudinal-transverse cracks or delaminations on it.
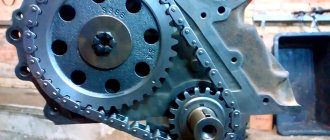
The principle of operation of the element is based on the passage of a rubber ring through the tensioner roller, crankshaft pulley, coolant pump wheel, camshaft sprockets and guide roller. In other words, the ring belt connects all these mechanisms, ensuring their coordinated operation. You should know that the Priora is equipped with a Gates Kit model belt as standard. This product requires working with plastic rollers that are not of reliable quality. Experienced “priorists” recommend replacing elements before the end of their service life. According to AvtoVAZ, the timing belt on a Priora needs to be changed after a mileage of 200 thousand km. Here a beginner will understand that this is an overinflated resource. Nevertheless, it is generally accepted that with short-term drives around the city and on smooth roads, without active use of the car, the belt, together with other elements, will last this long.
On the contrary, periodic trips, especially outside the city, and active driving on roads of varying quality significantly reduce the service life of the timing belt along with other elements of the timing belt mechanism.
Some Prior owners regularly change the belt after 40 thousand km. The other part does this after 60 thousand mileage.
How long does it take to change the belt?
Be that as it may, each car owner must decide for himself after what period of time it is time for replacement. It is necessary to inspect the belt for wear as often as possible, and when the approximate time for replacement comes, the intervals between the next visual inspections should be reduced.
It was written above that the primary sign of timing belt wear is poor engine starting, but there are also other symptoms.
- Uncharacteristic noises coming from the engine.
- Strong engine vibrations felt in the cabin.
- Exhaust color black, changed.
Mileage, as such, cannot be considered the only correct criterion for determining the replacement of a timing belt. The fact is that there are many other factors that affect wear. Even a relatively low mileage of a car cannot guarantee the good condition of the belt.
When worn, the rubber of the product peels off from the cord, and the mud-dust composition gives a devastating effect in the form of an abrasive effect. To fix the problem, you should eliminate the original sources of lubricant leakage and carefully inspect the element itself.
As mentioned above, timely replacement will save the car owner from large financial costs. The same can be said about the Priora engine, the piston-valve group of which does not have recesses, like on the “ten”. On such an engine, if the belt breaks, the meeting of the pistons with the valves is inevitable.
I would like to add a little about visual diagnostics. If the car “knocks” on the road, how to check the belt? For Prior owners, this will not be difficult to do, because all you need to do is open the protective cover and take a look. On the other hand, the Priora does not have breakdown sensors that send a signal directly into the car interior, like in foreign cars.
Bend valves
In many cars, when this belt breaks, the valves bend, since when the camshaft breaks, the rotation of the camshaft stops, and the crankshaft continues to rotate by inertia, which leads to the pistons meeting the valves and, accordingly, to their damage.
On the VAZ 2110, valve bending occurs only on a 16-valve engine with index 2112, to make it more clear, if a 16-valve engine has an aluminum receiver, then on this internal combustion engine, if the timing belt breaks, the valve will bend.
On an 8-valve engine or a 16-valve engine with index 21124 (with a plastic receiver), the valves do not bend when the timing belt breaks.
How to visually check the condition of the timing belt
To prevent serious damage, diagnostics of the condition of the gas distribution belt of a car engine should be carried out monthly.
During the inspection, small cracks in the material from which the timing belt is made may be detected, but this does not always mean that it is urgent to buy a new spare part. Thanks to the reinforcement, the inner toothed part of the belt can remain intact, and replacement of the part may not be necessary. At the same time, if the reinforcing component is damaged, the belt is considered unsuitable for use. This condition of the timing belt can be confirmed by extraneous noise during engine operation and difficulty starting the engine.
A sign of a malfunction in the gas distribution system may be black exhaust or vibration of a running power unit. If the above-described signs of improper condition of the timing belt appear, you should contact a car service center. If necessary, you can diagnose this element yourself.
Most often, before checking the timing belt tension, it is necessary to remove the protective casing. The procedure for carrying out this operation differs for each car brand and engine modification. When the protective casing is removed, it is necessary to rotate the crankshaft, which will allow the timing belt to rotate and assess its condition.
You should make sure that the belt teeth are not damaged (there are no cracks or breaks on their surface). Then the timing belt tension is checked. If oil stains or traces of coolant are found on this part, you need to find the location of the leakage of technical fluids and eliminate the cause of this malfunction.
Here are various signs indicating the need to replace the timing belt:
Worn material. Timing belt wear occurs in much the same way as with tires. If the belt material is severely worn, it may slip off the pulleys or break. Such situations occur at high engine loads (for example, while towing a trailer or trailer), as well as at high air humidity.
Abrasion of timing belt teeth occurs when the tension roller or pulley is displaced from the desired position, at high temperatures, or due to bearing wedging. Such wear on the teeth can be detected during inspection by the appearance of the fabric base of the belt (fleecy fabric fibers, uneven texture, etc.).
Presence of cracks and delaminations visible to the naked eye
When inspecting the timing belt, you need to pay attention to its front and rear surfaces.
Hardening of the material on the back side of the timing belt. It becomes shiny, hard and loses elasticity
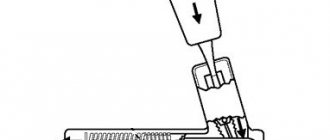
Loss of elasticity leads to poor contact with the timing pulley. How to check a timing belt for hardening of the material using a screwdriver was described in previous sections.
Timing belt stretching. As a result of material wear, a significant increase in the working length of the belt can occur. As a result, the tension roller may move beyond its permissible limits. Such changes help reduce the degree of tension and stiffness of the timing belt.
Timing belt deviation from the required position. This may be due to a faulty bearing or tension pulley. Further operation of the gas distribution mechanism will lead to increased noise, vibration and overheating of the mechanism.
Design features of timing belts
Structurally, the timing belt is a toothed structure of the internal working surface with different tooth shapes. The three most common tooth shapes are:
- trapezoidal,
- Round,
- Complex.
The rounded tooth shape has slightly better performance characteristics compared to the trapezoidal one due to a more uniform distribution of loads along the profile. Due to this, the risk of teeth “jumping” is reduced. In addition, the rounded shape of the teeth helps reduce noise when the belt operates. Complex shapes, like round ones, also have a curved profile.
Increased requirements for the performance characteristics of timing belts also predetermine the specific properties of the materials from which they are made. First of all, this relates to strength characteristics: tensile strength under dynamic loads, increased flexibility, wear resistance, durability.
It should also be taken into account that timing belts operate in conditions of high temperatures and an extended range of their variations: in summer, the temperature under the belt protective casing can reach 100 degrees or more, and in winter, the engine is started at temperatures below - 40 ° C.
The internal structure of timing belts that meets such increased requirements is quite complex. It is a multi-layer “pie”, the top layer of which contains synthetic rubber compounds that are resistant to temperature changes and wear, and the inner layer includes a fiberglass cord that provides tear resistance. In addition to layers, to improve performance characteristics, fabric braiding of the teeth and, in some cases, the outer surface of the belt is used.
Materials are the main direction for improving timing belts. Since the 80s of the last century, Gates, one of the most reputable manufacturers in the world, has been inventing and introducing into production nitrile-butadiene rubber, which has significantly improved the characteristics of belts (though at the same time increasing the cost of production). Since then, both belts made from traditional materials (chloroprene rubbers) and new ones (nitrile rubbers) have been widely used.
Manufacturers usually limit the operational durability of chloroprene timing belts to a mileage of no more than 60 thousand km. For nitrile belts, this figure is significantly higher: up to 120 thousand km and even (for certain models) the entire service life of the car. However, for our operating conditions, experts do not recommend replacing the timing belt less frequently than every 60 thousand km.
general information
Most often, the timing mechanism is located in the front of the car; in older car models it can be found between the engine cylinder and the radiator. Today, manufacturers are trying to reliably hide the part, however, to find it, you just need to unscrew the protection and start repairing. The composition of the element is a rubber mixture. Many manufacturers use highly saturated nitrile, which provides excellent wear resistance at high temperatures. There are teeth on the inside. Manufacturers produce their own type of belts for each car model.
A broken belt will cause many problems for your car. The whole point is that the part uses basic systems. When it breaks, the shaft freezes in one position. The pistons continue to move, hitting the valves and deforming them. The consequences can be dire.
The main reasons for the break:
- An unscrupulously assembled car engine.
- Severely worn mechanism.
- The elasticity of the material has deteriorated significantly - rupture occurs.
- Poor quality workmanship of the part.
- Pump rollers are not tensioned well.
If you buy a used car and there are any doubts about its history, it is better to make a replacement than to spend money on repairs later.
Purpose of the timing belt
The main purpose of the belt is to synchronize the rotation of the crankshaft and camshaft of the internal combustion engine. If the movement of these main drives of the crank mechanism and the valve system is not synchronous, two critical malfunctions occur:
- the engine combustion chambers will lack the necessary compression;
- The ignition angle is incorrect.
In most diesel engines and many gasoline engines, a situation may arise when “the valves meet the pistons.” When purchasing a car, you need to find out the exact name of the engine model that is installed on it. This can be done using the VIN, but sometimes the engine is changed during the operation of the car, then this is more difficult to do. According to the engine model, you need to enter a query into a search engine, for example, “4G63 engine valves meet pistons” or something like that. The received links must be analyzed. If the answer is clear: “they do occur,” the timing and mileage before replacement must be observed. If the belt breaks or jumps, it will most likely lead to capital failure.
Many car enthusiasts advise purchasing a car with an engine equipped with a chain timing mechanism. It is believed that they are more reliable. It is not always so. Even if it is a million-dollar engine, this does not mean that the chain guide should not be changed in a timely manner. This work can be more labor intensive than replacing a belt.
Purpose of timing belts, their types and replacement frequency
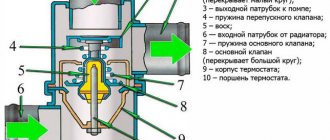
Synchronizing the rotation of the engine crankshaft and the camshaft (or shafts, if there are two) of the gas distribution mechanism is the main purpose of the timing belt. The synchronization process itself is to ensure that the camshafts rotate at exactly half the speed of the crankshaft. The location of the timing belt in the gas distribution mechanism is shown in the figure.
From the engine crankshaft pulley, force is transmitted through the belt to the camshaft pulleys, ensuring their rotation at the required speed. In turn, the eccentrics located on the camshafts, through pushers, rocker arms and rods, open or close the valves at strictly defined points in time, thus ensuring the movement of gases in the engine cylinders.
Simply put, it provides a classic scheme for the movement of gases in the engine along the strokes: intake, compression, power stroke and exhaust.
The above scheme using a timing belt has become most widespread in modern engines, due to a number of advantages over camshaft drive schemes via gears (the so-called lower camshaft):
- the belt does not require lubrication, is located outside the cylinder block and is located in a place accessible for diagnosis and replacement;
- Along with the gas distribution mechanism, it is possible to drive other devices, for example, a water pump (pump)
- the rubber base of the belt material ensures quiet operation;
The main disadvantage of timing belts is the risk of rupture and the consequences associated with this.
How long does it take to change the timing belt?
Question from a reader. “Hello Sergey. I have a VAZ 2110, with a 16 valve engine. Recently we were scared that if the timing belt breaks, the valves can bend, then consider the repairs to cost a decent amount. I have a question for you: how long does it take to change the timing belt? Alexander."
The topic is really interesting. Let's think about it together...
How long does it take to change the timing belt?
We partially discussed this issue in the article - timing belt or chain. Interesting read. But today we will talk specifically about the timing belt.
timing belt
A little theory. The timing belt (or timing belt), an integral part of the link between the crankshaft and the camshaft (shafts on a 16 valve engine). As the crankshaft rotates, this belt rotates the camshaft, which opens or closes the valves in a certain sequence. Thereby providing fuel injection or exhaust gas outlet. It is a “dry” connecting link in the crankshaft-camshaft chain. That is, it is located outside the engine (usually covered by a casing) and is not lubricated by engine oil, unlike the chain, which is located inside the engine and is lubricated by engine oil. This is a theory.
Here is a short video that shows how it works.
As it becomes clear, impressive forces act on the belt and it wears out. Therefore, it needs to be changed from time to time. If you don't do this, you can run into serious problems. The belt will simply break, there will be an imbalance in the engine, and there is a chance of bending the valves. Although modern engines are immune to this, they do have pitting on the engine pistons.
And here many questions arise, the main one is how long should it be changed?
I’ll say this - if you have a new car under warranty, you won’t even know when it’s being replaced. They'll just replace everything under warranty. Usually it is either 40 – 50,000 for our cars. Or 60 - 70,000 for imported ones. ON my FORD FUSION, the timing belt lasted 150,000 kilometers.
However, if you no longer have a warranty, and you do not know when it was last changed (the car was purchased from a different owner). That question sounds different.
That's what I would do!
1) I would try to find out from the previous owner whether the timing belt was changed at all? If so, approximately when. If the mileage on our domestic car with a replaced timing belt is more than 30,000 kilometers, then it needs to be changed; on a foreign car it would be changed after 50 - 60,000. Also, if the belt has not been changed, it is necessary to urgently change it, provided that the car has a high mileage.
2) Where was it changed, at the official station or at Uncle “Vasya’s” in the garage
This is also important. I'll explain why
If you change it from the officials, then, as a rule, they supply original spare parts, and accordingly it will also be original. It takes quite a long time (remember even my FORD FUSION - the original lasted 150,000 kilometers). Again they will give a guarantee. If you changed it in Uncle Vasya's garage, it's 50/50, they can install a good timing belt, and it will also run for a long time. They can recommend another one - cheaper, but no one knows how long it will last. By analogy, I’ll say that on our working VAZ 2111 it flies every 10,000 kilometers, because it’s not clear what spare parts are installed.
3) Even if the timing belt of the car you bought was changed 10 - 15,000 kilometers ago. It can easily break, especially for our cars; on foreign cars, the belts still last longer. Why you ask? YES because many motorists, especially in winter, warm up their engines in parking lots, for example, sometimes warming up the engine takes up to 10 - 15 minutes. The car's speedometer is stationary and the engine is running. Therefore, in our latitudes, with difficult road conditions and our winters, this unit needs to be changed more often. Let's say the manufacturer assures that it covers 60,000 kilometers, let's say on our Lada Priora. Feel free to divide the mileage by two and get 30,000 kilometers, this seems to be true. On foreign cars too, only there the manufacturers claim 100 - 120,000 kilometers, here you can not divide by two, but subtract 30 - 40%, that is, it changes after about 60 - 70,000 kilometers.
I think the course of my thoughts is clear. If you have the original version, and the manufacturer claims that you can drive 120,000 kilometers, it is better to change it after 80,000 kilometers. You will be calmer. Write off 40,000 for wear and tear and winter warming up. Also remember, you shouldn’t skimp on the timing belt, especially if your pistons don’t have “pits” for breakage cases - then you’ll end up with expensive repairs. Buy only proven copies, those that the factory installs on its cars. I think I have fully covered the topic, read our AUTOBLOG
Consequences of a broken timing belt
Timing belt failure can be gradual. As a rule, this is belt stretching, a shift in valve timing and, as a result, difficult engine starting, increased exhaust smoke (the result of incomplete combustion), engine vibration and the appearance of extraneous noise.
The occurrence of such symptoms can be caused by other reasons, but this is another reason to check the condition of the timing belt. Otherwise, the risk of belt breakage increases, leading to much more serious consequences.
A timing belt break can also be sudden, due to the use of low-quality components or failure (jamming) of the water pump driven by the same belt.
To understand and evaluate the negative consequences, it is advisable to again consider the operation scheme of a timing belt with a belt drive. The following figure shows a cross-section of the engine, illustrating all 4 strokes of operation and the location of the valves in each stroke.
If you imagine that the belt has broken, it becomes clear that the valves “freeze” in the position at the moment of the break, and the pistons continue to reciprocate. Accordingly, at a certain point in time, a “meeting” of the valve plates going down and the upper parts of the pistons occurs.
A typical result of such a “meeting,” commonly known as “bent valve,” is shown in the figure below. Replacing valves on a modern engine is an expensive and slow process (unless the work is carried out in emergency mode).
Sometimes the consequences of the meeting are even more serious: the valve pierces the piston, and then the complexity and cost of repairs increase significantly.
Pad
A high-quality KK gasket is not only belt protection, but also a guarantee of cleanliness under the hood of the car. Some consider the gasket to be an insignificant element that cannot seriously affect the performance of the engine, but this is only partly true. As was written above, a faulty gasket means the passage of oil fluid, which inevitably leads to failure of various elements, especially belts, and negatively affects the dynamics of the power unit - oil comes out.
Valve cover gasket
A dry and clean engine is always good; it indicates care for your 4-wheeled friend and indicates the normal condition of all cuffs and seals.
After opening the hood, the first thing that catches your eye is the valve cover. The latter closes the GDS mechanism and is equipped with a neck for pouring lubricant into the motor.
The cover is fixed to the head itself with bolts or nuts, and there must be a sealing gasket between them.
Over time, under regular interaction with the phenomena described above, the gasket inevitably becomes unusable. It loses its elasticity, becomes hard, and small cracks appear on it through which oil can leak.
Replacing the gasket, as was written above, is carried out simultaneously with replacing the timing belt. In addition, this replacement is carried out if the driver notices that the seal is leaking. And in this case, the caring owner will also change the timing belt, since there is a possibility that oil has gotten on it. It turns out that both elements - the timing belt and the gasket - must be replaced at the same time.
How to install a gasket on a sealant
The gasket can be easily changed independently if you have a set of simple tools. You also need to buy a good high-temperature sealant and any degreaser.
Removing the gasket does not promise anything difficult:
- First, the air intake housing is dismantled.
- The fixing bolts are turned out around the entire perimeter.
- Attachments are removed (if the cover is burdened with additional devices).
- The old gasket is dismantled and thrown away.
- The place where the new gasket will fit must be carefully processed and cleaned.
- The gasket must be put in place using sealant.
When replacing the gasket, errors may occur that you need to be aware of:
- The owner bought a low-quality seal, as a result of which the lubricant leak not only did not stop, but even intensified.
- The sealant was applied unevenly or the composition itself was old.
- The cover bolts are not tightened evenly, which means the cover is skewed.
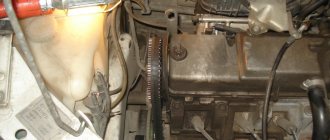
Chevrolet Lacetti Removing the coolant pump
We replace the pump assembly if there is noise from the bearing or in the case of tight rotation of the pulley with the drive belt removed, large radial play of the pump shaft, or fluid leakage from the inspection hole. Drain the coolant (see Replacing the coolant). Remove the timing belt (see Checking the condition and replacing the timing belt).
Using a 10mm head, unscrew the four bolts securing the bracket for the right support of the power unit (for clarity, shown with the engine removed)…
...and remove the bracket.
Using a 12mm socket, unscrew the lower fastening bolt of the rear timing drive cover.
Using a 10mm socket, unscrew the second bolt of the lower...
...and two bolts for the upper mounting of the rear timing cover.
Remove the rear timing drive cover.
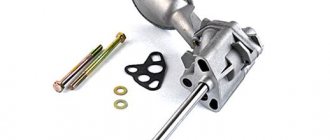
Use a 5mm hex to unscrew the three screws securing the pump.
Remove the coolant pump.
Remove the pump O-ring. Before installing the pump, clean the mating surface of the cylinder block. We install a new rubber o-ring into the groove of the pump housing.
When subsequently adjusting the timing belt tension, it is necessary to turn the pump installed in the cylinder block socket.
Therefore, to maintain the sealing properties of the ring, we recommend applying a layer of silicone grease to it, which reduces friction in the moving joints.
Install the coolant pump in reverse order.
In this case, it is necessary to ensure that the groove on the pump body is located as shown in the photograph. The final tightening of the pump mounting screws is carried out after installing the timing belt (see Checking the condition and replacing the timing belt).
Tensioner roller
This video performs very important functions. If it becomes unusable, then it twitches at XX and does not inspire confidence. To eliminate the possibility of wear, it is recommended to change the tensioner roller at the same time as the alternator belt.
Replacing a roller is not as difficult as it might seem at first glance.
- After removing the timing belt, you need to dismantle the VF housing, which sits on 2 nuts.
- Then the bracket securing the power steering reservoir is removed.
- The power steering reservoir is removed from the bracket by moving upwards.
- Now you can unscrew the roller using a 15mm wrench.
- The tensioner structure itself will have to be removed using a 12mm wrench and an extension.
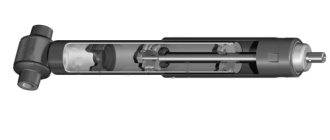
Tensioner rollers provide tension to the timing belt, working due to oil pressure in the system. For the normal functioning of the entire GDS mechanism, optimal belt tension is required. The video is responsible for exactly this.
Timing tension roller
If the tensioner roller is faulty, a tight fit of the timing belt on the shaft pulleys is not ensured, the element is no longer protected from slipping, and at one point may come off, putting the engine in great jeopardy.
The design of the tensioner roller is simple. Its main part is a roller made of 2 halves. They are also required to have flanges to prevent the belt from slipping.
The roller is installed on the front of the engine block. Here it is secured with 2 bolts. A cylindrical type spring is also required, fixed between the stops of the block and the roller bracket. Thanks to this spring, constant belt tension is ensured and slipping is eliminated.
Some power units use not one, but two tensioner rollers. One is in the timing drive, and the other is in the shaft drive. The rollers are not alike; they differ in design and shape. When choosing and purchasing a new roller, this should be taken into account.
The tensioner roller, like the belt, has a limited resource. When replacing the belt, you should carry out a similar procedure with the roller. Some manufacturers do not always recommend the same service life for parts. 60 thousand kilometers is the average value, after which both elements need to be changed.
Sounds quite complicated. What is the cost of replacing a timing belt?
Many people change the timing belt at a service center, but the procedure is not a simple one, and if you are not sure that you can handle it properly, it is better to entrust the procedure to people who earn their living from this. You still need to choose a reliable service station, keeping in mind what difficulties a broken belt can cause.
On average, the price of a timing belt kit at a service center will be about 4-5 thousand rubles, and I’ll charge about the same for the work. Therefore, when planning to change the timing belt at a service station in 2021, you should focus on figures in the region of 10,000 rubles. More precisely, we can say by looking at a specific car.
The cost of replacing a timing belt with your own hands will naturally be lower, because here you only need to consider the prices for all the parts of the kit. In addition, there is a wider choice among the original or analogues, and there is no service station markup. Thus, changing the timing belt yourself will cost about 3,250 rubles - this is the average price based on the cost of 10 different sets (not including the pump) for popular cars.
Objectively assess your strengths and choose the timing belt replacement option that suits you best.
Belt Condition Assessment
It is necessary to check the condition of the belt every 10-15 thousand kilometers. The condition of the belt is assessed after removing the timing belt protective cover.
Verification Process
Unscrew the bolts securing the cover and remove it. Next, we proceed to inspect the timing mechanism.
The belt should not contain:
- Cracks;
- Cliffs;
- Sticking threads;
- Traces of oil;
If such comments are found on the belt, it must be replaced.
Replacing the timing belt on a VAZ 21127 Lada Granta engine with your own hands
Unlike VAZ 21126 engines, with which there is practically no difference, the new Grants are equipped with manual and automatic transmissions without a control hole in the gearbox housing. This complicates the replacement of the belt, since it is almost impossible to control the position of the crankshaft at TDC of the first cylinder using marks (at the ebb of the oil pump, the marks also disappeared).
Therefore, if we have a dial depth gauge (a micrometer with an indicator), it would be very nice to put it to use. Using the device it will be easier to set the piston of the first cylinder to TDC. Otherwise we'll use a long screwdriver or something like that.
An ideal option is an indicator depth gauge. Thank you, VAZ
Be that as it may, our work order is as follows:
Maintain temperature conditions
This is important, since we will not be able to tension the new belt correctly. Antifreeze temperature should be 20-25 °C
Only at this temperature will the marks on the tension roller coincide. If the temperature is within 90 °C, the mark will go 6 mm towards the radiator, and at 0 °C - 5 mm towards the windshield. This must be taken into account. To fix the crankshaft, unscrew the generator drive pulley and drain the antifreeze without problems, you need to remove the starter. You don't have to turn it off. Three nuts and the starter is removed. Using a Torx T30 bit, unscrew the upper timing cover. We evaluate the condition of the drive as a whole, in particular the belt, rollers and pulleys. We combine marks 1 on the camshaft drive gears with cutouts 2 in the rear cover. If it doesn’t work the first time, turn the crankshaft two more turns. Using the same bat, unscrew the lower front cover. Let's take it off. Remove the generator drive pulley by first releasing the belt and removing it. To fix the crankshaft, we use the hole for the starter, the flywheel teeth and a powerful screwdriver. Using a Torx E8 bit, unscrew the ignition coil of the first cylinder and unscrew the spark plug. We install a thin long screwdriver into the spark plug hole and calculate the top dead center by turning the crankshaft. It should look something like this. We fix the camshaft gears. To do this, we use either a special device or a simple wooden block made of soft rock. Then everything is simple. Loosen the tensioner and remove the timing belt. Remove the bypass and tension rollers. We do not lose the washers that are installed under the rollers. We drain the antifreeze from the cylinder block using a plug, after closing the starter hole. We remove the pump. We install a new one. We install new rollers, tighten the bypass roller with a force of 125 Nm, tighten the tension roller until it is fully tightened. Installing a new belt. We adjust the belt tension by turning the tension roller counterclockwise. We fix the tension roller by aligning marks 1 and 2 on the outer race and the roller body. Tighten the roller bolt to a torque of 25 Nm. We install the generator drive pulley, install its drive belt and tighten the pulley mounting bolt to a torque of 110 Nm. We check the alignment of the marks and the belt tension, tighten the tension roller bolt to 41 Nm.
The belt and rollers are installed. All that remains is to check the tightening torques of the roller bolts (2.3...3.6 kgf.m) and tighten the belt with a special wrench or a puller for retaining rings (with a jaw diameter of no more than 3.2 mm, a replaceable head of 15 mm) until the marks align.
Timing marks
To replace the belt, you need to know where the timing marks are located. They are necessary for the correct setting of valve timing; this is very important; if the marks are knocked off and the engine is started, the valves may bend.
Mark on the crankshaft
This mark can be found by removing the generator drive pulley from the crankshaft; there will be a special cast point on the crankshaft gear, which must be aligned with the casting on the oil pump housing, as shown in the picture.
Crankshaft mark
The mark can also be found on the flywheel by removing the air filter box and removing the clutch compartment plug.
Camshaft mark
The mark is located on an 8-valve engine on the timing belt cover mount, and on a 16-valve engine on a plastic lining. The marks can be seen in the picture below.
Camshaft mark for 8-valve internal combustion engine
Camshaft marks for 16-valve internal combustion engines
Tips on how to increase resource
- Warm up the engine before driving in cold weather.
- When replacing, also change the rollers and pump, following the manufacturers' recommendations.
- Buy spare parts from trusted brands, check whether you have purchased a counterfeit.
While writing the article, I was able to find statistics on the mileage at which the belt broke on cars. The statistics are as follows:
Timing break statistics
Of course, the data is difficult to analyze, since neither the car brands nor the operating conditions are known. In general, we can conclude: check whether the timing belt on your car has reached the end of its life, replace it in proven places and do not skimp on spare parts.