What are guides needed for?
In fact, it is the main element of the valve mechanism on a car engine. The design and material from which the guides are made are designed to function under high speed and load conditions. In addition, the elements are exposed to high temperatures. And sometimes overloads even occur - at the moment when the lubrication of the element disappears.
Using the guide, it is possible to install the valve so that its plate fits as tightly as possible to the cylinder head. Only in this case is it possible to increase the compression ratio, and therefore the power.
What happens during deformation?
As you understand, literally anything can happen when the engine is running. The guide elements overheat, the alignment with the valve stem is disrupted, and as a result, the motor parameters deteriorate. Under constant loads, the element breaks even more, and the seat chamfer is destroyed. And in the best case, you will have to replace the seat and valve, since the latter will burn out.
If the valve stem continues to “walk” in the guide, the seals will also be destroyed. They are made of a relatively soft material, but under excessive stress it hardens. As a result, even with a slight displacement of the rod, destruction of the oil seal can occur. The result is that oil enters the combustion chambers, heavy carbon deposits appear, and the level of harmful emissions increases. In addition, the catalyst and lambda probe (oxygen sensor) become unusable. And even if you install new caps, the problem will not go away for long.
On topic: GAZ-53 valves: adjustment. Trucks
Replacement process
As mentioned above, a special attachment is required to remove and install the guides. Let's look at what it is and how to use it.
Description of the tutorial
The mandrel for removing and installing the guide consists of two parts. The first part is a rod of a certain length, machined on a lathe and having different diameters in certain places. The largest diameter of the rod occupies its main length and is 18 mm. The rod is held by hand by this part, and it limits the rod from slipping to the other side when removing the bushing, which will protect the surface of the block head from being hit with a hammer. The diameter of the second part of the rod is equal to the diameter of the sleeve. The length of this part is equal to the depth of the hole in which the sleeve is located. The third part of the stem is the shortest - its diameter corresponds to the internal diameter of the valve stem (the diameter of the inner surface of the guide). Its purpose is to ensure that when knocking out the bushing, the direction of the rod strictly corresponds to the direction of the bushing and does not create a distortion of the rod when hitting it with a hammer.
The second part of the rod is similar to a socket head. It is distinguished from a socket head by the absence of edges inside (a cylindrical hole with a diameter and length equal to the diameter and length of the upper part of the guide). In the upper part of the head there is a hole with a diameter equal to the inner diameter of the sleeve and the outer size of the rod on the working side. As can be seen from the description of the mandrel, finding a replacement for it using available materials is not so difficult. To do this, at a minimum, you will need a cylindrical rod of a convenient length, the diameter of which on one side is equal to the outer diameter of the sleeve. As an attachment, you can use an old oil pump rod from a VAZ, after grinding off the gear.
To install the guide in place, use a socket of the appropriate diameter or a suitable hollow tube. Further in the text the terms “mandrel”, “rod”, “head” will be used, implying both a special mandrel and suitable available means.
The process of removing a worn guide and installing a new one
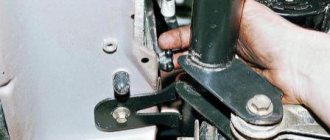
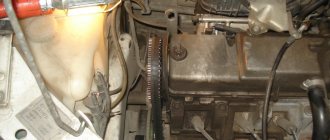
To remove the bushing, turn the cylinder head over with the working part facing up. Next, take the stem, insert it into the valve hole and carefully press it out with a hammer.
In this process, the accuracy of the blow is important. If you hit the surface of the cylinder head with a hammer, this will disrupt the plane of the cylinder head. To knock out the bushing, the blow must be strong, and for this it is better to use a heavy hammer. To install a new bushing, place the cylinder head on the surface in the position in which it is placed on the engine. Then take the new bushing, coat the outer surface with oil and install it in the desired hole.
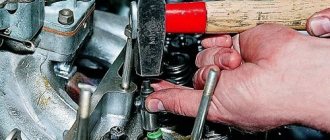
Next, put the head on it and insert the rod
Gently hitting the top of the rod with a hammer, press the bushing guide into place. When installing, pay attention that the selected means do not touch the top of the oil seal seat (marked with arrow 1), since upon impact the seat will be deformed or a piece will break off from it. The head should rest against the base of the oil seal seat (marked with arrow 2)
There are no problems with removing and installing the guide bushing. This is a simple procedure that requires certain knowledge, accuracy and precision when working.
Something else useful for you:
- Do-it-yourself disassembly and washing of hydraulic compensators - instructions + video
- How to install the cylinder head on an engine
- Tightening the cylinder head - how to do it correctly?
What are the guides made of?
There are several types of guides, which are divided according to the material from which they are made:
- Brass.
- Bronze.
- Cast iron alloys.
- Metal ceramics.
The leaders in cost and thermal conductivity are elements made of brass and bronze. That is why most of the products are made from these materials. Metal-ceramic ones have good characteristics, but their cost is several times higher, and they are often inaccessible to ordinary motorists.
Causes of parts failure and their consequences
The corresponding feature of the guide parts is that they do not fail overnight, but wear out evenly. The lifespan of parts on economy cars ranges from 100,80 to three hundred thousand km, and on more expensive foreign cars it can reach one million km. The wear process is influenced by several reasons that can accelerate it:
- the quality of the motor oil used and the timeliness of its replacement;
- temperature regime of the unit’s operation, the more often the motor overheats, the faster the rubbing surfaces wear out;
- the quality of the fuel and combustible consistency, whose vapors get into any leaks and contribute to the process of slow destruction of parts.
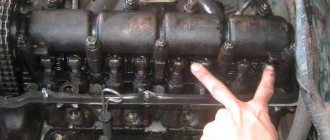
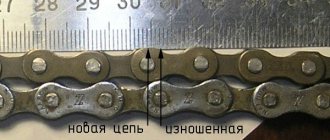
Carbon deposits on the rod destroy the bushing quite quickly
A worn part is characterized by a “broken” internal hole, as a result of which the valve stem begins to move very freely in it, and later free play occurs. The rod warps during operation, and the plate does not fit well with the seat, the mating density gradually disappears. Gases break through from the combustion chamber into the mechanism, and oil gets in from above, resulting in carbon deposits. It also accelerates wear, rapidly rendering the part completely unusable.
Materials used to make bushings
For the production of bushings, materials with good wear resistance and thermal conductivity are used. Among these you can find:
- special cast iron alloys;
- bronze;
- brass;
- metal ceramics.
In terms of thermal conductivity and cost, brass and bronze are among the favorites, which is why the vast majority of bushings are made from alloys of these metals.
Aspects to consider
Most of the bushings have a special support collar on the outside, designed to ensure appropriate fixation of the part vertically in the cylinder head. If the part is smooth, then installation is carried out using a special mandrel.
For intake valves, the guide bushings should not protrude so as not to increase the aerodynamic drag of the intake channel. Exhaust valve bushings are designed to “hide” the valve stem as much as possible to protect the latter from exposure to high temperatures and provide better heat dissipation.
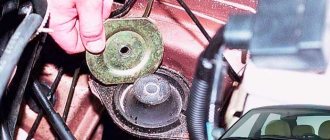
Appearance and placement of the valve guide bushing in the cylinder head
How to determine wear?
The inner surface of the bushing wears out the most. Wear becomes noticeable when the mileage reaches 150 thousand km or more. But if you use low-quality brands of oils, then the resource of the elements becomes even shorter.
There are two ways to check the degree of wear:
- Using two measuring instruments - a nutrometer and a micrometer. They allow you to measure the minimum value of the (internal) diameter of the bushings. In addition, with their help you can measure the maximum diameter of the valve stem stroke. In fact, the difference between these two values is the wear value. Just before starting measurements, be sure to clean all elements from dirt, dust, and oil. This will significantly increase accuracy and reduce error.
- Using a special hour indicator mounted on the stand. This can be an indicator or micrometric bore meter. If the gap is large, it is necessary to install a new valve and recheck. If this time the gap goes off scale, you will have to change the guides.
On the subject: Is it worth buying a Lada-Vesta: expert opinion
However, it is best to replace the valve guides during a major overhaul. You still need to remove the cylinder head for measurements. And this is the most difficult thing in the repair procedure.
Tools and materials
Replacement of guide bushings is carried out using the following tools:
- hammer;
- sweeps at 8.022 and 8.028;
- mandrel for pressing out and pressing in bushings.
The bushings are changed using a stepped mandrel - a brass or bronze tool. It rests against the guide sleeve, after which it is knocked out with a hammer blow. This method of pressing out does not harm the cylinder head as much as using a regular hammer and chisel. A special puller is used not only to remove bushings, but also to replace them.
Stepped mandrel used for pressing out VAZ 2106 guide bushings
The best tool for replacing guide bushings is a push-out puller. Such devices allow you to remove valve bushings without damaging the seating plane on the cylinder head. The presence of this tool allows you to avoid scoring and other cylinder head defects that may appear when using a mandrel and hammer.
Puller-extruder for guide bushings VAZ 2106 - universal tool
How to remove old guides
Before starting repairs, you need to warm up the cylinder head to 100 degrees. Due to the fact that aluminum expands more than brass or bronze, it will be a little easier to remove the guides.
Things to consider when dismantling:
- To remove it, it is best to use a drift (special mandrel). Of course, the cost of the tool is quite high, but with its help you will be able to press the bushing clearly along the axis. But it is allowed to use simple and pneumatic hammers.
- Quite often it happens that the bushing comes out poorly. You will have to resort to using a drill - you need to drill out the guide with it. Often it does not need to be completely drilled out; simply reducing the wall thickness is enough.
- Please note that the landing socket should have as smooth a surface as possible. Scratches, various types of roughness, and other defects, even minor ones, are not allowed.
After pressing out the old bushings, you need to thoroughly clean the internal seating surfaces.
The procedure for replacing valve guides for VAZ cars
To replace it, you must dismantle the cylinder head and additionally have a special attachment for removal and installation. However, do not be alarmed, since the design of the attachment is simple, and instead use available tools that match the parameters of the bushing.
- We remove the attachments that interfere with the removal of the cylinder head.
- Remove the valve cover.
- We loosen the timing chain and remove the camshaft gear (do not forget to align the marks).
- We dismantle the cylinder head and place it on a clean, flat surface.
- We remove the camshaft with the bed (unscrew the nuts gradually, otherwise the bed will become skewed and you will not be able to remove it).
- Remove the rocker arms and springs.
- Checking the valve play. Where it is, we remove the valves; where it is not, we install springs in place.
- We turn the cylinder head over and knock out the guides from the side of the combustion chamber with a tool.
- We install new bushings and assemble the engine (when assembling, do not forget to observe the tightening torque of the nuts and its order).
How to install new bushings?
Before installing 2108 valve guides, the actual preload must be determined. In order to do this, you will need to measure the diameters of the bushings and the seats for them in the head. The maximum difference should be 0.05 mm. If the socket is too small, you will have to select a bushing of a smaller diameter, and vice versa.
On the subject: How to disable WebRTC in different browsers?
Immediately before pressing in the bushings, it is necessary to warm up the head and treat the guides themselves with liquid nitrogen. This is not always the only one available in the garage. Therefore, put the parts in the freezer for several hours - as a result of cooling, they will decrease in diameter.
The pressing procedure is performed in reverse order. In order to install the elements, you need to use a hammer (simple or pneumatic) and a mandrel. Using gentle blows, you need to drive the elements into the mounting holes. And it is also recommended to treat the VAZ-2108 valve guides with machine oil to make pressing easier.
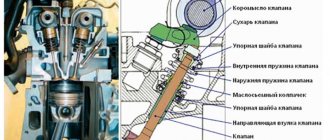
General arrangement of cylinder head bushings
On modern cars, valve heads are made of special alloys.
Valve guides for VAZ 2106
On the VAZ 2109, for example, the guides are made of wear-resistant material and are pressed into the head at high temperatures, so changing them is quite difficult. But it is still necessary to carry out the replacement procedure, since the bushing, despite its strength, wears out over time, losing its tightness. The problem is especially acute for engines with a large number of valves.