Tools and components required for installing two carburetors
To carry out installation work you will need:
- wrenches ranging in size from 8 to 14;
- screwdrivers with flat and Phillips blades;
- pliers;
- drill, but you can also use a screwdriver;
- angle grinder;
- vice;
- metal cutter;
- vacuum gauge bar.
The following components will be required:
- 2 carburetors of a suitable model. It is advisable to use new ones, since the old ones are unable to produce the same mixture. The more identical the composition is supplied to the cylinders, the greater the increase in power will appear in the engine. Old carburetors can only be used during the experimental phase;
- When installing two carburetors on a classic, two intake manifolds from Oka will be required;
- Gas drive parts. Since one carburetor was previously installed, the throttle drive will need to be upgraded;
- Fuel lines and other technical hoses;
- To ensure greater effect from installing two carburetors, you will need to install an additional air filter.
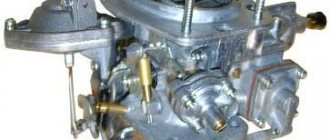
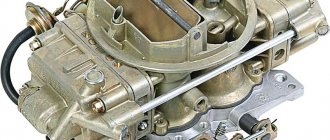
2 carburetors
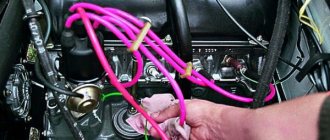
When installing carburetors, it may be necessary to secure the hoses, so it is advisable to purchase a set of clamps before starting work.
two carburetors for VAZ 2101, VAZ 217, VAZ 2106 and other classics
I think that many will be interested in this topic. And that’s why I’ll try to present it as detailed and clear as possible, naturally, in order to do all this you need to at least be able to hold a wrench and a screwdriver in your hands. So let's start: The fact is that at high speeds the engine lacks: 1. air; 2. fuel With high mileage, it is clear that the pistons of cylinders 2 and 3 are blacker (over-rich mixture), and cylinders 1 and 4 are lighter (lean). The issue is resolved by installing two carburetors, which provide a more balanced supply of the air-fuel mixture than one, even a sophisticated carburetor. With 2 carbs, the engine pulls very well at the bottom (torque) and at the top it pulls very well (power)... To install this device we will need the following tools and materials - we will need keys and screwdrivers of different sizes, pliers, a drill, a grinder, well and a vice of course. - of the materials we will naturally need two carburetors of the same model, I installed the simplest Webers model 2106, other specialists also installed Solex model 21083, I think we can install others if desired, we also need two manifolds from Oka, as it turned out to find them it’s not so simple, we also need all sorts of little things like tees for gasoline, antifreeze, vacuum, and of course all these hoses, in addition to this we may need a metal cutter and gas drive parts.
So, let's start describing the installation of all this.
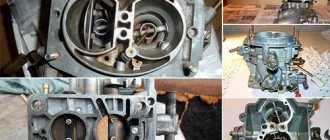
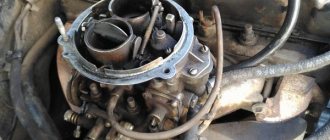
To begin with, if your car has a heated lower part of the carburetor, I would recommend draining the antifreeze, then remove the carburetor, then unscrew the manifold mounting nuts (there are 5 of them) and carefully remove the manifold, then take the purchased manifolds from Oka and put them on there are carburetors on them, first on the first manifold, then on the second, then we take it and open both chambers of the carburetor with our hands and look to see if the edges of the manifold are sticking out somewhere (especially for Weber-type carburetors), if they don’t stick out, then it’s normal, go to the second carburetor and to the collector and do the same thing, if these edges still stick out, then we take a drill and insert a cutter into it and, holding the collector in a vice, we grind off these edges, the work is not difficult in principle, but it is long, and you need to do it carefully, after the work is done we put on the carburetor again look at the collector and see whether the edge of the collector sticks out or not, if so, then repeat the operation with the cutter.
Then we take the collectors and look at the channels, as experience shows, the quality of production is so lousy that on my collectors there were studs sticking out inside, thereby creating furious resistance to the flow; if there are any protrusions, they need to be eliminated. After this, you need to try on the manifolds to the cylinder head, and then make slots for the threads in place, this is also not difficult, then you need to align the manifolds correctly, usually to do this you need to remove the cylinder head, but I did it this way, and it was almost exactly right. Then you need to make the central fastener for the collectors, I made it from a strip of steel 3-4 mm thick, but it can be made from anything else. The collectors are fastened as follows - they are fastened with two nuts along the edges (for this purpose the slots have already been made with a grinder), one in the center and two (the most inconvenient) at the bottom closer to the central fastener along the nut on the collector; for this it will be necessary to make two metal plates which will press against the collector (this is important because if you don’t press in these places, the antifreeze will go into the cylinders and the engine will run poorly, I’ve tested it in my own experience). This is what it will look like in an intermediate version (photo by Evgeniy GTI):
So we have secured the manifolds and we can move on, now we connect the manifold heating and the vacuum brake booster through the tees (if it is not there, then these holes will have to be plugged)
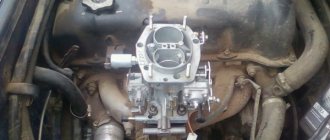
Now we take the carburetors and install them like on a regular manifold. Regarding carburetors, it must be said that it is desirable that they are the same, and the components are also the same. When installing, you need to unscrew the quality and quantity screws on both carburetors by the same amount. Now that the carburetors are in place, it’s time to work on the gas drive. If the carburetors are Solex, then it’s easier to make a cable drive, for them there are special plastic linings that fit on the carburetor at the place where the gas rod is attached; if you look at it, it’s clear, for Webers they will have to be redone, then whoever comes up with the idea can do it, I personally bought two gas cables from the brand, they are about 40 cm long, and I made a regular drive, the end of the cables was attached to those plastic things and in the place where the old ones were attached to the gas pedal rods, brackets for attaching the outer covering of the cable are very easy to make.
The main thing is to make sure that the dampers open as synchronously as possible. Now fill the drained antifreeze and you can try to start it. Naturally, it is advisable to tighten all the hoses with clamps; it may not start the first time (it started for me the second time). Anyone can make a filter as they please, I cut out four ovals from a sheet of metal with a grinder, the size of a regular filter, and put a filter on each carburetor, but that’s what I did, and how you do it is your main thing to clean the air.
After the engine starts, it needs to be warmed up, after which it needs to be adjusted. You can turn to bikers who regulate multi-carburetor motorcycles using a vacuum gauge bar. You can make this bar yourself from econometers, but like all VAZ instruments, they have an error, be healthy, first they need to be calibrated. I adjusted the mixture quality sensor IKS-1; it is screwed in instead of a spark plug and you can observe the color of the mixture, it should be light blue, at idle, from the beginning in the first, then in the second, and so on, everywhere there should be the same color of the mixture, then with the screw you need to set the speed, that's all, it's not difficult to make a choke, although in the summer the engine works well without it. As for the performance indicators, what they say is that the consumption is high is, frankly speaking, nonsense, my consumption was 9.5 - 10 liters per hundred in the city and 8.5 liters on the highway at speeds over 100 km/h, at the time of writing this was More than 1000 km have been driven, and the consumption data has not changed. Regarding the dynamics, the car accelerates an order of magnitude faster, works more willingly at high speeds, pulls well at low speeds, in general there are only advantages, I found only one minus - the price, and there is also a small failure - if at low speeds (1000-1800) press the gas sharply, but you can remove it. When tested on the highway, the car accelerated without much effort to 160 km/h in 4th gear at 6000 rpm, and this is not the limit. Testing continues... Options for other installations:
- Author: dedd
Rate this article: Share with friends!
Installing an adjustable Panhard rod on a VAZ 2107, VAZ 2106, VAZ 2101 and other classics
Installation of a gearbox from Fiat Polonez on a VAZ 2107 2106 2101 and other classics.
Preparing to modernize the engine power system
In order to install two carburetors, it is recommended to initially drain the antifreeze through the fuel heater. After this, it is necessary to dismantle part of the fuel system. To remove the intake manifold, you need to unscrew the five bolts that secure it.
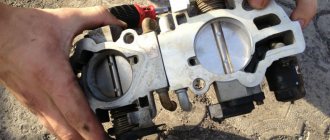
Connecting the carburetor to the manifold is not done on the car. This type of work is carried out in good lighting. Having connected the carburetors one by one to the intake manifolds of the Oka, you need to open both chambers and check the condition of the joint. It is strictly forbidden to allow the edges of the collector to protrude above the joint. The air-fuel mixture will swirl at the junction at high speed and the engine will starve.
Fitting intake manifolds
To eliminate protruding edges, use a metal cutter inserted into a screwdriver or drill. The transition between parts should be as smooth as possible. For better results, you can use sandpaper or special sanding pastes.
Installation of a polished engine power system
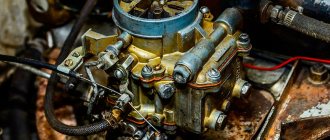
During a visual inspection, it is possible to detect sagging and casting defects in both the carburetor and the manifold. A car owner who independently installed and tuned the fuel system knows about the need for modifications, but a newbie may be surprised by the protruding pins inside the manifold. This creates strong resistance to air flow, which significantly reduces the effect of installing two carburetors.
Modification results
The main concern that car owners have when tuning is the appearance of excessive fuel consumption. The engine, working with two carburetors, consumes fuel within normal limits, since the increase in power occurs mainly due to a more optimal ratio of fuel to air in each cylinder.
The increase in gasoline consumption occurs only due to a more aggressive driving style, which is observed after an increase in torque and power. Car owners provide maximum fuel supply to the cylinders when starting at traffic lights, since dynamic characteristics, as a result of this modernization, increase by 10-15%.
The reliability of this system is at a high level. Although the presence of additional components increases the risk of breakdown, if installation and adjustment operations are performed correctly, carburetors will not require owner intervention for a long time.
Installing a second carburetor cannot be considered an easy tuning. The car owner should realistically assess his strength before starting modernization. If you take a risk, the result will not take long to arrive. The significant improvement in low-end thrust thanks to the high torque and increased top speed are well worth the effort of installing two carburetors.
Tuning of the VAZ 2104 engine, nulevik filter for the VAZ engine, chip tuning of the VAZ 2105 engine. Installation of a new power supply and ignition system. Injector for VAZ 2104, VAZ 2105, VAZ 2107. Installation of two carburetors Engine modification, engine tuning VAZ 2107, VAZ 2105, VAZ 2104, Lada Classic
Vehicle mounting
After adjustment and modification, the manifolds are fitted to the cylinder head. Slots for threads are made in the required places. You can control the connection of the manifold to the cylinder head either with or without removal. For reliable fixation, a central fastener is required. A strip of steel about 4 mm thick is suitable for these purposes.
Fixation is done with three nuts. One of them is located in the center, and two are located at the edges. It is recommended to prepare in advance two plates that secure the intake manifold at the bottom. Performing this operation will prevent coolant from entering the combustion chamber.
Upon completion of the installation of the manifold, it is necessary to connect the cooling system and vacuum brake booster. If the latter is missing, a plug should be installed. After this, the carburetors are installed.
Device
VAZ 2109 tuning Solex carburetor
Before tuning, you need to know how the Solex carburetor works. It was produced in several modifications and on the VAZ 2109 it was installed either DAAZ-2108 or DAAZ-2183. The first of the carburetor modifications was installed on a 1.3 liter engine, the second on a 1.5 liter engine. These carburetors are devices that are designed to accurately meter fuel into the air stream. The Solex carburetor also has the following features:
- It is in the carburetor that the process of forming a combustible mixture from fuel and air takes place, with its subsequent supply to the engine cylinders (see When replacing a VAZ cylinder is not necessary);
- Note that the Solex carburetor has two vertical channels called chambers.
Solex carburetor design
Note. A throttle valve is provided at the bottom of each chamber to allow air to pass through.
- Due to the fact that there are two chambers, and the damper drive is designed in such a way that as you press the gas pedal, one and then another channel opens, such a carburetor is called a two-chamber carburetor.
Note. The chamber that opens earlier is called primary, and the one that opens later is called secondary.
- Among the main features of the carburetor, we also note cone-shaped narrowings, called diffusers. They are needed to create the vacuum necessary to suck fuel from the float chamber (a special container in the carburetor body).
Note. The fuel level in the float chamber is constantly maintained to ensure normal carburetor operation.
- The Solex carburetor consists of two main parts: upper and lower. The flange housing, air filter fixing studs and fuel fittings are what the upper part consists of. The lower part consists of the housing, diffusers, float chamber and throttle valves.
VAZ 2109 carburetor tuning
Technical parameters of DAAZ-2108/2183 carburetors
| Diffuser and its diameter, mm | 21-23 |
| Performance of the main fuel jet TZh | 97,5-97,5/95-97,5 |
| Performance of the main air jet or VJ | 165-125/165-125 |
| Mixing chamber diameter, mm | 32 |
| Diameter of pump nozzles, cubic cm for 10 strokes | 14,5/14,5 |
Features of installing carburetors
It is better to install two new carburetors. Their parameters must be identical. The position of the mixture quality and quantity screws should be checked. If necessary, adjustments are made. It is important that the adjusting screws are turned out the same amount.
All hoses must be securely secured with clamps. To ensure reliable and durable operation, it is important to install an air filter. Since there is only one filter in the standard production, modification is required. How to make a filter depends on the ingenuity of the car enthusiast, but the main thing is to avoid allowing the engine to operate directly. An option for making a filter is to cut out a sheet steel housing to the size of the filter element.
Installing air filters
The next stage is to obtain synchronous operation when the gas drive is applied. To control Solex carburetors, a cable drive is used. We install the stock plastic trim and the second carburetor is synchronized with the first. A test run of the engine will show how correctly the preliminary adjustment was carried out.
The final adjustment is carried out on a warm engine using vacuum gauges designed for multi-carburetor bikes. You can also use for these purposes:
- calibrated econometers;
- mixture quality sensors inserted into the spark plug hole.
Having installed two carburetors on a VAZ, during operation you should monitor the condition of the spark plugs of each pair of cylinders. A different color from the normal electrodes will indicate that the mixture feeding the engine is excessively rich or lean. Having decided which carburetor requires adjustment, it is necessary to achieve the optimal mixture composition. It is important that the engine operates stably at any speed.
Options for modifying the standard VAZ carburetor
There are two main options for independently modifying the carburetor, which is installed on the “seven” by the factory. The advantage of any of them is obvious - you do not need to buy a new carburetor. However, the owner must know the design of the standard device well in order to be able to competently carry out modifications.
Constructive modification
Structural modification is considered one of the most common ways to “mobilize” all the strength of an old carburetor. This is how the problem of engine power is solved - immediately after modification, the driver will feel dramatic changes in the car’s power traction.
Structural modifications can only be carried out on a carburetor removed from the vehicle. It is recommended to first clean the device body from dust and traces of gasoline.
Modifying the design of the carburetor on the VAZ 2107 involves performing the following actions:
- Removing the spring connecting the vacuum pump and the throttle valve in both chambers.
- Making a drive from thin wire and connecting the damper directly to the pump levers - that is, replacing the springs with wire.
- Replacing the diffuser of chamber No. 1 with a larger one (from 3.5 to 4.5).
- Installing a new nozzle on the accelerator pump (nozzle must have a value of at least 40).
The essence of the procedure is to replace some elements of the device with more productive ones
At this point, the minimal structural modification of the carburetor on the VAZ 2107 can be completed. However, experienced car owners also recommend replacing the jets - both air and fuel. This will provide the carburetor with more stable flows of the two components of the emulsion (gasoline and air), especially if you install jets with a higher throughput (1-2 sizes larger than the standard ones).
Wider air jet openings will create a rich mixture faster
The work performed will not only increase engine power, but also save on fuel consumption. Although in some cases, as car enthusiasts note, replacing springs with wires does not allow the dampers to close on time, which can lead to increased gasoline consumption.
Video: work process
Tuning when using a repair kit
The use of a carburetor tuning repair kit is suitable for those cases when the driver is no longer satisfied with the operation of the power unit - slow acceleration or loss of power when driving uphill. At the same time, the cost of a conventional repair kit is low, while the effect of its use can be felt immediately.
The repair kit includes all the parts necessary for tuning
This modification includes a number of actions with a completely disassembled carburetor:
- A repair kit for the factory DAAZ carburetor is purchased.
- The main diffusers are polished with the finest grit sandpaper. Small diffusers are also polished, but with a fine-grain file.
- All parts from the repair kit are installed or replaced, after which the carburetor is assembled.
- If necessary, adjust fuel consumption (using quality and quantity screws).
Grinding reduces friction between components and allows you to optimize carburetor performance
This tuning method requires maximum attention and caution. If at least one element of the repair kit is installed incorrectly, then stable operation of the carburetor is out of the question.
Video: using the repair kit
Engine starting
The engine needs to be sufficiently warmed up after the first start. By the way, it may not be possible to start right away and this is quite normal. Next, you should adjust the motor. You can turn to specialists or even bikers who have extensive experience in regulating multi-carburetor motorcycles using a vacuum gauge plate. It is possible to make such a thing yourself from econometers, although they have a very high error and require calibration. The quality sensor is placed in place of the spark plug and the color is checked - there should be a blue mixture at idle. The color should be like this everywhere - in the first, in the second, in the third, in the fourth. All that remains is to set the required speed using the quality screw, and that’s it. The suction is very easy to adjust, although in the summer it already works fine.