Possible malfunctions
In common parlance, many VAZ owners call the unit in question a “grenade” - this is exactly what it looks like in appearance.
Most often, CV joints break after the boots are damaged. In this case, dirt, sand, etc. begin to get into them. Foreign particles quickly destroy the assembly, and, of course, it has to be replaced.
If a damaged boot is detected in a timely manner, then in most cases serious trouble can be avoided. After replacing it, all that remains is to wash the CV joint and return it to its place. When the problem remains out of sight of the VAZ car owner, then there is a high probability that the grenade will become unusable literally after 2-3 hundred kilometers.
A sign of CV joint failure is a characteristic sound reminiscent of crunching gravel. It occurs exclusively when turning and accelerating. Such a signal is the basis for an urgent inspection of the hinge and its replacement.
Fortunately, the new element is relatively cheap and is sold in almost any auto store. However, you should not experiment - take only parts made strictly for the VAZ-2109.
In general, replacing a hinge yourself is not at all difficult - it is enough to have at least a little repair experience and a basic set of tools.
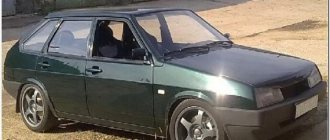
Use of CV joints in a VAZ 2109 car
How to replace the heater valve on a VAZ-2109 yourself
Installation of CV joints began to be performed on front-wheel drive cars. This is due to the fact that the use of a crosspiece in the cardan transmission, with four needle bearings, as in rear-wheel drive vehicles, does not ensure the required equality of the angular velocities of the shafts - driven and driven. When using such a device, it will be associated with an increase in the dimensions of the unit, the price of the product will increase, and the torque will be transmitted with a large pulsation, which will increase with an increase in the angle between the shafts. The design of CV joints provides a service life the same as the service life of a car, but during operation it was revealed that wear of the elements occurs faster, especially its external parts. Although they are made flexible, from moisture- and frost-resistant materials, the part cannot serve for a long time under the influence of external factors. It is greatly influenced by constant deformation, large amounts of abrasive and moisture. In addition, during repairs or long-term operation of the car, the boot may become damaged, and cracks may appear on the protective rubber, which will lead to failure of the element. The shaft leading to the CV joint may also be damaged. Often this defect is difficult to notice with the naked eye, but with a crooked shaft the operation will not be normal. All this leads to the need for repair or replacement of the CV joint.
How does the internal CV joint of a VAZ 2109 car work?
In order to determine the structure of the CV joint, it can be disassembled. For this:
- The hinge moves and is removed from the spline shaft.
- Use a screwdriver to pry up and remove the plastic stop, as shown in the photo.
Removing the plastic stop
The hinge shaft is clamped in a vice.
Removing the retaining ring
- Using pliers, the separator with the cage and balls is removed.
- Six balls are pulled out with a screwdriver.
- The clip is disconnected from the separator.
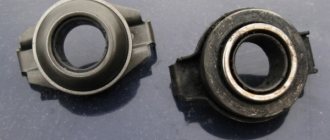
If, after dismantling, all parts are in good condition, the assembly can be assembled by first putting 80 cm3 of lubricant into its cavity. Such a complex design of the internal CV joint on the VAZ 2109 shows how difficult it is to disassemble and repair it. And if dirt gets in and the protective cover is damaged, other parts of the CV joint may become unusable. The component elements of the product are not interchangeable, so the best option for a VAZ 2109 car would be to replace the internal CV joint along with the boot (see How to replace the boot). Traces of grease visible on the joint body indicate a break in the boot. If oil leaks at the junction of the gearbox and the drive axle shaft, this indicates wear of the inner “grenade” oil seal, which requires replacement. A characteristic “crunch” when the car moves around corners indicates the need to check the angular velocity joints. A noticeable “play” when rocking the drive axle shaft with your hands or at least a torn joint cover indicates that the VAZ 2109 internal CV joint needs to be replaced.
How to replace the internal CV joint of a VAZ 2109 car
The instructions for replacing the internal CV joint of a VAZ 2109 car with your own hands suggest the following procedure:
- The hub nut is unscrewed.
- You need to remove the wheel.
- Unscrew the ball joint, which will free the strut from the lower arm.
- To ensure free movement of the outer CV joint, the wheel must be moved to the side.
- The outer grenade is knocked out of the wheel.
- Both grenades are knocked out of the gearbox.
Carefully, to avoid damage, the drive shaft is clamped in a vice. The clamp that the boot holds on the body of the inner CV joint is released. A screwdriver is used for this. The boot is removed
It can be cut if further use of the element is impossible due to breakage. The old CV joint is knocked off the drive shaft using a special guide made of bronze. The CV joint and a new boot are put on the shaft.
- The inside of the CV joint is generously lubricated with grease.
- It is necessary to ensure that the direction of the drive and the seat of the product coincide.
How to replace the internal CV joint on a VAZ 2109 can be clearly seen in the video.
Drive Shaft Installation
- New retaining and thrust rings are installed.
- After applying graphite lubricant to the joint splines, the drive shaft is placed in the gearbox housing.
Installation of the drive shaft in the gearbox
- Fixing the shaft in the side gear.
- Installing the unit into the wheel hub.
- Final assembly is performed in the reverse order of disassembly.
On our website you can find a lot of useful and necessary information on this topic.
Replacing the outer CV joint of a VAZ 2109 (2108, 21099)
Necessary tools, accessories and spare parts
Soft metal drift
Key "30" (knob with head)
Key "17" (head or socket)
Pliers (preferably extendable)
Slotted screwdriver or circlip remover
New outer CV joint (they are the same for both wheel drives of the car)
New CV retaining ring
CV joint lubricant (CV joint-4 or equivalent) 40 g
New hub nut
If necessary, CV joint boot and clamps for it
Preparatory work
Place the car on a level surface and securely fix it (handbrake, wheel chocks)
Using a thin chisel, we bend the edges of the wheel hub nut (they are bent to fix the nut in the groove of the CV joint shank)
We loosen the tightening of the front wheel hub nut (where the replacement will be made) using a “30” wrench
We jack up and hang both front wheels of the car (this way we remove the clamping force of the anti-roll bar on the suspension and thereby make it easier to dismantle the necessary parts)
We clean the parts of the front suspension and wheel drive from dirt
We use the key at “30”. Remove the nut and washer underneath.
It is attached with two 17mm socket bolts to the bottom of the steering knuckle. Unscrew and remove the bolts.
Disconnect the outer CV joint shank from the wheel hub
We move the front strut towards ourselves, and pull the shank out of the hole in the hub. At the same time, we try to prevent the inner CV joint from being pulled out of the gearbox (we try not to move the drive towards ourselves too much). At this stage, it may be difficult to remove the shank from the hub since there is a splined connection that “sours” over time. To facilitate dismantling, you can hit a couple of times with a hammer through a wooden spacer (block) at the end of the shank.
Removing the CV joint boot
Both clamps from the CV joint need to be removed - large and small. We use a screwdriver and pliers to disconnect the clamp lock. After removing the clamps, move the boot up along the “stick” of the drive (so as not to interfere).
We remove the outer CV joint (“grenade”) from the drive shaft
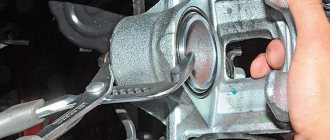
We turn the CV joint so that its inside is visible. We knock it off the drive shaft using a soft metal drift. We strike the clip. At the same time, we try to hold the drive so that it does not jump out of the gearbox. The separator and the balls inside it cannot be hit. Usually a couple of blows are enough, since the CV joint is attached to a spring retaining ring, which is easily compressed.
Use a screwdriver or puller to pry up and remove the retaining ring. There is no need to remove the thrust ring.
Installing a new CV joint
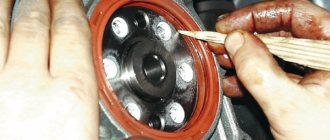
We put new lubricant 20 grams into it. We install a new retaining ring on the drive shaft. We place the CV joint straight and hammer it onto the shaft with a hammer through a drift. We install the boot in place by first putting the remaining 20 grams of lubricant into it. We install clamps. We tighten the clamp locks with pliers. Before tightening, squeeze the air out from under the boot by squeezing it a little.
Notes and additions
The reason for replacing the outer CV joint on a VAZ 2109 may be the appearance of a crunching sound from the suspension when driving at low speed and simultaneously turning left (right). This suggests that, as a temporary measure to eliminate the crunching noise, you can try to wash the cavity of the CV joint (“grenade”) with diesel fuel or gasoline, dry it and apply new lubricant.
For more details about the malfunctions of the CV joints of the VAZ 2108, 2109, 21099 and how to diagnose and eliminate them on your own, see the page: “Signs of a malfunction of the CV joints of the wheel drives of the VAZ 2108, 2109, 21099.”
VAZ 2109 grenade replacement
How to change the lubricant in a Chevrolet Lanos gearbox
The “Grenade” (as it was popularly called) was called a constant velocity joint (or, as it is correctly called, a constant velocity joint). It is designed for mechanical transmission of torque from the gearbox drive shaft to the wheels and ensures uniform rotation (without jerking) of the wheels when turning at angles exceeding 70 degrees.
Failure of this important organ, most often caused by dirt getting under the boot (rubber protection), is serious and must be fixed as soon as possible, because it is the most important element in the front-wheel drive
To find out whether this mechanism requires repair, you need to find a sufficiently large area, turn the steering wheel in any desired direction until it stops, and move off very sharply. If during a maneuver you hear a characteristic crunch in the front of the car, it means that the grenade requires immediate repair. The side that requires repair corresponds to the side to which you turned the steering wheel during the maneuver.
The choice of the repair side (if both are worn out) is yours, but it is recommended to replace the grenade first on one side and then on the other. However, if you are replacing more than one, you can do the work on both sides.
- First of all, remove the boot from the hub nut on the wheel and loosen the nut. It's worth noting that you will need plenty of force, so it is recommended to use all possible leverage.
- Loosen the wheel bolts slightly, jack up the car, place a stump with a diameter of at least 30 cm under the body and remove the wheel. Then you can finally unscrew the hub nut and throw it away, because it can always be replaced with a new one.
- Now you need to remove the brake caliper so that it is not in the way, which is held on by two 19 bolts. There is no need to unscrew the brake hose; it will be enough to hang the caliper on it in the engine compartment.
- Using a 17mm wrench, also unscrew the two bolts that hold the lower ball joint and move the lower arm down so that it is out of the way.
- Place a small wooden block against the hub and, with sharp blows of a hammer, knock out the CV joint inward.
- Remove the clamp from the boot, then remove the boot itself, clamp the drive shaft with a gas wrench and knock out the outer grenade with a hammer. If it is necessary to replace the internal CV joint, then drain the transmission oil from the gearbox in advance and, using a chisel and hammer, remove the internal grenade.
- Next, first of all, a boot is installed on the drive shaft, then the outer grenade is lubricated at the junction with the drive shaft, a clamp is secured to the boot and a retaining ring is installed. The drive shaft must be hammered onto the grenade with a hammer made of soft metal or with some kind of lining (the same block).
- The remaining lubricant is squeezed out inside the boot, which then must be placed directly on the grenade.
- Now all that remains is to carefully drive the drive shaft with the grenade into the gearbox and drive the grenade itself into the wheel hub using shims.
- Insert the ball joints into place, or, best of all, replace them with new ones while you still have the opportunity. After this operation, tighten the two ball joint bolts.
- Attach the caliper to the hub. The pads can also be replaced if they are worn out.
- We install a new hub nut and tighten it until it stops, after which we install the wheel, tighten it, remove the car from the jack and, using an additional lever, tighten the hub nut as tightly as possible. Don't forget to also wear a duster.
As you noticed, there is nothing complicated in this process! Good luck on the roads!
We are starting renovations
To independently remove CV joints on a nine or any other car, you need to have the following tool on hand:
- A socket wrench for “30” or a socket with a strong wrench.
- Hammer and chisel.
- Balloon wrench.
- Set of spanners and sockets.
- Penetrating lubricant such as WD-40.
- Capacity of at least 5 liters.
- Marker or metal scriber.
- Jack, support and wheel chocks.
The procedure for replacing VAZ grenades is quite simple, but you will have to suffer a little, since knocking the old element off the drive is problematic. You need these tools:
- Set of sockets and keys. In particular, you will need a socket wrench or a “30” socket.
- Jack (it is best to use a hydraulic one paired with a support).
- Hammer.
- Chisel. Before replacing the grenade on the VAZ-2109, it must be removed; to do this, you will need to loosen the nut.
- Capacity 4-5 liters.
- Puller for retaining rings.
- Vise.
You will also need a new repair kit. It consists of a grenade, a locking ring, lubricant, a nut, a boot and two clamps.
So, the first thing you need to do is dismantle the old grenade. By the way, before changing the boot on the VAZ-2109 grenade, the same manipulations are performed. The thing is that it can only be replaced after the removal has been carried out.
Without this, installing a new boot simply won’t work. You will need to perform the following manipulations:
On the side to be repaired, loosen the wheel fastening. Using a drift, you need to straighten the edges of the nut. Place chocks under the rear wheels to prevent the car from rolling away. Use a 30mm wrench to remove the nut. Raise the side of the car that is being repaired with a jack, remove the wheel, and place the car on a support. Completely unscrew the nut from the grenade
Please note that the washer is used when installing a new grenade - do not lose it! Drain the gearbox oil. Remove the two bolts that secure the ball joint to the suspension arm.
Check the condition of the hinge - if it is deplorable, you will have to change it. You will most likely have to pull the pin out of the steering knuckle. The tip may interfere with the removal of the grenade. Now that everything is ready, you can pull the hub along with the strut to release the CV joint.