Labeling
Before starting work, you need to understand that it is important that during the process of replacing the timing belt, the pre-set risks do not go astray.
Otherwise, you will have to go deeper into the settings and spend more than one hour installing the part. When installing the timing belt, it is important to align the pistons so that in the first cylinder the piston is at the highest point of the first cylinder. In this position, the piston is at its maximum distance from the crankshaft. This is the position the engine is in when the marks are correctly set. In this position it is necessary to change the timing belt.
The number of marks, as well as their location, may vary depending on your engine type.
The following marks can be distinguished:
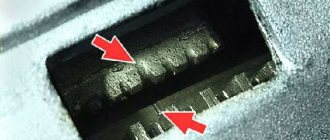
- Mark on the flywheel.
- Mark on the pulley.
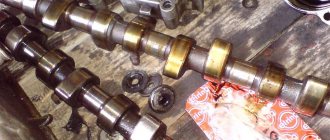
- Camshaft mark (two on a 16 valve engine).
They all must match before replacing the timing belt. In order to set the correct position, rotate the crankshaft by the bolt securing the pulley to it. Please note: turning the camshaft pulley is prohibited.
After you have set TDC, replace the belt and tighten the tensioner.
At the end of the work on installing the belt, rotate the crankshaft several revolutions, check if the marks have gone astray. Repeat the adjustment if necessary.
Why is it necessary to set the labels correctly?
For the correct operation of the gas distribution mechanism of a car, it is necessary that the closing and opening of the valves occur in a strictly defined sequence. The slightest inaccuracy in the operation of the camshaft and crankshaft leads to the fact that the gas exchange process in the cylinders is disrupted, and the engine stops working in the correct mode.
A timing belt is a rubber part that during operation can wear out, crack, tear, etc. Therefore, it is necessary to replace the element in a timely manner.
When installing a new one, you should set the labels correctly. This is necessary to ensure that the engine operates correctly from the first seconds of startup. If installed incorrectly, serious problems can occur, including engine failure.
Factors indicating the need to replace the chain
The timing chain, like other spare parts, has a specified service life, after which it must be replaced. It is possible to use parts beyond the service life allotted by the manufacturer; however, this will void the warranty and the manufacturer will not be liable for damage resulting from a breakdown.
Factors indicating the need to replace the ZMZ 409 timing chain:
- her physical condition;
- metallic sound in the engine compartment;
- The car's mileage has exceeded 80,000 km since the last replacement.
The double-row chain showed better performance and reliability than the single-row chain.
Tools needed for work
Installing marks is not an easy process and if done incorrectly, you risk spending a lot of time installing the part. And that's not the worst thing. There are cases when careless drivers break the engine and other mechanisms of the car.
First of all, stock up on the necessary tools:
- Socket head.
- Jack to raise the car.
- Keys No. 17 or 19 - depends on what kind of car you have.
Advice: it is better that you have all key diameters starting from No. 10.
Large flat head screwdriver.
Causes of timing belt breakage
- wear of the belt itself or its poor quality (shaft gears have sharp edges or oil from the seals).
- crankshaft jams.
- pump jams (the most common phenomenon).
- Several or one camshaft is jammed (for example, due to one of them becoming unusable - however, the consequences here are slightly different).
- The tension roller unscrews or the rollers jam (the belt becomes loose or overtightened).
Modern engines, since they are more powerful compared to their predecessors, have much lower survivability. If we consider the cause based on the valves, this problem arises due to the small distance between them and the piston. That is, if at the moment the piston arrives the valve is slightly open, then it immediately bends. Since for greater compression and contraction in the bottom of the piston there is no groove under the valve of the required depth.
Contact of oil or cooling liquid on the belt surface
As soon as traces of technical fluid appear on the product, the belt should be changed immediately. Otherwise, this can lead to slipping through the teeth, sliding off the pulley, and even breaking.
It is a serious mistake when drivers simply clean the dirty surface and continue to use this product.
Practice shows that if liquid gets on the belt, it is completely absorbed into the rubber. It loses its properties and begins to stretch.
Late replacement
Most timing belt manufacturers recommend changing their products approximately every 60 thousand kilometers. However, this figure may vary up or down, depending on the quality of the product.
Improper use
It happens that a product may jump due to errors during its operation. A common example is a weakened roller or tensioner. When the belt tension weakens, there is a possibility of slipping from the pulley grooves. In the opposite situation, if when installing the belt, it is overtightened, this will lead to its breakage.
Slippage can also occur when one of the pulleys has strong play. Therefore, it is very important to monitor the tension level of all parts of the mechanism.
External damage
Over time, various cracks and depressions may appear on the surface of the consumable, and the threads of the product may begin to peel off. With heavy loads on the belt, even the smallest defects will develop quite quickly. Therefore, they cannot be eliminated on your own. All you can do is replace it as soon as possible.
Low quality spare parts
There are very cheap “non-original” belts on sale. But don't be fooled by their price. Often the resource of such a product is only enough for 20 thousand kilometers. This is followed by either stretching or breaking.
Difficult operating conditions
Unlike a chain, a belt is very sensitive to high and low temperatures, high humidity and other weather conditions. They affect premature wear of the product. Therefore, more frequent replacement may be required.
Replacing a timing belt without marks
In some cases, it is necessary to install the belt if there are no marks.
For this you will need:
- Calipers.
- Screwdriver
First of all, remove the belt protective cover and unscrew the spark plugs.
Let's take a closer look at the process of replacing a belt without marks on an 8-valve engine.
- It is necessary to align the camshaft in the overlap, for example, it is convenient to select the second cylinder. To do this you will need a caliper and a screwdriver. Slowly turn the camshaft clockwise and observe the overlap position. To do this, use a barbell. Place it on the expansion joints and rotate the camshaft until the expansion joints are at the same height. That is, the position of the barbell should be straight, not beveled.
- After determining the overlap, it is necessary to set the TDC (top dead center) of the second cylinder. Insert a screwdriver into the spark plug channel. Slowly rotate the engine, only in the direction of engine movement, so that the piston rises up. At a certain point, you will feel that the flywheel begins to rotate easily. After this, you need to feel the lower and upper points with your hand and set the upper one.
- After adjustments, put on the new belt so that it matches, you may need to turn it a little. And also pull it tight.
- The next stage is checking the belt installation. Rotate the flywheel and look for a mark on it. Set it to the top position and check the marks on the camshaft. If the adjustment is made inaccurately, the risks will disappear.
On a 16-valve engine (2 camshafts), the installation is carried out according to the same principle.
Timing marks
More and more our site is “sliding” towards diagnostics. This is not surprising - chip tuning of a faulty car is unacceptable. And the client, as a rule, comes for a “reflash” with a whole bunch of malfunctions, in the hope of curing a depressed car.
Therefore, let us consider a seemingly simple procedure for monitoring the timing of the timing phases, which is necessary when monitoring and replacing a timing belt or chain.
2108, 2111
| Photo 1. | Photo 2. | Photo 3. |
The mark on the crankshaft pulley should be opposite the triangular mark on the engine (photo 1). In this case, the mark on the flywheel should be opposite the triangular mark on the casing. These marks will be visible if you remove the rubber plug on the gearbox (photo 2). The mark on the camshaft pulley should be opposite the L-shaped mark on the rear cover of the timing belt (photo 3).
| Photo 4. | Photo 5. | Photo 5a. |
On 2112 engines, the mark on the crankshaft pulley should be opposite the triangular mark on the engine (photo 4). You can still control it from above. The U-shaped protrusion on the gear should be exactly in the middle of the triangular mark on the engine. On the camshaft gears, the marks should be opposite the triangular marks on the rear cover of the timing belt (photo 5).
When replacing the timing belt on new 16-valve engines, there is no traditional triangle mark. The mark can be seen in the clutch housing window by removing the rubber plug, which is not entirely convenient. You can make it simpler by aligning the mark on the crankshaft toothed pulley with the casting on the oil pump housing, as shown in Photo 5a.
2121(2104–2107)
On Niva 21214 (and classic 2104–2107) engines, the mark located on the master disk should be opposite the mark on the front engine cover (photo 6). The mark on the camshaft pulley should be opposite the ebb on the bearing housing (photo 7).
| Photo 6. | Photo 7. | Photo 8. |
On Chevrolet Niva engines, the mark located on the master disk should be located exactly in the middle of the DPKV (photo 8). The mark on the camshaft pulley should be opposite the ebb on the bearing housing (photo 7).
21106, OPEL engine
On these engines, setting the timing marks is intuitive, just like on the 2112, that is, 2 marks on the camshaft drive gears and one on the crankshaft pulley. In the photo, all marks are indicated by arrows.
The timing belt is the simplest and most effective way to synchronize the operation of the crankshaft and camshaft. This extremely important element requires periodic replacement, and, despite its simplicity, cannot boast of easy installation. The whole point is that the installation of a new mechanism must take into account special marks, which tend to get lost. Most novice drivers do not know how to set the timing marks to their positions, so replacing a belt is often accompanied by unnecessary waste of nerves. Next, we will fully illuminate the pressing issue.
VAZ 2109 carburetor timing marks
Replacing the timing belt is one of the most important vehicle maintenance procedures. A broken belt leads to engine breakdown, which can lead to costly repairs within an hour, especially since this type of work does not require large material costs and the skills of a qualified specialist. Here it is very important to understand the processes occurring in a running engine in order to correctly orient the order of work to replace the timing belt. At the moment of fuel compression, the piston must be at top dead center; accordingly, there is a mark on the crankshaft toothed pulley, when aligned with the mark on the front engine cover, this position is fixed. When the piston is at top dead center, the valves of a given cylinder in the cylinder head must be completely closed. This also corresponds to a certain position of the camshaft, which is marked with a mark. Markers must be placed on the first cylinder of the engine. That is, the piston of the first cylinder is at TDC, the valves are completely closed. It is also necessary to understand that the next position of the piston at which the fuel is compressed and the marks are located correctly corresponds to one revolution of the camshaft and two revolutions of the crankshaft, that is, the crankshaft mark is twice aligned with the mark on the front cover of the engine, and its correct position corresponds to when the piston is in TDC at the moment of fuel compression and the valves of the first cylinder are completely closed, if you understand all this, then the process of installing the belt itself will not cause any difficulties. Take any existing internal combustion engine, all these processes will remain unchanged, the only difference is in the design of the timing drive, whether it is a belt, chain or gears. All we have to do is understand the nuances characteristic of each type of engine.
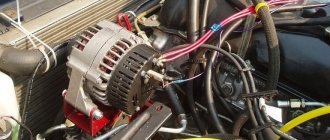
In this article I would like to talk about the timing device of an engine installed on a VAZ 2109 car, with a cylinder head having 8 valves, that is, each cylinder has one exhaust and one intake valve, respectively, the operation of these valves is ensured by one camshaft. And so where to start disassembling the timing drive mechanism. On this car it will be more convenient to remove the front right wheel. Remove the protective cover at the bottom. We need this in order to gain access to the generator drive pulley and the camshaft drive gear pulley. By removing the protective shield, we can unscrew the bolt securing the generator drive pulley. You must first loosen the tension on the generator belt and remove the belt. Then remove the plastic protective cover from above. It is held on by three mounting bolts. We loosen the nut securing the tension roller, after which the belt can be easily removed from the toothed pulleys.
Now you need to replace the tension roller with a new one. To do this, install the spacer washer, the roller itself and tighten the roller with a fastening nut.
It is advisable to change the pump at the same time; it doesn’t cost a lot of money, but it can cause a lot of harm if it fails.
VAZ 2109 carburetor timing marks
VAZ 2109 carburetor timing marks
Now you need to install the crankshaft correctly; to do this, scroll until the marks on the toothed pulley and the front engine cover align.
VAZ 2109 carburetor timing marks
The piston is at top dead center. This position also corresponds to a mark on the flywheel, which is aligned with the central slot of the ignition setting scale. It is clearly visible through the inspection window in the flywheel housing housing.
timing marks VAZ 2109 carburetor
The next step is to install the mark of the camshaft drive gear pulley, aligning it with the protrusion on the timing belt protective casing. This camshaft position corresponds to the moment of fuel compression in the combustion chamber, and the valves in the cylinder are closed.
timing marks VAZ 2109 carburetor
We install the timing belt as shown in the photo, passing it through the pump and tension roller.
timing marks VAZ 2109 carburetor
We install the generator drive pulley in its place. We tighten the belt using a tension roller; for this, the roller has special holes.
timing marks VAZ 2109 carburetor
After we have tensioned the belt and fixed the tension roller, it is very important to double-check that the marks are in the correct position. To do this, rotate the crankshaft several times and align the marks if they are aligned correctly. Close the upper protective casing, install the lower casing and wheel. That's it, the engine can be started.
How to correctly set timing marks on a VAZ 2109
Everyone needs to know how to set the timing belt of a VAZ 2109, because no one is safe from a broken belt. You are incredibly lucky if you become the owner of a car with a 1.5-liter 8-valve engine. On them, if the belt breaks, the valves remain unharmed; on the rest, unfortunately, the cylinder head will have to be repaired.
How can you tell if your timing belt is broken? Quite simply, since the spark disappears, the engine does not start, and the crankshaft rotates faster than usual. Of course, you need to know how to set the VAZ 2109 timing belt correctly when replacing the belt. Now let's look at this case.
How to remove the timing belt of a VAZ 2109?
Before starting work, place chocks under the rear wheels and apply the handbrake. This will prevent the car from rolling away. Loosen the bolts on the right front wheel as it will have to be removed.
Raise the right side with a jack and finally remove the wheel (throw it under the engine crankcase so that if the car falls, it will not fall on the brake disc). Open the hood and use a 10 mm wrench to unscrew the three bolts that secure the protective casing of the gas distribution mechanism. That's it, now you have a general view of it, you can continue.
Now loosen the nut on the generator and remove its drive belt. It will interfere with the replacement, since the pulley will have to be removed from the crankshaft. Using a 19 mm wrench (you can even use a cylinder) unscrew the bolt that secures the pulley to the crankshaft.
On carburetor versions of cars, you can insert a screwdriver or a small key into the pulley slot to keep the crankshaft from turning. On injection cars, you will have to use the help of a partner, who will sit in the cabin and press the brake pedal (in this case, you need to turn on the fifth speed).
When you unscrew the bolt, you need to loosen the VAZ 2109 tension roller to make it easier to remove the belt. To do this, take a 17mm wrench and unscrew the nut. Moreover, you can remove the VAZ 2109 timing belt completely, since when installing a new belt, it should also be changed.
Remove the belt from the pulleys and pay attention to the condition of the pump - there should be no play in it, pull its pulley to the sides with your hand. A characteristic feature of the presence of play and strong production of a liquid pump can be the appearance of wear along the edge of the belt. If there is one, then you should immediately change the pump.
As for replacing the pump, this must be done every second belt change. If we take into account that cars of this family are all older than five years, then the recommended period for replacing the belt is about 50 thousand km. The liquid pump operates for about 90-100 thousand km. mileage
Therefore, you need to install a new one in a timely manner, and not wait until it is completely worn out and breaks the belt. But the tension roller of the VAZ 2109 needs to be changed at the same time as the belt, there are no other options.
What you need to know
There are a number of signs indicating that it is time to change the timing belt on VAZ cars:
- black exhaust gases;
- uncharacteristic engine vibration during operation;
- difficult starting of the power plant;
- the appearance of noise in the motor.
If you replace a part, you must also change the roller. The pump requires mandatory diagnostics, as it rarely lasts more than 90,000 kilometers. These procedures can be classified as scheduled repairs.
If the belt breaks, the pump or pulley jams, then restoration work becomes unscheduled. To reduce the risk of such troubles, it is recommended to change the belt and its components more often - once every 35,000-40,000 kilometers.
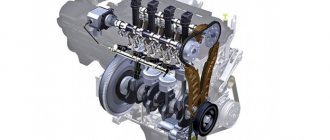
What is a timing belt for?
The timing belt is a rather complex unit in terms of design. It is based on a camshaft located in the cylinder head. With its help, the intake and exhaust valves are pushed. The valves, in turn, ensure the supply of a combustible mixture to the engine cylinders, and also help remove gases from the vehicle system. The operation of the camshaft is possible due to the presence of a crankshaft in the system. Thus, the mechanical force from the second to the first is transmitted using a drive belt.
A malfunction of the camshaft drive will disrupt the gas exchange process in the cylinders. The engine will not be able to function normally, and this is fraught with serious consequences for the main power unit
The belt is subject to temperature and mechanical influences; it is logical that sooner or later it will wear out. It stretches and cracks form on its surface, which negatively affects the operation of the entire system. Its slippage will affect the functioning of the valves: they will stop opening at the moment corresponding to the engine operating cycles. But the breakage of a rubber product is much more dangerous. During a break, the gas distribution mechanism remains inactive, therefore, the valves do not close until the piston rises, an impact occurs, after which the valves themselves bend, and defects form on the piston.
When is it necessary to replace the timing belt and set the marks?
Without exaggeration, a worn timing belt can be called a “ticking time bomb.” The importance of this element in the car system is difficult to overestimate. Usually it is made of high-quality rubber, the service life of which is designed for 50-60 thousand kilometers. But, if the vehicle is operated in unfavorable conditions, the replacement interval will be different.
Replacing a belt and pump is a labor- and financially expensive process. But all the work will cost much less than repairing a failed engine due to a broken gear mechanism. In no case should you save money and put off scheduled car maintenance “for later.”
In most cases, the replacement interval is indicated by the manufacturer in the documentation for the vehicle. In addition to the resource built into the belt, it is worth considering the following factors that shorten the service life of the rubber element:
- Engine oil getting on the surface of the timing belt
- Leakage of the front crankshaft oil seal
- Tension roller malfunction
- Pump jamming
As you can see, there can be a sufficient number of breakdowns in the car system that directly affect the service life of the belt. If the scheduled replacement time has come, or its resource has been prematurely exhausted, it is not enough to simply replace the old mechanism with a new one - you also need to take care of the correct installation. To successfully do all the work, it is enough to arm yourself with the necessary tools and know how to align the belt with the marks.
What happens if you set the tags incorrectly?
The consequences of a job done incorrectly can range from minor to significant. It is for this reason that it is important to approach all work responsibly. If you don’t have the proper attitude or self-confidence, entrust the work to a professional auto mechanic. Depending on the brand of the car, the following troubles may arise during the operation of the car:
- Misaligned phases often cause valve burnout
- Valve bends on some VAZ family cars
- Possible deformation of the cylinder head, failure of the guide bushings, and the formation of cracks inside the elements
- Remaining oil on spark plugs
The above consequences of incorrect label installation are observed in most cases. But, for example, on an 8-valve VAZ-2114 engine, the valves do not bend or bend even in the most severe cases. But the 16-valve power unit of the “fourteenth” does not have such advantages, so a major overhaul of the engine may be required.
We set the timing belt ourselves
The process of setting tags yourself is not that complicated, but it does require some in-depth knowledge. Among other things, it is periodically necessary to check the position of the shafts, since they tend to change their location relative to other timing elements for various reasons. In the following two situations, you have to set marks almost every time:
- During a complete timing belt replacement: the shafts will need to be set in the correct position, otherwise engine operation will be impossible
- During repair of the gas distribution mechanism, adjustment of their position is also required
It should also be taken into account that on cars with a sports camshaft, the principle of setting the drive belt may be completely different. To know exactly how to do all the work on sports or tuned cars, it is best to familiarize yourself with the detailed information provided in the instructions for a specific power unit.
Having all the necessary tools in hand, you can proceed directly to the main work. All work comes down to the following steps:
- Removing the battery
- Jack up the right front wheel
- Then we find the camshaft and crankshaft
- Then you need to find a risk on the shaft pulley
- Find the mark on the engine block
- Align the two marks by turning the wheel
- Rotate the wheel until the two marks completely coincide
Then, in reverse order, we collect everything that was originally removed. This method is suitable if the timing belt is fully tensioned. If the marks do not match, you will have to remove the belt and place marks separately on the crankshaft and camshaft.
Adjustment or how to set timing marks on a VAZ 2106 yourself
Coordination of the relative position angles of the camshaft (CV) and crankshaft (CV) is done by aligning the marks on the sprockets with the ebbs on the engine housings. There are two of the latter: one is located on the front aluminum cover (long dash), the second is on the bed of the RV. Unambiguity of the relative location of the “beacons” is important throughout the entire chain change operation.
Decoding notes
Without pre-basing the pistons and valves, installing the timing chain on the VAZ 2106 according to the marks is impossible. Therefore, the significance of the marks is not at all conditionally decorative. The signs give an understanding of the position of parts inside the motor:
- The mark on the KV pulley, which coincides with the long line on the front cover, means that the pistons of cylinders 1 and 4 have reached TDC.
- The mark on the RV sprocket, combined with the tide on the bed, informs about the closed valves in cylinder 4 - this is where the compression stroke occurs.
For your information. The numbering of the “pots” starts from the radiator side.
When the marks coincide, the ignition distributor slider is turned towards cylinder 4, and the valves of the latter are closed. By analogy with setting the clutch on a “classic”, the unambiguity of the relative position of the crankshaft and camshaft serves as the basis for adjusting the clearances in the valve mechanism and the ignition setting procedure.
How to restore tag matches
When the chain is pulled out, the marks will go away. The main difficulty is to return them to a position of mutual coincidence. This work is combined with dismantling the old chain. However, there is no need to rush to remove it - misalignment of all factory markers is fraught with danger.
The base is the position of the crankshaft at which the pulley mark coincides with the long line on the front cover. In this case, the drilling hole for the camshaft star should be closer to the high tide. This must be achieved first. It is worth remembering that the transmission is made with a 2:1 ratio - two revolutions of the crankshaft correspond to one revolution of the camshaft.
After fulfilling the basic requirement, you can begin to dismantle the HF pulley, the front cover, release and remove the tensioner, and remove the damper. The following is the procedure for adjusting the marks on the RF. The method for setting timing marks on a VAZ 2106 consists of following these steps:
- Remove the camshaft sprocket, remove all other gears and the chain stopper.
- Take out the chain.
- Put the camshaft sprocket back (without the chain), tighten the bolt, tighten it, securing the part by the teeth with a screwdriver.
- Rotate the camshaft until the marks on the sprocket and bed coincide.
- After fixing the sprocket with a screwdriver, unscrew the bolt and remove it.
- Install a new chain, sprockets, tensioner shoe and damper plate.
Unnecessary fears when dismantling the RV sprocket are not appropriate. The shaft design includes a pin. In addition to transmitting torque, it serves as a fixator of a certain position.
How to put on a chain
Installation of a new chain begins with its attachment to a new crankshaft sprocket. Next, the damper, tensioner shoe, and limiter are mounted. The chain is passed through the drive shaft gear and secured along the way. Afterwards it is mounted on the camshaft sprocket, and its position is adjusted according to the cycle:
- Put it on the shaft.
- Look at the relative position of the drill bit and boss.
- Take off.
- Move one tooth in the desired direction.
The final procedure is to tighten the chain, during which the tensioner is twisted all the way with good force. After rotating the HF key, the final check of the coincidence of the signs is carried out.
How to set timing marks on the crankshaft and camshaft
On many domestic cars, in particular VAZ, this procedure predetermines the following actions:
- Remove the old belt and install a new tension roller
- Rotate the camshaft pulley until its mark matches the mark on the cylinder block
- We turn the crankshaft to the level when the mark on the pulley is positioned strictly vertically
- You can verify the correct installation through a special window with a plug in the clutch housing
- Pull out the plug and see if the mark on the flywheel is located opposite the cylinder block strip or not? If yes, then the work can be considered completed
Article on the topic: Functions of gearbox oil
If everything was done correctly, first put the timing belt on the crankshaft pulley, and then on the camshaft pulley. It is also worth saying that the location of the shafts does not depend on the type of gas distributor. Therefore, the procedure for replacing the timing chain is largely identical.
Nuances in installing a timing chain according to factory marks on a VAZ 2106: pitfalls
It is difficult to achieve perfect alignment of two pairs of marks. The main reason is the use of components with dimensions within the maximum limit. By the way, adjusting the VAZ 2106 carburetor with your own hands also never follows the ideal scenario - additional recommendations from experienced craftsmen are almost always used.
Allowable elevation shifts
One of the unwritten norms allows for a discrepancy between the sprocket drilling and the camshaft bearing housing boss within a half-tooth in one direction or another. To be more specific, the installation of the timing chain of the VAZ 2106 engine according to the marks is considered complete when the camshaft sprocket is aligned exactly, and the mark of the crankshaft pulley goes slightly forward. This guarantees stable traction throughout the entire speed range.
If the camshaft star is aligned with the mark, and the knee pulley does not reach the TDC mark, the engine operates stably only up to a speed of 100 km/h. After crossing the border, there is a loss of traction and increased fuel consumption.
Extremes
A discrepancy of one tooth between the timing marks and the camshaft sprocket is unacceptable. This is usually evidence of critical chain stretch. When it is new, it is worth inspecting the seat under the key on the crankshaft - perhaps it is broken, hence the excessive play.
Engines with significant mileage are often prone to arbitrary changes in the location of the RV star mark during the rotation of the HF. This leads to:
- Slicked teeth in engagement of the gear shaft of the oil pump drive with the drive shaft (“fungus” with “pig”).
- Play in the distributor.
- Ellipse of timing sprockets.
For your information. Using a split star helps achieve perfect mark placement. It is installed to replace the standard camshaft gear.