Step-by-step instructions for setting the clock
Before setting the time on the car alarm control panel, you need to insert a working battery into the communicator. The battery is installed in a special compartment located behind the back cover.
Table: settings in the main key fob function menu
| Task | Activation and access to function | Actions to perform | Communicator's reaction |
| Setting the time | |||
| Setting the clock | Press and hold button 4 (3-4 seconds) | Key 2 increases values, 3 decreases | The key fob will respond with a long melodic signal and then two short signals. The clock digits of the current time will start blinking |
| Setting the minutes | Briefly click on the fourth key | Button 2 - increase the parameter, 3 - decrease | During programming, the minutes of the current time will start blinking on the remote control |
| Setting an alarm | |||
| Setting the alarm clock | Briefly press the fourth button. | The second button - the value increases, the third - decreases | The alarm clock numbers are blinking on the communicator screen |
| Setting the alarm minutes | Pressing the 4th key | The second button increases the value, the third decreases it | The alarm minute indicator flashes on the key fob display |
| Turning the alarm on/off | Quickly press the fourth button | The second key enables the function, the third – disables it | When the option is enabled, the “On” indicator lights up on the screen; when disabled, the “Off” indicator lights up. |
| Setting the timer | |||
| Setting the Timer Clock | Briefly press button 4 | The second key increases the function values, the third - decreases. | The timer clock indication starts blinking on the key fob screen |
| Setting the Timer Minutes | Briefly click on the fourth button | To increase parameters, use the second key, to decrease - the third. | The minutes of the timer are flashing on the remote control display |
| Activate/deactivate the timer | Button 4 is pressed | To enable the option, click the second key, and to disable it, click the third. | When the option is enabled, the “On” indicator lights up on the screen; when disabled, the “Off” indicator lights up. |
| Setting the volume and type of alerts | |||
| Selecting the signal volume | Briefly press the fourth button | Button 2 is used to select the volume of sound pulses. If you want to activate the silent mode, press the third key. | The siren indicator blinks on the key fob display |
- when loud sound signals are turned on, the inscription “RUDE” blinks on the screen;
- when quiet impulses are activated, the display shows “WEAK”;
- If the vibration mode is turned on, the “VIBRATION” indicator lights up.
To exit the programming menu, the user must take no action for eight seconds. During this time, you cannot press buttons on the communicator.
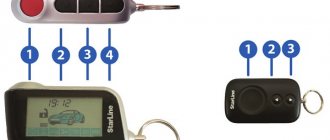
Photo gallery: designation of buttons on the key fob
Table: step-by-step instructions for setting up the functions of the main Starline A93 key fob
| Task | Activating the function | System response | Setting the function |
| Setting the clock |
| Long press on K4 (3-4 seconds) | One long melodic and two short beeps. The clock will start flashing | Short press on keys 2 (increase time value) or 3 (decrease) | |
| Setting the minutes | Short press on K4 | The minutes are flashing | Quick click on key 2 (increase) or 3 (decrease) |
| Setting an alarm | |||
| Setting the alarm clock | Quick press on K4 | The alarm clock indicators are flashing | Briefly press button 2 (increase) or 3 (decrease) |
| Setting the alarm minutes | Brief click on K4 | The alarm minutes are flashing | Quickly press buttons 2 (increase) or 3 (decrease) |
| Turning the alarm on/off | Short press on K4 | Alarm icon flashing | Briefly click on button 2 (on) or 3 (off) |
| Setting the timer | |||
| Setting the Timer Clock | Quick press on K4 | Timer clock values are flashing | Short press on key 2 (increase) or 3 (decrease) |
| Setting the Timer Minutes | Short click on K4 | The minutes of the timer are flashing | Quickly press button 2 (increase) or 3 (decrease) |
| Turning the timer on/off | Brief press on K4 | The timer icon is flashing | Briefly press key 2 (on) or 3 (off) |
| Setting the volume and type of alerts | |||
| Selecting the signal volume | Quick click on K4 | Siren icon flashing | Short click on key 2 – select the signal volume. Quickly press button 3 to turn on silent mode |
| Selecting the signal type | |||
Timed engine start
Automatic starting of the engine on time can be done using an alarm clock and a timer.
Icons on the Starline A93 keychain
Setting up autorun on alarm clock
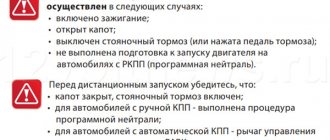
Before you set the power unit to start on an alarm clock with auto start, you must make sure of the following:
- the current time on the communicator is programmed correctly;
- the alarm clock is set to the required start time;
- The configured alarm is turned on.
Autorun on an alarm clock will be configured as follows:
- The programming menu is entered.
- To activate cursor selection of functions, press and hold button 2 until two short and one long beep sounds. Moving the cursor over the icons at the bottom of the screen with a quick click on keys 2 and 3, set it to the clock icon.
- The first key of the communicator is pressed. The vehicle's exterior lights will blink once and the remote control will emit a melodic signal. Over the next five seconds, the key fob screen will display the duration of time until the engine warms up. Icons in the form of a dial and a bell on the communicator display will indicate that the option is enabled.
Video: autostart on alarm clock
The “Alex Sila” channel in its video showed in detail the process of setting up and automatically starting the engine according to the alarm clock readings on the Starline A93 alarm system.
Starline a93 setting the starter operating time during autostart
Setting the clock on an alarm system with automatic engine start of a Starline A93 car is done as follows:
- Take the communicator and install the battery into it. To do this, remove the back of the cover and install the battery in the special slot, taking into account the polarity.
- The key fob will turn on. If the key lock has been activated, unlock the device.
- Click on button number 4 and hold it down until the communicator speaker plays a melodic signal. After a pause, the device will emit two more short-term sound pulses.
- The pager will go to the time settings adjustment menu. To set the clock, the second and third buttons are used. The second is for reducing parameters, the third is for increasing. To quickly add or subtract hours, you can hold down these keys.
- To set the minutes, click on the fourth key.
- The same buttons (2 and 3) are used to adjust the minutes. The second key is used to decrease, the third - to increase indicators. For quick adjustment, the buttons are pressed.
Andrey Sharshukov clearly demonstrated the process of adjusting time parameters.
How does the Starline A93 alarm with auto start work?
Many modern car alarms are no longer just security systems that protect the car from theft. Now there are many additional functions, for example, the ability to automatically start the engine.
To autostart Starline A93, you need to press special buttons and you can learn more about its configuration, characteristics and capabilities from this article, which also contains an informative video.
It is worth saying that this is a very convenient option.
After all, the car owner can take advantage of this opportunity remotely, even from home.
Source
How to set up auto-start on alarm?
You need to set the alarm time to start the car engine like this:
- Activate the function programming menu.
- Move the cursor on the communicator screen to the indicator with a clock symbol, then click on the first key. The car's lights will blink once, and the communicator's speaker will play a melodic signal.
- The time will appear on the communicator screen after which the function of starting the internal combustion engine by alarm will be activated. To adjust the parameter, use the pager buttons.
- Five seconds after setting the alarm clock parameters, the time indication will appear on the pager screen.
Alex Sila talked about adjusting the time parameters for remote starting of an internal combustion engine.
Possible causes of failure and their elimination
Reasons that can lead to malfunctions of the watch:
- The battery installed in the communicator is low. With this problem, the clock usually lags. The key fob display shows an indication of the charge of the power source, so its discharge can be determined in a timely manner. When the battery fails, the communicator may emit a characteristic warning signal.
- Replacing the power supply. If you install a new battery in the key fob, the alarm will automatically reset all previously configured time values. Changing parameters when replacing the battery is only possible if the security mode was turned on after installing the device. It is not recommended to change temporary values before this.
- Malfunctions in the operation of the communicator itself. If the device uses a working battery, then the cause of the problem may lie in the software component of the remote control. To fix the problem, you will have to flash the communicator.
The solution to any malfunction begins with diagnostics and installation of a new battery in the Starline A93 key fob.
To fix problems, you can repair the remote control:
- The back cover of the communicator is removed and the battery is removed from the device.
- In the rear compartment, under the film, there will be a bolt that secures the two parts of the pager to each other. You need to unscrew it using a Phillips screwdriver. The housing parts can then be detached.
- The board is carefully removed from the device and visually diagnosed. Using a soft and dry cloth, it is necessary to clean the circuit and internal parts of the case from dust and dirt. If you cannot remove them, you can use a cotton swab moistened with alcohol. It is necessary to carefully remove traces of dirt without flooding the board with liquid.
- The circuit is being diagnosed. Using a multimeter, the user can ring and check contact tracks and other elements. A damaged capacitor can be identified visually - this component will swell. Failed parts and sensors are replaced by re-soldering.
- After repair, the device is reassembled; this process is carried out in reverse order.
To replace the battery in the key fob, you can use one of two methods:
- Standard. The battery is replaced, and then the user independently adjusts the time values and other options.
- Non-standard. The battery in the key fob is changed at exactly 00:00. As a result, the communicator will reset all parameters, and the time countdown will begin from this point. This method will allow the user not to change the watch settings.
Reasons for settings failure
If the wrong time is displayed on the communicator display, the reason may be that the battery is low. Key fobs of Starline anti-theft systems have a battery charge indication function, so the consumer can timely determine its condition. If the battery loses capacity, it will not be able to perform its main function. As a result, a symbol indicating a discharge will appear on the communicator’s display, and the device’s speaker will also emit a corresponding sound signal.
The problem may be caused by replacing the power supply. When a new battery is installed in the communicator, the system automatically resets the time parameters. In addition, when changing the battery, all parameters of the anti-theft system will be reset. After completing the replacement, it is necessary to activate the protective function, that is, arm the car. Only then is it possible to adjust the time parameters.
The reason may be that the pager is not working correctly. If you are sure that a working battery is installed in it, you need to look for the problem in the software part. Problems with its operation may be caused by moisture getting on the board. Sometimes flashing the device can solve the problem, but we recommend entrusting this task to specialists.
GO FASTRELIABLE talked about replacing the battery in the device.
Reset to factory settings
To reset all parameters to factory values, perform the following steps:
- The ignition in the car is turned off. The service mode entry button is pressed nine or ten times depending on which settings are being reset. In the first case, the functions indicated in the first table are returned to the factory values, in the second - for table No. 2. Detailed numbers are indicated in the service documentation. The siren should play several beeps.
- The button to enter the service mode is pressed once. One sound pulse of the siren will sound.
- The first key on the key fob is pressed. If the siren beeps, this indicates that all parameters have been successfully reset.
- The ignition in the car is turned off. External lighting devices will blink three times.
Why is it necessary and what will happen if you don’t set the clock?
If the user configures the communicator to autostart on an alarm clock, the engine will start at a certain time. Otherwise, the launch will take place according to the time indicated on the key fob.
If the timing values are set incorrectly, the user will have to start the engine remotely several times. This, in turn, will lead to faster wear of engine structural elements. Even if autorun is not used, but the time is set incorrectly, the alarm will not go off when needed.
Setting the clock on the Starline A93 key fob
To set the time on the Starline A93 key fob, you need to perform a number of manipulations.
The main advantage of StarLine is the ability to connect to the car’s Kan-bus. This essential element of any modern car allows you to centrally control all devices and parts of its design. In particular, opening doors or starting the engine remotely. It is for the latter that the function is used by brand alarms.
The Starline A93 Eco menu differs from its competitors precisely in that it allows you to control the car from a distance.
Trouble-shooting
When the battery is discharged, it is enough to replace it with a new one. To do this, open the cover at the back of the key fob, remove the old battery and install a new one. In this case, it is necessary to take into account the polarity of the power source. To avoid setting the time on the key fob, the battery replacement can be scheduled for 00.00.
To fix problems with the software component of the remote control, it needs to be re-flashed. In this case, you should contact specialists.
When replacing the battery in your device, it is recommended to check its condition. To do this, remove the back cover and remove the battery. Then unscrew the screw located in the rear section under the film and disconnect the vertical parts of the case from each other.
Then the board is removed from the communicator and visually inspected for damage. Use a dry cloth to remove dust and dirt.
Heavy stains can be carefully cleaned with a cotton swab moistened with alcohol.
A multimeter is used to diagnose the circuit. Non-working elements are replaced by re-soldering. A failed capacitor is identified by its swollen appearance.
After checking and replacing all elements, the device is reassembled (proceed in reverse order). Upon completion of work, the Starline A93 configuration is checked.
How to set the clock on the StarLine A93 alarm system
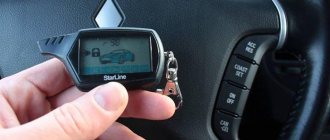
First of all, install a battery or battery into the communicator. This is done simply - open the cover on the back and insert the battery into a special socket.
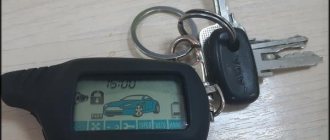
As soon as the battery is in place, the key fob will turn on. In some cases, the owner may encounter key blocking, but this problem is resolved in a few seconds. After turning on, press button 4 and hold it in this position until a special signal is heard in the speaker. A distinctive feature of the desired sound signal is its melody. After the main sound, the key fob will emit 2 more short ones.
Immediately after this, the device will beep - it will go to the time parameters menu. To set the clock, use buttons numbered 2 and 3. The first of them is used to lower the indicator, and the last one is used to increase it. Quick changes in chronometer indicators are achieved by holding down the buttons.
To go to the clock setting menu, use key number 4. As for adjusting the indicators, the same buttons are used for this as in the previous case, each of which has exactly the same role.
- the function menu is activated;
- the cursor on the screen is moved to the icon in the form of a clock and after fixing it, the first button is pressed;
- as confirmation of the action, a melodic signal will sound and the lights on the key fob will blink once;
- the alarm time will appear on the screen, which must be set in the same way as a clock - using the second and third keys;
- After completing the steps to select the alarm time, a five-second pause is made, after which the indicator will begin to show the desired value.
You can start the engine using the Starline alarm clock only during one start cycle. An active indicator in the form of a clock with a bell on the control panel will serve as evidence that the function has been launched.
Even the new Starline A93 key fob can break. It may suddenly start showing the wrong time. There are three main reasons why this can happen:
- the battery runs out;
- new battery;
- program failure.
Replacing the battery with a new one can also cause the key fob to display the time incorrectly. This is due to the fact that the program provides for resetting the parameters when replacing the battery. Absolutely all settings are reset, not just temporary ones. To reconfigure them, you must first activate the auto protection feature. As soon as it is armed, access to the menu opens.
As for the last reason - software problems - they can be caused either by a failure in the device or by moisture. To fix the problem, they use solutions such as flashing the device or drying it out. The method you choose depends on the cause of the problem. But flashing the key fob requires some skills, so it is better for inexperienced users to entrust this to service workers.
The main methods for setting up Starline A93 can be found in the video instructions.
How to set the time on the Starline A93 key fob: installation, set, clock, alarm, set
It doesn’t take much time to set the time on the Starline A93 key fob. The process is simple and quick. By setting the time on the key fob, you can use the engine to start automatically according to the clock.
Why is this needed and what will happen if you don’t set the clock
One of the functions of the Starline A93 car alarm is automatic start of the vehicle engine according to time. By setting the required value, the car will start itself, without requiring any action on the part of the owner.
To use the function, you must set the clock on the Starline A93 key fob. Otherwise, the alarm will start at the wrong time or you will have to adjust the alarm clock taking into account the lagging/hurried system clock.
How to set the time on a key fob
The Starline A93 alarm system is distinguished by its ease and simplicity of operation. All settings and control of the car are carried out using 4 buttons. Actions and alerts are visualized on the LCD screen.
The time setting is carried out as follows:
- Enter the “Functions Menu”. To do this, press and hold button 4 for several seconds. Upon entry, 1 long and 2 short beeps are heard. The clock on the screen begins to blink.
- To set the time, use buttons 2 and 3 - increase and decrease the value, respectively. First change the clock. Then press button 4 and set the minutes in the same way.
- The next press of button 4 takes you to the alarm time setting menu. Hours and minutes are configured similarly to step 3.
- After pressing button 4, they switch to the mode of turning on (ON) or turning off (OFF) the alarm clock. When turned on, the alarm will sound at the configured time.
- Then the autorun timer is set. The process is similar to adjusting the alarm clock: using button 4, you go to setting the hours and minutes, turning the function on and off.
When entering the menu, the user is given 8 seconds to set the clock on the key fob. If no action has been performed during the specified period, the device returns to its original position.
There is another way to set up a car engine to start using a timer. To do this, press and hold buttons 2 and 3 simultaneously until a long and short beep appears.
The alarm clock icon will flash at the bottom of the display. If you press button 1, the icon will be lit constantly. In this case, autorun will turn on according to the time set on the alarm clock.
If you press buttons 2 and 3, they switch to autorun mode using a timer, and an hourglass image appears. The machine will be turned on when the mode is activated and subsequently after a set time interval.
Reasons for settings failure
During operation, settings 93 may fail. The problem can be caused by:
- The communicator battery is low. Its status indicator is displayed on the key fob, so you can avoid completely discharging the battery in a timely manner. When the battery is low, the clock may lag.
- Replacing the battery in the key fob. When replacing the power source, the previously set time parameters are reset. The only exception is if the alarm has been armed. Therefore, before replacing the power source, it is not recommended to set the clock on the Starline A93 alarm system.
- Incorrect operation of the communicator. If the battery is charged, problems with the remote control software may cause temporary settings to fail.
Trouble-shooting
When the battery is discharged, it is enough to replace it with a new one. To do this, open the cover at the back of the key fob, remove the old battery and install a new one. In this case, it is necessary to take into account the polarity of the power source. To avoid setting the time on the key fob, the battery replacement can be scheduled for 00.00.
To fix problems with the software component of the remote control, it needs to be re-flashed. In this case, you should contact specialists.
When replacing the battery in your device, it is recommended to check its condition. To do this, remove the back cover and remove the battery. Then unscrew the screw located in the rear section under the film and disconnect the vertical parts of the case from each other.
Then the board is removed from the communicator and visually inspected for damage. Use a dry cloth to remove dust and dirt.
Heavy stains can be carefully cleaned with a cotton swab moistened with alcohol.
A multimeter is used to diagnose the circuit. Non-working elements are replaced by re-soldering. A failed capacitor is identified by its swollen appearance.
After checking and replacing all elements, the device is reassembled (proceed in reverse order). Upon completion of work, the Starline A93 configuration is checked.
What happens if you don’t set the clock on the key fob?
The correct setting of the software clock determines how accurately the alarm time will be set for remote starting of the car engine. If there are problems with the chronometer, the start will occur at the wrong time, which can lead to unpleasant consequences.
This does not mean that the engine will not start at all - it will simply not occur when the car owner needs it. As a result, the latter may encounter a situation where the engine is simply not warmed up at the right time. And this will lead to rapid wear of the starter mechanism. The alarm function and reminder function will not work correctly.
Specialization : Graduated from the State Automobile University, worked for 20 years at GAZ-56, now I drive a Zhiguli.
Setting the clock
To enter the configuration mode for the key fob itself, press and hold button 4: first the key fob will give one signal, after a pause – 2 more. After that, release the button. The hour display will start blinking - set the desired hour by increasing the number with button 2 or decreasing with button 3. Then briefly press 4 - the minutes will start blinking, set them in the same way.
By pressing 4 again, you will go to setting the alarm time - set the hours, then the minutes in the same way. The next press on 4 will switch the key fob into the alarm on/off mode: if you set it to ON, the key fob will sound an alarm every day at the previously set time. Select the desired setting and press 4 again - now set the autorun timer.
The principle of setting the autorun time does not change - set the hour and minute, press 4 and then turn on the timer (ON) or disable autorun by timer (OFF).
Next, adjust the volume of the key fob signals and the vibration level, or simply do nothing with it - after 8 seconds it will automatically save all the settings and exit the programming mode.
You can also activate the timer launch in the second way, and there will be some differences in the operating algorithm:
- Press and hold button 2 or 3 until you hear a long beep followed by a short beep.
- The alarm clock icon will start blinking on the screen in the bottom row. If you press button 1, it will light up constantly, buttons 2 and 3 will switch to the adjacent icon.
- To exit this mode, hold button 1 for a long time until the signal sounds.
What is the difference? If the alarm icon is displayed on the screen, then autostart will not occur at the time set by the timer, but at the time for which the alarm is set. If you activate the hourglass icon, it will occur starting from the time you activate this mode and then every few hours. What is it for? In cold weather, this mode of operation allows the car not to get cold, and it is used on diesel cars, or when spending the night in the car in winter. To set up periodic autorun, you need to activate the hourglass and set the key fob timer and set the correct interval.
As soon as you activate the hourglass, the display on the screen will change: initially the inscription 4H will appear, and further short presses on button 1 will change the inscription to 6H, 8H and so on up to 24H. Periodic engine starts will occur at intervals of 4 hours, 8 hours, and so on. When you exit setup mode, the engine will start automatically.
Video: Setting the time on the starline a 93 alarm key fob (without unnecessary information)
Source
Starline a93 (a63, a39, a36) key fob operating instructions
You may have a keychain with a horizontal arrangement of icons, or maybe with a vertical one. The first ones came complete with signaling devices released before 2021. All modern systems come with vertical icons. The additional key fob is the same in both the first and second cases.
Key rings Starline A93
1.1. Duration of pressing key fob buttons
- short press – a single press of one or two buttons lasting less than half a second; long press – press and hold one or two buttons until the key fob beeps; double press – press the button 2 times in a row within one second; sequential pressing – double pressing of one or different buttons. First, press and hold the button until a sound signal appears, then release this button and briefly press the second (or the same) button.
1.2. Control commands
The table below shows the main commands of the key fobs with feedback, as well as the additional Starline a93 key fob - it briefly shows how to use them.
Basic control commands for Starline A93 key fobs
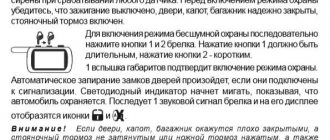
1.2.1. Arming and disarming
To arm the Starline A93, you need to briefly press button 1, to disarm it, briefly press button 2.
Video of arming and disarming
1.2.2. Silent arming and disarming
To arm without sound, press and hold button 1 until a beep sounds, then release it and briefly press it again. To silently disarm, we perform the same manipulations with button 2. In silent mode, no siren signals will be emitted when disarming and arming.
Video of silent arming and disarming
1.2.3. Silent mode
Starline a93 has a silent mode. Many people confuse it with silent mode. In silent mode, even if any security zone is triggered, the siren will not emit signals. All information will be transmitted only to the key fob.
To turn on silent mode, press button one long and then button 2 briefly.
Video of enabling silent mode
1.2.4. Disable alarm
To turn off the alarm on Starline A93, you need to briefly press button one. In this case, the siren will stop screaming, but the system will still be armed.
1.2.5. Temporarily disabling shock and tilt sensors
To turn off the warning level of the shock sensor, briefly press button 1 twice in a row when the alarm is armed. To turn off the main level, repeat the same procedure with the first button. Then the shock sensor will be completely disabled. To turn it on again, quickly press button 1 twice.
Video of turning off and turning on the shock sensor
To disable the tilt sensor, quickly press the third button twice when the system is armed. To turn it on, follow the same procedure.
Video of disabling and enabling the tilt sensor
1.2.6. Panic Mode
To turn on the Panic mode on Starline A93, with the ignition off, you need to simultaneously press and hold buttons 1 and 3 until the key fob beeps. In the “Panic” mode, the siren turns on for 15 seconds, the doors are locked, and the alarm is armed. To disable this mode, press button 2 briefly - the siren will stop screaming, but the doors will remain closed and the system will be armed.
Video of turning off and turning on Panic
1.2.7. Remote engine start and stop
How to start the engine? You must press and hold button 1 until the beep sounds. If the engine has already been started remotely or automatically, then long pressing button one will increase engine operation by 5 minutes.
The engine is stopped by sequentially pressing buttons 1 and 4, regardless of the alarm version.
1.2.8. Managing additional channels
All channels are turned on and off by successive clicks. Below are the buttons to control the channels.
- 1 – 2+1 2 – 3+1 3 – 4+1 4 – 2+3 5 – 3+2 6 – 4+2
1.2.8.1. How to open the trunk using the Starline a93 key fob
Opening the trunk from the Starline A93 alarm key fob occurs precisely with the help of additional channels. By default, this is channel 1. That is, in order to unlock the trunk, you need to press and hold button 2 until the beep, then release it and briefly press button 1.
In this case, if there is a trunk control via can or its opening is connected via analogue, then the trunk will open. If connected correctly, even if the alarm is armed, opening the trunk will not trigger it. Starline will simply exclude this security zone for a while. As soon as the trunk is closed, the system will arm it again.
It is worth noting that the Starline A93 itself will not be able to open the trunk. It simply happens that the car does not have the ability to electrically control the trunk release. Or maybe the car has the ability, but you didn’t agree with the installer about how to connect it. Yes, this is a separate service and costs money (if the control is in can, then it’s free). In this case, at least press the buttons on the key fob - it will do no good, the trunk will not open.
1.2.9. Adjusting the sensitivity of the shock and tilt sensor
To enter the shock sensor adjustment mode, press button 3 until the key fob beeps, then release it and briefly press button 3 again. We get into the mode for setting the preliminary level of the sensor. By short pressing keys 2 and 3, set the desired sensitivity of the shock sensor preliminary level. Next, press 3 long and 3 short again. We are in the shock sensor main level settings menu. Again, use keys 2 and 3 to set the desired sensitivity of the alarm level of the sensor. Next, press 3 long and 3 short again and exit the adjustment mode.
Engine starting options
There are several ways to start the engine using the Starline A93 alarm:
- Starting the engine based on temperature. The system monitors the temperature and, if necessary, starts the engine to warm it up.
- Trigger by time or so-called trigger by alarm clock. The engine will start at a certain time.
- Periodic engine starting.
To start the engine on time, first of all, you need to set the time on the Starline A93 key fob. Setting up the clock is intellectually understandable and for most users it will not be difficult to set the time on the key fob, but if difficulties suddenly arise, instructions are provided below that will help you deal with the problem that has arisen:
To summarize the above
That's all the simple steps to ensure that the time setting is successful. To exit the “Functions Menu”, you can briefly press button 4 to scroll through the remaining menu items until you exit, or if you do not perform any actions for 8 seconds, the menu will be exited automatically. Setting the time is the initial step for subsequent work with the alarm, and will allow the owner to use functions such as timed start, periodic start, or combine engine control and vehicle safety.
Source
| Selecting the type of sound signal | Subsequent pressing of the fourth button | Key 3 activates the “Siren” impulse, and 2 - “Trill”. | When the siren signals are activated, the “SIG1” indicator lights up on the screen, and the “SIG2” trills. |