How to make an aquaprint with your own hands at home? To answer this question you need to understand what it is. In fact, waterprint is a type of water immersion printing. Using this method, you can imitate a variety of surfaces. Moreover, it can be applied to any surface, customized to the design features. This method of decoration was actively used in Japan at the end of the last century.
Now, it has gained unprecedented popularity among craftsmen who are interested in car tuning. The film fits perfectly on all possible surfaces. This allows you to decorate cars of any model. The material practically does not fade, and also, it is not afraid of water. The latter characteristic makes this film popular among yacht owners.
What it is?
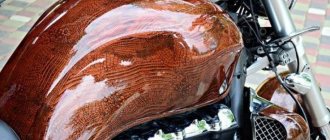
Aquaprinting of parts began to be used in Japan approximately 40 years ago. And now in Russia the method is in demand among car enthusiasts. Special pattern transfer technology allows you to create unique surfaces with:
- wood texture;
- the plane of the stone;
- reptile scales.
Carbon fiber trim is often chosen for sports cars. Metal and plastic elements of the interior of exclusive cars are designed to match the structure of the leather and seats.
How is aquaprint made? The technology is:
- surface cleaning;
- applying the main shade and preparing the film;
- film activation;
- immersion in containers to transfer the image to the part;
- drying and varnishing.
To ensure that the coating is evenly and efficiently distributed, the image textures are adjusted according to parameters several centimeters larger than the plane of immersion of the element.
Preparing car parts for applying aquaprint
Of course, every detail of the car that you decide to individualize using hydrographic printing should be prepared in advance - in the same way as is done, for example, before painting. The sequence of actions to prepare a car part for immersion printing:
- thorough degreasing of the surface. Note that in this case this procedure should be treated with even more attention than before traditional painting. If the workpiece has an outer rubberized layer, it must be completely removed, usually this is done with the same solvent that is used to degrease the surface;
- sanding the part is necessary to increase its adhesion, but here a certain compromise must be observed - the risks caused by sandpapers of large fractions will be clearly visible even after applying the water print. So use only the finest-grained material - it will eliminate visible defects and at the same time give an imperceptible roughness to absolutely smooth surfaces;
- primer coating is required mainly for plastic surfaces - this will protect the soil from swelling;
- priming the part is carried out for the same purpose as with classical painting, with one difference - after applying a layer of primer, the surface must be sanded again;
- If the design applied by hydrographic printing requires a background of a certain color, we apply this base color with nitro paint in a thin and uniform layer. We take into account that modern coloring nitro compounds dry in literally 15-25 minutes.
And only after the base paint layer has completely dried, you can begin the procedure of applying water print to a part of the car interior.
What is decorated with this method?
Aquaprint is also called hydrographic, impression or hydrographic printing. This is an effective decoration method that allows you to achieve high-quality results. Typically, the technology is used to decorate cars - external and internal parts. The use of hydrographic film allows you to achieve a unique appearance of transport. This will also protect against theft, since cars with noticeable designs are stolen less often.
The film attaches well to metal, plastic, wood, and glass. On each material, the image lasts for a long time after being fixed with varnish and subject to the decoration technology. Such an image does not deform for a long time even from temperature and moisture. How aquaprint is made is described below.
What is aquaprint
Appearing in the late eighties, hydrographic printing technology was not available to the masses for a long time, but was actively used in a variety of fields. Applying decorative patterns to almost any material, from plastic and glass to metal and wooden surfaces, required the use of innovative technologies, ensuring high-quality decoration of parts of any geometry. Currently, hydrographic printing has become so advanced that this technology is used for texturing and decorative design of their products by such companies as Mercedes-Benz, Toyota, Boeing, Adidas, BMW, Samsung, Nike, Nissan, Dell, HP. By and large, the average user is unlikely to distinguish whether a car’s dashboard is decorated with mahogany or hydrographic printing, so advanced is this technology, which vaguely resembles the usual painting of a car body. The good news is that recently waterprint on cars has become available to ordinary motorists. Immersion printing (the scientific name of the method) allows you to create textures on any details that will be almost completely identical to their prototypes, be it valuable wood species, metal surfaces, stone, animal skin.
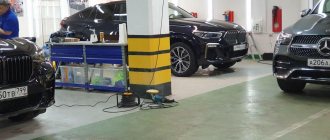
Premises requirements
Aquaprinting can be done at home, without the participation of a specialist. Decorating things is allowed at home if it comes to small details. It is more convenient to carry out hydrographic printing in a utility room or garage with an area of at least 20 square meters. m. The main thing is that there is a container for work, where the part to be decorated can completely fit. Moreover, the container must be installed stably so that it does not swing, otherwise the design will be transferred unevenly.
In the room where hydrographic printing is planned, there must be hot water - connected or heated. This is due to the fact that to decorate with film, the container is filled with water at a temperature of at least 35 degrees. Hydraulic printing is a simple and inexpensive procedure that is also accessible to beginners.
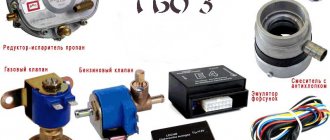
Materials and equipment
How is aquaprint made? First you need to prepare everything you need for work. Used or new equipment can be used. Equipment for water printing will require:
- a tank that will be sufficient to immerse the part;
- containers for washing finished decorative products;
- special film for image transfer;
- a set of devices and tools for preparation - roughing and grinding;
- activators of film, paints and varnish;
- painting gun - spray gun or compressor with a spray gun.
The surface with old worn paint or with chips is sanded and sanded before priming. Having removed dirt and roughness from the part, you need to degrease the surface and apply the base color.
Since the immersion printing process requires maintaining a temperature (29-32 degrees), a thermometer (mercury or alcohol) and an electric industrial boiler with a heating sensor are required. The thermometer must be fixed on the surface of the liquid. A boiler is needed to temporarily turn on and heat water.
To carry out aquaprinting with your own hands, you can use an old bathtub. You can make the container yourself from a barrel, sawing it vertically, and also installing it on clamps in the form of a platform. The second half can be adapted for washing products.
To drain the waste liquid, wash the tank and fill the bath, a pipeline with a drain and a water supply with taps are installed. If there is no central connection for communications, then a special filter and pump are installed in the pipeline. It is necessary to install an additional reservoir into which the filtered solution will be pumped. This helps to carry out the process according to the principle of circulation of filtered liquid.
The work can be done at home if you follow the aquaprint technology. It is important to familiarize yourself with all the nuances in advance. Only after this can you begin to do the work.
What will you need?
This type of tuning requires quite a lot of different tools that will allow you to carry out this work as accurately as possible. Therefore, stock up on the following devices:
- Water thermometer;
- Electric boiler;
- Bath for water. It must be the right size;
- Compressor;
- Spray.
This is the required minimum. A spray gun may also be required. It all depends on the volume of work.
Preparation
How is aquaprint made? First, the surface is cleaned with coarse sandpaper. Rubberized areas are removed and surfaces with corrosion are sanded with primer and varnish.
Cleaning from oil stains and dust is required. It is convenient to process a large area with a grinding machine, and for small, hard-to-reach areas of bends, grinding is carried out manually or using a drill with a small grinding attachment. High-quality grinding can be done with a special paste or automotive primer.
After cleaning the parts, they are degreased with pure gasoline or alcohol. Then automotive primer is applied. After drying, secondary sanding with sandpaper and degreasing is performed. Then you can proceed to the next stage.
Preparing the car
An extremely important point is the correct preparation of the part for applying the film to it. This work consists of several stages. The appearance of the car after tuning largely depends on the correctness of their implementation. Preparation is carried out in the following order:
- First, degrease the surface. To do this, wipe the part with a solvent. Please note that many decorative parts of the car are coated with a rubber-containing substance. This is done to protect the part. Be sure to remove this substance completely;
- Sand the surface with fine sandpaper. This will greatly simplify gluing the decorative film;
- After sanding the part, a special primer is applied to it;
- The part is primed. For this, a regular primer is used. If a small area of the body is being processed, you can purchase it in an aerosol can. For large volumes, the easiest way is to use a spray gun.
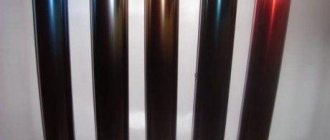
It remains to carry out the last preparatory operation - applying the base color.
The easiest way to do this is to use nitro-based paints. It dries quickly enough and allows you to stick the film without much difficulty. It is important to choose the right color. This is done taking into account the characteristics of the film that you plan to use. To select a color, it is better to take the advice of professionals. Most stores that offer car paints will mix the best color for you. Read more in the article “Simple ways to prepare a car for painting.”
Film
To create an aquaprint at home, fill the container with water and heat it to 35 degrees. Then, according to the sketch of the part, the film is cut based on the 3D geometry of the form.
Guessing the area for complex geometry is not so easy. Craftsmen make sketches of the dimensions of the part in advance, perform development and drawing of the surfaces of the planes. The size of the film is made with a margin; small notches need to be created on the edges in increments of 2 cm. The activator is prepared for work and the pattern is transferred.
Transferring a drawing
This is the next stage of do-it-yourself waterprinting at home. The prepared film is placed on the water in the bath. To do this, fingers are dipped and an impression is made on the edge of the film. It is important that the sticky surface rests on the surface of the water.
The notches made on the film are gradually rolled up. If bubbles appear under the surface of the film, carefully blow them out. 2 minutes after turning the areas, apply the activator with a spray gun using S-shaped movements. After 10 seconds, the film dissolves, and a jelly-like mass with a pattern remains on the surface.
Then the prepared part is immersed in the bath at an angle of 45 degrees. All movements must be neat, smooth and uniform. After immersion, the parts are taken out. You need to inspect it - the paint should lie evenly.
Drawing technology
It is possible to carry out high-quality hydrographic printing with your own hands at home if you adhere to all the nuances of the technological process. Before starting work, review the information on the Internet. In response to the request “do-it-yourself aquaprint video”, many interesting videos have been shot that will help explain all the intricacies of image transmission. After mastering the material, proceed to the step-by-step process.
Part surface preparation
The planes are cleaned with coarse sandpaper. Remove the rubberized areas and sand the planes with the elements:
- corrosion;
- primers;
- varnish
Removes oil stains and dust particles. It is convenient to process a large area with a grinding machine, but for small, hard-to-reach curved surfaces, grinding must be done manually or using a drill with a miniature grinding attachment.
High-quality sanding can be done using a special paste or automotive primer.
After cleaning the surfaces of the part, degrease them with pure gasoline or alcohol. Apply automotive primer. After drying, sand again with fine sandpaper and degrease again. Now the part is ready for the next step.
To obtain certain shades and transition combinations of the color palette, experienced craftsmen apply a primary color to the part that matches the base and texture of the design.
Film preparation
Before cutting the film for aquaprint, the container is filled with water and heated to a temperature of 35 degrees. Next, according to the sketch of the part, the film is cut, taking into account the 3D geometry of the form.
Guessing the area for complex geometry is quite difficult. Craftsmen carry out preliminary sketches of the dimensions of the part, scan and draw the surfaces of the planes.
This is interesting: Auto parts for Honda cars
The area of the film is made with a margin of several centimeters, and small notches are made on the edges in increments of 2 centimeters. Prepare the activator for the water print and begin transferring the pattern.
Image transfer
The prepared film is carefully placed on the surface of the water in the bath. To do this, dip your fingers and make an impression on the edge of the film. The sticky plane should lie on the surface of the water.
The slightest vibrations and dragging on the surface are unacceptable: the paint may be transferred with a loss of texture or transferred with blurred areas.
The notches made on the film will gradually begin to curl up. If bubbles have formed under the surface of the film, carefully blow them out. After 2 minutes, after turning all the sections, apply the activator using a spray gun in S-shaped movements (horizontally and vertically). After 5-10 seconds, the film dissolves, leaving a jelly-like mass with a pattern on the surface.
Next, immerse the prepared part in the bath at an angle of 45 degrees (starting from the sharp corners of the part). We perform all movements carefully, smoothly, evenly, without sudden movements. After the part is completely immersed, we immediately take it out. We inspect the part - the paint should lie smoothly, without distortion of the design.
Washing and drying
The finished part must be thoroughly rinsed in the same water to remove any remaining sticky layer.
Next, the part must be dried evenly. Hard-to-reach areas of the forms can be exposed to a weak air flow at room temperature (after the paint has completely dried). Large elements are placed on racks, and small ones can be hung on hooks.
Applying varnish
The application of varnish is carried out after all surfaces of the element have completely dried. The coating is done in several layers, after which the part can be polished.
Difficulties
Aquaprinting at home is a simple technology. But it has features that you need to know in order to avoid mistakes:
- If the water in which the film is placed is cold, then folds will form on the product. The best temperature is 30-35 degrees.
- It is important to choose the right amount of activator. If there is not enough of it, the coating will peel off, and if there is too much, it will smear. There should be enough developing component so that the film stretches without wrinkles.
- Washing must be done with clean water, otherwise the image will be damaged and the varnish will be applied unevenly.
- Preparing the product for applying the image must be done carefully. If there are traces of rust and dirt, the image will not transfer smoothly.
Aquaprint as a business
Before opening a business providing these services, you need to familiarize yourself with the pros and cons of the activity. The advantages include:
- high demand;
- low competition;
- good profit;
- lack of large investments.
Due to the high demand, hydrographic printing is highly profitable. People's desire for unique things makes such a business in demand. After all, many motorists want to have a car with an unusual exterior. Waterprinting is also done on mobile phones, laptops and other things.
Today, this business is not very widespread, so it will become a source of stable and high income. As practice shows, this area is profitable due to its low cost. If a person has printing skills, then he can achieve success without large investments.
One of the shortcomings of the business is the lack of experienced specialists who can do the work themselves. If a novice businessman has the skills of this technology, then he can teach those who want to become familiar with the principles of aquaprinting.
Options for creating a waterprint business
The organization of such activities can be carried out in two ways. In the first case, the entrepreneur must have all the skills to perform hydrographic printing and a suitable room for this, which is a garage. If the project becomes successful, it will be possible to expand over time. To do this, you will need to rent a room, purchase equipment and hire several specialists who are well versed in immersion printing technology. With mass production, this type of income will be quite profitable.
In the second case, the business can be based on mediation between clients and craftsmen who make water prints with their own hands. This option requires practically no initial investment, but it will not be too profitable. Opening your own business without start-up capital is quite suitable for beginners.