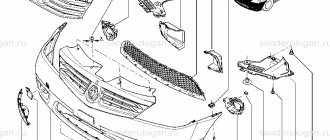
Is it possible to do without painting the bumper?
The function of the bumper, both front and rear, is to protect the vehicle from damage in minor collisions.
In modern cars, the front bumper also reduces pedestrian injuries in the event of a collision. Therefore, most of these parts are made of plastic. Very often, as a result of damage, the plastic bursts, and sometimes even shatters into many pieces. In this case, it makes sense to purchase a new bumper, which will only need to be painted. Currently, many car shops sell already painted bumpers (new) in a large assortment. Having entered such a store, all that remains is to choose the color to match your car. And most importantly, the price of a painted new bumper will be 20-25% less than the cost of repairing the old one.
However, in auto stores such parts can not be found for all cars, but only for the most popular ones, for example, Daewoo Lanos. In the case of rare cars, the bumper will have to be repaired. Typically, bumpers are soldered after first being removed from the car.
Basic level: learning how to properly putty machine elements using a video of the process
Self-painting of the car interior
At this stage of body restoration, as in many others, a preparatory stage can be distinguished. It consists of creating a package of working equipment:
- several types of spatulas;
- putty;
- several types of sandpaper;
- solvent (usually white spirit).
Anyone interested in how to properly putty a car in the video can learn more about the details and sequence of the procedure:
- clean the damaged surface to a matte state using coarse sandpaper and water;
- degrease the treated area;
- apply a layer of putty as quickly as possible;
- Level the surface using fine-grained paper for subsequent priming and painting.
This technique is purely for informational purposes, as it does not involve a large number of nuances. Poor informational soil is the most immediate reason why a beginner is able to make a large number of mistakes.
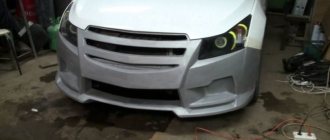
Painting a new bumper
A new bumper also needs to be prepared for painting, especially since new products are coated with various protective oils that need to be removed. They may also be partially damaged during delivery of the goods.
- Step #1. We take sandpaper number P800 and start sanding. New products have burrs that need to be cleaned out.
- Step #2. We degrease the new polished bumper from the factory shipping oil.
- Step #3. We begin priming with a 2-component acrylic primer. After applying the first layer, wait until it dries. We begin applying the second layer after the first layer becomes matte. Beginners are advised to purchase ready-made diluted soil, since dilution requires strict proportions.
- Step #4. We take sandpaper (sandpaper) from P500 to P800 and rub the primed layer. Thanks to this grouting, the primer is permanently glued to the plastic.
- Step #5. Blow off crumbs with a compressor.
- Step #6. Degrease with solvent.
- Step #7. Apply buza and apply paint in layers. Wait 15 minutes between coats.
- Step #8. Glossy coating.
Work algorithm
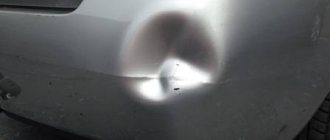
How to fix a small dent on the edge of a car bumper
Repair involves several stages:
- washing and degreasing;
- stripping;
- soldering (if necessary);
- surface grinding;
- applying putty;
- padding;
- painting.
Once the bumper is sparkling clean, you can begin cleaning it, which should be done with a grinder or grinder. It is assumed that the old paint and primer will be removed to bare metal. This and other stages of repair must be carried out wearing safety glasses and a respirator to avoid small paint particles getting into the eyes and respiratory tract.
Removing paintwork using a sander
After sanding the coating, if there are gaps in the plastic, they must be eliminated. To do this work yourself, you will need a soldering iron. The part must be soldered from the inside so that the seams are not visible. Soldering is carried out in 2 stages:
- grabbing the edges of a damaged part to fix their location. For convenience, you can use a clamp;
- soldering of parts. Before doing this, perform reinforcement (you can use staples from a stapler).
The next stage of DIY repair is puttying. It is necessary to smooth out imperfections on plastic. For work, take a two-component composition, mix it according to the instructions, and then apply to the surface. Please note that the composition hardens quickly even when spread in a thick layer. After the mixture has dried, which will happen in less than an hour, walk over the surface with coarse sandpaper (P120). After this, apply the finishing mixture, which, after drying, can be sanded with fine-grain sandpaper P220.
DIY car bumper putty
The next stage of DIY repair involves applying a primer. It prevents the plastic bumper from being exposed to chemicals and mechanical shocks. Apply the product in a thin layer. It is convenient to spray it with a spray gun, which must be thoroughly rinsed before applying the paint.
The last stage of DIY repairs is painting. It is made with paint, the shade of which is pre-selected to match the color of the entire car. Before painting, you need to dry the car by blowing it with warm air or letting it sit in the garage for several hours. Painting is done with a spray gun in 2-3 layers. After applying each of them, you need to let the surface dry for several hours.
Tools and materials
To repair a damaged car with your own hands you will need:
- grinding apparatus;
- soldering iron with a power of about 300 W and a wide flattened tip;
- sandpaper with a grit from P80 to P1200 (coarse for initial processing, fine for finishing);
- a small block of wood on which the sandpaper will be attached;
- solvent;
- polishing paste;
- putty;
- a primer with a composition suitable for use on plastic after puttying with a special compound;
- dye;
- brush or spray gun.
Preparing the putty consistency
Diagnostics of a diesel car engine: subtleties and nuances
Before mixing putty, you need to carefully read the instructions for this type, since if you prepare the solution in violation of the technology, the whole thing will go down the drain. If it is a putty with fiberglass, then mixing it is a little easier; you don’t have to worry about overpressing the hardener or mixing it incorrectly by letting air in, since air does not enter it. But if you are dealing with mixing polyester putty, then you need to strictly follow the instructions. Firstly, add 1.5-2% of the hardener mass, and secondly, spread it with certain movements (in the video the master shows how to properly mix the putty). It is done as if smearing it into a spatula, this is done so that air does not get into the putty and it does not become porous.
There are 7 important points to note:
1. The grinding area must be larger than the area being repaired.
2. Apply putty only to a clean and grease-free surface.
3. Use only a clean spatula.
4. Stir the putty thoroughly and correctly and prevent the entry of air bubbles.
5. Add the required amount of hardener strictly according to the instructions.
6. After activating the putty, its lifetime is limited, so you need to apply it in just 6-10 minutes at a temperature of 20 °C.
7. Putty is applied to the car in two steps with an interval of 20-30 minutes.
Putty quality
The quality of the putty is influenced by the quality of its components. Putties from different manufacturers may use different quality binder polymers, different sizes of talc particles and quartz microspheres, and may also contain various chemical additives. The quality of the putty can determine the ease of its application, sanding, whether the sanding paper will clog, the presence of pores after hardening, as well as the degree of shrinkage. A good putty should have excellent adhesion to the surface and minimal shrinkage after complete hardening.
How to repair and paint a plastic bumper
In everyday life as a practicing painter, the most common thing is repairing and painting bumpers. We will consider repairing the most common defects. For example, let's take a chipped and cracked bumper.
To begin with, let's fix the cracks by drilling through the places where they end (3-5 mm in diameter). This way we will stop their further spread. The next step is to cover the outside of the defect or crack with self-adhesive aluminum tape, which will act as formwork and tire at the same time. Options with other fasteners are also possible. If your bumper is filled with foam from the inside, it will have to be removed at the repair site.
To bring the fault into a static position so that it does not float, you need to use a powerful soldering iron. We melt the edges from the inside of the part, along the broken plastic, thereby fastening the edges of the crack together. If there are broken pieces, then grab them around the perimeter too, melting them with a solid seam.
Next, sand the area to be repaired (from the inside) with a coarse abrasive (80-120 grit sandpaper). Degrease it. We apply a layer of putty containing glass fiber; it would be useful to put a piece of fiberglass (fiberglass) for better reinforcement. For very serious fastening in places of fracture, you need to make “U”-shaped brackets from steel wire. Drill the bumper and apply seams using steel staples.
Be sure to countersink the holes, and also sharpen the profiles for the brackets with a needle file. This is necessary so that the brackets sink into the surface of the bumper. Now that the fiberglass putty has set, you can remove the aluminum tape. And then we proceed to repair the front part of the bumper.
In practice, the work on preparing plastic for painting is almost no different from work on the body. If the bumper is painted and there are no visible places of clean plastic, then everything is according to plan. Degrease, putty until smooth, then sand. For high-quality repairs, you can use a special putty for plastic. But its price is high, so they often use conventional two-component polyester putty.
We prime it with a two-component acrylic primer and sand it with a fine abrasive (400-500) for painting. We degrease and paint again. If the task is to do a high-quality painting, then it is necessary to add plasticizer (another name for “Elasticator”) to the primer and paint. This is a liquid in a bottle that gives your coating some plasticity. As a result, during further use, even with small shocks, the paint will remain in place and will not become covered with a network of chips and will not fly off like fallen leaves. Plasticizer is sold in the same stores where car paints are sold.
I recommend reading - new materials and technologies for repairing car bumpers.
Kinds
All automotive putty offered on the market is divided into:
- fiberglass;
- rough;
- finishing;
- liquid;
- universal.
The putty is selected based on the planned work and the nature of the damage to the car body. Only with the help of a good and correctly selected mixture can you achieve the desired result.
Auto putty is a finishing material presented in the form of powder or finished paste. The powder is diluted in the required proportions, while the paste is completely ready for use. The putty mixture is required for finishing the damaged surface of the car followed by applying a paint layer.
To put it simply, you need to putty your car in case of damage, chips and scratches that disrupt the attractive appearance of the car and potentially threaten the gradual spread of corrosion.
Putty is used to repair both metal and plastic parts. But not every putty is suitable for certain tasks. It is important to understand which mixture to choose, what its features and advantages over competitors are.
We choose wisely, taking into account key factors and with an emphasis on achieving optimal quality of body repair. To choose the composition, you need to study each type of putty.
Fiberglass
Fiberglass putties are widely used in body repairs.
The key advantages of fiberglass car putty are high strength and long service life. The main role in this is played by the fiberglass itself, which is part of the composition.
After processing the body, the mixture acquires solid-fraction properties. Essentially, when applied and dried, you get a layer of fiberglass.
An important aspect in favor of fiberglass is the ease of processing and sanding. You will be able to give the surface the desired shape and a high degree of smoothness.
Fiberglass has become widespread in body repair, where it is necessary to seal through holes, holes and other similar consequences from corrosion.
After drying, the composition crystallizes, which makes the processing process somewhat more complicated. The work will take a lot of time, but the result will be completely worth it.
Among the leaders in the production of fiberglass car putties, it is worth highlighting the companies Fiber and Novol.
They have several features in terms of application:
- Fiberglass compounds can be applied without problems to treated, clean metal and even to an old paint layer.
- The main condition for obtaining a high-quality processing result is preliminary degreasing of the surface. Just not with gasoline, but with a good special solvent.
- Fiberglass putties consist of a main component and a hardener. Before use, the main part is thoroughly mixed, since sediment from solid fractions may appear during storage. Light fractions rise upward.
- Make sure the mixture is uniform in color and consistency before use. You can store it outdoors for no more than 10 minutes. Therefore, try to keep it with the lid closed. Otherwise, the mixture will harden and will be unsuitable for further body repairs.
- The most important thing in the correct preparation of fiberglass putty is maintaining the proportions. The main mass accounts for 3% of the hardener. That is, 1 kg of base requires 30 g of hardener.
- When the proportions are selected, the components must be thoroughly mixed until smooth and applied to the prepared surface. The drying speed is affected by the characteristics of the mixture itself, as well as the air temperature.
Finishing
Finishing putties are used for minor damage
This putty is used mainly in cases where minor damage and unevenness need to be corrected. It often works together with a coarse mixture and is used after rough repairs.
Finishing compositions are based on fine-grained components. They can be used independently when it is necessary to treat scratches or chips that have occurred on the metal surfaces of the car.
Most often, finishing compositions are relevant for final processing. Mixtures are divided into two categories:
- Fine;
- Nitro.
They are equally effective at repairing small damage. They are easy to process and sand. The main task of finishing putty is to prepare the repaired surface for painting.
Advantages include excellent adhesion, filling capacity, elasticity and resistance to temperature changes.
It is important to mix this putty correctly in order to reveal the full positive qualities of the composition. The mixture is applied in a layer of up to 3 millimeters to a pre-treated and prepared surface.
For 100 parts of base there are 2 - 3 parts of hardener. That is, here we are talking about 3%! of the total mass. Calculations are easy to make when choosing proportions.
It is important to quickly and thoroughly mix the ingredients until a homogeneous mass is obtained. Finishing putties harden quickly, so you should not prepare large portions at once.
The drying speed depends on the characteristics of the mixture and environmental conditions, but usually takes no more than 30 minutes. After drying, it is treated with fine-grained sandpaper, which allows you to fully prepare the body for painting.
Universal
Universal putty is used for quick body repairs
As the name suggests, the key benefit is versatility. Such mixtures combine the properties and advantages of fine-grained and coarse-grained compositions.
They are mainly used for quick body repairs when the car owner does not have time for thorough processing. The compositions are strong, quite elastic and provide a smooth treated surface.
Putty is used by analogy with other types of compositions for body repair. Proportions are observed according to the manufacturer's instructions.
Liquid
Liquid putties are distinguished by high processing speed
This is a new name in the world of automotive putties. They are distinguished by a light fraction and are applied using a special gun.
The features of the composition make it possible to treat not only minor damage, but also large areas of the car body. The advantages include high processing speed. But their hardening speed is lower when compared with similar compositions. It takes 2 hours or more to dry.
If you decide to choose a liquid type of putty mixture for your car, do not forget about the need to purchase a special tool. No special skills are required to process the body. The mixture is filled into the container of the gun and applied to the surface by spraying.
When the putty has hardened, it needs to be sanded and further paint and varnish activities can begin.
Bumper sanding
Sanding is a mandatory stage of work when repairing a plastic bumper. It is best to sand the finished putty layer using a grinder with a No. 240 wheel. The device quickly and efficiently processes chips and irregularities. Usually the machine does not work well in hard-to-reach places, so you have to use fine sandpaper there.
Be especially careful when sanding seams, as they can be easily damaged. After finishing sanding, carefully blow off the dust, since small cracks may be hidden under it and will remain unsealed.
In this case, the work of soldering and puttying will have to be repeated. By choosing the right putty and using it correctly, you can repair the bumper yourself, creating a high-quality and beautiful coating that will serve faithfully for many years.
Fiberglass putty
It is advisable to use putty with fiberglass:
- with significant flaws;
- presence of large cracks;
- with large depressions and through holes of different sizes.
Fiberglass putty
The material has high elasticity and sufficient strength, which is necessary to create an ideal reinforced coating.
The advantage of this putty is its ease of application. It is ideal for body repairs of any complexity. It can be used on steel, wood, polyester and laminated surfaces, but cannot be applied to nitrocellulose and other reactive primers.
The basis of fiberglass putty is the resin involved in the polymerization process. Glass cloth or fiberglass is used as a filler for the mixture. It is thanks to these components that shrinkage is minimized after the material hardens. The resulting layer is practically not subject to cracking and destruction. Small particles of fiberglass perform a reinforcing function, and the resin gives the material plasticity.
An important component of the putty is the solvent, thanks to which the finished composition reaches the required consistency. After it evaporates, the mixture thickens and hardens.
Along with numerous advantages, putty with fiberglass has a drawback: it is difficult to give it the desired shape, since the material has low plastic properties. Therefore, it is better not to use the composition for curved structures and parts subject to vibration.
An additional element to a fiberglass product is a hardener. It is attached to the main material and is sold in tubes. Designed to be added to a mixture to cause a reaction to crystallize the composition.
The material has elasticity and sufficient strength
General information about the material
Fiberglass putty is a composition based on an unsaturated modified polyester resin, reinforced with special fibers and is a two-component product. In its original form, any polyester resin is quite hard, so various targeted additives are added to it to enhance ductility and elasticity. The fiberglass in the putty is intended to further enhance the strength of the material after drying.
Rough
Coarse putty is used for large damage to the body.
Coarse putty is used for major damage to the body. It's coarse-grained. Suitable for complex work when it comes to serious body damage and defects:
- dents;
- holes;
- deformations, etc.
It is distinguished by the inclusion of a special filler made of metal shavings. This guarantees a better connection and increased strength of the treated area.
The most popular coarse putties are mixtures based on aluminum filler. They are heat-resistant, ductile, elastic and easy to sand after drying.
Due to its characteristics, rough automotive putty guarantees the smoothing of even large damage. If we talk about manufacturers, the leaders include Solid and Mixon.
Never make too large batches of coarse putty as it hardens quickly. Approximately 4 - 7 minutes after mixing the components, the composition will no longer be applied to the body. Therefore, prepare the mixture based on how much putty you actually have time to use.
The rough type of composition interacts with almost all other types of auto putties. The coarse-grained type is used for rough work, and then thinner putty mixtures are applied.
Putty and painting. Do-it-yourself bumper repair: putty and painting video
Puttying a plastic bumper before painting.
Well, instructions on how to dilute putty for plastic.
DIY bumper repair: putty and painting video
Do-it-yourself bumper repair: putty and painting video
Fill the resulting seams on the surface of the bumper with glass fiber putty. Despite the fact that the cost of most putty mixtures does not exceed 500 rubles, many car enthusiasts are interested in how to make putty for a bumper
with your own hands.
DIY textured putty
The car bumper is perhaps the part that suffers most often as a result of an accident, and not only that. Puttying and sanding the bumper.
| Bodywork information | 1152 |
| Let's consider the technology of correct | 7844 |
| And, of course | 2700 |
| Make sure you have availability | 880 |
| Home Repair by yourself | 8165 |
| Well, let's | 5490 |
| Although you can get by | 5586 |
Puttying and painting are inevitable processes.
Do-it-yourself bumper repair: putty and painting video
Emery wheels, solvent, putty, primer, paint and varnish; Technical devices to ensure respiratory safety. Do-it-yourself bumper repair and painting.
Puttying and painting of a car bumper, necessary materials and putty for this; a primer with a composition suitable for use on plastic after puttying with a special compound.
DIY bumper repair: soldering, putty and painting.
So, let's assume that you have figured out the putty; upon completion, you need to wait some time for the putty to harden.
How to properly repair a bumper yourself?
Assembling the electrical panel with your own hands
A grinder (its presence is very desirable, but if the crack is large, then it is simply absolutely necessary).
- DIY oscilloscope on a microcontroller
- DIY magazine beads
DIY frame buildings
A plastic bumper has an attractive appearance, its production is much cheaper, it weighs less than its metal counterparts and, as practice shows, repairing a plastic bumper is much easier to carry out. . To prove the latter, I bring to your attention a detailed photo report on repairing a plastic bumper, VAZ 2114, with your own hands, that is, at home.
DIY gear reducer
Putty, primer, paint and varnish.
The first step is to remove the damaged plastic bumper.
- DIY Caesar dressing
- DIY pots for aquarium plants
DIY graphic equalizer
It is quite difficult to clean everything manually, and it will take a lot of time. Alternatively, you can use an electric drill with attachments.
Polishing - perfect shine
Polishing is an optional step, but it can be used to remove shagreen, if the varnish does not spread well, and dust. Dust during painting can occur in varying amounts. are 10 specks of dust on the bumper , then there is not much point in polishing. But if there are 100 specks of dust on the part, and even a few mosquitoes are stuck, then it is better to polish the bumper yourself.
For polishing you will need the following materials:
- emery R-1500 and R-2500 ;
- a bucket of clean water with a car sponge and a rag;
- automobile scraper for washing glass;
- polishing machine with white and gray circles;
- farekla polish G3 or better ;
- farekla polish G10 or better ;
- preservative (wax) polish and microfiber.
To completely remove dust, you can wipe down the entire bumper or only the most visible parts. The dust is rubbed off with R-1500 sandpaper and water, and finally with R-2500 sandpaper . You need to simultaneously pour water with a sponge and vigorously rub with sandpaper, checking periodically with a scraper. Dust is clearly visible in fluorescent lamps, so the lighting must be good. It is strictly forbidden to polish your car outside, as the wind carries strong dust, which leaves deep scratches on the paint.
After grouting the dust, the bumper is polished with coarse G 3 on a white wheel . The part is washed well with water. The part is then polished G paste on a gray wheel . This circle removes streaks and enhances shine. The best shine is obtained after rubbing the part with a preservative polish using microfiber.
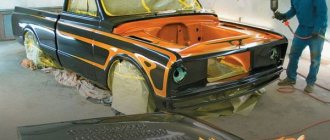
In any garage you can paint the bumper yourself. To do this, you only need the simplest car painting equipment.
Repairing the bumper yourself allows you to save more than twice when compared with prices at specialized service stations. And if you take into account the fact that bumpers are the most breakable parts, then servicing your car yourself will save money in your pocket, and the process itself will bring a lot of pleasure.
Putty for repairing plastic bumper Novol
The manufacturer of the Novol brand has been on the market for about 30 years; over these years, a lot of paint and varnish work has already been done in Europe, Asia, and Africa. The Polish company producing paint, primer, putties for cars, and, of course, varnishes, has gained authority in the market for these products due to its high quality.
If we go directly to the description of the putty for repairing the Novol plastic bumper, we can note the widest range in terms of price-quality ratio; you can choose putty for products made from the following materials:
- metal;
- wood materials;
- glass;
- and, of course, plastic car products.
Putty for plastic bumpers from this manufacturer is distinguished by its elasticity, that is, resistance to vibration during vehicle operation.
I would like to note a few tools and some equipment that are necessary to prepare the bumper for putty, but only with its previous repair, after severe defects:
- Grinding machine. Perhaps one of the main tools needed during puttying work;
- A small amount of sandpaper of different types;
- Soldering iron. It is desirable to have a more powerful one in order to seal cracks before directly applying putty for plastic bumpers;
- Good solvent. For degreasing the surface;
- And finally, primer, putty, varnish, and paint.
Putty for fiberglass
Repairing the surface of a car, boat, or boat always begins with puttying. Using putty, all strong and subtle flaws and dents are removed. Each surface requires its own type of putty. Putty for...
Plastic putty technology
Putty on plastic is a rather labor-intensive operation that requires skills and abilities. There is one feature: when working with plastic, only flexible putty is used, since vibration during the process is taken into account.
Ready-made polymer putty
To obtain a high-quality, smooth surface when filling, ready-made polymer putty is best suited. This putty is sold in buckets and is ready for use, which saves time on mixing.
Polyester putty for plastic
Putty for plastic is a product consisting of a mixture of various fillers and a hardener, applied with a spatula. It is used to smooth out scratches on the surface before painting, and due to its elastic and adhesive structure.
Finishing material
Requirements for putty
When deciding which putty to choose for the bathroom, you need to take care of meeting the basic requirements:
Firstly , the material must be moisture resistant. This means that both during the polymerization process and during further operation, the mechanical characteristics of the composition used should not decrease under the influence of moisture.
- Secondly
, after polymerization, the putty layer should not be subjected to intense thermal deformation. This is due to the fact that tiles are often used as finishing, and if the base is too “movable,” then sooner or later the cladding will begin to fall off. - Thirdly
, the material must be as durable as possible. The optimal service life of a leveled wall starts at 20 years, and it is this figure that you should focus on when choosing a mixture for work.
All these parameters must be taken into account, because high-quality moisture-resistant putty for the bathroom is the basis for all finishing.
Features of the most popular products
If we talk about the compositions used for this purpose, the characteristics of most of them are quite similar:
High-quality Portland cement is used as a binder. The use of this material is completely justified: with regular moistening, especially in the first months after application, the composition gains significantly greater strength than when drying at normal or low humidity.
- Clinker chips, sifted sand, ground marble, gypsum, etc. are used as filler. To facilitate application and extend service life, hardeners, plasticizers, and sometimes pigments are also added to the composition. Painted putties can be used for self-finishing, i.e. without the use of finishing materials.
- An alternative to cement compositions are putties with a polymer binder. The most popular today are water-dispersed compositions based on liquid acrylic or latex with the addition of marble grain.
- Like cement ones, these compositions are absolutely not afraid of moisture either during application or during further operation. However, the high price and relatively small (albeit expanding) range are still reducing the popularity of polymer materials.
- Another trick when leveling bathroom walls under tiles is the use of facade mixtures. According to their characteristics, they are almost ideal for use in conditions of high humidity. Well, we can easily disguise the coarse-grained texture with tiled cladding!
As for gypsum leveling mixtures, the name of which contains a mention of moisture resistance, you should not use them in the bathroom. They, of course, resist moisture much better than traditional gypsum putty, but in the bathroom they will lose to both cement and polymer compositions.
Offers from manufacturers
You may find the following waterproof putties in hardware stores:
"Weber Vetonit
"Shitrock
"GLIMS Styro Prime":
"GLIMS Finish-R":
| Parameter | Description |
| Country of manufacture | Russia |
| Suitable materials for processing |
|
| Color | White |
| Weight | 5 kg |
| Approximate consumption with a millimeter layer of application | 1200 g per square meter |
| Possible layer thickness | 0.1-10 mm |
| Application method | Manual |
| Curing period | Day |
| Base type | Cement |
| Price | 225 rubles |
"Prospectors Basic Gray":
Soldering the bumper and preparing for painting
A cracked or broken bumper can be soldered, but only if it is not crushed and all elements are available. True, there are craftsmen who undertake to make patches themselves. However, the result of such work is not always flawless.
You can sew a crack in a plastic bumper in at least three ways:
- reinforcement with staples;
- reinforcement with metal mesh;
- soldering with plastic.
The first method - soldering with reinforcement with staples - requires a minimum of tools and materials. Everything you need for this can probably be found in your home workshop. We are talking about staplers from a stapler and a regular soldering iron.
The staples are fused into the plastic and heated with a soldering iron. The legs of the brackets are installed so that the crack runs between them. Their crossbar needs to be recessed a little deeper than the surface, but no more than 1/3 of the thickness of the plastic. The step between brackets is 1-5 mm. To make the work go faster, the soldering iron tip (if it is too thin) should be riveted so that it looks like a screwdriver.
Another method of soldering a bumper involves reinforcement with a metal mesh. It is fused from the inside, pressing with a special roller. Soldering with mesh is faster, but the result is no better than in the case of brackets. In general, the technology is similar, the only difference is the type of reinforcement.
But the most modern and technologically advanced way to repair a plastic bumper is soldering with plastic solder. The seam is so strong that the bumper is unlikely to break in the same place even with a strong impact - rather, it will burst somewhere nearby. In fact, after soldering with plastic, the structural strength of the part is completely restored.
To solder, you must first determine the type of plastic, for which you should pay attention to the special markings on the back side. There should be letters like ABS, PP, PVC or others
These abbreviations indicate the type of plastic according to which you need to buy profiled plastic solder.
In addition to the solder itself, you need a technical hair dryer with a special nozzle, as well as a drill or at least an electric drill with a set of abrasive heads. First you need to connect the crack and secure it with strips of plastic on one side. Next, using a drill with a conical attachment, a seam is formed for triangular solder. Using a hair dryer, the solder is fused into the seam.
Soldering must be done on both sides. When the plastic has completely cooled, the excess is removed by sanding. At the same time, the seam remains strong because the solder connects it at the molecular level.
After high-quality soldering, you can begin to putty the plastic. For these purposes, you will need a special putty for plastic, putty with fiberglass (preferably), sandpaper (R-100, R-150, R-240, R-360), anti-silicone, solvent 646 and a napkin. Next you need to do the following:
- Remove dirt stains and resins using anti-silicone;
- Use R-360 sandpaper to remove the gloss from the surface of the part so that the materials adhere well;
- Fill deep uneven areas with fiber putty (preferably) or regular plastic putty (the final choice should be plastic putty).
You need to clean the dried putty with coarser sandpaper (R-100) and gradually work up to fine sandpaper (R-220). This can be done either using a pneumatic machine or manually, using special bars (irons). When the part is smooth, it needs to be smoothed with R-360 sandpaper so that later there is no shrinkage of the materials.
Then you need to wash the part, blow it off, degrease, wipe with a napkin and prime (the first 1-2 layers of primer are placed on the putty areas, and then, if necessary, the rest of the part). For ease of processing the primer, immediately after the last layer, you can spray the developing layer with metallic paint of a contrasting color.
To process the soil you will need sandpaper R-500 or R-600. In order not to rub the edges and ends of the part down to putty and plastic, it is better to rub the primer by hand. In addition, this will better erase any remaining defects in the putty. After grouting there should be no pores or scratches left.
At the end, you need to blow off the part, degrease it and wipe it with an antistatic cloth. After this you can paint it.
Plastic repair technologies
There are two ways to accurately select the appropriate plastic repair technology:
1. Incineration:
Break off a small piece of plastic from the part being repaired. Make sure there is no paint, release agent or other contaminants on the broken piece. Set it on fire. If the plastic burns, emitting heavy black smoke and soot, this indicates that there is no need for preliminary priming. If the plastic burns with a clean flame (like a candle), then before the main priming it is necessary to apply primer for plastic.
2. Buoyancy check:
Place the plastic in water. If it drowns or is completely submerged in water, this indicates that the part does not need preliminary priming. If it floats on the surface of the water, then before applying acrylic primer it is necessary to apply primer for plastic.
Due to the fact that during the manufacture of plastic body parts, various special mold lubricants are introduced into them, before starting repairs, the remnants of these lubricants must be removed as follows:
Degrease using White Spirit and clean with anti-silicone compound.
General provisions
What properties does waterproof putty for wet rooms have? Why is it worth using it when carrying out finishing work in a bathroom or swimming pool?
Basic qualities
- High moisture resistance
. If we are talking about rooms with high humidity, it means that all finishing materials used in them must, first of all, easily tolerate dampness and direct contact with drops of water;
- Resistant to temperature changes
. An unused bathroom is cold, but after you fill the tub with hot water, it immediately becomes hot. In such cases, ordinary putty begins to change its volume, as a result of which the lining falls off;
- Durability
. On average, you can count on 20 years of service, so you don’t have to worry about the immediate need for repeated repairs.
Varieties
The following types of putties have the qualities described above:
- Cement
. The main component of such mixtures is high-quality Portland cement. When exposed to moisture, this building material only gains strength and does not lose it. Also a plus is the fairly low cost of the product. And if you also choose putty with the addition of, for example, marble chips or colored pigments, then you can do without further decoration at all, which will lead to even greater savings;
- Polymer
. These are water-dispersed compositions based on acrylic or latex. In addition to high moisture resistance, they are also distinguished by simple operating instructions. The only negative is the relatively high cost.
Methods for repairing damage
Small scratches on unpainted plastic just need to be sanded out. This is done even with the paintwork of the body, but its thickness is disproportionately less.
Large scratches on the bumper are puttied. And here ordinary automotive metal putty is not suitable. For these purposes, two-component compositions based on polyester resins are needed.
Attention! When choosing a repair composition, you should pay attention to its grain size. There are leveling mixtures with coarse filler grains - they are difficult to grind. There are finishing compounds with the finest grains - they are used to seal small scratches and to apply a finishing layer over the leveling layer. And the most popular for do-it-yourself repairs are universal types of medium-grain putty.
The putty usually contains pigments to match the bumper.
But it’s unlikely that you’ll be able to get the color completely right. Therefore, when the scratch is large, it is better to paint the part after puttying, even if it was not painted. This stage follows standard technology: sanding, priming, applying two or three layers of paint. Repairing cracks in bumpers made from different materials is carried out in different ways: soldered or glued. Through breaks are also removed either by soldering patches or by gluing in a fiberglass bandage. And in order to properly repair a crack or break, you must first determine what material the bumper is made of.
Useful tips
As you can see, when choosing auto putty, it is better to focus on the nature of the damage. This will allow you to decide which mixture is optimal in a given situation.
At the same time, there are general rules that must be followed when carrying out body work and using automotive putty compounds.
- Degreasing. This is one of the key rules, ignoring which usually leads to poor quality of the work done. For degreasing, some use regular gasoline. But this is not an optimal solution and is not suitable for some types of putty. Therefore, it is better to use special solvents. When repairing a car bumper, make sure that the solvent applied will not damage the paint layer. It is better to cover entire areas with tape.
- Required types of putty. Depending on the nature and complexity of the damage, you may need one or more types of mixture. Decide on this in advance so that you don’t have to interrupt your work and run for new putty.
- Cleaning up. Any surface to be treated is pre-cleaned. The most relevant tool for this work is sandpaper with a grit of P60 to P180. Only a cleaned, degreased and dried surface will interact optimally with car putty.
- Speed of work. Auto putties do not tolerate delays. The peculiarity of their properties is that they quickly harden and become unsuitable for work. Strictly follow the manufacturer's instructions for storage methods, and prepare dry mixtures in small portions so that you have time to produce a paste.
- All proportions are selected strictly in accordance with the manufacturer’s recommendations. Therefore, read the instructions before starting work.
- Spatulas. Since the mixture is applied with a spatula, one universal tool will not help to thoroughly treat the surface. Prepare several types of spatulas in advance.
Based on these rules and instructions from car putty manufacturers, you can carry out all the necessary repair work yourself without any problems.
It is impossible to say unequivocally which of the presented mixtures is better or worse. It all depends on the nature of the damage. The manufacturer plays an important role. Choose putties from leading brands, the quality and characteristics of which you will be confident in.
Subscribe, leave comments and ask questions that interest you! We will try to answer them! Tell your friends about us and wait for new interesting materials!
Features of putty consumption
To determine how much material you will need, you need to carefully examine the packaging with the mixture. As a rule, it indicates the approximate consumption per 1 m2, provided that the putty is applied in a layer of 1 mm. This parameter may differ not only depending on the type of material (polymer, cement or gypsum).
For example, Weber Vetonit LR+ (dry solution) indicates that the composition consumption is approximately 1.2 kg per “square” when applied in the thinnest layer. But the polymer composition from the same manufacturer, but only in ready-made liquid form, will be consumed faster. It will take 1.7 kg per 1 m2. Indicators depend on the company and additional parameters.
As a rule, putty is purchased with a reserve, since some nuances may arise during the work process. For example,:
- There are many depressions, shells, and various envelopes on the surface. Of course, in this case the consumption of the mixture will also increase. This happens especially often when processing concrete surfaces.
- In any case, part of the composition will remain on the tools and mixing container. When treating the ceiling, large drops of putty end up on the floor. Nobody wants to pick them up and reuse them, and this is not recommended. Also, a lot depends on the experience of finishing work. At first it is more difficult to control the material.
We count the consumption
Rigorous calculations in this case are difficult to make. But to have at least a superficial idea, let's look at an example.
Let's say we use the Weber Vetonit LR+ composition. We will be finishing a room with an area of 18.5 m2, provided that the concrete walls are already covered with starting putty, that is, they are quite smooth. We have no experience in applying the material. In this case, we will need approximately 26.8 kg of dry mixture. But if we change the walls, and they become not even, but with a large number of holes and defects, then we will need to buy 28.6 kg of putty. If the work is carried out by a master, then, most likely, 25.5 kg will be enough for him.
Accordingly, the less work experience you have and the more defective the walls, the larger the reserve it is recommended to make.
When all the calculations have been made and the mixture has been purchased, you can begin work.
Technical characteristics and composition
Bumper putty differs from other types of mixtures in its properties. The technical characteristics are as follows:
- increased adhesion of material to plastic;
- resistance to mechanical damage;
- lightweight grinding;
- elasticity of the solution.
Manufacturers produce special formulations that consist of two components.
- Base - which contains polyester resins, dispersed fillers and pigments.
- Activator - promoting hardening of the solution.
The size of the base filler fraction determines the type of putty; the pigment allows you to bring the color of the mixture as close as possible to the material that is being processed.
Calculation of putty per 1 m2
The required amount of putty is determined by the amount of work required to eliminate defects. The average weight of the substance ranges from 200 to 1800 grams. Therefore, the manufacturer produces mixtures in such containers. The exact quantity is indicated on the packaging that accompanies the can of putty.