Replacing and adjusting the ignition module on a VAZ 2107
The VAZ 2107 ignition module (injector) is a unit whose malfunctions are quite difficult to diagnose.
Problems with the module's operation are noticed only after serious engine malfunctions occur. If the engine does not start, you should try adjusting the ignition. If the engine is running unevenly, a serious check of the functionality of the VAZ 2107 ignition module may be required. Ignition is an electronic system for converting the low voltage of the vehicle's on-board network into high voltage and supplying the latter to the electrodes of the spark plugs.
Ignition module
The ignition module is a device designed to convert DC voltage from the on-board network into electronic high-voltage pulses with their subsequent distribution among the cylinders in a certain order.
Design and operating principle
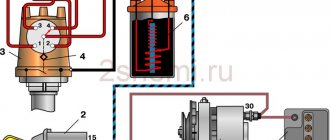
The design of the device includes two two-terminal ignition coils (transformers) and two high-voltage switches. The voltage supply to the primary windings of the transformer is controlled by the controller based on the information received from the sensors.
In the ignition system of an injection engine, voltage distribution is carried out according to the idle spark principle, which provides for the pairwise division of cylinders (1–4 and 2–3). A spark is formed simultaneously in two cylinders - in the cylinder in which the compression stroke is coming to an end (working spark), and in the cylinder where the exhaust stroke begins (idle spark). In the first cylinder, the fuel-air mixture ignites, but in the fourth, where the gases burn out, nothing happens. After turning the crankshaft half a turn (180 0), the second pair of cylinders enters the process. Since the controller receives information about the exact position of the crankshaft from a special sensor, problems with sparking and its order do not arise.
Location of the ignition module VAZ 2107
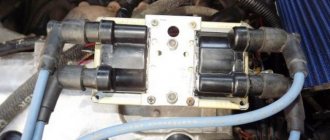
The ignition module is located on the front side of the cylinder block above the oil filter. It is secured to a specially designed metal bracket using four screws. It can be identified by the high-voltage wires coming out of the housing.
Factory designations and characteristics
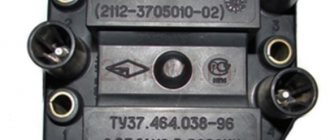
VAZ 2107 ignition modules have catalog number 2111–3705010. As an alternative, consider products numbered 2112–3705010, 55.3705, 042.3705, 46.01. 3705, 21.12370–5010. They all have approximately the same characteristics, but when purchasing a module you should pay attention to the engine size for which it is intended.
Table: technical characteristics of the ignition module 2111–3705010
| Name | Index |
| Length, mm | 110 |
| Width, mm | 117 |
| Height, mm | 70 |
| Weight, g | 1320 |
| Rated voltage, V | 12 |
| Primary winding current, A | 6,4 |
| Secondary winding voltage, V | 28000 |
| Duration of spark discharge, ms (not less) | 1,5 |
| Spark discharge energy, MJ (not less) | 50 |
| Operating temperature range, 0 C | from -40 to + 130 |
| Approximate price, rub. (depending on manufacturer) | 600–1000 |
Checking the ignition system elements
Misfires in engine operation, especially in wet weather, are a consequence of breakdown of the insulation of high-voltage wires. There should be no cracks or damage in the wire insulation. You can check the insulation for breakdown using a wire connected to ground. If you run it along the insulation while the engine is running, a spark will be observed in places with damaged insulation. Another clear sign of poor insulation is noticeable electric shocks when touching high-voltage wires while the motor is running.
A broken high-voltage wire can be easily determined with an ohmmeter. The resistance should be between 3-10 kOhm. The spread of indicators between the wires should be no more than 1-2 kOhm.
Signs of breakdown
When the ignition is turned on, the engine ECU malfunction indicator light comes on, and after the engine is started, it should go out. A burning warning light is the first sign of problems with the ignition system. Other prerequisites for diagnosing the ignition module are “floating” engine speed and problems with starting. The cause of such failures may be faulty high-voltage wires or spark plugs, so you need to make sure they are working before you start diagnosing the ignition of the VAZ 2107 (injector). Often, cylinder misfires occur due to compression problems or damage to the intake manifold gasket. This must be taken into account when searching for the causes of engine failure.
Purpose and principle of operation
Installation of ignition VAZ 2107 injector by marks
VAZ 2110 ignition module The ignition module of a modern car performs the function of generating high voltage to generate a spark on the spark plugs. It consists of two coils with a closed magnetic circuit and a two-channel switch. Sometimes the switch is made as a separate device, but in most cases it is combined with an electronic control unit for the engine. Externally, the modules differ in the number of wires in the connection connector: a module with a switch has 4 wires, and paired coils have 3.
The ignition module is controlled by the ECU, which supplies constant voltage in the form of low-voltage control signals to the windings of its coils at the right moment. The end of the signal is the beginning of the spark. Thanks to magnetic induction, at the moment of application, a high voltage is generated, creating a spark at the spark plug. The device is located in the engine compartment and can be easily identified by the high-voltage wires leading to the spark plugs.
Checking the ignition coil
The coil is checked based on two indicators: the presence of a short circuit and an open circuit. Before diagnostics, the ignition coil must be disconnected. After this, one probe of the device is connected to the central contact of the coil, the second to the body (ground). If the display shows resistance equal to infinity, there is no short circuit.
The primary winding of the coil for a break occurs differently. The probes of the device must be connected to the right and left contacts. The resistance between them should be within 3-3.5 Ohms.
If the resistance of the primary winding does not correspond to the norm or there is a short circuit in the coil to the housing, it must be replaced.
Methods for checking the ignition coil
The simplest method, which does not require special equipment, but is unsafe. Remove the central high-voltage wire and crank the engine by turning the ignition key. At the same time, we lean the removed wire against ground or the car body. If there is a spark, then the coil is ok. An assistant may be needed for this operation.
The second method, which is also more accurate, is to measure the resistance of the coil windings using a multimeter measuring device or “popularly” using a tester.
Measuring ignition coil resistance
We clean the coil contacts (studs on the body). The first check is the resistance of the primary winding. To do this, connect an ohmmeter to two studs and take measurements. Depending on the type of coil being tested, the resistance should be within the following limits: coil 2101-2107 B-117A = 3-3.5 Ohm; coil 2108-099 027.3705 = 0.45-0.5 Ohm.
Then we check the resistance in the secondary winding circuit. We connect one terminal of the tester to the central terminal of the high-voltage wire, and leave the second terminal of the probe at the terminal of the primary winding. In this case, the resistance of the working coil should be as follows: B-117A = 7.4-9.2 kOhm; 027.3705 = about 5 kOhm.
Ignition adjustment
The injection modification of the VAZ 2107 does not require adjustment of the ignition timing. The electronic control unit, using a sensor, determines the optimal ignition timing. The participation of the car owner in adjusting the operation is limited to setting the engine timing belt to the marks.
To check the performance of the ECU and the functionality of the sensors, it is necessary to connect a computer with specialized software. In this way, the cause of most electronic ignition system malfunctions can be determined.
It is also worth checking the operation of the throttle position sensor yourself. When the throttle is closed, the voltage on the sensor should be no higher than 0.55 volts, and when fully open - 4.5 volts. Measurements must be made with a voltmeter with the ignition on.
Ignition coil
Black short circuit for the "seven"
Any type of ignition, including dual-circuit ignition on a VAZ 2107, cannot work normally without a coil. The main task of this component is to convert low voltage to high voltage. It is the high voltage in the ignition system that will make it possible to break through the air gap between the spark plug and produce the spark necessary to ignite the combustible mixture in the cylinders. To ensure normal ignition performance of an injector equipped with nozzles or a carburetor, a B117A coil is used on the contact system.
As for the location, the VAZ ignition coil is located in the engine compartment on the left mudguard. It is fixed with two special pins. As for the device itself, it is a regular transformer with a magnetic core. This element consists of an external magnetic conductor, as well as a core, and is equipped with two windings.
The cylindrical body of the device itself is made of durable steel, which protects it from damage. The entire structure is closed from above using a sealed lid made of a special insulating material (the author of the video about the adjustment is the channel Behind the Steel Gates).
How to set the ignition on a VAZ 2107
The ignition module is a mechanism whose malfunctions are very difficult to identify. Usually, problems begin to be solved when it becomes obvious that something is wrong with the car. If your VAZ 2107 does not start the first time, you cannot set the ignition, and uneven engine operation begins to confuse you - it’s time to carry out a proper check. Let us recall that the engine ignition module of the “injector” type is the same system that, with the help of coils, supplies electrical energy in order to form a spark and start the car.
Ignition adjustment of VAZ-2107
Correct ignition adjustment is one of the most important procedures, which is mandatory for all cars. The exception is modern expensive models. This procedure makes it possible to significantly reduce consumption, improve dynamic characteristics and increase the efficiency of the power unit as a whole. Neglecting the ignition settings can lead to complete failure of the power unit. As a result, the owner will be forced to pay for expensive repairs.
Remember that before adjusting the ignition of the VAZ 2107, the carburetor must already be pre-adjusted. Following this recommendation will save time during the work process. Next, we will consider in detail the procedure for adjusting the ignition.
Ignition installation for VAZ 2107
In order to quickly set the ignition on a VAZ-2107 with your own hands, you need to prepare a special 38 mm key and a multimeter. The optimal device for making adjustments is a strobe, and for models with a contact ignition system it is recommended to use an ohmmeter. The instructions below are universal for all basic modifications of 2107, since minor design differences do not affect the location and method of dismantling, repairing or adjusting the main segments and assemblies.
- Preparation. Preparatory operations are an important part of any repair work. The safety, time costs and effectiveness of manipulations depend on their implementation. Shift into neutral, then disconnect the negative terminal from the battery. This will allow you to avoid short circuits during the adjustment process, which can cause failure of expensive electronic components, damage to the wiring, as well as injury to the technician himself.
- Removing the distributor cap. To do this, you need to press out the spring clips using a screwdriver, which will allow you to remove the protective casing.
- Installing the crankshaft in the required position. At this stage, in order to set up the VAZ-2107 ignition correctly, you will have to use a 38 mm key. With its help, you need to turn the crankshaft clockwise. Change the position of the mechanism until the upper end of the side contact of the distributor slider is aligned with the first contact of the distributor cap. For the next step we will need a measuring device.
- Resistance measurement. This procedure will be described using the example of using an ohmmeter. Attach one probe of the device to ground, and attach the second to the contact bolt of the distributor. The meter scale should show zero value, do not disconnect it from the parts.
- Ignition check. Slowly turn the crankshaft until its mark aligns with one of the lines located on the distributor cover. The long strip on the distributor corresponds to 0° setting the advance angle, the mark in the middle corresponds to 5°, and the short notch corresponds to 10°. If you use AI-92 or 95 gasoline, it is recommended to select the average value. It is worth understanding that these parameters are used in relation to VAZ-2107 models. If the setting is done correctly, at the moment the marks are connected into one line, the resistance displayed on the device will rise to infinity, which will indicate the correct ignition setting. Otherwise, the system must be calibrated.
- Advance angle adjustment. Using a wrench, loosen the fastening nut that secures the distributor to the cylinder block. After this, you need to turn the distributor body. Rotate the part clockwise until the resistance is zero. When you reach the required value, stop. From the “zero” position, begin to slowly turn the distributor in the opposite direction until the resistance begins to increase. To eliminate the gap in the roller drive, gently press the slider in a reverse clockwise direction. Having obtained the desired result, tighten the nut securing the distributor and install the cover. To perform this procedure, you can use a 12-volt test lamp. This method is very dangerous, since the procedure is performed with the ignition on. If you do not use the proper level of caution, you may receive an electric shock or damage your vehicle's wiring. When the contacts are opened by a breaker, a pulse with a force of up to 300 V is generated in the circuit.
Diagnostics of ignition timing without special equipment or intervention in the design
To check, you must select a road section that is free from traffic participants. Warm up the engine, drive out onto a flat area and accelerate to 50 km/h. After this, engage fourth gear and press the gas quite vigorously. If at this moment detonation appears in the engine cylinders for no more than 3 seconds, it means that the ignition is set correctly. This effect is determined by an uncharacteristic ringing sound. The duration of detonation beyond the specified time indicates that it is necessary to slightly reduce the advance angle. If there is no anomaly, on the contrary, the angle must be increased. This procedure allows you to perfectly match the power unit to the quality of the fuel used to ensure maximum engine efficiency.
As you can see, adjusting the ignition of a VAZ 2107 in practice turns out to be a fairly simple task. Above we examined the main aspects and main nuances that arise in the process of performing this operation. Our recommendations can help almost any inexperienced motorist do the setup on their own, saving good money. Unless you have excellent knowledge of your vehicle's design, we recommend that adjustments be made using technical documentation or under the supervision of an experienced technician. Strict adherence to safety rules and preparatory procedures will minimize the likelihood of various undesirable situations occurring.
Proper short circuit check
First, check the coil winding for short circuits. To do this, you need to connect a multimeter that determines the resistance. Before checking, it is recommended to lubricate the tip of the high-voltage wire with a special lubricant, which can be purchased at any spare parts store for the VAZ 2107, or with technical petroleum jelly.
We disconnect the module from the tips and connect one terminal of the device to the central contact that the coil has, and the other to ground. If the device display shows “infinity”, this means that there is no short circuit - that is, everything is in order. It is worth noting that if, when ringing the circuit, the display indicators did not change (and, for example, the number one was preserved), then this is infinity.
Now let's check the primary ignition circuit for an open circuit.
To do this, you will need to install a multimeter to the left and right contacts, which are responsible for the ignition function. With this installation, the ohmmeter should change its readings. Otherwise, it will be not just the coil that needs to be replaced, but the entire device. Please note that the normal value is 3-3.5 ohms.
How to check the ignition coil of a VAZ 2107?
Checking the ignition on a VAZ 2107 is performed using a multimeter or ohmmeter.
- It is necessary to disconnect the wires from the ignition coil terminals.
- And connect the multimeter electrodes to the terminals of the primary winding of the ignition coil.
- Check resistance. The resistance of the primary winding on a coil of type B-117 A, at a temperature of 20°C should be approximately 3-3.5 Ohms, for a coil of type 27.3705 - 0.45-0.5 Ohms.
- Connect a multimeter to the high-voltage terminal “+B” to measure the resistance on the secondary winding. The resistance of the secondary winding on a coil of type B-117 A at a temperature of 20°C should be 7.4-9.2 kOhm, for another type of coil - 27.3705 (normal resistance is considered to be 5-0.5 kOhm).
In this video you will learn in more detail how to check the ignition coil
Checking the secondary windings of the module
First, disconnect the wire ends from it. If you have already done this, then place it exactly in front of you. Then install the device to the upper and lower right outputs and carefully monitor the indicators that the device will display in a second.
After this, we perform exactly the same actions with the upper and lower left exits. Naturally, the ohmmeter readings should change and ideally be at least 7 ohms.
If at least one coil does not meet the standards, then in order to avoid unforeseen situations with your VAZ 2107, we recommend replacing the entire module.
How to remove the coil
If your fears are confirmed, and the coil really needs to be replaced, then installing a new one will not be difficult.
To do this, first remove the air filter housing, then the negative wire terminal from the battery and disconnect the high-voltage wires from the module. Having removed the wires located there from the module cover, unscrew the three nuts that secure it and disconnect it from the bracket.
That's all. Even a novice VAZ 2107 driver can perform such simple manipulations. If you already have a new part, then immediately after removing the coil you can install it. To do this, you need to perform all the steps we previously described in reverse order.
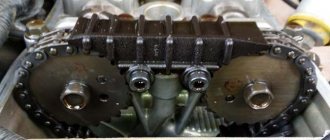
If it happens that you suddenly forgot how the high-voltage wires were originally located, then thanks to one little hint from a caring manufacturer, you won’t have to fiddle around for long. The secret is that on the module itself the numbers of the cylinders to which the wires must be connected are indicated.
How to replace the coil and ignition module on a VAZ 2101-VAZ 2107?
Note! When carrying out both operations, remove the minus terminal from the battery, if you don’t know how to do this, then in this case, read “this” article in which everything is written, namely the first point you will need to study!
Let’s add something else, after you remove the coil or module , they should be in normal condition externally and there should be no cracks on the body, much less through cracks, if your coil or module has all this, then replace yours unit for a new one!
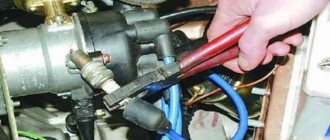
Removal: 1) There is nothing complicated in removing both units and checking them is also easy if you have a special device. At the beginning of the removal and checking, we will start with the ignition coil and move on to the module little by little, so in order to remove the coil from it, you first need to disconnect the central high-voltage the wire that is attached to the place (Indicated by the blue arrow in the photo below) is attached, then take a wrench or socket with a wrench or with an extension (Whatever is more convenient for you) and with them unscrew the two nuts under which the wires are located (Indicated by red arrows) and then why remove all the wires from the reel, but before you work with the wires at all, either remember where each one goes, or take a photo from which you will later understand where which wires need to be connected (This is important), and when everything is disconnected, there is more on the sides Unscrew the two nuts that secure the ignition coil to the car body (see small photo), but there are also wires under these bolts, so do not mix them up when installing the new coil.
READ GMC Says It Will Build an All-Electric Sierra Pickup
Note! After removing the coil, check it for resistance and thereby find out what condition its winding is in and whether the coil has insulation, to do this, check with a multi-meter by turning on the ohmmeter mode for the resistance of the primary winding, which should be in the range of 3.07-3.5 Ohms for the contact system and 0.45 ± 0.05 Ohm for a non-contact ignition system at an ambient temperature of 20 ° C, at the same temperature, measure the resistance of the secondary winding, it should be large and be about 5400-9200 Ohm, for more details on how to check the resistance of both windings, see the video below:
Also, do not forget to check the coil for insulation; to do this, connect one of the device’s terminals to ground as shown in the diagram below, and connect the other terminal in turn to each terminal and your device should give a reading of at least 50 MOhm, otherwise replace the coil with a new one !
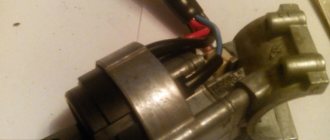
2) Now let’s take a look at the ignition module, as you understand, it is installed from the factory only on fuel-injected cars, this unit is also quite easy to remove, but only to remove it you will need a “5 mm” hex wrench (Immediately check with which bolts your module is attached, just instead of hexagon bolts, they were also fastened with ordinary bolts for wrenches and sockets), first, if the air filter housing bothers you, then remove it (For information on how to remove the housing, read the article: “Replacing the air filter housing on a VAZ”), after removing you will have to connect the minus terminal back if you previously removed it and turn the key in the ignition until all the instruments light up, now to check the wire block that is connected to the module, to check it, first disconnect it (see photo 1) and after that Throw the negative probe coming from the voltmeter to ground and connect the positive one to the middle terminal on the wire block (This terminal is also marked with the number 15) and the device should show 12 V, if the voltage is shown less then either there is something wrong with the wiring, or the battery is dead, or the controller is not configured or has become unusable, after this check, turn off the ignition and remove the key and clean module from dirt after that (with a rag, for example), then disconnect all four high-voltage wires from it (see. photo 2) and unscrew either the three nuts (see photo 3) that secure the module to the bracket, or the four hex bolts (see photo 4), depending on how your module is mounted.
Note! When you remove the module, proceed to check it, on the module itself, as you can see in the picture below, there are numbers indicating the number of the cylinder (That is, each pin tells which cylinder it goes to, one of the pins is indicated by a blue arrow for clarity), to all pins in turn you you need to connect an ohmmeter and thereby you will find out whether the secondary windings are alive or not, connect the wires to the terminals in the following order 1-4 and then 2-3, the device should show 5.0-6.0 kOhm in both cases, after that connect one of the contacts to the ground of the module ignition (Ground is the metal part of the module) and connect the second to pin 15 (This pin is located in the connector, the connector where all the pins are located is indicated by a green arrow) and if the device displays infinity (Infinity is when the measurement does not change, for example, before connecting everything your device showed 1 and after connecting it the number did not change, then this is infinity) then the primary windings are not shorted to ground and check further, well, termination in the same connector indicated by the green arrow, look for pins “1a” and “1b” "(These are the outermost terminals) and connect an ohmmeter to them; if the device shows infinity, this indicates that there has been a break in the contacts in the module circuit and it is faulty!
Installation: The ignition coil is installed in its place in the reverse order, but just be careful with the wires, but the ignition module needs to be installed a little differently, as you have already seen from the photos above, there are cylinder numbers that indicate which output of the ignition module goes to which cylinder goes, and on the high-voltage wires there are the same marks (That is, which wire goes to which cylinder), so when you connect the wires to the coil terminals, connect strictly so that the first wire, for example, goes to the first terminal of the coil, the second to the second, etc. .d.
READ How much oil is in a box Logan 1.4
Never check the module with a multimeter, there is no point in this, as you have already noted in this article, I always carry a second one with me just in case and, if necessary, change it if the old one has become unusable and the corresponding symptoms appear, so you can check it in the module Or maybe it’s not the module, and a second one is always needed because no one knows when the main one will fail, and if it does, it will even be difficult to get to the repair site.
New entries
Copying site materials is prohibited!
During operation, you have to face various problems in the operation of the engine. If the engine starts to run unstably or the traction is lost, the ignition module (MZ or coil) may be faulty. Do not rush to change it to a new one, first check it with a multimeter.
Setting the ignition
Another important problem among VAZ 2107 owners with an injector system is how to accurately set the ignition.
As you know, in such models, all engine control is carried out electronically, so for such work you will need a computer, installation of a special program on it for the engine of an injection car, a tester, as well as keys and screwdrivers.
First of all, turn on the ignition and ground to make sure the electric pump is working. If it does not work, then check the relay that controls it.
Is the fault light flashing? Connect your personal laptop with a special program to the car’s on-board computer to try to determine the cause using the available data.
If the engine is working properly, you should start it and check the throttle device: throttle position sensor, throttle opening level (no more than 1%) and passing wires. Use a tester to measure the voltage of the sensor (it should not exceed 0.55 volts) and the on-board network (its voltage should exceed 12 volts).
Perform the same actions again, but with the gas pedal pressed all the way. Now all readings should change as the sensor voltage is normally around 4-4.5 volts and the throttle opening is hovering around 90%. Adjust the throttle to full opening and turn off the additional air flow, and then start the engine and lock the throttle at half opening. Now you should adjust the throttle to completely close the hole.
As you can see, there is nothing difficult either in installing the coil yourself or in setting the ignition on this car model. Now you can decide for yourself whether to contact specialists or not. Remember that by performing small checks and minor repairs on your VAZ 2107 on time, you will always be confident in the reliability of your “iron horse”.
Why turn on the ignition?
Incorrect ignition installation is a rather serious problem that haunts owners of cars with ZMZ-402 engines, but we are not talking about it now. The ignition of the combustible mixture must occur strictly at a certain moment. If this moment is incorrect, then the engine does not work as it should.
Correct installation of the ignition on a VAZ 2107 can solve several problems that are in one way or another related to engine operation:
- Engine overheating. Often, too early ignition causes detonation. Because of this, the temperature regime of the motor changes. The load on the parts of the crank mechanism increases, and its service life is significantly reduced.
Reduced vehicle dynamics. It doesn’t matter whether the ignition is earlier or later, in any case this malfunction occurs. When an explosion of the combustible mixture occurs while the piston is at top dead center, all the energy of the explosion is transferred to the crankshaft and converted into torque. Accordingly, the engine response at such a moment is maximum.
If you set it earlier, the explosion will occur towards the upward piston, which in addition overcomes the pressure in the cylinder. Naturally, this slows down the rotation of the crankshaft, despite the decent inertia of the flywheel.
- If the moment is later than necessary, then the piston will already go down during the explosion. When the piston reaches bottom dead center, the expansion of gases will continue and some of them will escape into the exhaust manifold. This is where the popping sounds in the exhaust manifold come from.
How to set the ignition on a VAZ 2107
The ignition module is a mechanism whose malfunctions are very difficult to identify. Usually, problems begin to be solved when it becomes obvious that something is wrong with the car. If your VAZ 2107 does not start the first time, you cannot set the ignition, and uneven engine operation begins to confuse you - it’s time to carry out a proper check. Let us recall that the engine ignition module of the “injector” type is the same system that, with the help of coils, supplies electrical energy in order to form a spark and start the car.
Ignition installation for VAZ 2107
Let's look at how to install the ignition of a VAZ 2107.
Place the piston of the first cylinder in its highest position, which corresponds to the end of the compression stroke. To do this, remove the spark plug of the first cylinder, rotate the crankshaft to the top lifting point of the piston, and then carefully check the alignment of the marks on the crankshaft pulley and on the front cover.
To measure the gap between the contacts, you need a feeler gauge, and if the gap is not normal, then you need to loosen the adjusting screw and set the gap. You can measure the gap between the contacts using a feeler gauge; if the gap does not correspond to the norm, you need to loosen the adjusting screw and set the gap. Using a portable lamp, adjust the start of contact opening.
And you can check that the ignition is installed correctly without a strobe light. You need to drive the car a little, before warming up the engine to 90 degrees. If you press the pedal sharply while driving at 50 km/h and a slight detonation occurs, the ignition is set correctly.
Proper short circuit check
First, check the coil winding for short circuits. To do this, you need to connect a multimeter that determines the resistance. Before checking, it is recommended to lubricate the tip of the high-voltage wire with a special lubricant, which can be purchased at any spare parts store for the VAZ 2107, or with technical petroleum jelly.
We disconnect the module from the tips and connect one terminal of the device to the central contact that the coil has, and the other to ground. If the device display shows “infinity”, this means that there is no short circuit - that is, everything is in order. It is worth noting that if, when ringing the circuit, the display indicators did not change (and, for example, the number one was preserved), then this is infinity.
Now let's check the primary ignition circuit for an open circuit.
To do this, you will need to install a multimeter to the left and right contacts, which are responsible for the ignition function. With this installation, the ohmmeter should change its readings. Otherwise, it will be not just the coil that needs to be replaced, but the entire device. Please note that the normal value is 3-3.5 ohms.
Checking the secondary windings of the module
First, disconnect the wire ends from it. If you have already done this, then place it exactly in front of you. Then install the device to the upper and lower right outputs and carefully monitor the indicators that the device will display in a second.
After this, we perform exactly the same actions with the upper and lower left exits. Naturally, the ohmmeter readings should change and ideally be at least 7 ohms.
If at least one coil does not meet the standards, then in order to avoid unforeseen situations with your VAZ 2107, we recommend replacing the entire module.
How to remove the coil
If your fears are confirmed, and the coil really needs to be replaced, then installing a new one will not be difficult.
To do this, first remove the air filter housing, then the negative wire terminal from the battery and disconnect the high-voltage wires from the module. Having removed the wires located there from the module cover, unscrew the three nuts that secure it and disconnect it from the bracket.
That's all. Even a novice VAZ 2107 driver can perform such simple manipulations. If you already have a new part, then immediately after removing the coil you can install it. To do this, you need to perform all the steps we previously described in reverse order.
If it happens that you suddenly forgot how the high-voltage wires were originally located, then thanks to one little hint from a caring manufacturer, you won’t have to fiddle around for long. The secret is that on the module itself the numbers of the cylinders to which the wires must be connected are indicated.
Setting the ignition
Another important problem among VAZ 2107 owners with an injector system is how to accurately set the ignition.
As you know, in such models, all engine control is carried out electronically, so for such work you will need a computer, installation of a special program on it for the engine of an injection car, a tester, as well as keys and screwdrivers.
First of all, turn on the ignition and ground to make sure the electric pump is working. If it does not work, then check the relay that controls it.
Is the fault light flashing? Connect your personal laptop with a special program to the car’s on-board computer to try to determine the cause using the available data.
If the engine is working properly, you should start it and check the throttle device: throttle position sensor, throttle opening level (no more than 1%) and passing wires. Use a tester to measure the voltage of the sensor (it should not exceed 0.55 volts) and the on-board network (its voltage should exceed 12 volts).
Perform the same actions again, but with the gas pedal pressed all the way. Now all readings should change as the sensor voltage is normally around 4-4.5 volts and the throttle opening is hovering around 90%. Adjust the throttle to full opening and turn off the additional air flow, and then start the engine and lock the throttle at half opening. Now you should adjust the throttle to completely close the hole.
As you can see, there is nothing difficult either in installing the coil yourself or in setting the ignition on this car model. Now you can decide for yourself whether to contact specialists or not. Remember that by performing small checks and minor repairs on your VAZ 2107 on time, you will always be confident in the reliability of your “iron horse”.
Symptoms of a malfunctioning ignition module
Symptoms of a faulty ignition module may be the following:
- The “Check Engine” indicator is on, the on-board computer shows the “cylinder misfire” error;
- engine troits;
- the engine does not pull;
- when accelerating the car jerks;
- poor engine starting.
Setting the ignition
Another important problem among VAZ 2107 with an injector is how to accurately set the ignition.
As you know, in such models, all engine control is carried out electronically, so for such work you will need a computer, installation of a special program on it for the engine of an injection car, a tester, as well as keys and screwdrivers.
First of all, turn on the ignition and ground to make sure the electric pump is working. If it does not work, then check the relay that controls it.
Is the fault light flashing? Connect your personal laptop with a special program to the car’s on-board computer to try to determine the cause using the available data.
If the engine is working properly, you should start it and check the throttle device: throttle position sensor, throttle opening level (no more than 1%) and passing wires. Use a tester to measure the voltage of the sensor (it should not exceed 0.55 volts) and the on-board network (its voltage should exceed 12 volts).
Perform the same actions again, but with the gas pedal pressed all the way. Now all readings should change as the sensor voltage is normally around 4-4.5 volts and the throttle opening is hovering around 90%. Adjust the throttle to full opening and turn off the additional air flow, and then start the engine and lock the throttle at half opening. Now you should adjust the throttle to completely close the hole.
As you can see, there is nothing difficult either in installing the coil yourself or in setting the ignition on this car model. Now you can decide for yourself whether to contact specialists or not. Remember that by performing small checks and minor repairs on your VAZ 2107 on time, you will always be confident in the reliability of your “iron horse”.
The VAZ 2107 ignition module (injector) is a unit whose malfunctions are quite difficult to diagnose. Problems with the module's operation are noticed only after serious engine malfunctions occur. If the engine does not start, you should try adjusting the ignition . If the engine is running unevenly, a serious check of the functionality of the VAZ 2107 .
How to test an ignition coil with a multimeter || Lada 21110-3705010 (VAZ 2107/Niva)
Ignition is an electronic system for converting the low voltage of the vehicle's on-board network into high voltage and supplying the latter to the electrodes of the spark plugs.
“VAZ 2107, the injector does not get a spark to the spark plugs, what is the reason? Does anything depend on the spark plugs?
“VAZ 2107, the injector does not get a spark to the spark plugs, what is the reason? Does anything depend on the spark plugs?
- don’t touch his brains, he has nothing to do with them
READ VAZ 2110 injector starts and stalls reason
- Remove the wire completely from the spark plug and the coil - perhaps the mechanics placed an acid plug and the wire was destroyed! Check everything - one by one - so as not to mix it up! Good luck! Look for oxides and rust on the reel. And check your connection.
- Power will be supplied to the ignition module, as well as to the injectors, immediately when the ignition is turned on. If not, you need to look at the main fuses of the control system. They are located under the glove compartment shelf (if you bend over, you can see them). There are three fuses and three relays. Main relay, fuel pump relay and cooling fan relay. Nearby, respectively, are their fuses. Of course, first you need to check whether there is power to the fuses themselves. It should always be there, regardless of the ignition switch. If the fuses are OK, check whether one of the relays (the main one) clicks when the ignition is turned on. If it clicks, check the voltage at the relay output (it happens that although it clicks, the contacts in the nm do not close). If it does not click, check the voltage on the relay coil (you can use a light bulb). If not, check the circuit from the lock to the ECU and from the ECU to the relay. If there is no connection from the ECU to the relay, remove and install the ECU connector, at the same time inspecting the contacts for moisture, traces of oxidation, etc. If there is no connection from the lock to the ECU, look at the circuit, lock, and signaling (if there is one). Let's say everything is ok with this. We look at the circuit from the relay to the ignition module, injectors, mass air flow sensor, IAC. If there is a relay at the output, but no further, then there is only a break. Well, or again the signal. We checked, there is some wear on the module, etc., let's check the spark. It is not advisable to break, you may be lucky, or maybe not (then the ECU is a kayak). It is better to insert a candle into the tip and securely attach it to ground. There is no spark, which means there is something wrong with the crankshaft position sensor or the circuit from it. If all other sensors malfunction, either together or separately, there will be a spark! There is a spark, but it won’t start - check the fuel. Remove the plastic cap from the ramp and hold the hole with your finger so that the nipple pin is buried in the hole and turn on the ignition (with an assistant). There the pressure is 2.5-3 atmospheres, and if everything is normal, then you can’t hold it with your finger. True, it starts with 1st atmosphere, but it works poorly. If there is no pressure, listen to see if the pump is running when the ignition is turned on (in fact, all checks begin with this). I can’t hear it, go back to the same relay and check the circuits. It's buzzing, check the filters and tubes (are they pinched?)
- tell me there is no spark VAZ 2107 injector
- The fuse is in the brain area (it is separate, not in the block) Signal signal Well, then look in the low voltage circuit (is there anything coming to the module ). the module itself , all the wires and spark plugs could not be covered at once
- you need to check the voltage in the battery. The headlights are on. Are the spark plugs dry?
VAZ 2107 injector - treatment of tripping and misfires
Diagnostics revealed that the fourth gasoline injector was clogged, tripping and multiple misfires in all.
Checking the ignition system elements
Misfires in engine operation, especially in wet weather, are a consequence of breakdown of the insulation of high-voltage wires. There should be no cracks or damage in the wire insulation. You can check the insulation for breakdown using a wire connected to ground. If you run it along the insulation while the engine is running, a spark will be observed in places with damaged insulation. Another clear sign of poor insulation is noticeable electric shocks when touching high-voltage wires while the motor is running.
A broken high-voltage wire can be easily determined with an ohmmeter. The resistance should be between 3-10 kOhm. The spread of indicators between the wires should be no more than 1-2 kOhm.
[tip]Spark plugs must not show any visible damage. It is necessary to check that the gap between the contacts is 0.8 mm.
You can check the operation of the candle visually. To do this, you need to unscrew the spark plug, apply it to ground and connect the high-voltage wire. If you start turning the starter, you should see a clearly visible spark between the electrodes on the spark plug. If it is missing or it breaks in a different place, the spark plug needs to be replaced.
Sources:
https://xn116-5cdagf5b9cdset.xnp1ai/raznoe/vaz-2107-inzhektor-proverka-modulya-zazhiganiya-kak-proverit-modul-zazhiganiya-vaz-2107-inzhektor-multimetrom-prakticheskie-rekomendacii-v-rabote-s- modulem-zazhiganiya.html
How to Check the Ignition Module of a VAZ 2107 Injector
The ignition module is a mechanism that is very difficult to detect. Usually, obstacles begin to clear when it becomes clear that something is wrong with the car. If your VAZ 2107 does not start for the first time, you will not be able to turn on the ignition, and uneven engine operation will begin to bother you - it’s time to carry out proper testing. Let us recall that the engine ignition module “Injector” is a system that, using coils, supplies electronic energy to create a spark and start the car.
If you decide to check if the ignition module is working and if any coil is working, you will need to use a special device called a multimeter or in other words an ohmmeter. It will show the ignition module voltage and help you find the location of the leakage current in the circuit.
For your convenience, it is better to put the module before the process - it will be easier for you to do such a thorough job, and you will not get tired.
Disconnect the module from the tips and connect one output of the device to the central contact with the coil, and the second to ground. If the device screen displays “infinity”, this means that there is no short circuit, in other words, everything is fine. It is worth noting that if the characteristics on the monitor did not change when the circuit was installed (and, for example, number one remained), then this is infinity.
Now we will check whether the primary ignition circuit is closed.
To do this, install a multimeter on the left and right contacts, which are responsible for the ignition function. In this case, the ohmmeter should change its readings. Otherwise, not only the coil will change, but the entire device. Please note that the rating is 3-3.5 ohms.
Replacing the ignition module of a VAZ 2107
In case of malfunction, it is better to replace the ignition module with a new one. Repair is possible only if the breakdown is not a break or short circuit of the windings, but a visible violation of any connection. Since all the conductors in the module are aluminum, you will need special solder and flux, as well as certain knowledge from the field of electrical engineering. However, no one can guarantee that the device will work flawlessly. Therefore, it is better to buy a new product that costs about a thousand rubles and be sure that the problem with the ignition module has been solved.
Even an inexperienced car enthusiast can replace the module independently. The only tools you will need is a 5mm hex wrench. The work is performed in the following order:
- Open the hood and disconnect the negative terminal from the battery.
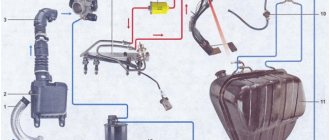
- Remove the air filter housing, find the ignition module and disconnect the high voltage wires and the wiring harness block from it.
- Use a 5mm hex to unscrew the four screws securing the module to its bracket and remove the faulty module.
- We install the new module and secure it with screws. We connect the high-voltage wires and the wire block.
- We connect the terminal to the battery and start the engine. We look at the instrument panel and listen to the sound of the engine. If the Check engine light goes out and the engine runs stably, everything is done correctly.
Video: replacing the ignition module of a VAZ 2107
Thus, it is quite simple to determine the malfunction and replace the failed ignition module with a new one with your own hands. To do this, you only need a new module, a 5-point hexagon and step-by-step implementation of the instructions from specialists.
VAZ 2107 injector, also known as the “seven”, is the latest model from the line of VAZ cars with rear wheel drive. “Seven” was created on the basis of the VAZ 2105 with significant differences: engine power, appearance of lighting devices, interior design, and seat shape. In this article we will look at the main parameters, functions, malfunctions, pros and cons of the injection VAZ 2107, in particular the ignition system.
Photo VAZ 2107