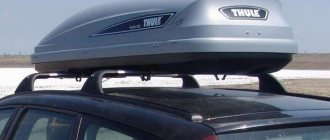
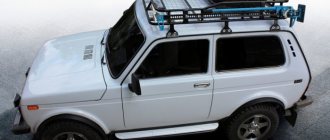
A good trunk is the key to comfortable transportation of any of your cargo. And the most important condition that will ensure you comfortable use of the trunk is its correct installation. The universal design of the Turtle Air 1 rack will allow you to place it on the roof rails of your car under any parameters and conditions.
What is important to know before installation?
To fully experience the benefits of using Turtle racks, it is important to follow the installation instructions correctly. Turtle Air rack kits include two roll bars, hardware with lock and keys, rubber pads, all necessary bolts and instructions.
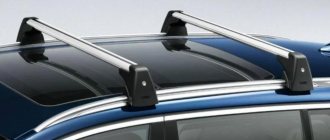
Since the distance between the roof rails varies from vehicle to vehicle, and even within the same vehicle, the front and rear distances vary, the Turtle Air 1 rack bars move 5 cm on each side, allowing the crossbars to be extended by up to 10 cm. The load capacity remains the same and up to 75 kg. The maximum distance between the roof rails in this case is from 112 to 122 cm. If the arch is wider than the roof of your car, its design allows you to shorten it to the required size.
Turtle Air racks have a bolt that allows you to change the angle of the base of the support. This must be taken into account if your car has diverging roof rails. This ensures a tighter grip of the railing by the support. All places where the trunk comes into contact with the car roof rails have rubber spacers that protect the cargo from scratches and are also designed for mounting and dismantling the trunk without harm to the car roof.
How to secure cargo on rails
A useful element for securing cargo on the roof are special structural fasteners or load limiters. They are made of durable plastic in the shape of a triangle with a built-in bracket, installed on the rectangular crossbars of the trunk, as well as on the aerodynamic elements. The method of fastening must be clarified when choosing a roof rack for a car.
A roof rack is a practical element that will allow you to quickly and reliably transport cargo of various sizes. When choosing and purchasing a certain type of trunk, you need to focus on the practicality of the design and the features of the car body. Experts recommend not to skimp on additional mounts in the trunk of a car, since these elements are designed to ensure the safety of things.
Did you manage to solve your problem using the recommendations from the article?
Yes!
46.4%
No. More answers required. I'll ask in the comments now.
37.75%
Partially. There are still questions. I'll write in the comments now.
15.85%
Voted: 347
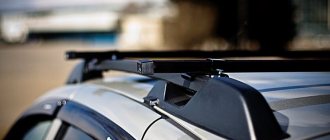
Installing a Turtle Air 1 rack on regular roof rails
Measure the distance between the roof rails. To do this, install supports without an arc on the rails. Measure from zero one support and the other, respectively. Do this for the front and back of the roof separately. How to properly shorten the transverse arches is written at the end of the article.
1. Insert supports into each end of the aluminum arch profile. Make sure you hear a click. If you clicked the transverse arch into the support, but you needed to separate them again, then you need to completely unscrew and remove the clamping screw, move the outer shell of the support onto the rail and press the latch with a screwdriver.
2. Adjust the length of the arc according to the measured distance between the rails. This distance may differ between the front and rear of the vehicle if the roof rails on the vehicle are divergent. On both sides, the arc should be inserted equidistant from the base of the supports.
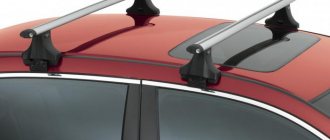
Place the rack in the desired location on the vehicle's roof rails.
3. The movable clamp for securing the trunk to the roof rails is located at the bottom of the support. It is tightened with a hex bolt at the top of the trunk until it is firmly fixed on the inside of the roof rail. Alternately tighten all the rack supports until the clamp is firmly held on the roof rails. Tighten alternately - a couple of turns on each support.
4. Then tighten the crossbar securing bolt. It is located in the groove of the arch profile and prevents any movement along the supports.
5. After making sure that the trunk is securely and correctly fastened to the roof rails, close all supports with lids. The support covers are closed 4 turns using the key included in the kit.
6. Don’t forget to check that the roof rack is securely installed: pull it forcefully in different directions. The trunk should remain locked in place without any unnecessary movement around the entire perimeter. And just in case, tighten all the bolts tightly.
Options for homemade roof crossbars
Option number 1 . Creating crossbars this way will be the easiest and won’t take much time. In this case we will need:
- clamps for fastening in the amount of 4 pieces;
- profile pipe 20*40 (20*30 can also be used).
Manufacturing of roof rails. Option #1
Manufacturing process:
- Decide on the size of the crossbars (in our case - 140 cm). In order not to make mistakes in further dimensions, after creating the first blank, we recommend that you double-check all the measurements taken in advance.
- Next, you need to drill holes for the clamps that will secure the crossbar.
Manufacturing of roof rails. Option #1 - The next stage is the preparation of metal plates with which we will fix the crossbars we have made for the trunk.
Manufacturing of roof rails. Option #1 - Next, you will need to paint or heat-shrink everything.
- The final stage will be the installation of the entire structure on the roof rails of the car.
Manufacturing of roof rails. Option #1
This type of rack is recommended to be used only when transporting luggage, because due to its poor aerodynamic properties, it may create extraneous noise while driving.
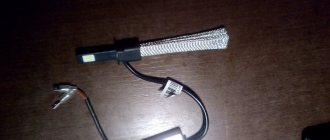
Option number 2 . This option will not be as practical as the first, and will require violating the integrity of the car's roof rails. So, we need:
- profile pipe made of aluminum;
- anchor fastenings, with hooks at the end;
- M6 (M8) screws.
Manufacturing of roof rails. Option No. 2
The process of making crossbars with your own hands will be as follows:
- The aluminum profile (50*25mm, wall thickness - 3 mm) is cut to the length we need (the distance between the rails).
- It is necessary to drill holes in the profile for M6 screws and take into account the length of the anchor bolt.
Manufacturing of roof rails. Option No. 2 - In the roof rails of the car, through holes should be drilled for the M8 anchor. This process requires care and precision. The holes should be drilled at equal distances. You also need to take into account the distance between the fastening elements of the roof rack installed on top. By the way, you can make a roof box with your own hands based on the required parameters of your car.
- Before installation, it is advisable to paint or heat-shrink the cross members using a hair dryer. Also, all drilled holes must be treated with anti-corrosion agent.
- The further process will be as follows. An anchor bolt with a hook at the end is inserted into the drilled hole in the railing. A metal profile is attached to it. M6 screws are inserted into the drilled holes on the square pipe, which must be used to get into the hook at the end of the anchor.
Manufacturing of roof rails. Option No. 2 - The next stage is tightening the M6 bolts, and only then the M8 anchors. You need to place larger washers under them in advance to increase the pressure area at the fastening points. To ensure that the bolts do not become loose while driving, it is recommended to lock them.
Manufacturing of roof rails. Option No. 2
This process of making and installing crossbars is recommended for permanent use. After dismantling the crossbars, the appearance of the car greatly deteriorates due to drilled rails.
Option number 3 . This option will be more practical, since the materials used in it have more streamlined shapes. Therefore, when the car moves, practically no noise is created. But the maximum load capacity of these crossbars does not exceed 60 kg. By slightly enhancing the method presented below, it will be possible to load up to 90 kg. But this will require additional costs. To make the crossbars we will need:
- furniture profile, wall thickness - at least 1 mm;
Manufacturing of roof rails. Option No. 3 - plugs for furniture profiles;
- U-shaped fastenings;
Manufacturing of roof rails. Option No. 3 - bolts, nuts, washers;
- rubber with a thickness of 10 mm.
The process of making crossbars for roof rails will be quite simple. The main thing is to take the correct measurements and not make mistakes:
- You need to drill holes in the profile taking into account the width of the profile and the diameter of the U-shaped fastening.
Manufacturing of roof rails. Option No. 3 - Next, the crossbars are painted in the required color. You can also use heat-shrinkable tubing that is resistant to variable weather conditions. All holes are treated with anticorrosive.
- A sealing rubber is placed on the U-shaped profile (a porous tube used to insulate pipes is also suitable).
Manufacturing of roof rails. Option No. 3 - The next step is the process of assembling the entire structure and installing it on the roof rails of the car. To do this, fasteners are installed under the roof rails of the car. The crossbar fits onto pre-drilled holes. Between the roof rails and crossbars there is a sealing and insulating material - rubber. After that everything is clamped.
Manufacturing of roof rails. Option No. 3
This process of making crossbars is quite simple and does not require any special skills. Also, the advantages of these crossbars for installing a trunk are that they can be installed at different distances, depending on the cargo being transported and the make of the car.
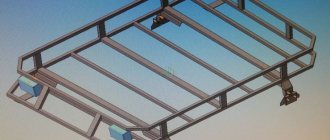
Option number 4 . In this case, it is necessary that the vehicle's roof rails have specially designed mounting holes. To make crossbars for the trunk, we will need experience in welding. We list the materials needed to create the crossbars:
- aerodynamic profile;
- metal corner 50*50*4 mm;
- consumables: bolts, nuts, washers;
- paint, gloves, brush;
- eye and respiratory protection.
Manufacturing of roof rails. Option No. 4
The manufacturing process itself will be as follows:
- The profile is cut to a measured length, taking into account the corners welded on the sides.
- The corner is cut 20-25 cm long. Holes for the mounting bolts are immediately marked on it. It is also recommended to drill them out before welding.
- Next, you need to weld the profile and prepared corners. All welds are cleaned and removed from slag, and drilled holes are treated with anti-corrosion agent.
- It is advisable to paint the finished structure. Do not paint a freshly welded surface, as this will lead to rapid peeling.
- After complete drying, you can install everything in its place.
Manufacturing of roof rails. Option No. 4
As can be noted from the experience of drivers, such fastening of the crossbars does not create additional noise when the car is moving at a speed of more than 100 km/h. Also, the manufacturing process itself will not take you more than 2 hours. And installation and dismantling, if necessary, can be completed within 10 minutes.
As you can see, making roof crossbars with your own hands is quite simple. This process requires the ability to work with power tools, precision, a little time (no more than 2-3 hours), and skillful hands. Making your own crossbars will cost you 2 or even 3 times less than buying them in specialized stores.
Author: Lagoda Vladislav Fedorovich
Higher education: secondary specialized. Specialty: Auto mechanic. Good knowledge of the design of foreign-made passenger cars. Work skills: replacing the timing belt of the cylinder head, chassis wheel alignment and maintenance. Repair…
What materials and tools are needed to make crossbars?
To make a roof rack with roof rails with your own hands, there are many ways, depending on your imagination and the availability of available material at hand (or the ability to buy it). All of them can be divided into two groups:
- without violating the integrity of the rails;
- with holes made in them.
Considering that additional structures on the roof will to a certain extent affect the aerodynamic properties of the car, it is better to remove them when the transportation of goods using the roof rack is not expected.
If the crossbars are removed, the holes in the roof rails (even neat ones) will disrupt the aesthetics of the car’s exterior. Therefore, it is preferable to do without them.
To perform work on installing cross rails on the roof of a car, you will need the following materials and tools:
- durable metal profile;
- heat-shrinkable tube with an internal diameter of the appropriate size, allowing you to insert a profile into it;
- rubber strips;
- fastening material, which can be U-bolts, nuts, washers and other hardware;
- metal strip, in case of self-made staples;
- grinder or hacksaw;
- drill with drills;
- paint and brush;
- construction hair dryer;
- anti-corrosion coating;
- measuring tape or tape.
To make crossbars, we need a grinder