Connecting a rear view camera requires some knowledge and skills, so not everyone can do it themselves - you will have to go to an auto electrician. But most drivers cope with this task perfectly, especially if you carefully read this connection manual.
Typically, for cameras for video surveillance of the situation behind a car, the connector on the board is black - minus and ground, red + power, maybe 3.3 volts and 5 volts, yellow - complex video output. There are also controls - white or brown, but this depends on the manufacturer. Red, black and yellow are generally followed by all camera manufacturers. To check, connect it to the TV through a regular “tulip” - it should show.
Pinout of camera wires with backlight
The infrared illumination on the rear view camera displays the image in color in sufficient light, and in insufficient light, thanks to the IR illumination, displays the image in black and white at a distance of approximately 5 meters. So, their presence on rear-view cameras is relevant, unlike recorders, where they are of an advertising nature for “night photography” without practical application, which cannot be said about LED backlighting on rear-view cameras - it’s better without them than with them!
Connecting two car cameras to a monitor
The operating principle is such that when reverse gear is engaged, voltage is applied to the coil, the rear camera is turned on, and the power contacts of the front camera are open. When the rear camera is turned off, the relay is switched off and sent to the button through contact 87a plus. We turn on the button - the front camera works.
Installing a rear parking camera
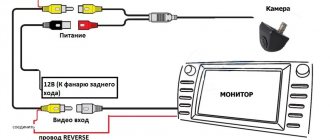
Connecting a camera from reverse (classical). The camera is connected to the reverse wiring: plus to plus and minus to minus. When you turn on the reverse gear, it goes from the reversing light to the reversing camera, and it sends a signal to turn on the monitor automatically, so there is no need to do any additional manipulations. The reversing camera automatically turns off when reverse gear is disengaged. The camera is connected using a cord, which is initially located on the wiring next to the camera, or using a wire with a plug, for which there is a plug on the camera wiring.
There are even wireless rear view cameras (video transmitter and video receiver with a radio channel), then the connection will look like in the diagram.
Useful: Pinout of car radio ISO connector
Rear view camera installation methods:
- into the license plate illumination socket or into the trunk handle or place for the camera - no damage is caused to the car;
- camera in the frame of the license plate - the hole for the cord is not visible, since it is behind the frame;
- mortise camera - similar to a peephole, convenient among parking sensors, in the lock cylinder or just the body;
- on the pin - minimal damage, since the wire passes through the pin itself, is invisible, installation with the pin up;
- overhead - have a certain angle and minimum dimensions, often have a certain position for installation;
- on a bracket - convenient because you can mount it in almost all places and change the angle of the camera and rotate the image.
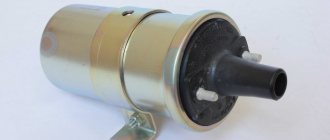
Please note that all cameras are usually powered by 5 volts, there is a voltage stabilizer in it and it supplies 3.3 volts to the camera itself; for some, this stabilizer can withstand a supply of 12 volts, but this is rare, usually it burns out. On ordinary Chinese cameras powered by 12V from the reversing light, a 5-volt stabilizer is sealed in a plastic fork of the wire for power and tulip; the camera itself also contains a 3.3-volt stabilizer.
How to connect correctly
Connecting a standard rearview camera for a car involves using cables for transmitting a video signal and installing wires for power supply.
The voltage is turned on only when you start moving in reverse, which eliminates the transmission of the signal to the radio display when stopping or moving forward.
When connecting a camera to a Chinese radio without a digital CAN bus on vehicles equipped with a reversing lamp control unit, additional relays and an anti-aliasing filter are required.
Wired model
The classic connection diagram for a rear view camera involves the use of RCA connectors located on the back of the car radio housing. Such a connector is provided only for head units; information about the presence of a plug is provided in the technical documentation. Connection cables are laid from the camera through the vehicle interior; it is recommended to run the cords parallel to the standard electrical wiring. When laying through the hinges of the trunk lid, a reserve length of wire is provided, eliminating cable tension.
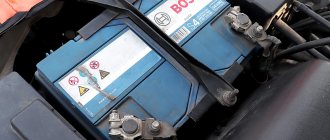
The design of the camera provides power, which is supplied via a separate cord from the vehicle’s on-board network. The wire marked Reverce must be connected to the contacts of the reverse indicator lamps. The negative signal is supplied from the car body (for example, from the ground bolt located under the bumper or in the luggage compartment).
When connecting equipment to a Pioneer 2 DIN radio, you must use the plug marked with the text RC In or Camera In. The mark is placed on the equipment body or in the operating instructions. In the central harness of the radio there is a separate cable marked Reverse (with a pink insulator), which must be connected to the positive power circuit. To connect the power, reverse gear lamps installed in the rear parking lights of the vehicle are used.
Connection features on European-made machines
To connect a rear view camera to a Chinese radio based on the Android operating system, you need to install cables with “tulips”. The circuit uses additional wires coming from the signal cables. The cords supply a signal to the head unit, allowing a graphic image to be displayed. To power the electronics of the viewing device, power is supplied from the reverse indicator light.
Some European-made cars use a factory lamp control unit, which cannot be turned off by reprogramming the controller. When the engine is running, the unit continuously checks the status of the lamps, which is reflected on the display in the form of noise. Inserting a relay into the circuit, which is powered by the cigarette lighter or on-board socket, does not allow the camera to be turned on. The switch box will click continuously, but there will be no image on the display.
Introducing a diode into the circuit with an additional capacitor that smoothes out current ripples does not eliminate interference. To solve the problem, it is necessary to install a high-resistance relay with power supplied from an outlet or cigarette lighter through an additional unit. The circuit retains a diode bridge and a smoothing capacitor, which prevent pulses from the lamp integrity monitoring module from affecting the relay.
The owner can independently assemble the device by selecting the component values according to the characteristics of the car.
There are ready-made solutions manufactured by Chinese enterprises; the user only needs to connect the cables. If, after installing the smoothing unit, noise is noted on the display, then the correct operation of the generator and voltage regulator is checked. It is also recommended to ensure that the ignition system components are in good condition.
Wireless model
To install a wireless camera, you need to place a signal receiver and transmitter. The devices are located in the luggage compartment and near the head unit. To operate the transmitting device and the lens illumination, it is necessary to supply power from the reverse gear indicator light. With such a connection, 2-4 seconds pass between the activation of reverse and the image output, which are necessary to initialize the communication channel between the transmitter and the receiver.
Replacing a rear view camera - instructions
Like any other electronic device, these camcorders sometimes burn out (especially if power is constantly supplied to them). Then the replacement steps will be as follows:
1. We remove the camera.
2. We cut off the standard harness from the camera, closer to the camera. It will be in a shielding braid, the braid will be prepared for soldering with another similar braid from the new camera.
3. A cord with a tulip-type connector comes off the new camera. A long cord is attached to it, which should stretch all the way to the screen. We don’t need all of it, since our screen has standard wiring that we connect to. We cut off the connector with a small piece from the long wire and clean it. There will be a central core inside the braid. We will need both.
4. We solder the wires of the cut standard harness to the new camera:
- Yellow on the standard one - to the central core, cut by the new chamber.
- Braid from a standard one to braid from a cut new camera
- Black on the standard one - to the negative wire on the new camera (usually black)
- The red one from the new camera needs to be connected to the positive wire that powers the reversing light (green with a white stripe)
5. Turn on the ignition, put the automatic transmission selector in position R. If there is an image, everything was done correctly.
If you power the camera from a reversing light, there may be ripples on the screen when you turn on the camera - you will have to connect it from the power supply via a relay. It is necessary to turn it off, because if +12V is constantly supplied to the video camera (for example, from the license plate light), then sooner or later its voltage converter will burn out.
Don’t forget to carefully solder and insulate everything, preferably with heat shrink. It is advisable to cut the cords with a margin so that you can quickly replace the camera in the future without disassembling the casing. Before cutting the cords on a standard camera, you need to be sure that it is not working. The issue of attaching a new camera is purely a plumbing issue and can be solved without any problems. It is better to take an infrared camera - it “sees” better in poor lighting.
How to determine where to install the camera
Before you begin installing the patch cables and the reversing camera housing, you should find a point that provides the greatest viewing angle and is not thrown by dirt when the car is moving. Depending on the body configuration, the equipment is mounted on the license plate light strip, trunk lid or rear bumper. A Chinese-made camera is connected instead of the license plate light, while a diode is kept inside the unit. Such an installation scheme does not ensure the transmission of high-quality images.
Placing the equipment at the height of the bumper allows you to capture space at a distance of 2-3 m from the rear of the car. It should be remembered that the lower the vehicle, the smaller the viewing area will be. Because of this, contact with a subtle obstacle is possible when reversing. Installing the device on the trunk lid expands the radius by 30-35%. This installation technique is not used on trucks and vans, since it does not allow maneuvering with the rear door leaves open.
On buses or trucks, the device is mounted on the top edge of the body; the lens is pointed downwards.
The user can install two cameras by connecting them through a special controller. The radio screen displays a picture from each source or from 2 simultaneously. The parameter is adjusted through the hub settings. It is possible to use a 2-position switch that transmits signals from different sources.
Depending on the location of the device, wiring harnesses are laid to transmit the signal. When using a wireless product, it is necessary to ensure reliable signal transmission. Metal body elements reduce the intensity of data transmission, so the number of partitions between the transmitter and receiver should be minimized.
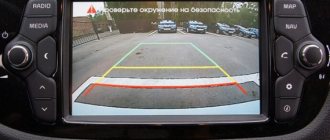
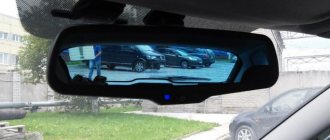
If the radio does not see the connected device, then you should configure the equipment through the menu. Android head units are equipped with a function that displays parking lines on the display.
The distance between the elements and the degree of curvature when turning the steering wheel are adjusted depending on the dimensions of the car.
The function and the ability to adjust parameters are not available in all players.