Welcome to ChipTuner Forum.
Theme Options
Bashkirov Vladimir
Dear, hello! The Saber Gazelle, her mother, Business, came to me. And the stove would malfunction at least once in my presence! It turned on flawlessly, both after turning off the ignition and after turning off the fan by turning the CV control knob. The fault is hidden. I questioned the driver passionately about the malfunction and found out the following: a) when the fan is not working, the climate control display lights up and icons are displayed. When switching the blowing direction, the gearmotors hum and the dampers move. When you turn the RHF knob, a change in the rotation speed setting is indicated (the fan itself does not spin). b) While driving, if the speed is sufficient, the cabin is warm without a fan. Conclusion: Most likely, the climate control ECU is working. Either the stove fan or the PWM frequency regulator (electronic resistor, so to speak) is faulty.
Since the Gazelle organization decided to change both the resistor and the motor. The panel must be removed for this, as well as for further diagnostics, so we decided to first buy a resistor and a motor.
I found an interesting point. The QC ECU has two connectors, all wires are thin, approximately 0.75. This means that the power wires go directly to the PWM, and from it to the motor. Power comes only to one leg of one connector. When the ignition is turned off, the power disappears. If you touch one of the connector terminals with the probe of the test lamp, the motor starts working immediately at maximum speed. This does not depend on the position of the ignition key, and does not depend on whether the connectors are connected to the QC ECU.
Who has any thoughts?
Added after 10 minutes
[QUOTE=SNN;902626]Dear, hello! The Saber Gazelle, her mother, Business, came to me. And the stove would malfunction at least once in my presence! It turned on flawlessly, both after turning off the ignition and after turning off the fan by turning the CV control knob. The fault is hidden. I questioned the driver passionately about the malfunction and found out the following: a) when the fan is not working, the climate control display lights up and icons are displayed. When switching the blowing direction, the gearmotors hum and the dampers move. When you turn the RHF knob, a change in the rotation speed setting is indicated (the fan itself does not spin). b) While driving, if the speed is sufficient, the cabin is warm without a fan. Conclusion: Most likely, the climate control ECU is working. Either the stove fan or the PWM frequency regulator (electronic resistor, so to speak) is faulty.
Create an account
Register a new account in our community. It's very simple!
Modern cars are equipped with heaters that maintain a set temperature in the cabin thanks to the presence of sensors and electric drives in their system. But the more complex the mechanism, the more of its elements can fail. Electronics are “afraid” of high humidity, sudden temperature changes and dust. And such factors are very difficult to avoid in a car. Therefore, some components or the entire mechanism as a whole may periodically fail.
Instructions for replacing the heater control unit on a Gazelle
One of the reasons for malfunctions in the operation of heating equipment on almost any car, including the Gazelle, is a breakdown of the control unit.
Here individual components or the entire unit may fail. The only correct solution to the problem is to remove and then replace the control unit.
Owners of domestic commercial vehicles do not necessarily need to seek professional help. There is nothing overly complicated about removing a faulty heater control unit on a Gazelle. Even a novice car owner can cope with this task if he approaches the issue competently, follows the instructions and observes basic safety principles.
It is better to work in a garage, but with good ventilation. Use a standard set of tools, including screwdrivers, a set of heads, adapters, etc. Depending on the specific situation, select the set of tools yourself. But no specialized or expensive professional-grade devices are required to replace the control unit.
Gazelle Gazelle discord
To deal with the heater control unit on the Gazelle, you need to determine which car is at your disposal.
The instructions will be considered using the example of the Gazelle 2705. The peculiarity here is that the instruction manual is slightly different depending on when the vehicle was produced.
Therefore, we suggest considering two instructions at once. In the first case, the recommendations are relevant for the commercial vehicle GAZ 2705 (Gazelle), produced before April 2002. If the car was produced at the factory after April 2002, then in relation to it you will need to follow slightly different recommendations in order to remove and replace the heater control unit.
Instructions for the old Gazelle 2705
First, we will look at how to replace a failed heater control unit on GAZ 2705 series vehicles manufactured before April 2002.
You shouldn’t be surprised at the number of old Gazelles that travel along domestic roads. That’s why motorists are actively interested in the nuances of replacing the control unit on older models.
The work begins with preparatory activities. It is recommended to perform similar procedures when working with the updated version of the GAZ 2705.
Preparation includes the following procedures:
- prepare all the necessary tools, arrange them in a place and order convenient for you;
- if the reason definitely lies in a failed heater control unit on a Gazelle, then buy a new unit in advance or find it at a car wrecker to save money;
- be sure to disconnect the negative terminal from the battery on the car, or remove the battery completely;
- move the front seats as far back as possible or remove the seats;
- Prepare a convenient light source in the form of a portable lamp or a powerful flashlight.
The work will take quite a long time. Especially for those who are faced with replacing the control unit for the first time. Therefore, it is better to prepare in advance for the fact that it will take you more than one hour to replace it.
With the seats removed, much more free space appears in the cabin, and therefore it will be objectively more convenient to work in the Gazelle. But here he decides for himself how it will be better for him.
Having completed the preparation, you can begin to remove and subsequently replace the control unit.
Gazelle, produced before April 2002, includes 2 control units in its design. One is front, the other is rear.
Removing and replacing the front block
To begin with, we will consider dismantling the front block, since there is an impressive amount of work to be done here. Removing the rear control unit takes much less time and effort.
- The first step is to disconnect the negative terminal from the battery. Please note that such actions will erase all information stored in the memory of electronic storage devices.
- After this, work is carried out to dismantle the instrument cluster on the Gazelle dashboard. Here you need to unscrew several fasteners around the perimeter.
- Now the upper part of the car's dashboard is removed. Gently pull it towards you, do not make sudden movements or jerks. Otherwise you can break it.
- Next, be sure to apply marks, marking the current position of all cables.
- At the next stage, the clamp of the cable sheath is released, the clamp is removed and the cable itself is removed directly from the temperature control lever of the heating system.
- In exactly the same sequence and using a similar algorithm, the cable responsible for the operation of the air flow distributor is removed.
- If your Gazelle is equipped with air conditioning, you will need to disconnect the hoses from the existing vacuum switch at this stage.
- The heater control unit itself is held in place by 4 screws. All of them can be completely unscrewed.
That's it, the block can be removed and its current state checked. If necessary, carry out the necessary repair and restoration work.
But it happens that the unit cannot be repaired, and only a complete replacement will help.
To replace the control unit, you need to take a new similar part and install it in its rightful place. This work is done in the following sequence:
- Return the repaired old one to its place or place a new unit in its place, tighten all the screws of the control unit.
- Reconnect the cables using the previously applied marks.
- Secure the cables to the heater control panel using clamps.
- Install the adjusting clamps and secure the cable sheaths.
- Return the instrument cluster to its rightful place.
Diagnostics
If the speed control unit fails, then you need to understand which of the elements of the entire circuit has failed. The control of the Gazelle stove is electronic, and all drives are electric.
- To begin with, with the engine turned off, we try to turn the temperature regulator. When you turn it, you should hear clicks from the gear motor. If there are no clicks, then you need to check the power in the block that comes to the tap opening motor. This can be done using a test lamp or a multimeter.
- If the fan speed controller does not work, you need to check its operation in all positions. If it does not work in all positions except the last one, then the reason is a faulty rheostat. If operation is not heard in any of the positions, then you need to check the power supply to the fan block. If power comes in, then it is broken.
- If the stove adjustment works correctly, but the display does not light up, then the display itself or the backlight is faulty.
Heater Gazelle business device.
The tap is controlled automatically by the heater control unit depending on the selected temperature. In addition, the temperature of the air supplied to the cabin is regulated by a central damper, which, by turning, directs the air flow, or part of it, through or bypassing the radiator.
In addition to the central damper, there are a number of dampers that redistribute the air flow. The dampers of the Gazelle Business heater, unlike previous models, are controlled by gear motors, not cables. The control is carried out by the heater control unit. The electric heater fan is located inside the housing and to access it it is necessary to remove and disassemble the entire heater. Despite the fact that the fan electric motor is imported, this arrangement completely negates all the advantages of the heater.
The speed of the electric motor is regulated smoothly by turning the handle on the control unit, due to the electronic regulator located on the heater body. To access it, as well as access to almost all elements of the heater, you need to remove the front panel completely. The only thing that can be changed without removing the panel is the heater core. To change it, just remove the glove compartment.
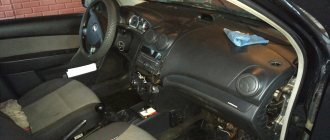
We remove the panel from the gazelle .2005. Installation and removal of the Gazelle Panel. We remove the torpedo on the gazelle.
Subscribe to the channel. Gazelle repair
.
How to remove
a panel on
a gazelle
.
Gazelle stove repair n/a
Replacing the gazelle
2007.
Repair
Repair of the control unit will directly depend on the cause of the malfunction:
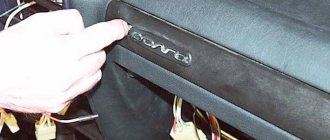
- If the power check shows that there is no “+” on the gear motor, then there is a malfunction in the heater control system. It needs to be dismantled and either repaired or replaced with a new one. For repairs, it is better to use the services of specialists, and if you have experience in this work, you can try to solve the problem yourself. To dismantle it is necessary: remove the top drawer for documents; unscrew the front panel (two screws on top and two on bottom); remove the decorative trim; pull out the entire panel so that all terminals can be numbered; disconnect the terminals; then take out the control element itself. Then reassemble everything in reverse order.
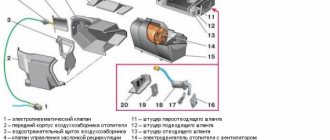
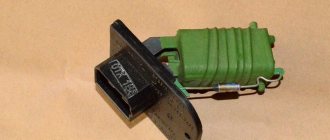
- To replace the resistor, you need to either remove the entire dashboard, or cut a hole under the box for documents, after first removing the box itself. To replace the fan, it is necessary to dismantle the entire instrument panel along with the stove. Then disconnect the stove from the dashboard, “halve” it and remove the resistor. If there is no power to the fan block, then the reason must be sought in the heater control system. To do this, you need to check it with a multimeter. Pinout of contacts of the Gazelle Business heater control unit:
- reserve;
- motor-gearbox (MR) feedback, heat-cold;
- access to the BRS;
- reserve;
- 5V, power supply for external temperature sensor;
- tap closing signal;
- tap opening signal;
- coolant heating sensor input;
- external temperature input;
- interior temperature sensor input;
- reserve;
- external temperature sensor housing;
- feedback, MR, glass - legs;
- MP heat – cold “+”;
- MP heat – cold “-”;
- MP recirculation “+”;
- MP recirculation “-”;
- MR glass – chest “+”;
- MR glass – chest “-”;
- MR glass – legs “+”;
- MR glass – legs “-”;
- feedback MR glass – legs 1;
- output of the heated glass and mirrors relay “+”;
- air conditioning relay output “-”;
- frame;
- feedback MR heat – cold 2;
- on-board network.
- To repair the display, you need to dismantle the entire heater adjustment element (as described in point No. 1) and repair or replace the entire assembly unit. If you repair it yourself, you can change the handle illumination diodes to a different color or change the brightness.
How to Remove the Gazelle Heater Control Unit – Auto news and car repair tips
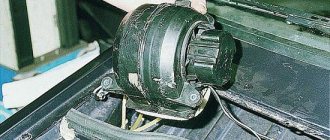
Heater fan
| If the glove compartment is opened or removed, the blower motor (4) becomes accessible. It is inserted from below into the air duct (1). The resistors and thermal switch (3) in the illustration are removed together with the plug (2). When installing, make sure that the resistance block does not violate the airtightness of the air duct. Apply sealant if necessary. |
Heater Gazelle business troubleshooting.
What to do if something in the heater does not work? Due to the design of the heater, diagnostics in case of failure of its parts is difficult. Initially, as always, you need to check the fuse.
Checking gearmotors.
Checking the gear motors of the windshield blower dampers and deflectors can be checked without completely removing the panels. It is enough to remove its lower part. The main damper motor is accessible from the driver's side. To check gearmotors, you need to disconnect the connector of its electric motor, the connector with a lock, and connect a tester to it in voltmeter mode or a test lamp. With the ignition and heater on, you must press the button that controls this damper. The control lamp should light up. If the lamp is on and the gearmotor does not work, it must be replaced.
If you are on the road and do not have the opportunity to replace the damper drive with window defroster, you can remove the rod from the damper lever on the driver’s side and turn it manually, locking it in the open position. To open the damper on the passenger side, you will need to unscrew the screws securing the gearmotor and, by turning its housing, secure it in the same way.
Checking the electric motor and speed controller.
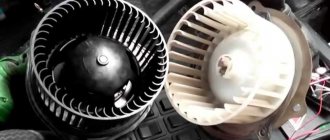
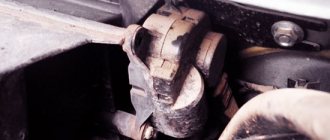
To check the heater fan motor and the cause of its failure if the fan does not work, you will need to remove the air intake in the engine compartment. Inside the window that opens, two wires with a connector will be visible. To check the power supply, connect a test lamp to the connector terminals and, with the ignition on, turn the heater speed control toward maximum speed. The control lamp should light brightly. When turning the handle towards the minimum speed, the brightness of the lamp should decrease. This indicates that the speed controller is working properly.
If the control lamp is on and the fan does not rotate, then its electric motor is faulty. To check, measure the resistance between the motor terminals in the connector. Motor malfunction may be caused by stuck brushes. In this case, you can try knocking on the heater body. In this case, the operation of the fan can be restored before the next time it is turned off, possibly longer, but you can still get to the service center in a warm place.