It is possible to change the visual design of the cladding and exterior of the car interior using the latest technology - immersion printing. A special method of applying a design is often called hydrographic printing or aquaprint. It is possible to transfer original images onto the plane of the body or change the design of interior elements by making an aquaprint with your own hands at home. It will take a little practice and strict adherence to the production process.
Aquaprint technology and the history of its appearance
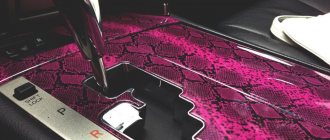
Hydrographic printing transfers well to glass, plastic and metal. Even on wooden door inserts, dashboard trims and armrests, it is possible to change the original shade and highlight the unique texture. The part is prepared and dipped into a “bath”, on the surface of which an image is placed. The activator for aquaprint will fix the design, and after drying the part is coated with varnish.
Aquaprint - what is it?
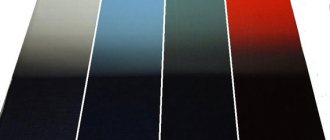
Decoration technology began to be used in Japan about 40 years ago, and in recent years in our country it has gained unprecedented popularity among auto-tuning enthusiasts. A special display transfer technology allows you to obtain unique surfaces of elements:
- wood textures;
- stone planes;
- reptile scales.
Carbon fiber trim is popular for sports cars. Metal and plastic inserts in the interior of exclusive cars are designed to match the structure of the seat leather.
The technological process consists of the main stages:
- cleaning the surface of the element;
- applying the base shade and preparing the film;
- film activation;
- immersion in a container to transfer the image to the part;
- drying and finishing with varnish.
To uniformly cover the plane of the object and ensure high-quality distribution of the texture of the pattern, the film is adjusted in dimensions several centimeters larger than the plane of immersion of the part.
Premises requirements
Aquaprinting can be done at home, without the participation of a specialist. Decorating things is allowed at home if it comes to small details. It is more convenient to carry out hydrographic printing in a utility room or garage with an area of at least 20 square meters. m. The main thing is that there is a container for work, where the part to be decorated can completely fit. Moreover, the container must be installed stably so that it does not swing, otherwise the design will be transferred unevenly.
In the room where hydrographic printing is planned, there must be hot water - connected or heated. This is due to the fact that to decorate with film, the container is filled with water at a temperature of at least 35 degrees. Hydraulic printing is a simple and inexpensive procedure that is also accessible to beginners.
Materials and equipment required for printing
To carry out the technological process, you will need to prepare equipment for aquaprinting. You can purchase used equipment or get a new one. Basic elements for production:
- a spacious tank with a volume sufficient to completely immerse the part;
- container for washing finished decorated products;
- special film for transferring the image;
- a set of devices and tools for the preparatory stage - rough surface treatment and grinding;
- film activators, several different paints and topcoat;
- spray gun - a spray gun or compressor with a spray gun and a spray nozzle of a certain diameter.
A surface with old worn-out paint or with chips is sanded and thoroughly sanded before priming. Having removed all dirt and roughness from the part, the surface is degreased and coated with a base color.
This is interesting: Replacing the timing belt on a Honda
Since to carry out the immersion printing process, you need to observe a strict temperature regime (29-32 degrees). To do this, it is better to get a thermometer (mercury or alcohol) and an electric industrial boiler with a heating sensor. The thermometer is fixed on the surface of the liquid for constant monitoring. A boiler will be required to temporarily turn on and heat the water to the desired temperature.
An old bathtub is suitable for performing the technical process. You can make the container yourself from a barrel by sawing it vertically and installing it on clamps in the form of a platform. The second half can be adapted for washing products.
To drain the waste liquid, wash the tank and fill the bath, install a pipeline with a drain and a water supply system with taps for warm and cold water. If the production is located in a room without a central communications connection, then a special filter and pump are cut into the pipeline. An additional reservoir is installed into which the pump will pump the filtered solution. This will allow the process to be carried out on the principle of circulation of filtered liquid.
Registration of your activities
It is important to understand that each type of business activity must be registered with the local tax office.
The first step is to write an application according to the established template. Depending on the type of business (individual entrepreneur or LLC), the list of documents that must be submitted to the tax office along with the registration application varies.
Let's consider a simple option for registering an individual entrepreneur with the opportunity to choose a simplified taxation system. Minimum documents to start a business:
- Contact the local tax office and write an application using the P210001 model;
- Present a receipt for payment of the state fee in the amount of 800 rubles for registration;
- Several photocopies of your passport.
A few days later, you need to contact the tax office again to pick up the extract.
Interesting article : Growing asparagus as a business.
Drawing technology
It is possible to carry out high-quality hydrographic printing with your own hands at home if you adhere to all the nuances of the technological process. Before starting work, review the information on the Internet. In response to the request “do-it-yourself aquaprint video”, many interesting videos have been shot that will help explain all the intricacies of image transmission. After mastering the material, proceed to the step-by-step process.
Part surface preparation
The planes are cleaned with coarse sandpaper. Remove the rubberized areas and sand the planes with the elements:
- corrosion;
- primers;
- varnish
Removes oil stains and dust particles. It is convenient to process a large area with a grinding machine, but for small, hard-to-reach curved surfaces, grinding must be done manually or using a drill with a miniature grinding attachment.
High-quality sanding can be done using a special paste or automotive primer.
After cleaning the surfaces of the part, degrease them with pure gasoline or alcohol. Apply automotive primer. After drying, sand again with fine sandpaper and degrease again. Now the part is ready for the next step.
To obtain certain shades and transition combinations of the color palette, experienced craftsmen apply a primary color to the part that matches the base and texture of the design.
Film preparation
Before cutting the film for aquaprint, the container is filled with water and heated to a temperature of 35 degrees. Next, according to the sketch of the part, the film is cut, taking into account the 3D geometry of the form.
Guessing the area for complex geometry is quite difficult. Craftsmen carry out preliminary sketches of the dimensions of the part, scan and draw the surfaces of the planes.
This is interesting: Auto parts for Honda cars
The area of the film is made with a margin of several centimeters, and small notches are made on the edges in increments of 2 centimeters. Prepare the activator for the water print and begin transferring the pattern.
Image transfer
The prepared film is carefully placed on the surface of the water in the bath. To do this, dip your fingers and make an impression on the edge of the film. The sticky plane should lie on the surface of the water.
The slightest vibrations and dragging on the surface are unacceptable: the paint may be transferred with a loss of texture or transferred with blurred areas.
The notches made on the film will gradually begin to curl up. If bubbles have formed under the surface of the film, carefully blow them out. After 2 minutes, after turning all the sections, apply the activator using a spray gun in S-shaped movements (horizontally and vertically). After 5-10 seconds, the film dissolves, leaving a jelly-like mass with a pattern on the surface.
Next, immerse the prepared part in the bath at an angle of 45 degrees (starting from the sharp corners of the part). We perform all movements carefully, smoothly, evenly, without sudden movements. After the part is completely immersed, we immediately take it out. We inspect the part - the paint should lie smoothly, without distortion of the design.
Washing and drying
The finished part must be thoroughly rinsed in the same water to remove any remaining sticky layer.
Next, the part must be dried evenly. Hard-to-reach areas of the forms can be exposed to a weak air flow at room temperature (after the paint has completely dried). Large elements are placed on racks, and small ones can be hung on hooks.
Applying varnish
The application of varnish is carried out after all surfaces of the element have completely dried. The coating is done in several layers, after which the part can be polished.
Workshop workers
There are two ways to organize the activities of an immersion printing workshop: mastering the technology yourself and finding an experienced specialist.
In the first option, the entrepreneur will have to look for training courses on this topic: many suppliers provide them for free when purchasing a set of equipment. It is also advisable to study master classes and videos published on the Internet. Finally, you can purchase a starter kit for aquaprinting, which includes several types of films and all the necessary reagents.
The second option is more difficult to implement: even in a large city you can only find a couple of dozen immersion printing experts. Therefore, the business owner will have to either send an apprentice to the same courses, or use a third way - learn how to apply the image yourself, and hire an experienced car painter to prepare and paint the parts: fortunately, such masters are more common than waterprint specialists:
Employees of the aquaprint workshop
| Job title | Rate, rub. | Qty | Amount, rub. |
| Painting specialist | 25000 | 1 | 25000 |
| Accountant at ½ rate | 10000 | 1 | 10000 |
| Payroll tax | – | – | 10500 |
| Total: | 45500 |
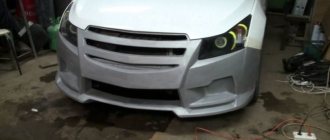
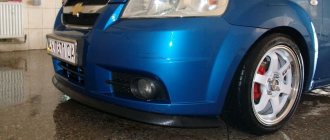
Car parts suitable for waterprint
For decoration with a special texture or specific pattern, most car parts that have a pronounced plane for design are suitable. The elements of the interior exterior of the car look original:
- steering wheel plane;
- console elements;
- door trims;
- inserts on the dashboard;
- door cards and armrests.
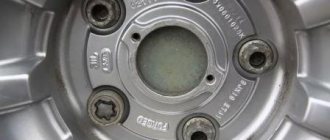
The image is also applied to the body planes of external parts:
- roof rails;
- wheel disks;
- planes of mirrors and spoiler.
Film
To create an aquaprint at home, fill the container with water and heat it to 35 degrees. Then, according to the sketch of the part, the film is cut based on the 3D geometry of the form.
Guessing the area for complex geometry is not so easy. Craftsmen make sketches of the dimensions of the part in advance, perform development and drawing of the surfaces of the planes. The size of the film is made with a margin; small notches need to be created on the edges in increments of 2 cm. The activator is prepared for work and the pattern is transferred.
Difficulties
Aquaprinting at home is a simple technology. But it has features that you need to know in order to avoid mistakes:
- If the water in which the film is placed is cold, then folds will form on the product. The best temperature is 30-35 degrees.
- It is important to choose the right amount of activator. If there is not enough of it, the coating will peel off, and if there is too much, it will smear. There should be enough developing component so that the film stretches without wrinkles.
- Washing must be done with clean water, otherwise the image will be damaged and the varnish will be applied unevenly.
- Preparing the product for applying the image must be done carefully. If there are traces of rust and dirt, the image will not transfer smoothly.