Purpose and location of the water pump
The water pump (pump) is designed to circulate antifreeze in the engine cooling system in forced mode. In this way, the hottest parts of the engine are cooled - the cylinders, pistons and combustion chambers. Hot antifreeze enters the radiator, where it is cooled by the oncoming air flow.
Without a water pump, coolant cannot circulate in the channels and lines. Therefore, when operating a car with a damaged pump, the engine quickly overheats and fails, and therefore requires expensive repairs.
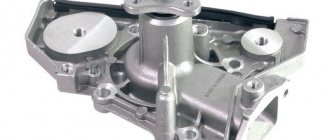
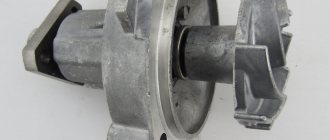
The design of the water pump is quite simple. The shaft, built into a housing with an integral flange, houses the impeller on one side and the drive pulley hub on the other. The rotation of the shaft is ensured by a pair of bearings, and the housing is sealed by an internal oil seal.
Some manufacturers additionally equip the pump with a grease nipple - a nozzle for pumping lubricant into the bearing.
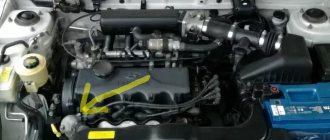
In classic VAZ models, the water pump is installed on the front of the engine and is screwed not directly to the cylinder block, but to a separate housing.
The pump shaft and impeller are driven by a crescent-shaped belt running from the crankshaft pulley to the generator. The design and operating principle of this unit are the same for carburetor engines of classic VAZ models and for engines with fuel injection.
https://youtu.be/https://youtu.be/bkH3pt1g5-U
_
Fault prevention
Everyone wants every part of their car to work for as long as possible. What affects the life of the fuel pump?
- Quality of antifreeze, timely replacement and level control. This is perhaps one of the main factors in the normal operation of the entire cooling system: from the engine jacket to the radiator.
- Cleanliness in the cooling system. The absence of solid particles and impurities will slow down the wear of the pump.
- Timely replacement of sealing gaskets of pipes that deteriorate (“tann” and crack) under the influence of coolant and high temperatures.
One of the most serious consequences of a malfunctioning water pump is boiling of the coolant and overheating of the engine, especially in the heat in traffic jams. When standing in city traffic jams in the summer, you need to monitor the engine temperature and prevent critical heating. And on long trips, always have a supply of antifreeze for topping up.
Troubleshooting
The following breakdowns are typical for water pumps on classic VAZ models:
- bearing wear and resulting shaft play;
- Mercury leakage through the seal;
- The shaft is skewed and jammed.
Almost all pump failures are due to bearing wear. The pump operates normally with minor wear and shaft play. As the clearance in the bearing baskets increases, the seal begins to leak antifreeze, and unnatural noises - noises or cracklings - can be heard from the pump installation site when the engine is running. As a result, the shaft tilts. There are three possible scenarios for further development.
- The bearing seizes and the belt slips off the pulleys. The engine continues to run, but the red low battery indicator on the instrument panel illuminates and the coolant temperature quickly rises to maximum.
- When a bearing seizes, the shaft splits into two parts. As in the first case, the battery discharge lamp lights up when the engine is running and the coolant temperature is at maximum.
- Due to the misalignment of the shaft, the rotating impeller punches a hole in the wall of the pump housing, through which all the coolant escapes in seconds, and the engine immediately overheats. In this case, it will be necessary to replace not only the pump, but also the housing in which the impeller has broken through the wall.
Unlike front-wheel drive VAZ models, where the pump is hidden under the timing cover, in the “classic” it is visible. This allows you to avoid unpleasant consequences. It is only necessary to periodically check the pump as follows.
- We start the engine, open the hood and listen. If you hear suspicious noises from the front of the engine, press the accelerator pedal manually and increase the speed until a hum is clearly audible.
- Carefully inspect the front of the engine for coolant leaks.
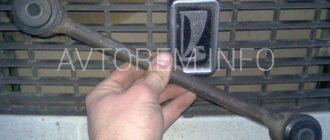
- If you find an antifreeze leak, grab the pump pulley with your hand and move it along the shaft axis to detect any play.
- If you feel a slight play or doubt the tension of the belt, unscrew the generator mounting nut on the adjusting bracket and loosen the belt. Then pump the pump pulley again.
Due to their age, the plant no longer produces original spare parts for these cars. Commercially available spare parts rarely last more than 50,000 km. Remember this number when servicing your vehicle in order to detect a malfunction in time.
If you find slight play, do not start replacing the water pump right away. He will still “live” on 3-5 thousand. km mileage However, you will have to constantly monitor its condition and order a new pump in advance.
If there are leaks to the ground, there is noticeable play in the shaft, and you hear rattling sounds during operation, the pump should be replaced immediately with a new one.
Purpose of the VAZ 2107 pump
A water pump is a device whose main mechanisms are a shaft and an impeller. The pump shaft is driven by transmitting torque from the engine crankshaft. Torque is transmitted through a pulley and a belt drive, which connects components such as the crankshaft and the generator.
On VAZ 2107 cars of the carburetor type in the first years of production, the pump pulley is also used to attach the forced cooling fan. Modern VAZ 2107 models of injection and carburetor types are equipped with electric cooling fans, so there is no need to drive the fan.
The pump ensures the circulation of coolant in constant mode after starting the car engine. If the pump does not function, the cooling cycle will be disrupted, which will lead to excessive overheating of the motor and failure. It is very important to replace the pump in a timely manner, otherwise the consequences will be fatal.
Water pump problems
The pump has a fairly simple design, so identifying faults is not difficult. Malfunctions may be associated with failure of the bearings, and there may also be a leak of coolant due to wear of the sealing seals. Such problems have various types of consequences:
- If there is a coolant leak, the antifreeze level will decrease and the engine will overheat. If coolant is leaking, you can compensate for its deficiency by adding antifreeze or water. If a fluid leak occurs, it is important to promptly identify this type of failure.
- When the bearings jam, the consequences of this phenomenon cause the belt to break. In this case, continuing to move is strictly contraindicated.
Replacing the pump on a VAZ 2107 car, injector or carburetor, if the above reasons occur, is mandatory. At home, you can repair the VAZ 2107 pump yourself. How to do this is shown in the video below.
However, experts do not recommend resorting to repairing the product, since it is much easier and more efficient to replace the pump than to buy a repair kit and carry out repair work. It is especially important to pay attention to the integrity of the main pump components.
What is needed for replacement
To replace the pump, you will need to use the necessary tools. These tools include:
- Keys for 8,10,13 and 17.
- A container to drain antifreeze from the system.
- Screwdriver.
The first step is to drain the coolant from the system, and only after that can you begin to replace the device. The process of replacing a water pump does not present any difficulties, but when performing work it is important to follow a clear sequence. We will look further at how the fluid is drained and the pump is replaced on a VAZ-2107.
How to remove a pump from a car: step-by-step instructions
To replace the water pump on a VAZ 2107, you need to drain the coolant. This is done by removing the cap from the radiator, as well as sequentially unscrewing the plug on the radiator and cylinder block. After draining the antifreeze, you can begin work on replacing the water pump. Step-by-step instructions for replacing the pump on a VAZ 2107 car:
- When loosening the nut securing the generator housing, remove the belt.
- Using a key set to “13”, you need to unscrew the bolted connections that secure the pump pulley. After unscrewing the bolts, it should be dismantled.
- Unscrew the fastenings of the coolant supply pipes and then remove them.
- Carry out the process of unscrewing the bolted connections by which the pump is fixed, and then dismantle it.
- After the pump is dismantled, it is necessary to replace the sealing gasket. The old gasket must be changed.
- Unscrew the 4 fastening nuts of the pump, and then disassemble it.
- Install the new pump along with the O-rings. O-rings and gaskets cannot be reused.
- Now you can assemble all the parts in the reverse order of removal.
From the instructions described above, it is clear that the process of replacing the pump is not particularly difficult. Before resorting to such actions, you should find out how to check the water pump. Checking the serviceability of the water pump involves performing the following procedures:
- Antifreeze leak detection. If the water pump fails, a coolant leak will inevitably occur. The location of the water pump housing should be inspected.
- The occurrence of extraneous noise. If the device makes strange noises, then this is the reason that it will soon need to be replaced.
- Formation of excessive vibration. Excessive vibration indicates bearing failure.
- System contamination. If you do not replace the antifreeze for a long time, this will certainly cause the pump to fail.
Replacing the water pump
The work of assembling a new pump on a classic VAZ model consists of several stages.
- Selection and purchase of a new part.
- Preparation of tools and workplace.
- Dismantling the old pump and determining whether it can be repaired.
- Installing a new pump and checking its operation.
Buying a new pump only makes sense if you are sure that the old pump is faulty or is reaching the end of its service life. If there is a car shop nearby, you can buy a pump during disassembly.
Replacing the pump on a VAZ with your own hands | VAZ lovers club
The main feature of domestic Zhiguli cars is that their cooling system consists of water pumps and pumps. The pumps of these machines have always been very reliable and durable, but still, over time, they were expected to break down. But the water pump failed only in two cases.
Water pump breakdowns
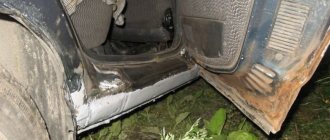
The first case is a leaking pump. This malfunction is immediately noticeable. Water or coolant leaks appear on the housing, which indicate a problem. The main thing is not to hesitate in solving it and to replace the pump as quickly as possible.
Otherwise, a few drops of coolant on the body can turn into a small trickle within an hour, and in a few minutes the system can lose the entire coolant. Under such conditions, not only can the pump burn out, but real problems can also begin with other parts of the motor due to significant overheating.
Therefore, replacement must be carried out immediately at the first sign of a leak.
The second problem is related to the appearance of unpleasant noise. This hum indicates that it is time to change your water pump bearings.
When it appears, you can drive for a while, but until the bearings are completely worn out, after which the pump will completely fail and leak due to excess pressure.
It is impossible to say for sure how long it will take for the noise to appear; it will depend on the general condition of the cooling system, the model and durability of the pump. It can last for just a few minutes and continue to work for several months; it is quite difficult to give an accurate forecast.
But you should not delay and conduct experiments, checking how much it will be enough, because this can lead to failure of the entire system and, according to the law of meanness, this will happen at the most inopportune moment.
The pump will definitely become unusable and replacing it cannot be avoided, so don’t hesitate.
A breakdown of the pump or cooling system will require you to shell out a lot of money, but if the engine overheats, these costs will increase several times, so it is better to take care of repairs in a timely manner.
This is a good enough reason not to put the problem off for a long time, but to immediately resolve this issue on your own or by contacting a car service, before one minor breakdown leads to the failure of more important systems, the repair of which will cost much more. But how to choose a high-quality pump and replace the water pump without turning to specialists for help.
Replacing the pump on a VAZ
In order not to make a mistake in choosing, you need to purchase a native VAZ pump. This will be the most ideal option not only in terms of costs, but also in terms of the reliability and durability of such a pump. If you couldn’t find a suitable option, you can listen to the advice of professionals or rely on your taste and choose the most optimal pump, since many options are suitable for a car of this brand.
To make your choice easier, you can rely on financial capabilities or recommendations from friends or acquaintances. They can recommend a good store with competent salespeople who can help you choose quality products. It is important that the kit includes more than one pump, as well as a tube of sealant and gaskets. But it happens that you have to buy sealant separately.
When changing the pump, you need to remember about replacing the cooler. There should always be enough of it. When installing a new pump, it is better to use new coolant and not skimp on its quantity.
Its durability will depend on this.
The quality of the antifreeze is of great importance, and if it was replaced a long time ago, then it is better to spend the money and buy a new cooler, completely replacing it in the system.
In order to replace the pump on VAZ 2101-2107 models, you will need several required tools. Open-end, box and socket wrenches for 8,10, 13 and 17 millimeters.
For used coolant that will need to be drained, prepare bottles or a bowl to avoid spilling this environmentally harmful solution on the ground.
If you replace a regular plug with a sensor that detects the inclusion of a fan at the radiator outlet, you will need a 27-30 wrench.
When all the tools are ready, you can begin directly replacing the pump. In this process, the order of actions is important, so do not rush.
Pump replacement steps
First of all, you need to unscrew the drain plug located on the engine block. All old coolant is drained into a pre-prepared container. If the cooler needs to be replaced completely, you first need to find the drain plug, on the sensor of which there is a button that turns on the cooling fan. Once the drain has been found, you can empty it of liquid.
Next, the battery is disconnected from the terminals and pulled out. In order to disconnect the fan from the battery, you need to unscrew the bolts that hold the fan to the casing and remove it.
After this, you should loosen the generator belt. Using a 17mm wrench, loosen the nut holding the generator shaft slightly and disconnect the belt from the generator shaft. To do this, it is not necessary to unscrew the nut completely.
Using the same 17 key, unscrew the bracket adjacent to the pump, which is connected by a bolt. After this, the bracket is moved to the side and the three fastening bolts are unscrewed, holding the pump pulley with a screwdriver.
- Next, unscrew the pulley itself.
- In order to remove the pump from the engine, you need to unscrew the four nuts located on top and disconnect the parts.
- The place of the old pump is cleaned of traces of the previous gasket so that the new part is installed in a clean place.
- After preparing the surface, a new gasket is installed, pre-coated with sealant.
- When everything is ready to install the new pump, all that remains is to secure it by performing all the above steps in reverse order.
After completing the installation, coolant must be poured into the system. Regardless of whether an old or new cooler is used for this, the tap must be open to effectively fill the system.
In order for air to escape from the system, it is necessary to disconnect the hose from the intake manifold, remembering to return it to its initial position upon completion of the process.
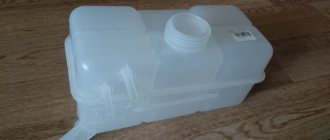
Since the liquid expands when heated, make sure that there is free space in the expansion tank.
By following these rules, replacing the pump will not cause any problems and you will not have to spend money on car service services.
Source: https://ourvaz.ru/instrukcii/zamena-pompyi-na-vaz-svoimi-rukami.html
Choosing a new pump
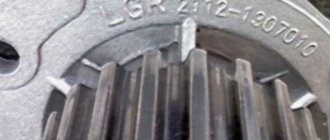
Pumps with the symbol 2101, installed on classic VAZ models of the first series, are currently not produced. Fits pumps (part numbers 2107-1307011-75 and 2123-1307011-75) with larger impeller and reinforced construction. First of all, they were produced for Niva. These pumps are a little more expensive than regular ones. So there should be no problems with the correct selection of a new pump.
On VAZ 2101-07 power units equipped with an injector or carburetor, pumps of the same design and size are used.
The most popular pumps among car owners are the following manufacturers:
- luzar;
- Hepu;
- TZA;
- "Phoenox".
Commercially available pumps have impellers made of plastic, cast iron and steel. Pumps with plastic impellers equipped with elongated and extruded blades have proven themselves to be flawless. Cast iron parts are less efficient at pumping liquids, while steel parts are susceptible to corrosion and are more likely to be counterfeits.
Water pumps are sold as a set of housings or individually. Your choice depends on the integrity of the housing - if it is damaged or corroded from the inside by an old rotor, purchase the entire product. When the body is intact, you only need to buy the transmission part.
How to remove the pump on a VAZ 2106 car
Regardless of the chosen method of troubleshooting, the water pump will have to be removed from the car. The operation cannot be called complicated, but it will take a lot of time, especially for inexperienced drivers. The whole procedure is performed in 4 stages.
- Preparation of tools and work location.
- Disassembly and dismantling of the element.
- Selecting a new spare part or repair kit for an old pump.
- Restoration or replacement of the pump.
After disassembly, the removed pumping unit should be examined for restoration. If only primary symptoms of wear are noticeable - a slight play of the shaft, as well as the absence of damage to the housing and the main bushing - the element can be restored.
Most car enthusiasts are inclined to completely replace the unit. The reason is the fragility of the restored pump, small savings on restoration and the lack of repair kits on sale.
Required tools and supplies
You can remove the “six” water pump on any flat surface. The inspection ditch simplifies only one task - unscrewing the generator mounting nut in order to loosen the belt. If desired, the operation is performed lying under the car - it is not difficult to reach the bolt. The exception is cars that have preserved side casings - anthers, screwed on from the bottom with self-tapping screws.
No special pullers or devices are required. The tools you need to prepare are:
- a set of heads with a crank equipped with a ratchet;
- wide container and hose for draining antifreeze;
- a set of ring or open-end wrenches with dimensions of 8-19 mm;
- mounting blade;
- flathead screwdriver;
- knife and brush with metal bristles for cleaning flanges;
- rags;
- protective gloves.
From consumables, it is recommended to prepare antifreeze, high-temperature sealant and aerosol lubricant such as WD-40, which makes it easier to loosen threaded connections. The amount of antifreeze purchased depends on coolant losses due to pump failure. If there is a slight leak, it is enough to purchase a 1 liter bottle.
Taking this opportunity, you can replace the old antifreeze, since the liquid will still have to be drained. Then prepare a full filling volume of antifreeze - 10 liters.
Disassembly procedure
The procedure for dismantling the pump on the “six” is greatly simplified compared to the newer front-wheel drive VAZ models, where you have to remove the timing belt and disassemble half of the drive with markings. On the “classic” the pump is installed separately from the gas distribution mechanism and is located outside the engine.
Before starting disassembly, it is advisable to cool the warm engine so that you do not have to burn yourself with hot antifreeze. Drive the car into the workplace, apply the handbrake and disassemble according to the instructions.
- Lift the hood, find the drain plug on the cylinder block and place a cut canister underneath to drain the antifreeze. The mentioned plug in the form of a bolt is screwed into the left wall of the block (if you look in the direction of travel of the car).
There is an easier way to remove the pulley. Without a tensioned belt, it rotates freely, which creates inconvenience when loosening the mounting bolts. In order not to fix the element with a screwdriver, loosen the indicated fasteners even before removing the belt drive by inserting a screwdriver into the pulley slot on the crankshaft.
After removing the pumping unit, perform 3 final steps:
- plug the open opening with a rag and use a knife to clean off the remaining cardboard gasket from the landing pad;
- wipe the block and other components where antifreeze previously splashed;
- remove the pipe at the highest point of the cooling system connected to the intake manifold fitting (on the injector, the heating pipe is connected to the throttle valve block).
The pipe at the highest point is turned off for one purpose - to open the way for air displaced by antifreeze when filling the system. If you ignore this operation, an air lock may form in the pipelines.
Video: how to remove the water pump VAZ 2101—2107
Preparation of tools and workplace
To replace the water pump on a classic VAZ model, you will need a flat, illuminated area or a warm garage (in the cold season). Since all work is carried out from under the hood, a surveillance channel is not needed.
You will need the following tools:
- set of socket wrenches and heads;
- flat screwdriver; crowbar;
- Gloves made of material and rags.
- In addition, high temperature sealant and 1 liter of coolant are required for refilling. To seal the coolant, prepare a 10-liter container with a wide neck (a plastic container or cut from the side of a canister) and a stretch meter for a regular hose.
To avoid burns, all work must be done on a cold engine.
To remove the pump on classic VAZ models, you don't need to rotate the crankshaft, align the toe markers, or disassemble the gear drive like you do in the housing on front-wheel drive vehicles. Simply park your car on a level platform and immobilize it with the handbrake.
How to check the pump's performance?
How to check a pump is a simple question. Any car owner can do this without resorting to the help of specialists. The first thing that can become an alarming signal in the operation of the VAZ 2114 pump is the excess temperature of the liquid in the engine cooling system. This information will be given to you by an arrow on the dashboard. The fluid temperature in the engine should not exceed 90 during normal operation of the system.
If you notice that the temperature indicator has risen above the permissible norm, this may indicate either a coolant leak, which is also the reason for the incorrect operation of the water pump or its components, or its complete failure. In any case, even after watching the training video, you should conduct a couple more tests. You need to warm up the car engine to operating temperature (82-90 degrees) and clamp the upper radiator hose.
If the water pump is working properly, you will feel pulsating pressure in the pipe. In addition, it is worth inspecting the oil seal and determining whether coolant is leaking through the pump holes. To do this, remove the timing belt cover. If there are brownish streaks or deposits on the pump holes, this is a sure sign that the seal needs to be replaced. A pump malfunction, namely a bearing failure, can be identified by the characteristic noise when the pump operates.
If it is impossible to visually determine damage to the water pump, but all the prerequisites may indicate its malfunction, the only correct step is to remove the pump from the outside. This way you can evaluate by eye the performance of the reverse side of the rotor, namely the blades, which are often destroyed by rust. In any case, replacing the water pump will not cause you any trouble if you study the process in detail in the video and follow the instructions described below.
Dismantling the pump
Drain unused fluids in the following order:
Open the mask and side of the drain plug. Place a container of uninterruptible fluid under the vehicle. The inner screw is located on the left side of the cylinder block (in the direction of travel) under the third spark plug. The drain screw is located next to the oil pressure indicator.
- Unscrew the screw with a nut using a 13mm key and place one end of the hose in the container. Remove the screw completely by hand and detach it to the side, immediately place the hose on the hole.
- The other hand slowly opens the upper radiator plug. During fluid disassembly depletion, open the radiator plug to allow air.
- When disassembling the fluid begins to release a thin line on the side of the block, screw the plug screw in and tighten it with a wrench.
There is no need to drain all the coolant when dismantling the pump. You just need to reduce your level below the pump installation location. However, it is not recommended to cut a heavy flow, because in this case a lot of hot water is lost.
To fill the freshly brought fluid with fresh air and channel, disconnect the thin manifold heating branches (in the carburetor version of the engine). In an engine with fuel injectors, the cable is connected to the throttle body.
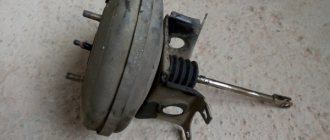
The generator disk is necessary for further work. To do this, use a flat wrench 17 to unscrew the tensioner mounting nut (located in the upper part of the total mounting bracket) and push the generator housing towards the crankshaft using the shaft. For easier access to the nut, you can disconnect and remove the battery.
The generator disk is necessary for further work. To do this, unscrew the fastening nut with wrench 17 (located in the upper part of the mounting bracket) and move the generator housing towards the crankshaft using the shaft. You can disconnect and remove the battery to gain easy access to the nut.
Once the belt is free, remove it from the pulleys and continue disassembly.
- With a heavy screwdriver on the pump shaft, loosen and remove the three screws that secure the pulley using a 10-point screwdriver. Remove the pulley and set aside. The water pump pulley is a screwdriver, unscrewed and removed.
- Unscrew the nut that protects the generator adjustment bracket using a screwdriver up to 17.
- Using a 13mm key, unscrew the four nuts that secure the pump flange to the housing.
- Carefully open the pump flange with a screwdriver and remove it.
- Clean the old gasket and sealant residue from the surface of the pump housing and remove any liquid residue. Use a small mirror to check the condition of the case from the inside.
- Assess the condition of the remote pump. If the Desalina leaks and the roller is a little loose, you can fix it.
Replacement process
The sequence of the process is as follows:
- The VAZ 2109 is placed in the garage and the handbrake is tightened. The gearbox must be in the “Neutral” position. If the car is just back from a trip, you need to let the power plant cool down.
- The working fluid must be drained from the system using drain plugs and a container to collect the fluid. At the same time, you can assess the condition of the system - brown and dirty liquid will indicate that the system is very dirty and needs to be flushed.
Using keys “10”, unscrew the three bolts securing the protective cover of the timing belt. It is located on the left side of the power plant. Afterwards, the cover is removed, but is not removed far, since there are marks on it for setting TDC in the 1st cylinder.
Removing the protective cover
Aligning the marks on the camshaft
Using a key set to “17”, the tension roller nut is first loosened and then completely unscrewed. Then the video is removed. It should also be checked for wear - there should be no play in it, and it should rotate without jamming.
Remove the belt from the camshaft gear and lower it down. Next, use a “17” key to unscrew the bolt securing this gear, and it must be locked using a powerful screwdriver through the technological holes in the gear.
The gear must be removed carefully, since it is locked on the shaft using a key; when removing it, it is important not to lose it.
Then the nut and three bolts securing the back cover are unscrewed, this is done with a “10” key. This cover is then removed, providing access to the pump mounting bolts.
- The pump mounting bolts are also unscrewed. To remove the faulty pump, you will need to pry it off with a screwdriver.
- Simply removing the pump from its seat will not work, since the distance between the engine and the fender liner is not enough. To pull the pump out, you will have to jack up the engine itself a little from the pump side until it becomes possible to remove it.
Removing the pump - Before installing a new one, the pump seat will need to be thoroughly cleaned with a knife to remove any remnants of the old gasket and wiped well.
- The new pump is placed in place so that the markings on the end of the housing are at the top. The pump mounting bolts must be tightened well, but carefully, since they are screwed into a block made of aluminum.
Reassembly is carried out in the same sequence as disassembly, but some nuances must be taken into account.
Pump installation
Before installing the new pump, check how it fits with the old housing. To do this, insert the pump with the gasket into the slot until it stops and turn the end of the shaft. If the rotor rubs against the housing wall, you probably have a fake.
Reverse the procedure for assembling a new pump.
- Apply housing flanges and gaskets.
- Install the pump in the correct position - the bolts that protect the generator bracket should be on the left side.
- Tighten all mounting bolts in reverse order. Secure the pulley.
- Install the alternator drive belt and tighten it by pressing a crowbar against the electrical box housing. Tighten the clamp nut. The alternator belt is installed and tensioned at the final stage of assembly.
Before pouring, it is better to filter the old liquid through a fine brass mesh. Pour the liquid carefully so that no sediment forms at the bottom of the container.
First, fill the system with fresh antifreeze through the radiator filler neck. Slowly add antifreeze, observing the tube removed from the manifold heating block (in an injection engine - the throttle valve). As soon as the liquid flows from the tube, immediately put the cap on the connector and secure it with a clamp. Carefully pour the remaining coolant into the expansion tank to the required level (between the Min and Max marks).
When finished, close the radiator and reservoir caps and start the engine. After warming up to 80-90 ° C, check the front of the engine for leaks and wait for the cooling fan to turn on. This means there are no air pockets in the hoses, which means the cooling system is working properly.
The final stage of pump replacement
Pour coolant into the radiator. To avoid air locks, you need to open the stove valve to maximum. Don't forget to disconnect the antifreeze supply hose from the intake manifold. Put it in place only when antifreeze starts flowing from this hose.
After filling the antifreeze to the required level, start the engine and let it warm up to operating temperature. After letting it run for a while, turn it off, after the engine has cooled, add the missing amount of antifreeze, if necessary. Also check the belt tension. After all these steps, the car is ready for use.
Water pump repair
If the old pump housing is intact, it can be repaired by replacing the shaft with commercially available bearings and seal. To do this, use a special puller to squeeze out the impeller and then pull out the shaft. This operation can save up to 60% of the cost of a new pump and can be done independently.
Replacing the pump in the cooling system of classic VAZ models yourself is not that difficult. Using a standard set of tools and carefully following the instructions, you can do this without outside help.
Pump repair
In some cases, the water pump can be repaired. It is recommended in situations where either wear of the bearings or the oil seal located inside the device occurs.
Repairing the pump will save you about 600–700 rubles, which in principle is not so little. The maintainability of the pump is determined by the condition of the impeller and shaft. If they are relatively new, then they can be restored.
A complete replacement of the pump on VAZ cars is only for the better. The new unit is inexpensive, and after replacement the car’s engine will begin to function fully.