Connecting a GM12 and OBD2 scanner to VAZ, Lada cars
This article will discuss ways to connect diagnostic scanners to the OBD2 and GM12 connectors of VAZ, Lada, and the following models: 2107, 2108, 2109, 21099, 2110, 2111, 2112, 2113, 2114, 2115, Granta, Priora, Vesta, X -ray, Kalina, Largus, Niva The work of the ELM327 OBDII and Master Kit BM9213 scanners with VAZ, Lada cars and diagnostic programs Torque, OpenDiag and their correct configuration will be considered. We will also consider connecting these scanners using the example from the videos
.
Connecting a diagnostic scanner via GM12 and OBD2 connectors to VAZ, Lada cars
Let's start right away with where most novice diagnosticians of VAZ or Lada cars fail. For its injection cars, AvtoVAZ installed connectors for connecting GM12 type ECUs. The ELM327 scanner is designed to work with OBD2, so contacting the “brains” of the car by using this scanner to diagnose VAZ and Lada cars up to model 2114 will be a little problematic, but, in general, with certain “dances with a tambourine” it is quite possible (although cars with Bosch firmware 7.9.7 will be visible from 2011 without problems). But first of all, we will look at connecting a diagnostic scanner via the GM12 connector, which is connected to a car with a GM12 (OBD1) connector via USB.
Connecting the scanner to the GM12 connector of VAZ, Lada 2107, 2108, 2109, 21099, 2110, 2111, 2112, 2113
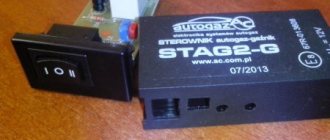
For diagnostics (as well as CHIP tuning, firmware) of injection engines of VAZ cars with a GM12 (OBD1) connector via the K-line, a scanner from Master Kit BM9213 and its upgraded version BM9213M are used.
User manual and pinout Master Kit VM9213
Operation Master Kit VM9213
- You can check the device using the Setup CE v1.7.exe utility https://masterkit.ru/zip/Setup CE v1.7.zip
- Apply 12V to the module, according to the connection diagram, the 5-24V power indicator should light up.
- Connect the device to the PC, the 5V power indicator should light up.
- The operating system should automatically install the driver. If this does not happen, download the driver https://www.ftdichip.com/Drivers/VCP.htm and install it manually using the generally accepted method. Please note that the latest drivers are available on the chip manufacturer’s website www.ftdichip.com/Drivers/VCP.htm
- Install the Setup CE program and run it. In the settings, select the device COM port assigned by the operating system.
- In the program menu Service - Settings, select the COM port issued by the operating system and click OK.
The VM9213 adapter also works on a PC with the KWP program. But when working with it, it is connected to the ECU only with the engine running. This is a feature of this program.
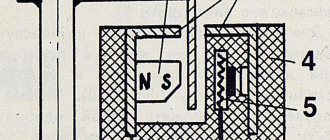
VM9213 device diagram. As you can see, it can work with both OBD1 (GM12) and OBD2, which makes it universal, suitable for working via K-line with all VAZ and Lada car models with an injection engine. With its help, you can carry out both diagnostics of domestic cars and firmware of their ECUs. It is also capable of diagnosing foreign cars that support connection via K-line or L-line, but this is a separate topic for another article.
As mentioned above, this scanner is capable of diagnosing modern cars equipped with an OBD2 connector and supporting debugging via the CAN bus. These are Lada models starting from 2114, up to Lada Vesta and X-ray.
Connection via K-line to VAZ, Lada cars with OBD2
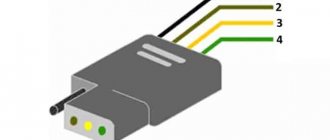
Pinout when connecting via OBD2 K-line adapter VM9213
Cars with an OBD2 connector are most often diagnosed using the ELM327 scanner. It is also possible to use it with OBD1 (our GM12), but not without labor costs.
ELM327 pinout when connected to OBD1 (GM12)
Here is a video about connecting the ELM327 diagnostic scanner to a Lada 2112 with GM12
Connecting the scanner to the OBD2 connector Lada 2114, 2115, Granta, Priora, Vesta, Kalina, Largus, Niva
Why is ELM327 used more often? Yes, simply because it is more widespread, supports a much larger number of cars and is itself made foreign (by the large Canadian company ELM Electronics), unlike BM9213 and other adapters from Master Keith. ELM327 is also compatible with a huge number of applications, both for PCs and smartphones based on Android or IOS. Or maybe even Windows Phone. The ELM327 can also “connect” with devices via Bluetooth or Wi-Fi protocols, which the original versions of BM scanners could not.
Pinout features
To independently diagnose a car through a connector, it is important to know how and where to correctly connect the necessary equipment. To make this task easier, a pinout diagram will help you.
In the pinout, the main outputs are designated as follows:
- A – this object is intended for connecting ground from a car battery;
- B – used to connect equipment of the “L-Line” type, which is not suitable for all modifications of the 2110 (this should be taken into account when selecting an adapter or scanner specifically for your car);
- M – suitable for connecting “K-Line” type devices (the most popular method for diagnostics, because thanks to the M output you can connect any computer equipment);
- N – this output will be supplied with power while diagnostics are being performed;
- G – this pinout object allows for control of work safety, helps to avoid short circuits or other problems of this kind.
Knowing the basic pinout symbols, you can easily connect diagnostic equipment and correctly carry out all procedures.
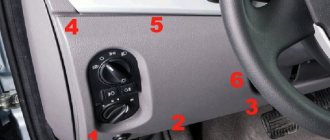
When is diagnostics required?
The first sign that the car system should be diagnosed will be the blinking of the CHECK ENGINE lamp located on the instrument panel. Please note that the presence of errors in the system will be the fact that after 10 seconds after starting the engine, the warning light will not go out and the error data will be stored in the ECU memory.
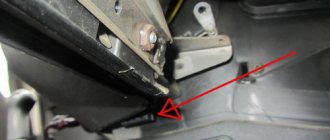
The error is indicated by an arrow.
Where is the connector?
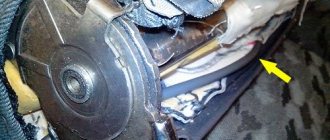
In order to read all the fault codes that have arisen using diagnostic equipment, you will have to get to the diagnostic connector, which is located directly under the instrument panel console on the left side.
The location of the diagnostic block is indicated by an arrow.
You will detect it immediately as soon as you look at the approximate area of its location, since its characteristic shape is very specific.
Most often, diagnostic program codes are “deciphered” using a special device. However, on VAZs it is not so difficult to do it yourself.
ECU January 4 for VAZ 2110
The diagnosis itself goes like this:
- Connect contact “B”, which has the diagnostic block and “ground”;
- Turn the ignition key to the third position, do not start the car;
- First, the aforementioned “CHECK ENGINE” lamp flashes code 12 three times in a row. It, in fact, does not signal any malfunction, but simply shows that the diagnostic programs are working. On the VAZ 2110 this happens in this order: the lamp blinks briefly once (which should be considered the designation of number 1). After a pause of at least two seconds, it flashes twice in a row (two). So we got the number two. And this is repeated three times so that the driver can understand these signs;
- Now you need to be careful not to miss any faults. After the diagnostic program has declared its serviceability, it will begin to display error codes, if any. In the same way - flashes and pauses.
Pinout
Knowledge of pinouts may be required if a car enthusiast wants to make an adapter for computer diagnostics with his own hands, or if you need to connect without one. Experts recommend buying ready-made devices without the need to make a plug yourself. However, if you do not have such an opportunity, and diagnostics need to be carried out urgently, we will consider two main pinout options used on VAZ cars of various years of manufacture. Until 2002, AvtoVAZ products used the following pinout option:
- The 4th and 5th pins are GND outputs.
- Pin 16 – +12 V (power line).
- The 7th contact is the diagnostic line itself.
Connecting the ELM 327 adapter to the VAZ 2110 diagnostic connector with your own hands (with photo)
There is a special lamp on the instrument panel with the inscription CHECK ENGINE. When you turn on the ignition, it lights up, and until you start the engine, a special program reads data from all systems and components of the car, thus transmitting data to the on-board computer to identify faults.
After you start the engine, the lamp should go out, but if it stays on for another 10 seconds, it means that some problems have been identified and error codes have been entered into the on-board computer programs. Communication with the controller is carried out using the diagnostic block.
CHECK ENGINE control signal on the instrument panel of a VAZ 2110
Instructions for performing diagnostics
To diagnose a VAZ, a computer or diagnostic equipment is connected using a diagnostic connector.
Computer diagnostic socket
All broadcast codes are read by the scanner. They are stored in the controller’s memory until its power is turned off. Using special software, specialists decipher the codes and determine what malfunctions and failures exist in the system.
The diagnostic procedure consists of several stages:
- Suspension diagnostics. This procedure is performed if uneven tire wear, knocking or humming is detected when driving at a constant speed, making sharp turns, or on an uneven road. And also in case of premature activation of the ABC, increased free play of the steering wheel.
- Engine check. The power engine should be diagnosed if it runs intermittently, takes a long time to heat up, is difficult to start, as well as with increased fuel consumption, loss of power, the appearance of extraneous noise, or a decrease or increase in idle speed. During diagnostics, the electrical supply and ignition system are checked, and the pressure in the cylinders is measured (the author of the video is Pavel Master).
ELM327
Separately, we will introduce you to the ELM327 adapter, with the help of which many VAZ 2110 owners perform full diagnostics on their own.
ELM327 is one of the latest OBD developments. This scanner is used to check cars using a computer. The key advantage is that the device supports all known OBD protocols and interacts with many diagnostic programs. A USB cable is used to connect the device to a computer.
The software for the ELM327 is mostly free, although some software is available only for a fee.
The adapter can work on computers with different OS. Namely:
- DOS;
- Windows;
- MacOS;
- Linux;
- PalmOS;
The full capabilities of the scanner can only be fully realized through properly selected software. For self-diagnosis, software for scanning the transmission and engine is available free of charge. Commercial versions of the programs allow you to additionally check other components of the car.
Key Features
Let's take a look at the capabilities that the ELM327 chip provides:
- Reads error codes and vehicle malfunctions;
- Displays codes and their descriptions;
- Exports data for printing, if necessary;
- Removes error codes;
- Displays data in metric and US measurement systems;
- Records, saves data, builds graphs;
- It has an acceleration counter from 0 to 100 km/h, which allows diagnostics on the go.
Many vehicle operating parameters must be checked while driving. Not all adapters are suitable for this, so it is important to choose equipment that suits your requirements.
Equipment
By purchasing this adapter, you get:
- High precision adapter based on ELM327 processor;
- OBDII cable;
- Cable for connecting to a computer;
- Disc with free software.
It is not necessary to have a powerful computer to operate the adapter and receive information. The parameters of the simplest laptops are quite enough to diagnose the VAZ 2110.
Self-diagnosis allows you to save a lot of money, get objective information about the condition of your car, and also save yourself from unnecessary financial costs that will certainly appear when you go to a service station.
Why is diagnostics needed?
Let's first figure out why we need to diagnose faults and whether this is required specifically for your car.
The main advantage of diagnostics is the ability to save money, time and modern nerves. If the car begins to behave inappropriately, some extraneous sounds appear, the stable operation of the engine is disrupted, then there are two options:
- To study all systems manually by dismantling and testing would waste a lot of time and nerves. The probability of finding the cause of the breakdown is far from 100%!
- Conduct computer diagnostics yourself by connecting a special adapter or cable to the computer. The program will scan the car and be able to issue the appropriate error codes. After studying our material with error codes, you can easily find the reason why the car began to behave abnormally.
Is it worth going to a service station?
The quality of diagnostics at a service station is often not much different from an independent check. Having an adapter and cable to connect the device allows you to deal with the problems of your own car without outside interference.
By contacting a service station, they can diagnose you with the same equipment, but they will only ask you for a decent amount of money. If you do not control the progress of the check yourself, technicians may claim to have found other errors that in reality do not exist.
The result of visiting a dubious service station for diagnostic purposes can be serious financial costs and a long absence of the car at your disposal.
Example of an adapter with cable
The only option when it is worth contacting a car service center is the lack of diagnostic equipment and the presence of good friends among car mechanics.
We recommend: Car generator diagnostics
How to diagnose a car
- Connect contact “B”, which has the diagnostic block and “ground”;
- Turn the ignition key to the third position, do not start the car;
- First, the “CHECK ENGINE” lamp displays code 12 with 3 flashes. It shows that the diagnostic programs are working. On the VAZ 2110 this happens in this order: the lamp blinks briefly 1 time (which should be considered the designation of number 1). After a pause lasting at least 2 seconds, it flashes 2 times in a row (two). So we got the number two. And this is repeated 3 times so that the driver understands these signs;
- After the diagnostic program has declared its serviceability, it will begin to display error codes, if there are any, of course. In the same way - flashes and pauses.
Features of the diagnostic connector
Standard 12-pin connector for diagnostics
Depending on the year of manufacture of the car, the connector can be 10-pin or 12-pin. To connect to it you will need to make an adapter.
We make wiring
You can also throw a separate wire, but this is “collective farm”.
The problem is that the codes differ slightly from source to source. I dealt with this problem in the past and realized that this is only an approximate diagnostic method, but for the first time it will do.
I DO NOT agree. The codes are universal and depend only on the protocol.
The trick is that OBD1 can also be installed - then you need an adapter. But even if there is an OBD2 connector, it is not a fact that the scanner will be able to connect to the ECU. It's like who's lucky with the ECU.
What can be done, high speed on a VAZ 2112 idle speed sensor also changed
See what's in the ECU. I would recommend an electrician as they KNOWLY have idle speed sensors that work.
Operating principle of the diagnostic connector
Information is collected, processed and stored. External test equipment connected to the diagnostic connector located inside the cabin will help you interrogate the electronic control unit, view error messages, find and eliminate faults. The European standard, launched in 2000, specifies that the test connection be located directly next to the driver's seat at an outstretched distance (up to 1 meter). The exact location is not specified. Access must be free, excluding additional manipulations with wrenches.
The creators of European passenger cars place diagnostic blocks under:
- dashboard,
- handbrake lever,
- steering column,
- ashtray.
Important. On the VAZ 2110, the diagnostic connector is mounted in a niche under the steering wheel on the driver's side.
The information provided by the car's electronic unit uses a special data exchange algorithm. The OBD2 (On-Board Diagnostics Version 2) protocol, developed by the USA, is recognized as a mandatory standard for checking cars with internal combustion engines. The command system, electrical signals, and exchange order are discussed. The shape of the connector has not been clearly established. Historically, since 2000, a two-row 16-pin trapezoidal connector has been used. At the same time, the VAZ 2110 continues to use the old-style 12-pin GM-12 connector. Manufacturers equip trucks and commercial vehicles with connectors of other types.
Where is the diagnostic connector on the VAZ 2110
Monitoring the condition of the car by ear, smell, touch, and visually allows you to focus the driver’s attention on emerging problems. The VAZ 2110 car is equipped with electronic devices for monitoring the operation of the engine, components, and mechanisms. An external diagnostic device will help you understand the situation.
The article will answer the questions:
- where is the diagnostic connector located?
- what diagnostic connectors are installed on the VAZ 2110,
- which scanner to choose,
- how the adapter is connected,
- which allows you to find out the testing of the vehicle.
Vehicle manufacturers, when releasing new models, strive to adhere to international standards. Making a car is half the battle. Ensuring service operation of the car and unifying maintenance is a more important task. The developers of the VAZ 2110, trying to keep up, equipped the car with nine sensors, eight actuators (the number of sensors and devices depends on the configuration option and version of the car), an electronic speedometer, tachometer, controllers, and an anti-theft system.
OBD connector location. How to find the OBDII connector
If you have purchased a diagnostic adapter and do not know where the OBD 2 diagnostic connector is located in your car, then this article will come in handy. The article will tell you where the diagnostic connector is located on cars of various brands: VAZ, GAZ UAZ, Chevrolet, Reno and others. The diagnostic 14-pin connector on a VOLGA car is located under the hood, on the wall of the engine compartment, on the passenger side
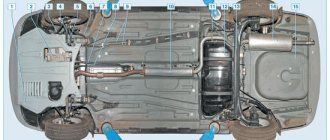
On newer models, this connector is already standard OBD 2 located under the steering wheel (a similar location in Gazelle cars of recent years). On a VAZ 2110 - 2112 car, the diagnostic connector is located to the right of the driver, next to the steering column at the bottom.
On a VAZ 2109 with a high instrument panel, the diagnostic connector should be found on the shelf under the glove compartment, next to the car's ECU. On cars of the VAZ 2108-2115 model range with a “European panel”, the diagnostic connector is located in front of the gearbox, directly under the cigarette lighter. The diagnostic connector is covered with a decorative cover. On a Kalina car, the diagnostic connector is also located behind the decorative cover near the gearshift knob. On VAZ Priora cars, the OBD diagnostic connector is located on the rear wall, behind the glove compartment. On UAZ cars, the diagnostic connector is located either under the hood near the wall on the left of the driver (goat), behind the driver's seat (loaf), under the steering column on new cars like UAZ Patriot. On Reno cars, the diagnostic connectors are located either behind the glove compartment; if you open it, you will see a diagnostic connector at the very end of the far wall behind the decorative cover, or under the steering column from below. On Chevrolet cars, the diagnostic connector is also usually located under the steering column at the bottom, or to the right of the driver on the side of the center console, near the driver’s right foot (Chevrolet Lanos).
Where to look for the connector
It is important to know that on different cars the required socket is located in different parts of the car. Moreover, on some AvtoVAZ models it may be in a completely different place compared to another car. Let's look at several VAZ cars as an example:
- on the VAZ-2112, as well as on the 2110, as well as 2111, the socket is located to the right of the driver’s seat, immediately under the column;
- on models 2108, 2109 and 21099, the socket you need is located under the glove compartment, on a special shelf;
- on cars with a europanel it can be found in the center of the console, near the cigarette lighter. A special decorative cover is used to disguise it;
- on Lada Kalina cars, the connector can be found near the gear shift lever. As is the case with cars with a Europanel, it is hidden under a special cover;
- on a Priora you need to look for it right behind the glove compartment, on the wall.
We recommend: What to check before buying a car
Improvement of the OBD connector for the VAZ 2110: independent connection of the ELM 327 adapter
There is a special “CheckEngine” light on the dashboard of the VAZ 21110 car. When the ignition is turned on, the light comes on and while the vehicle’s internal combustion engine is not running, a special program reads data from all units and systems of the vehicle, transmitting data on fault detection to the on-board computer.
If, after starting the vehicle’s internal combustion engine, the “check” does not go out for another 10 seconds, it means that faults in the system have already been identified and the corresponding error codes have been entered into the memory of the on-board computer.
The codes are deciphered either with a special diagnostic device or independently. Using the example of the VAZ 2110 “January-4” ECU, we will consider the algorithm for performing diagnostics independently:
- connect contact “B” of the diagnostic block and “ground”;
- turn the ignition key to the third position without starting the car;
- the “CheckEngine” light illuminates the code “12” (the light flashes once -1, after a pause of two seconds it flashes twice in a row -2 flashes three times in a row (the program has started diagnostics);
- the program will detect the malfunction by displaying the corresponding error codes (flash, pause).
Some tips for installing a modern ELM 327 adapter with the OBD-II program (protocol) for the VAZ 2110:
- purchase an adapter along with a cable;
- study the installation instructions (pinout of the block and location of each connector);
- You must insert your own cable into each connector of the block, checking the pinout; it must comply with the manufacturer’s instructions.
Let us also add that programs for determining faults of the ELM 327 adapter are downloaded from various sources on the Internet.
Installing a new adapter
Modern adapters elm 327 with the OBD-II program (puncture) are suitable for the VAZ 2110. You can also install them yourself. First you need to purchase an elm 327 and a cable for it. You already know the location of the diagnostic connector. Be sure to study the instructions, which indicate the pinout of the block and the location of each connector.
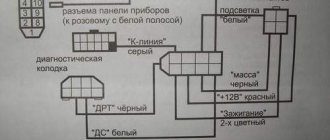
Connection diagram for ELM327 to 12 PIN diagnostic block
The pad can be removed quite easily. Insert your own cable into each connector of the block, making sure that the pinout of the elm 327 complies with the manufacturer’s instructions. Check that each connector is connected correctly and each cable is in the correct place. After this, the block is installed in its place.
Connecting the diagnostic connector to the block
Fault detection programs for elm 327 can be downloaded on the Internet, many of them in a free version. Now your VAZ is ready to detect errors in various car systems, and you can always download error codes from us.
Connecting the diagnostic connector to the block Connecting the diagnostic connector to the block
Materials for download:
- Other
- Engine
- Steering
- Electrical equipment
- Transmission
- Brake system
- Suspension
- Tuning
- VAZ 2110 Other
- Engine
- Steering
- Electrical equipment
- Transmission
- Brake system
- Suspension
- Tuning
- Electrical equipment
- Steering
- Video publications
- VAZ tuning photo stream
- Operation and repair manuals