The installation took me a day and a half at a leisurely pace, it doesn’t seem to be difficult, but until you adjust everything so that it’s good, a lot of time is wasted. If you don’t have the skills and various tools, then it’s better not to try it yourself.
And so the installation details:
1. A warm garage is very desirable, because... you will have to disassemble the interior, plus there is a lot of small painstaking fuss under the hood. 2. Buy a couple of liters of antifreeze. 3. Buy additional adapters for 16mm-18mm antifreeze hoses and clamps for them, just in case. 4. Tap M5x0.8 (to cut threads in the heater body)
I started first by installing the fuel intake and installing the fuel pump.
Under the hood I pulled it through the rubber plug of the brakes on the right, making a broach out of stiff wire, and first disassembled the pump chip to make it easier to pull it through. I clamped the Webast fuel clamps without special tools, just with side cutters; if that doesn’t work, buy regular clamps. The webast braid is monolithic, so I immediately figured out where and what wires go, and there’s nothing stopping them right now, I routed them under the hood. I screwed the fuses with the diagnostic chip onto a self-tapping screw to the standard fuse box.
I mounted the heater on the right pillar, did not use the bracket from the kit, bought an iron plate at a construction store and already bent it as needed. I screwed one bolt through the brake pipe fasteners, drilled a hole under the second on the strut cup, and inserted the bolt from the inside on the side of the strut. There was no need to remove the wheel; there was enough space there.
Plus I added diagonal rigidity to the bracket. Important point! Don’t be surprised, there are no threads for bolts on the heater body, but only holes in which you need to cut the threads yourself. To make it more convenient, I first connected the exhaust pipe, air duct, fuel pipe and wiring (since all this is located at the bottom of the heater block) and only then connected the antifreeze hoses. The main task was to heat the internal combustion engine, so the heater was connected after the heater radiator. We take the supply to the heater from the return of the stove by connecting the Webast pump into the cut in the hose. The pump was conveniently hidden right at the outlet of the stove behind the air receiver. There were a minimum of connections.
According to the wiring, we throw the mass onto the body, plus directly to the battery. Since the cabin heater was not connected, it is necessary to connect the red power one and the red one with a black stripe. We don’t touch the rest of the wires, but insulate them and hide them somewhere.
Is it easy to install Webasto on your own or is it better to contact a specialized company for installation? We will try to give a detailed answer to this question in our article.
Installing a Webasto pre-heater is an effective way to solve problems for motorists associated with cold engine starts, especially in winter.
Below we will tell you how you can install Webasto on your car, and also analyze the differences between self-installation of heaters on cars with diesel and gasoline engines and installation by specialists.
Is it advisable to install Webasto?
Any car owner knows how difficult it is to start the engine in the cold season. At the same time, the engine not only starts with difficulty, but a cold start leads to increased wear of power unit parts, and as a result, the service life of the equipment is significantly reduced. In addition, the level of comfort also decreases: from the moment you first try to start the engine until the moment the engine and the air in the cabin warm up sufficiently, a lot of time can pass.
- you actively use the car in the cold season, and even in a fairly cold climate (an example is the autumn-winter season in St. Petersburg and the region);
- you are using the vehicle for commercial purposes;
- you or your loved ones experience discomfort while in the cabin during the cold season
- then the installation of Webasto heating equipment for internal combustion engines becomes quite relevant.
If we talk about heaters from a German manufacturer, then their installation will be quite justified, even if we take into account the initially not the lowest cost of the equipment (from 38 thousand rubles for the heater itself + from 11 thousand for installation) . The feasibility of equipping a car with a Webasto heater is due to the advantages it provides:
- The ability to start the engine in any frost, even after the car has been standing in the cold for a long time.
- Increased engine life by reducing wear of parts.
- Reducing the warm-up time of the internal combustion engine, which leads to fuel savings (primarily relevant for gasoline engines).
- Effectively combats fuel thickening, which prevents the normal starting of a diesel engine.
- Warming up the oil before starting, which ensures an increase in the service life of the internal combustion engine and other vehicle systems.
Thus, the cost of equipping a car with a pre-heater will be recouped by saving fuel and lubricants and reducing the cost of major repairs and maintenance of the power plant.
GAZ Gazelle Next Dandy › Logbook › Unlocking Webasto on diesel Gazelle Next
Happy new year friends!
Next continues to present problems, this time it concerns the Webasto preheater. Once in the fall, when the temperature dropped sharply to -18C, before starting the engine, I turned on the pre-heater. But after working for a few minutes, it turned off. Repeated attempts to turn it on did not lead to success: when you press the “torch” button, the display lights up, the number 30 appears, but after 15 seconds the screen goes completely dark, and the heater itself does not even start. I read it on the Internet, looked through the instructions and concluded that the system was blocked. Reason: fuel left over from the summer froze in the fuel pipe of the system. The surprises didn't end there. I tried to start it without heating, but the starter didn’t even turn - the battery was dead. Why could he suddenly sit down? Is it really from one attempt to launch Webasto? That time, the Nexta was lit and started, I then charged the battery, but the next time, when it was -25 outside, I couldn’t start without heating.
I would like to leave a post here with instructions for unlocking the heater. Enough has already been written about this on forums on the Internet and here on Drive, but I think this instruction with pictures will be useful to someone.
As I understand it, Webasto blocking is not uncommon and there may be different reasons. The trick is that if it is locked, you can only try to unlock it with the engine running. That is, you need to be able to start it if it’s frosty outside. If the engine does not start without heating, you will have to either tow the gazelle into a warm box, or wait for warmer weather, or dance with a tambourine and a lamp...
So, if the gazelle starts, then these instructions can help.
1. We look for the fuse box in the hood above the steering column, open the cover (it is latched, do not unscrew the bolts) and find in the right row the fifth 25A fuse from the bottom - “Pre-heater”. I have it white. There are markings on the back of the unit cover. There is also a diagram in the instruction manual.
2. Start the engine, turn on the “Coolant heater” button on the dashboard, pull out the fuse for 3 seconds, turn off the button and turn off the engine, insert the fuse back.
3. On the Webasto control unit, turn on the heater with the “torch” button, remove the fuse again, turn off the heater with the same “torch” button, and after 3 seconds return the fuse to its place.
After this everything should work. My Webasto didn’t work right away, but after a few minutes, but IT WORKED! I am attaching the main photos.
source
How to install Webasto with your own hands?
Owners of many vehicles (primarily cars, minivans and small commercial trucks) seek to save money by equipping their car with a pre-heater. For this purpose, they decide to install a heating system with their own hands.
For this you will need:
- Webasto preheater with installation kit;
- instructions from the manufacturer containing recommendations for installation and connection;
- set of tools.
It is advisable to carry out work in a specially equipped place - in a garage with a pit or a lift.
General recommendations for installing Webasto
Self-installation of a Webasto heater on a car involves performing a whole complex of rather complex operations. If you do not have sufficient experience , you do not have the appropriate tools or an equipped place to work, you should contact a service center for help , entrusting the installation of equipment to qualified specialists.
Important! Installation carried out in violation of technology can lead to fuel fire and other consequences. Also, if installed incorrectly, there is a risk of failure of either the heater itself or the engine elements. In this case, failure of the Webasto device or malfunctions in the operation of the car can lead to the end of the warranty, both for the heater and for the car, if it is still under warranty.
At the pre-installation stage, it is necessary to study the operating principle of Webasto:
- Liquid heaters belong to autonomous heating devices, i.e. they function regardless of the operation of the internal combustion engine.
- The fuel required for the operation of the liquid heater is taken either from the main fuel tank or from an auxiliary tank specially installed to ensure the operation of Webasto.
- The fuel enters the combustion chamber of the heater, where it is burned, releasing a large amount of thermal energy.
- The energy enters the heat exchanger, where it is used to heat the liquid (antifreeze, antifreeze) circulating in the cooling system.
- Uniform heat distribution due to the circulation of antifreeze is ensured by an autonomous pump, which is included in the heater kit.
Diagram of the heater, preheater/reheater for the GAZelle Next heating system.
Diagram of the heater, preheater/reheater for the GAZelle Next heating system.
A feature of the diesel engine is its inability to maintain a high operating temperature when operating at idle speed, as well as at low load. This is especially pronounced in the winter season. As a result, engine parameters deteriorate (increased fuel consumption and wear of friction units) and the efficiency of the interior heating system decreases. To eliminate these shortcomings, as well as to make it easier to start the engine in cold weather, a pre-heater/reheater for the heating system will be used.
Heater/reheater device.
1 – air intake; 2 – air blower; 3 – liquid outlet pipe; 4 – glow pin/flame sensor; 5 – evaporative gasket; 6 – connectors; 7 – control unit with temperature sensors; 10 – heat exchanger; 11 – combustion chamber; 12 – Exhaust gas outlet; 13 – fuel intake; 14 – Circulation pump; 15 – liquid intake pipe; 16 – fuel metering pump.
2 starts working and blows through the combustion chamber ( 11 ) and exhaust system ( 12 ). At the same time, the control unit ( 7 ) tests all electrical components and sensors. Further, if there are no errors, fuel from the tank enters the combustion chamber ( 11 ) using the fuel pump ( 16 ) and is ignited using the glow pin ( 4 ). Gases after combustion of the air-fuel mixture exit through the exhaust system with a flame arrester. In this case, the circulation pump ( 14 ) drives the vehicle’s coolant through the heat exchanger ( 10 ) of the heater, warming it up. The average cycle time of the heater at -20 degrees is 40 minutes.
On Gazelle Next, the heater is turned on (with the engine and heating system running) using a button on the front panel. The heater operates in automatic mode. Heats the coolant to a temperature of 80... 85˚ C. It is recommended to turn it on at an ambient temperature of +5˚ C and below.
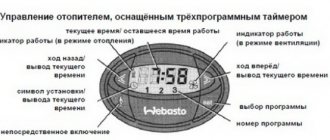
Preheater switch.
1 – reheater switch.
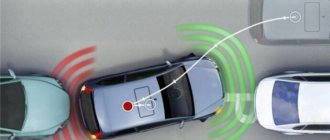
The pre-heater mode is activated using a timer or remote control. The timer sets the moment the engine starts and the duration of operation.
Remote Control.
1,2 – navigation; 3 – turning on the autonomous heater in timer mode; 4 – heater switching on; 5 – selection of heater operating mode.
Electrical circuit diagram of the heater, pre-heater/reheater of the heating system.
1 – heater remote control; 2 – heater switch; 3 – heater relay; 4 – relay and fuse box in the passenger compartment; 5 – resistor; 6 – fan; 7 – gear motor of the “legs-chest” damper; 8 – gear motor of the “heat-cold” damper; 9 – recirculation damper gearmotor; 10 – electric crane; 11 – generator; 12 – reheater switch; 13 – fuel pump; 14 – relay for turning on the reheater; 15 – diagnostic connector; 16 – control panel; 17 – electric pump; 18 – additional heater; F42 – relay and fuse box in the passenger compartment; F44 – relay and fuse box under the hood; XP 25/229-С – block connecting harness 25 (along the cabin) with harness 229 (along the panel), gray ; ХР 25/229-Ч – block connecting harness 25 (along the cabin) with harness 229 (along the panel), black.
source
Additional Webasto heater controls
For remote control and delayed start of the Webasto autonomous heater, you can additionally purchase a timer. A timer or remote control, as a rule, is not included in the standard package, but it can be installed additionally:
- The timer is mounted inside the car. Using it, we can pre-program the time to turn on the heater (for example, 20 minutes before the planned departure). At the same time, programming the start using a timer makes it possible not only to warm up the engine in advance, but also to ensure a comfortable temperature in the cabin - so that we will get into a warm car.
- An alternative or additional solution for controlling the heater is a remote control. It has a compact size, but allows you to turn on the autonomous heating system for the engine and interior from a distance, as well as select the operating time of the heater. Depending on the modification, the remote control can operate at a distance from 200 m to 1 km.
Webasto Air Top 2000 STC
You can install Webasto on Gazelle
for heating the interior, cabin, engine compartment.
To do this, use Webasto Air Top 2000 STC
- an autonomous air heater with compact dimensions. It is able to operate independently of the engine thanks to its connection to the fuel tank using a separate, low-noise motor (all the benefits of this element can be felt in cabs where a berth is provided).
The device is equipped with a metal-ceramic burner. This ensures long, trouble-free operation. Electronics compatible with the W-BUS bus provide access to additional possibilities for operating the equipment. The operation of the air heater is adjusted using a timer, remote control, or mobile phone.
The manufacturer offers to buy Webasto for Gazelle
with diesel and gasoline engines. There are configurations that operate from an on-board power supply of 12 and 24 V. This makes it easier to find a suitable option for a specific vehicle.
Heater power – 2 kW. This is quite enough to quickly heat the interior. Power consumption varies from 15 to 29 W, ensuring economical operation.
What are the dangers of installing Webasto yourself?
The Webasto installation process itself is not a difficult task, but the whole process depends on following the instructions, the technological map, as well as your skills in auto repair, electrical installation and installation of climate control equipment.
Even for a car enthusiast with car repair experience, installing Webasto can take up to 2 days. Deviation from the instructions and a small miscalculation can lead to voiding the warranty on the device and even lead to a car fire.
Before installing Webasto, you need to study the design of the system and options for its implementation in as much detail as possible. The stage at which many car owners make mistakes is connecting pipes to the engine. To do everything right, you need to have practical experience in carrying out such work.
The manufacturer Webasto recommends contacting certified service centers, since only specialists with extensive experience can ensure reliable and correct operation of the installed heater.
The problem of starting a cold engine in low temperatures is well known to every car owner. The power unit has difficulty starting in cold weather, and the degree of wear of loaded engine parts increases during such starts. Also, in winter, the operating comfort of vehicles is significantly reduced, since the time for warming up the internal combustion engine and the interior space to an acceptable level can be significantly increased.
To effectively solve these problems, the car can be equipped with a preheater. There are several types of such devices, with liquid engine heaters of the Webasto type having the best autonomy and performance.
In this article we intend to talk about how much Webasto costs with installation, what features and nuances are involved in installing Webasto on a gasoline engine or diesel unit, as well as how to install Webasto on a car yourself.
Read in this article
Features of heater installation
For the system to fully cope with the tasks assigned to it, it is necessary:
- ensure correct orientation of the heater;
- choose a suitable location that allows you to place the device below the level of antifreeze stored in the expansion tank;
- leave a safe distance between the heater and the system responsible for exhaust gases.
It is advisable to install the Webasto on the gazelle so that the antifreeze outlet from the boiler is at the top. When connecting to a cooling system, you must follow your own list of rules. Here it is important to install into the gap in the hose from the engine block to the stove. You can determine it with the engine running by running the fan at maximum airflow and at maximum temperature. After this, you need to probe the hoses: the hottest of them is the exit from the block to the stove. The need for such a connection is determined by the fact that an air lock may appear in the latter. This will cause the heater pump to idle. It may overheat and cause the heater to fail.
Correct installation of Webasto on the Gazelle Next will help protect the car in the cold season from the negative effects of subzero temperatures. The presented solution will allow you to enjoy a comfortable microclimate in the cabin in any weather conditions. For the system to work properly, you need to choose the right device and ensure its proper connection. You can avoid mistakes by entrusting the work to professionals.
source
Is it worth installing Webasto?
So, if the car is operated in a region with frosty and long winters, is used in such conditions as a commercial vehicle, the driver wants to increase operating comfort in winter, etc., then the question regarding the installation of a pre-heater becomes especially relevant.
In the case of Webasto, the answer will be in the affirmative, even taking into account the fairly high initial cost of such a heater and its installation. On average, buying and installing Webasto will cost from 40 to 100 thousand rubles. for the device itself (depending on the type of vehicle), as well as about 15 thousand rubles. for installation.
However, such a pre-heater will allow you to start the engine in any frost, increasing the overall resource of the internal combustion engine. We also note that warming up the engine and interior with an autonomous heater before a trip is noticeably reduced, which allows us to talk about fuel economy (especially in relation to gasoline cars).
On diesel engines, installing Webasto allows you to solve the well-known problem of diesel fuel, which thickens in cold weather. It turns out that installing preheating is more or less beneficial from an economic point of view, since fuel consumption is reduced, the engine is subject to less wear, which reduces the cost of its repair.
For maximum savings, many drivers (especially owners of passenger cars and small commercial vehicles) also prefer to install this equipment themselves. In other words, you will need a Webasto kit, installation instructions, the necessary tools and a place to carry out the work (it is advisable to have a garage with a lift or pit).
How to install Webasto with your own hands
Let's start with the fact that installing Webasto yourself involves a whole range of operations. If you are not confident in your abilities, do not have sufficient experience and suitable tools, then it is better to refuse independent installation and seek help from a professional installation center.
It should be remembered that incorrect installation can lead to fire and various problems during further operation of the vehicle and the autonomous heater itself, as well as failure of individual elements of the internal combustion engine and/or Webasto.
As a result of fuel combustion, heat is generated, which heats the coolant (antifreeze or antifreeze) of the engine cooling system. The specified coolant passes through the heater heat exchanger, which is connected to the standard engine cooling system.
Coolant circulation occurs thanks to a separate pump, which is built into the heater. The pump causes the coolant to circulate in a small circle, resulting in heating of the engine, as well as the elements of the internal combustion engine power system installed on the motor. The Webasto autonomous heater is a ready-made kit of all elements and parts that will be needed for installation. This kit includes:
- heater;
- electronic controller (control unit);
- coolant circulation pump;
- fittings for connection to the fuel system;
- fittings for connection to the cooling system circuits;
- metering pump for fuel supply;
- separate heater exhaust system;
- separate air intake;
- mounting brackets and fasteners;
- installation instructions and operating instructions;
As mentioned above, Webasto kits may differ, as they are intended for installation on different types of engines and vehicles (passenger gasoline and diesel cars, minibuses, trucks, special equipment, etc.). Taking into account such features, the sets differ in performance, basic characteristics and configuration.
When selecting a heater for a specific car, this must be taken into account separately. For example, installing Webasto for a diesel engine on a gasoline car may in some cases require additional fasteners and adapters, which ultimately makes installation very difficult.
Installing Webasto on a gasoline engine
Let's start with the fact that installing a Webasto heater on a gasoline and diesel unit will require free access to both the upper and lower parts of the engine compartment. At the same time, it is necessary to implement good lighting. The installation process itself involves the following steps:
- To begin with, the terminals from the battery are disconnected, after which the battery is removed from the car;
- Then you need to decide where to install the heater in the space under the hood. Given that it is desirable to install the heater closer to the cylinder block, many installations often use a reservoir bracket that contains the windshield washer fluid.
- The washer reservoir will need to be installed in a different location. Installing the heater closer to the BC allows you to increase its operating efficiency and reduce heat loss when using the heater. Also, during installation, special attention should be paid to the correct location of the heater in relation to the engine and other elements.
- Next, you will need to remove the fuel tank, after which the fuel intake will be installed and connected. The fuel supply pipe to the pump is attached to the body from the outside.
- Then the fuel pump is installed. When installing it, be sure to install a vibration absorber gasket.
- After this, you need to install a switch-on timer in the vehicle interior, which is included in the heater installation kit, and then install wiring to it.
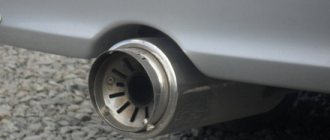
- Next, you need to attach the coolant supply and outlet pipes to the heater. An exhaust pipe is also connected to the device. This pipe is led out into the front wheel arch. To do this, you will need to drill a separate hole for the outlet.
- Upon completion, the fuel supply pipe should be connected to the pre-heater, after which the device is fixed in the selected installation location.
- Now the work affects the standard cooling system. You need to partially drain the antifreeze or antifreeze from the system into a previously prepared container so as not to spill the coolant when connecting it.
- Next, you need to cut the coolant supply and intake pipeline into the heater lines. For connection, tees are used, which are included in the heater installation kit. After this, the tees are fixed using screw clamps.
- After inserting the tees and connecting, you should add coolant to the level in the expansion tank. Then you need to select the area where the additional fuse and relay block will be installed, which are responsible for the operation of the standard interior fan.
- The above block with a relay is often placed on free studs of the engine shield, a wing boot is used, etc.
- Now you can proceed to laying the wiring harnesses, after which the installed devices are connected to the vehicle's on-board network. At the same time, the exhaust manifold of the heater is secured to the wing, after which the connection is made to the muffler and resonator.
- The final stage can be considered the installation and connection of the battery, after which the first test start of the engine is performed. After such a start, you need to let the engine run for XX 5-10 minutes.
- Then you should check the antifreeze level and add coolant if necessary. Next, the heater is turned on for a test and the entire functionality of the device is checked.
Equipping the heater with additional control: installing a GSM module for Webasto, timer, remote control
The basic configuration of Webasto includes a set with a timer. It is worth knowing that on many cars that are equipped with a heater from the factory, the device is used as an engine preheater and does not have a timer as standard. In this case, you can fully use the heater and control it by installing a timer on Webasto.
- The timer is installed in the car interior and makes it possible to program preheating until the moment when the engine is planned to start and the trip is planned (for example, 30 minutes before the driver gets into the cabin and starts the internal combustion engine).
- Another solution for controlling the heater is the ability to install a remote control on Webasto. The main advantages can be considered the compactness of the remote control itself, as well as the function of turning the heater on and off remotely. At the same time, you can set the operating time of the autonomous heater. Various remote controls allow you to control the heater from a distance of 200-300 meters to 1 kilometer; they may have a light indicator for feedback from the heater, etc.
The disadvantages include a limited coverage area, as well as possible loss of signal in severe frosts. Quite often in practice, the operation of the remote control is limited only to the line of sight of the car. In other words, in severe frosts and the presence of interference, in some cases it is not possible to start autonomous heating. Note that the Webasto GSM control module does not have such shortcomings.
- A special Webasto GSM control module allows you to organize remote control of an autonomous heater using the W-BUS digital protocol or via an analog signal using a smartphone or mobile phone. The specified module works in such a way that a SIM card of a suitable mobile operator is installed in the device and the phone number is stored from which the module will then be controlled.
Additional control of GSM modules can also be implemented through a special Thermo Call mobile application. A correctly selected non-standard or standard module allows you to start all Webasto heaters and autonomous reheaters that are supported by the original Webasto Thermo Test program.
Hyundai Galloper Bodrony konyak 2.5TD › Logbook › Installing WEBASTO heater
I purchased a used petrol Webasta 4.5 kW. Yes, the car is diesel, but the Webasta is gasoline! Everything is correct! Well, first of all, the price is 13 thousand rubles. I was satisfied, and secondly, according to reviews, gasoline webasts are generally less whimsical. So everyone decides for themselves here, I’m just sharing what I’ve done. Webasta has been in the garage since August. I wanted to install it after the bodysuit so that I wouldn’t have to fiddle with the heating system hoses several times.
I connected it to the system like this so that it could be used as an engine heater:
The connection is simple; you can’t stick the plug in the wrong place. Since the Webast is gasoline, I had to put a fuel tank under it. It is also visible in the photo. I used the washer reservoir from a gazelle. I'll add another photo: