19.12.2019
| (Votes: 1, Rating: 5) |
Issues discussed in the material:
- What are the types of windshield damage?
- Where can I repair a chip on my windshield?
- How to repair a chip on a car windshield with your own hands
- How much does it cost to repair a chip on a windshield?
- How to protect your windshield from chips
- Opinions from car owners: is it worth repairing a chip on the windshield yourself?
How to repair a chip on a windshield is a question that worries many car enthusiasts. Needless to say, almost every driver at least once in his life has encountered such damage to his car. In fact, the repair procedure is simple, already familiar to some, but it still requires compliance with certain conditions, the violation of which can negatively affect the final result, or even turn into a pointless waste of time and effort.
There are different types of car glass damage, and for each of them you need to choose your own method: either repair it yourself, or contact a service center. But you can often repair a chip on a car’s windshield with your own hands, applying a minimum of money and effort, which we will discuss later in the article.
Main types of windshield damage
Damage to windshields can be as follows:
- chips;
- cracks;
- branched cracks.
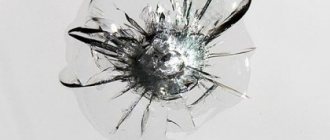
All three types are quite dangerous, as they can cause the entire windshield of a car to crack. The faster these damages are repaired, the lower the risk of irreparable consequences. If for some reason it is not immediately possible to repair chips on the windshield, it is better to seal them with transparent tape and carry out direct repairs as soon as possible.
The driver behind the wheel of such a car must drive the vehicle very carefully, avoiding shakes and sudden jolts. Otherwise, the cracks in the windshield may increase.
We recommend
“Which windshield is better: expert opinions and driver reviews” Read more
Postponing repairs for a while is only permissible if the passenger side of the windshield is damaged. If a crack or chip appears on the driver's side, repairs must be made immediately, otherwise the matter may result in a fine.
Experts classify chips on the surface of windshields according to their appearance:
- moon;
- star;
- Bulls-eye;
- combined.
The last option is the most undesirable and difficult to eliminate. The rest are completely fixable, you just have to try a little.
Windshields, as you know, are a multilayer structure of several glasses covered inside with a polymer film. There are most often three layers, and when an accelerating object hits the windshield on the road, not all of them are damaged at once. The result is a chip. Glass layers that the object has not reached may remain in their original form or crack.
To repair, the damaged area on the windshield is drilled out and replaced with a clear polymer material. Removing a damaged area using drilling is a rather painstaking process, which requires the presence of an equipped garage with the required level of illumination.
It is easier and more reliable for beginners to find in stores and use specially designed kits that include all the tools for self-repairing the windshield, and do without drilling. These kits allow you to repair defects on your windshield without the help of car service specialists and save your budget. One set can fix 20-30 chips or cracks. With a patient approach, the quality of the repair performed will not be inferior to the work of professionals.
We recommend
“How to stop a crack on a windshield: repair technique” More details
The better the polymer glue can fill the empty space and cracks at the chip site, the better the result will be. A difficult case for the chosen method is the following option: the outer layer chips slightly, about 3 millimeters, the middle one receives diverging cracks, and the third layer, the surface of which already belongs to the car interior, remains intact. Glue is not able to fill such small cracks.
Cases with larger chips can be repaired much more easily and without leaving any traces.
DIY windshield repair technology
So, let's go. We use the classic Chinese windshield repair kit as a repair kit.
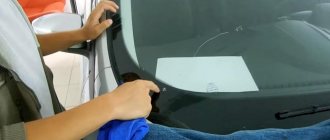
- You got hit on the highway. It would be rational to stop in a convenient place, get out, curse and cover the fresh damage with tape . It's good if you have some tape on hand. You must try to prevent dirt from getting into the damaged area . It’s even worse if water leaks into the damaged interior.
- We arrive at a place convenient for repairs. We take out the magnificent life-saving windshield repair kit. We make sure to do this at a time of day so that when the glue finally dries, it is still light . It is ultraviolet light that is important , and not just lighting from flashlights. Otherwise, the glue will not dry and will turn into snot. These snot can’t be pulled out of the crack later. By the way, no one forbids using an ultraviolet lamp. But the ambient temperature in this case is not as critical as is usually the case when painting with nitro enamel. I carried out repairs at -5.
- First of all, use a dry, lint-free cloth to clean the chipped area on the windshield. If necessary, this area must be thoroughly dried. It is useful to heat the glass by blowing it from the inside. One way or another, higher temperatures have a positive effect. It is better not to use chemicals and liquids. It is important to clean the chip, and not to push new dirt and fibers there and not to form some kind of film there from the cleaner.
- Now take a needle or thin awl and thoroughly clean the chipped area . This must be done very, very carefully. It is important not to break the glass. But the damaged area must be cleared of debris as much as possible. Let me remind you that the quality of the repair directly depends on the ability of the glue to get into the crack. Therefore, you need to try to open the crack channels as much as possible.
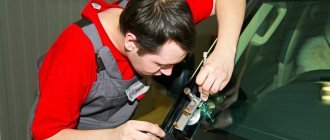
- Next, take the pedestal and glue it onto the glass exactly as described in the instructions. Tail at 12 o'clock. Let's fill the pedestal with glue. You need to fill it almost completely, leaving about ¼ of free space.
- We screw on the syringe from the kit and create a vacuum by fixing the syringe piston with a wire lock at the desired point.
- Let's wait 10-15 minutes. Let's move the syringe piston back and forth to increase the vacuum. First press the syringe to increase the pressure. We carefully monitor that the seal is maintained. Repeat these steps 2-3 times every 10 minutes. When repeating, sometimes we remove the syringe and check that there is no lack of glue inside the chip. If a deficiency is noticed, then add a drop of more polymer. You need to wait until all the bubbles from the treated space disappear. They are clearly visible from the cabin.
- After all these procedures, remove the pedestal from the glass. We drip glue onto the empty space in the chip, cover it with the film from the kit and smooth it to the level of the glass. We wait another 20-30 minutes until the glue sets. After this, remove the film and use a blade to wipe away the remaining unnecessary glue around the damage.
Where can I repair a chip on my windshield?
In what cases is it more rational and safer for further use to turn to professionals from a car service center? When the cracks are very long and there are a lot of chips. Self-repair in these situations can backfire: a lot of time and effort will be spent, and the glass at one point may not withstand it and burst even while driving. I don’t even want to imagine the consequences.
Car service specialists carry out the necessary repairs in this case quite quickly, in a maximum of 2 days. But practice shows that three hours is usually enough for the car to be returned to its owner in an updated form.
How to repair a chip on a car windshield with your own hands: step-by-step instructions
First of all, you need to sensibly assess your capabilities and risks. Even a small chip or crack will lead to poor visibility and, as a result, can lead to an accident. It may still be more advisable to seek the help of professionals.
If you are completely confident in a positive outcome, let's get started.
The magic solution for fixing cracks and chips on your car windshield is none other than polymer glue.
To get a 100% result, you must follow some rules.
We recommend
“Winter tires 255 R18: manufacturers, advantages, disadvantages” More details
1. Prepare tools and other aids .
To repair your windshield you will need:
- electric drill with an attachment for working with glass;
- injector;
- polymer glue;
- surface cleaning liquid;
- scriber;
- applicator;
It is important that the glue used to repair a chip in glass is polymer-based. The glass will remain 95% transparent, the location of the defect will be practically indistinguishable from the rest of the surface.
2. Carry out preparatory work.
Repairing a chip or crack with your own hands is not as difficult as it might seem at first glance.
The main thing is to do the preparatory work correctly. The result depends on how well the preparatory stage is completed.
The surface around the damage site must be wiped very well using a special liquid or alcohol. Subject the chip itself to intensive cleaning. Use a pump or steam cleaner at this stage of the job. Using a scriber, work around the edges of the problem area.
During your manipulations, the crack may increase. To avoid such a turn, it is better to release the pressure of the windshield in advance using an electric drill. Using a special glass nozzle, drill a hole no further than 2 mm from the end of the crack. Several cracks - several holes.
The holes made will restrain the crack from further growth. If you have an electric drill, you can drill holes as soon as a crack appears.
3. Do-it-yourself chip repair.
When all the materials are at hand, the preliminary operations have been completed, you can begin the repair. It is important not to make a mistake in the ratio of diluted glue and water.
Place the injector parallel to the glass surface so that its hole is in the center of the defect. Secure the injector bridges using special applicators, and to ensure better adherence, lubricate them with Vaseline.
Next, we begin to pour glue until the hole in the glass is filled. The injector is then carefully removed.
Ultraviolet lamps are used for quick drying; with their help, the drying period is reduced by 3 times - to about a quarter of an hour.
4. Final stage.
When the restored glass dries, its surface is carefully and carefully polished. For this operation you should prepare:
- glass polish;
- cloth napkin.
The liquid is applied to the restored area of the glass. Using a special napkin, rub for at least 7 minutes. There should be no trace of repair left on the polished surface.
Repair of chips
Obviously, chips, especially small ones on triplex, can be repaired more easily than cracks. For this purpose, inexpensive repair kits are sold in auto stores. The repair of the chip is carried out as follows: At the first stage, the remaining smallest glass fragments are removed. To do this, use the included rod, a regular blade, a pin or a vacuum cleaner. Then the damaged area is thoroughly cleaned and dried. After the preparatory measures, the chipped area is filled with a special compound. For this, a bridge with an injector is used. It is installed exactly above the chip, an injector with filler is attached to it, and a polymer composition is introduced into the chip cavity.
Moreover, its introduction is carried out cyclically - injection and pumping, again injection and pumping. This cyclic introduction of the composition ensures the removal of air and its complete replacement with the polymer. It is best to check for the presence of voids using a good, powerful flashlight. At the last stage, the device is dismantled, dried in direct sunlight or using a UV lamp, the leaked excess polymer is removed and cleaned with a conventional cleaner.
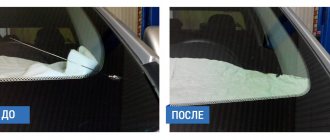
The entire repair takes no more than 30-40 minutes. As a result, thanks to the frozen polymer composition, which has turned into a kind of laminating film that ideally matches the optical properties of the glass itself, small chips and even “stars” become almost invisible.
How much does it cost to repair a chip on a windshield?
Repairing chips and cracks on the windshield at a car service center can cost from 300 to 7,000 rubles. And the more expensive the iron horse, the more expensive its therapy.
Often, services calculate the cost of repairs based on the length of the crack, that is, they set a fee per centimeter of damage repaired.
Repairing a chipped windshield with your own hands involves the cost of purchasing a set of special repair tools. Usually its cost is commensurate with the price of the service at a car service center.
We recommend
“The glass in the car is broken: what should the owner do to get compensation” More details
If you need to repair a small chip on the windshield, purchase a special set of windshield repair tools and fix the defect yourself.
This step will be financially justified if a new need arises to repair the chip. Firstly, you will already have the necessary tools. And secondly, the special polymer glue for filling chips in the kit is enough for several uses.
Windshield repair kit
The windshield repair kit consists of a special light-curing glue, a convenient syringe for pumping glue into the crack and auxiliary elements. On the Internet it can be found under the name windshield repair kit . This is the name of the set on Aliexpress and on Ali it costs 220 - 290 rubles. In offline stores, where you don’t have to wait for delivery, you can buy it for 390 – 400 rubles. Large chain stores sell a “US version” for 800 rubles. At this price, the point of buying a set remains questionable. After all, new glass for my car costs from 2500 to 4000 rubles. But here, of course, installation costs and unnecessary headaches must also be taken into account.
The operating principle of this set is based on the fact that a special penetrating glue is introduced into the crack and chip, which, when hardened, forms a transparent layer and prevents the crack from growing further. In addition to gluing, the glue probably also melts the edges of chips and cracks, since after repair the cracks seem to heal. Drying occurs in ultraviolet and vacuum conditions. The glue hardens inside the crack without oxygen. It is for this purpose that the kit contains a special pedestal and double-sided tape that limit the access of air to the gluing point. This allows you to create a vacuum at the place where the glue is applied.
How to protect your windshield from chips: preventive measures
To prevent further damage, the following measures are recommended:
- deflector for hood;
- glass film armoring;
- careful driving.
The use of a deflector is dangerous due to damage to the hood paint by metal fasteners during installation and operation.
Films are designed to protect against external influences: dust, dirt, water, stones, etc. Thus, armoring the windshield with a special film can protect the surface from damage for a long time. The disadvantage of the method is that the density of the material from which the film is made is not sufficient to withstand the continuous impact of wipers and small particles of sand. Over time, the protective film becomes scratched and will require replacement.
To avoid damage to the windshield when driving, make it a rule:
- drive carefully;
- maintain the required distance from the vehicle ahead;
- do not press against trucks;
- Reduce speed before gravel areas;
- In front of large oncoming traffic, reduce your speed and move as close to the right side as possible.