What are the advantages of Easyfuel?
Like any innovation, Easyfuel has its advantages and disadvantages. Let's sort them out.
- It simplifies the process, as it takes into account the design features of any refueling gun.
- Don't get your hands dirty on a dirty gas tank cap.
- No need to freeze your hands in cold weather.
- If you use canisters, the kit includes a tube with which you can open the neck and insert a funnel.
A significantly more complex design leads, along with ease of operation, to a significantly higher cost of repairs. In addition, if the gun is not inserted deeply enough, the shut-off valve often trips. Problems can also arise if there is an old model pistol at the gas station, but this is no longer a design flaw in the car.
Forum → Ford → Focus → Operation
This is done quite simply - the hatch is simply removed along with the plastic edging of the tank neck.
To do this, unscrew two plastic screws, one of which is on the left along the edge, and the second a little deeper on the right. It also holds the cord from the tank lid.
Next, carefully pull out the black body, first the left side.
It is better to do this work in a warm place. since the plastic is quite fragile.
Weather: This is done quite simply - the millet hatch is removed along with the plastic edging of the tank neck. To do this, unscrew two paste screws, one of which is on the left along the edge, and the second a little deeper on the right. It also holds the cord from the tank lid. Next, carefully pull out the black body, first the left side. It is better to do this work in a warm place. since the plastic is quite fragile. #
Why is it so difficult? There, one shell is removed, and everything else remains in place. And you don't need to unscrew anything. All you need is a flat-head screwdriver or a small knife.
to Rain:
Brother, tell me where I can buy a long plastic tube for the antifreeze reservoir,
Focus 1 amerekos, in stores they say they don’t have current to order, so I’m scratching my head?
to dmitrijjshumka: Good evening. Look at the showdown then. I can’t name specific stores, if only because I don’t know the city.
to Rain: Thanks for the info, I have one in mind, I’ll try to stop by.
to dmitrijjshumka: You're welcome. Contact us.
It will be useful Operating a car with worn tires: its consequences and legality
to dmitrijjshumka: Quite. I also advise you to check the functionality of the xx sensor, as well as the engine mounts.
to Rain: What is sensor xx?
to dmitrijjshumka: Idle speed sensor.
Damn, they took it off, but how to put it on? hands are probably crooked
to vitalik2010: We insert a crowbar into the filler neck and try to “put” the hatch (rubber part) on it, swinging the neck itself across.
Thanks for the advice, as it was written earlier, my hands are crooked, today I went to the guys in the service, I just casually said who tried to insert the thread? one tried, but it turned out that his hands were also crooked.
and by the way, someone said that you just pry off the cap with a flat screwdriver and that’s it! and the rest remains in place, he probably confused something with a Lada Kalina))
to vitalik2010: try, try, it should work.
to airbrush: so the fact of the matter is that the shell and the bracket are one whole.
Carrying out dismantling
Dismantling is not a difficult task, especially if you follow our algorithm.
- It is necessary to remove the fender liner from the right rear part of the car.
- The cable harness going to the lock drive must be disconnected and removed.
- Unscrew the screws on the side of the body to secure the filler pipe to the side member located on the right rear.
- Carefully remove the filler pipe, as far as the hoses allow (be careful not to overdo it), and remove the neck of the pipe.
- The seal latches should be pressed out with a screwdriver and the assembled structure of the hatch cover and seal should be removed.
- Use a screwdriver to pry up the retainer of the wiring harness and disconnect the harness from the seal (it is also necessary to release the cover along with the bracket).
- Final: use a screwdriver to press the lock and remove the cover.
Design, articles and prices of the gas tank flap
Removing the hatch itself, a round neck cover painted in the color of the car, is very simple. To do this, just open it, press the plastic lock with a screwdriver and pull it towards you. This may be necessary when selecting paint for local body repairs or replacement. With a bracket that fixes the cover it is more difficult. It is made of several parts - a hinged hinge, a body and an electromagnetic lock.
The price of a gas tank flap assembly with a lock, bracket and cover varies from 1800 to 4000 rubles .
The cost of the part depends on the manufacturer, and in addition, such brackets can easily be found at used disassembly sites. They just cost in the range of 1500-2000 rubles. Original part code 8M51A405A02AA or Y1428D01 along with neck.
It is worth noting
In cases where you only need to remove the Ford Focus 2 gas tank cap, for example, you are choosing the color of the car (for body repair), you can use only the last two points. Apply more force, as it is fixed with two holders. But if you try, the Ford Focus 2 gas tank cap can be easily removed without damaging the car in any way.
Assembly is carried out in the reverse order of dismantling. It takes a little patience and effort, and the Ford Focus 2 gas tank cap will be in place. The process itself does not require any special effort or large investments of time and money. Therefore, you should not contact expensive mechanics.
However, in cases where the skills are very weak, and the solution to the problem is critical, then it may be worth calling an experienced specialist. Clumsy hands can not only fail to solve a simple problem, but can also make things worse.
Removing and installing the fuel tank filler pipe hatch cover Ford Focus 2 2005-2008
- Repair manuals
- Ford Focus 2 2005-2008
- Removing and installing the fuel tank filler pipe hatch cover
You will need: TORX T20 wrench, Phillips screwdriver.
1. Remove the right rear fender liner (see “Removing and installing wheel mud flaps and fender liners”).
| 2. In the right rear wheel arch, disconnect the wiring harness block from the fuel tank filler pipe hatch lock drive by pressing the block fastening lock. | 3. Screw in the screws securing the fuel tank filler pipe to the side of the body... |
| 4. ...and the right rear side member. | 5. Move the filling pipe to the side as far as the flexibility of the hoses allows, and remove the pipe neck from the seal of its manhole cover. |
| 6. Remove the hatch cover assembly with the seal from the hatch in the wing by using a screwdriver to press out the two seal locks (one lock is visible in the photo, the second is located on the other side of the seal). | 7. Using a screwdriver, pry up the wiring harness holder... |
| 8. ...disconnect the harness from the gasket of the fuel tank filler pipe hatch cover... | 9. ...and remove the cover assembly with bracket and seal. |
| 10. Use a screwdriver to press out the latch... | 11. ...and disconnect the cover from the bracket. |
| Note If it is necessary to remove the cover directly (for example, to select paint during body repair), the cover bracket does not need to be removed from the car. It is enough just to disconnect the cover from the bracket (see paragraphs 10 and 11 above in this subsection). |
12. Install the fuel tank filler pipe hatch cover and all removed parts in the reverse order of removal.
↓ Comments ↓
Section 1. Vehicle design
General information about the car Passport data Car keys Controls Heating (air conditioning) and interior ventilation Doors Seat belts Seats Steering wheel adjustment Rear view mirrors Interior lighting Sun visors Interior storage compartments Hood Gearbox control Roof rack
Section 2. Recommendations for use
Safety rules and recommendations What you need to have in your car Running in the car Operating the car during the warranty period Preparing the car for departure Filling the car with gasoline Using a jack Towing the car
Section 3. Problems along the way
The engine does not start Malfunctions of the fuel injection system Idle has disappeared Interruptions in engine operation Diagnostics of the engine condition by the appearance of the spark plugs The vehicle moves jerkily The vehicle accelerates poorly The engine stalls while driving The oil pressure has dropped Engine overheating The battery does not recharge Starting the engine from external power sources Malfunctions of electrical equipment Extraneous knocking noises appear Problems with the brakes Puncture of a wheel
Section 4. Maintenance
General provisions Daily maintenance (EO) First maintenance (MOT-1) Second maintenance (MOT-2)
Section 5. Engine
Design features Possible engine malfunctions, their causes and solutions Useful tips Checking compression in the cylinders Removing and installing the engine mudguard Replacing the power unit suspension mounts Installing the piston of the first cylinder to the TDC position of the compression stroke Removing, installing and troubleshooting the flywheel Replacing engine seal parts Adjusting clearances in the drive valves Cylinder head Removal and installation of the engine Lubrication system Cooling system Exhaust system Engine power supply system Fuel vapor recovery system
Section 6. Transmission
Clutch Gearbox Front wheel drives
Section 7. Chassis
Front suspension Rear suspension
Section 8. Steering
Design features Possible malfunctions of power steering, their causes and solutions Steering column Steering rods Steering mechanism
Section 9. Brake system
Features of the device Possible malfunctions of the brake system, their causes and solutions Bleeding the hydraulic drive of the brake system Checking the position of the brake pedal Master brake cylinder Vacuum brake booster Replacing hoses and tubes of the hydraulic brake drive Removing and installing the brake pedal Brake mechanisms of the front wheels Brakes of the rear wheels Parking brake Anti-lock brake system
Section 10. Electrical equipment
Design features Diagnostics of malfunctions of on-board electrical equipment Mounting blocks Battery Generator Starter Ignition switch (lock) Engine control system Lighting, light and sound alarms Replacement of the windshield window wiper motor Replacement of the tailgate window wiper motor Removal and installation of the windshield washer Replacement of the front door window regulator motor Removal and installation of the electric motor of the radiator fan of the engine cooling system Replacement of the additional resistance of the radiator fan of the engine cooling system Removal and installation of the electric motor of the heater Replacing the additional resistance of the electric heater fan Electric heating of the glass of the rear window (tailgate) Instrument cluster Instrument panel switches Replacement of the control unit for electric windows and electric mirrors Car audio system Replacement of sensors and switches
Section 11. Body
Design features Possible body malfunctions, their causes and solutions Removal and installation of the radiator lining Removal and installation of wheel mudguards and wheel arch liners Removal and installation of bumpers Removal and installation of the front fender Removal and installation of the engine compartment frame and front bumper beam Removal and installation of the air intake and drainage box grille shield Hood Side doors Tailgate of hatchback cars Fuel tank filler hatch cover Seats Removal and installation of floor tunnel lining Passive safety system (SRS) Rear view mirrors Instrument panel Heater and air conditioner Interior fittings Removal and installation of interior linings Removal and installation of trunk linings Windshield wiper windshield Windshield wiper for tailgate window Replacing fixed glazing of the body Removing and installing the battery mounting shelf Caring for the body
Section 12. Wheels and tires
Technical characteristics Marking of rims Marking of tires Changing wheels Wheel nuts Breaking in tires Storing tires Balancing wheels Snow chains Spare wheel Checking tire pressure Checking tire tread Checking valves Checking radial and lateral runout of rims
Section 13. Purchase of spare parts
Engine oil Lubricants Coolants Brake fluid Fuel filter Air filter Engine oil filter Spark plugs
Section 14. A trip to the service station
Section 15. Winter operation of the vehicle
How to prepare a car for winter Recommendations for starting the engine in severe frost What is useful to buy for winter Useful winter tips
Section 16. Preparation for technical inspection
Recommendations List of malfunctions and conditions under which the operation of vehicles is prohibited Changes to state standards regulating the maximum permissible content of harmful substances in the exhaust gases of motor vehicles
Section 17. Tips for a novice auto mechanic
Safety precautions when carrying out repair work Tools Before starting work Restoring threaded connections Tips for body repair
Applications
Appendix 1. Tightening torques of threaded connections, Nm Appendix 2. Overall dimensions (mm) of Ford Focus II cars with sedan and station wagon bodies Appendix 3. Technical characteristics of engines and performance indicators of cars depending on the type of engine used Appendix 4. Air pressure in cold tires Appendix 5. Filling volumes, l
Electrical circuit diagrams
Diagram 1. Windshield wiper and washer connections Diagram 2. Battery charging system connections Diagram 3. Brake system hydraulic drive system connections Diagram 4. Ventilation, heating and air conditioning system connections Diagram 5. Engine starting system connections Diagram 6a. Speed control system connections Diagram 6b. Speed control system connections Diagram 7a. Engine control system connections Scheme 7b. Engine control system connections Scheme 7c. Engine control system connections Scheme 7d. Engine control system connections Scheme 7d. Engine control system connections Diagram 7e. Engine control system connections Scheme 7g. Engine control system connections Scheme 8a. Air conditioning system connections Diagram 8b. Air conditioning system connections Diagram 9. Power steering system connections Diagram 10a. Anti-lock brake system (ABS) connections Scheme 10b. Anti-lock brake system (ABS) connections Diagram 11. Vehicle Dynamic Stability System connections
How to remove the fuel tank on a Ford Focus II
Removing the gas tank is a complex procedure, and it cannot be done quickly. Before starting work, you need to find the wiring diagram and gas tank design for the Focus of the second version. With its help, you will figure out the necessary tools and the placement of fasteners, which will greatly simplify the task.
To remove the tank, you need to prepare in advance a set of keys and sockets, screwdrivers with different bits, a jack and WD-40. The sequence of actions will be as follows:
- Open the hood and remove the negative terminal from the battery to de-energize the car;
- You also need to remove the fuel tank fuse from the mounting block;
- To remove pressure in the tank, you need to perform several procedures at once. Start the engine and wait until the fuel runs out and the car stalls itself. Next, you need to try to start the car again by turning the starter for 4-7 seconds. If the engine does not respond, it means that the pressure in the system has disappeared, and you can proceed to dismantling work;
- We move under the car and unscrew the fastening screw of the thermal protection, and then remove the protective gasket itself to the side to make it more convenient to carry out subsequent procedures;
- We raise the fuel tank on a jack so that after removing the fasteners it does not fall and break the contacts, along with the fuel supply pipes;
- We remove the fastening bolt that holds the container guides - there is only one there. After this, we completely dismantle the mount and guides from the vehicle, remove the slings;
- We remove the tube supplying fuel from the container’s filtration element and turn off the fuel filter;
- We unscrew the clamp, remove the filler neck pipe, and disconnect the part from the hatch. If you can’t open the hatch, leave the part in place;
- We loosen the jack a little so that the fuel tank subsides and we gain access to the fuel pump;
- We completely remove the filler neck and dismantle the pipe connected to the fuel tank;
- We disconnect the fuel pump from the on-board network, having first disconnected all power terminals and chips. We turn off these elements one by one, and when this work is completed, you can carefully lower the jack to the bottom position and pull out the fuel container from under the vehicle.
The expansion tank cap broke on a Ford Focus 2 with photos and videos
Good day, dear visitors of my diary. Today I wanted to write a short review about the expansion tank cap for the Ford Focus 2 car.
My car has an expansion tank like the one in the photo below.
As they say and write in different descriptions, so to speak, and so on, I will begin my story in order.
When opening the hood of a Ford Focus 2 car and checking the oil level in the engine and transmission. I noticed that for some reason my coolant had decreased, not by much, of course. I then unscrewed the cap of the expansion tank.
The cap of the expansion tank was unscrewed with force, but of course I didn’t attach much importance to it. I added a little about three hundred grams of antifreeze. The cap was screwed on a little tight.
Many people think that the expansion tank cap is needed to prevent antifreeze from splashing out of the tank.
I can dissuade you, dear reader of this short note. This is a complex mechanism. If this “plug” fails, I guarantee you that antifreeze will constantly flow out of the expansion tank.
But these are not all the troubles that owners of foreign cars and Ford Focus 2 can expect.
The cap of a car's expansion tank is essentially a locking element, and has two elements in its structure: a high-pressure valve and a low-pressure valve.
I also took a photo of the fact that my lid fell apart when unscrewing it.
Well, since this is a complex element, then call it something like a cover, well, this is my opinion, it’s just somehow not good. I would call it a sensor for regulating the pressure of the coolant (antifreeze) of the car.
This sensor normalizes operation and protects the cooling system of your iron horse from damage.
Functions of the expansion tank cap;
When the engine warms up, the antifreeze also heats up and it expands, thereby creating increased pressure in the cooling system.
In order to prevent the radiator from inflating from excess high pressure in the car's cooling system and breaking the tubes, pipes and the expansion tank itself, a high and low pressure valve was invented, which is located in the cap of the expansion tank.
Normal pressure in various systems on warm engines should be in the range from 1.1 to 1.5 (bar) atmospheres. It's already dangerous. Well, if the pressure exceeds the specified norm, then the high pressure valve comes into play and bleeds it to normal.
Well, what do you think, if the high-pressure valve does not work and the pressure exceeds the permissible norms, then get ready for the pipes and pipes to rupture and the radiator to possibly inflate.
When the pressure is exceeded and the high pressure valve partially fails to operate on Ford Focus 2, a leak often occurs in the tubes that go to the car’s heater.
Watch my short video. Here I will tell you where a leak in the cooling system in a Ford Focus 2 can come from.
Now let's look at why low blood pressure is also dangerous?
Things are happening, for example, like now, the weather outside is sub-zero. We drove the car on business all day. At night we arrived home and parked the car. The antifreeze will begin to cool and settle down, thereby creating a reduced pressure, or, in short, a vacuum.
And if the low pressure valve does not work, then this is not very good. All hoses and pipes on the car will be compressed inward and “it’s not ice” as auto mechanics say.
When this low-pressure valve flew, it happened when I unscrewed the cap of the expansion tank. The cap unscrewed and the valve itself remained in the expansion tank
And I carefully pulled out this valve for about twenty minutes with the help of a screwdriver and pliers and some kind words and nibbles. Let me tell you, this is another task. You are afraid of damaging the neck of the expansion tank.
I carefully pryed up the valve with a thin screwdriver and at the same time pulled out the valve itself a little at a time. The valve must be pulled up and there is no need to unscrew it. In general, I successfully pulled out the valve from the expansion tank of the Ford Focus 2 and was overly happy about it.
Well, I thought that it would be necessary to purchase an expansion tank if there was damage or cracks on it.
I got distracted from the topic. So if the low pressure valve is working, then there is no need to worry. The low pressure valve starts working, that is, if a vacuum begins to create, then the system opens and replenishes with air. The hoses expand to normal levels.
On Ford Focus 2 cars, the valves in the expansion tank cap are combined, that is, they operate at high pressure in one direction and at low pressure in the other.
But on our VAZs, in the cap of the expansion tank there are two separate valves, one high-pressure valve and the second low-pressure valve. So I don’t know which is better. But in our cars, the expansion tank caps practically do not fail. Here is a topic for thought which is better and what’s worse. I’ll leave this problem to you, dear reader, to figure out.
The cap of the expansion tank, as can be seen from its design, does not hold anything and serves only to press the high and low pressure valves. The valve body usually contains two sealing gaskets that fit tightly to the neck of the expansion tank and act as seals. In many foreign cars, as in Fords there is only one valve, it is both inlet and outlet. It can both bleed and pressurize the car’s cooling system.
At the end of my short note, I want to write and say: Pay more attention to the cap of the expansion tank of your car. Just a piece of advice, if you see that the antifreeze is going somewhere, take a closer look at the cap and replace it with a new one.
I bought myself one like the one in the photo below. The lid is not expensive, only 213 rubles.
And a little advice: when you start screwing on the cap of the expansion tank, lubricate it a little with silicone grease, in general it will be fine. I had a high-pressure valve screwed up because I added antifreeze twice. But I had to immediately replace the cap of the expansion tank and that’s it.
This is where I finish writing a short note about the expansion tank cap of Ford Focus 2 and what kind of breakdowns it can have.
If you were interested in this small note and had any questions on this topic. Please leave your comment on this note or what kind of breakdowns you have experienced related to the cap of the expansion tank of your car
.
Sincerely, Gennady Fedorovich.
Share link:
The need to dismantle the gas tank
The procedure for removing a vehicle’s gas tank is carried out quite rarely, and even less often on your own, because many car owners prefer to take the car to a car service center, where professional specialists will do all the necessary procedures. In what cases is it necessary to dismantle the fuel tank?
- This will have to be done if low-quality fuel was filled, and during operation of the car it turned out that cleaning the fuel system is impossible. This point also includes blockages in the fuel cell;
- If the fuel tank has been damaged. This also includes deformation of the container when involved in an accident, temporary effects of corrosion;
- Removing the gas tank in case of damage to the rear of the car, when without dismantling the tank it is impossible to gain access to some elements of the body;
- When carrying out major body work;
- For other reasons.
Where is the fuel pump located on Ford Focus 2
Ford Focus 2 is one of the best-selling city hatchbacks. And despite the fact that the third generation of this car has already been released, the popularity of the 2nd Focus is not falling.
One of the advantages of this car is a wide range of power units, which includes 6 modifications of gasoline engines, and this is not counting diesel engines. All gasoline engines have a modern design and are equipped with injection power systems.
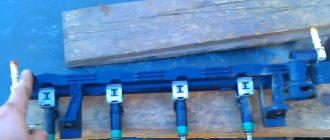
The most structurally complex part of the injector mechanical part is the electric fuel pump.
The unit is installed directly in the fuel tank, from which the entire power system is filled with gasoline under pressure.
The exact location is on the top of the tank, so getting to the unit is not so easy.