Bleeding brakes with abs ford focus 2
The presence of air in the brake circuits not only reduces braking efficiency, but also jeopardizes driving safety, since failure of the brake pedal can occur suddenly and at the most inopportune moment. Air in the system may not necessarily appear due to depressurization. During operation of the brake fluid, it picks up moisture from the air, water boils faster than the brake fluid, and therefore the evaporation of water inevitably causes air locks. At the first signs of airing in the system, it is necessary to remove air from it. Let's figure it out together how to bleed the brakes on a Ford Focus 2 and what is needed for this.
General principles of bleeding car brakes
Pumping of the entire system often takes place simultaneously with the replacement of the diesel fuel, which has its own resource - two years or 60-70 thousand kilometers.
In addition, air must be pumped out after repair and maintenance of circuits:
- after replacing brake hoses;
- replacement or repair of working or master brake cylinders;
- after replacing elements of the brake system line, pipes, fittings, seals;
- if air has entered the circuits as a result of a drop in the fuel fluid level in the expansion tank.
Symptoms
A clear symptom of the system being airy is a weak and uninformative pedal that activates after several presses.
In this case, we buy a liter of working fluid of the same brand as poured into the system, find a spanner for 9/11 fittings, a transparent container, a hose and a 17 mm wrench for bleeding the clutch hydraulic drive, if necessary.
Branded brake fluid. Domestic "brake" DOT-4.
How to bleed the brakes on the second Focus
For work we need a partner. First, we drive the car into a viewing hole or overpass and tighten the handbrake.
After this, the procedure is as follows:
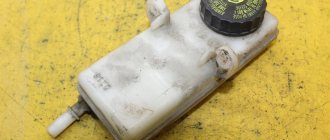
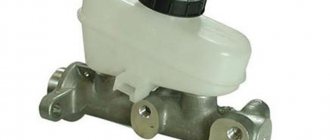
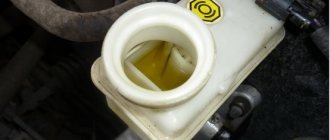
- Open the hood and find the expansion tank for the brake system and clutch.
To get to the expansion tank, on some models you will have to remove the top decorative panel.
We unscrew the tank cap; for convenience, you can remove the air intake grille, but this is not necessary.
The tank is located directly under the air intake - a little inconvenient, but it is quite possible to get there without unnecessary dismantling.
Add a full container of fresh liquid to the very edge of the neck.
Add new fluid using a funnel and a piece of hose.
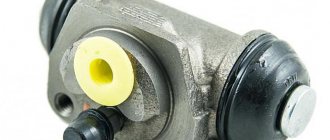
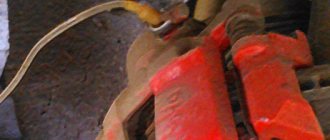
- We go under the car and thoroughly clean each fitting on the brake calipers on all wheels.
- Air removal is carried out in a certain sequence, it cannot be violated - first we bleed the caliper of the right rear wheel, then the front right, then the rear left, and finish with the front right. This is due to the distance of a particular working cylinder from the expansion tank and the main brake cylinder.
- The partner is in the driver’s seat, and we go to the caliper of the right rear wheel, remove the protective rubber cap and put the tube on the fitting, place the free end of the tube in a transparent container with fuel fluid.
We remove the protective cap, put one end of the hose on the fitting and lower the other into the container, prepare a key for 9 or 10 (front or rear wheels). - At our command, the partner actively presses the pedal five to six times and holds it in the pressed position.
- At this time, we unscrew the fitting 1⁄2 turn with a special spanner and observe how air bubbles come out of the tube.
An idea in case there is no partner nearby is to drain the liquid through a check valve. - We tighten the fitting until it stops, repeat the cycle until air stops escaping into the container along with the old fuel fluid.
- Do not forget to monitor the fluid level in the tank after each pumping cycle, ensuring that the level does not drop below the minimum mark.
- We repeat the operation for each of the wheels in the above sequence.
- If necessary, we pump the clutch hydraulic circuit using the same technology.
In the direction of the arrow – the clutch drain fitting with the drain hose already attached. - Add fluid to the nominal level, tighten the reservoir cap and check the performance of the brake system.
In cases where, after several pumping cycles, the pedal still remains “wobbly” and the brakes do not work from the first press to half the stroke, we check the entire system for leaks and fluid leaks.
conclusions
When working with brake fluid, you need to remember that it is toxic and absorbs moisture well, so you should not leave a bottle of new fluid open. Strong brakes and safe, smooth roads to everyone!
Video about replacing brake fluid using a special installation
Bleeding the brake system hydraulic drive, replacing brake fluid
Repeat this procedure paragraphs 4 and 5 until the leaking brake fluid is free of air bubbles. If all the fluid has drained from the master cylinder while bleeding the first brake, fill the master cylinder and bleed the brake again, taking approximately five seconds between cycles.
Tighten the bleeder fitting, remove the plastic tube and install the dust cap.
Repeat the procedure on the remaining brake mechanisms in the above sequence. These devices are a tube with a non-return valve that prevents escaping air and liquid from being drawn back into the system. Some kits also include a clear container.
Place the tube onto the bleeder fitting and open it. Press the brake pedal slowly and smoothly, then release it slowly. Repeat this action until the liquid coming out of the fitting is free of air bubbles.
These devices are driven by compressed air contained in the spare wheel chamber. However, note that the air pressure must be reduced, see
Bleeding Ford Focus 1 brakes, Changing brake fluid
Attach the supplied brake fluid-filled container to the master cylinder reservoir and to the spare tire.
Perform bleeding by opening the fittings one by one in the specified sequence and draining the liquid until it is free of air bubbles. This method has the advantage of having a large amount of fluid in the installed reservoir to prevent air from entering the master cylinder during bleeding. After bleeding is complete, wash off the spilled liquid, tighten the bleeder fittings to the torque specified in the Specifications and install their dust caps.
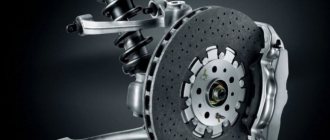
How does the braking system work?
To understand why the brake pedal sometimes fails, you need to understand the general principle of operation, as well as the design of the braking system. It is usually hydraulic, and the problems are common for different car models. The operating principle of the system is based on the fact that a special incompressible liquid is placed in a closed volume.
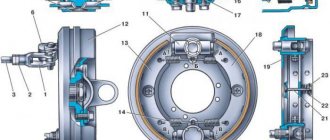
Hydraulic brakes include the following elements :
GTZ (brake master cylinder);
RTC (brake wheel cylinders);
brake discs, pads.
The working fluid here, in accordance with the name, is brake fluid, which has certain properties. The driver presses the brake, his force is transmitted to the GTZ filled with working fluid. The fact is that the device of this element contains a piston - it presses on the liquid, and through it the force is transmitted to the RTC. The latter are installed in the area where the wheels are located. Thus, the pads are pressed against the brake discs/drums. Sudden pressure on the pedal causes the pads to rigidly block the wheels.
Next, the driver releases his foot, and the return springs move the pads back. At the same time, the liquid is displaced into the GTZ. This short list represents the entire operation scheme of this system.
Recommended articles to read:
How to bleed the brakes on a Ford Focus 2: let's get to the bottom of it
Contents: Operation, Maintenance and Repair Manual
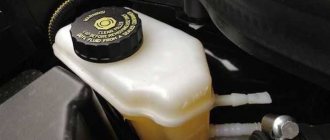
A drop in the brake fluid level indicates either a brake fluid leak from the brake system or excessive wear of the brake pads. If a light comes on on the instrument panel indicating a low brake fluid level, do not rush to add it immediately; first check the thickness of the brake pads: maybe the brake pads need to be replaced? Car manufacturers recommend replacing all brake fluid in the brake system after 40,000 km or 2 years (whichever comes first). Some drivers neglect this advice because the brake fluid in the brake reservoir seems quite clean to them, and this is completely in vain. The fact is that brake fluid is very hygroscopic (absorbs moisture from the air), and over time this moisture not only destroys the surfaces of brake cylinders and pipelines and, as a result, leads to premature failure of brake system components, but also significantly reduces the boiling point brake fluid. The normal boiling point of DOT-4 class brake fluids is 210-260 °C. With frequent heavy braking, disc brakes become very hot; if there is a high water content, the brake fluid can boil, which usually leads to brake failure.
TJ replacement sequence
To replace the brake fluid, you will need an assistant. The first thing you need to do is open the brake fluid reservoir cap and put it in a place where there is no dirt or dust. In many cars, there is a sensor located in the traffic jam and a connector is attached to it; for convenience, it is better to disconnect it. Then remove the caps from the bleeder valves on the brake cylinders. We start with the rear right wheel. A rubber tube of the appropriate caliber is attached to the valve, and the other end is taken out into an empty vessel. The assistant presses the brake lever all the way and holds it in this position. You, in turn, unscrew the fitting using a wrench and bleed out the old fluid; after you have tightened the valve, the pedal should be released. We repeat the operation until the amount of DOTA in the tank is at a minimum, and only then add a new TJ. Next, we continue to bleed until clean liquid flows from the fitting. Now, using the method described above, we bleed the old fluid from the left front, left rear and right front wheels. Upon completion of the procedure, be sure to secure the caps in place. Often, after changing the brake fluid in this way, additional bleeding of the brakes will not be required. After carrying out the work, it is important to add brake fluid to the tank up to the max mark and close it with a cap. That's the whole technology for changing brake fluid. The quality of functioning of the brake system is influenced by air. It penetrates the system during vehicle maintenance and operation. The brake lever immediately reacts to the presence of air in the system. She begins to gently fall into the floor. The brakes either apply at the very end, or do not apply at all. There is a risk of getting into an unexpected skid when trying to brake. You can determine the side of the circuit that has operating errors by looking at the braking distance of the iron horse. To do this, you should brake on dry and clean asphalt, at a speed of up to 60 km/h. The imprint from the tread of a locked wheel will indicate the presence of air in the brake system. To get rid of this indicator, it is worth bleeding the brake system. When changing brake fluid on special equipment at a service station, there is no need to bleed the brakes, because the process of replacing the TJ will proceed under pressure.
How much brake fluid does it take to change?
| Table of the volume of brake fluid required for replacement | |||||
| car model | DOT class | Required amount of fuel fluid, l | |||
| Ford Focus 2 | DOT4 | 1 | |||
| Ford Focus 3 | DOT4 | 1 | |||
| Ford Kuga | DOT4 | 1 | |||
| Chevrolet Niva | DOT4 | 1 | |||
| Chevrolet Cruze | DOT4 | 1 | |||
| Chevrolet Lacetti | DOT 4 | 0.5 a with ABS and ESP 1.0 | |||
| Kia Sid | DOT4 | 1 | |||
| Kia Rio 3 | DOT4 | 1 | |||
| Kia Rio 2 | DOT 4 | with ABS - 1-1.5 l without - 1 l | |||
| Kia Sorento | DOT 5.1 | 1 | |||
| Kia Spectra | DOT3, DOT4 | 1 | |||
| Renault Logan | DOT 4 | with ABS – 1-1.5 l without – 0.7 l | |||
| Renault Duster | DOT4 | 1 | |||
| Renault Fluence | DOT4 | 0,5-1 | |||
| Renault Sandero | DOT4 | 1 | |||
| Renault Megane 2 | DOT4 | 1 | |||
| VAZ 2107, 2109 | DOT 3 | 0,55 | |||
| VAZ 2114, VAZ 2115 | DOT 4 | 1 | |||
| VAZ 2108, 2110, 2112 | DOT 4 | 1 | |||
| Lada Kalina | DOT 4 | 1 | |||
| Lada Priora (VAZ 2170) | DOT 4 | 1 | |||
| Lada Granta | DOT 4 | 1 | |||
| Lada Largus | DOT 4+ | 1 | |||
| Daewoo Matiz | DOT 4 | 1 | |||
| Mitsubishi Pajero 4 | DOT 4 | 1 | |||
| Mitsubishi Lancer IX | DOT 3, DOT 4 | 1 | |||
| Mitsubishi Lancer 10 | DOT 4 | 1 | |||
| Mazda Demio | DOT 3, DOT 4 | 1 | |||
| Mazda 3 | DOT 5.1 | 1 | |||
| Mazda cx 5 | DOT 4 | 1 | |||
| Skoda Superb II | with ABS DOT 4 | 1 | |||
| SKODA Octavia A5 | DOT 4 | 1 | |||
| Toyota RAV4 | DOT 3, DOT 4 | 0,5 | |||
| Toyota Corolla | DOT 4 | 1 | |||
| Toyota Prado 150 | DOT 4, DOT 5.1 | 1,5-1,6 | |||
| Volkswagen Polo sedan | DOT 4 | 1 | |||
| Daewoo Nexia | DOT 4, DOT 5.1 | 1 | |||
| Hyundai Solaris | DOT 4 | 1 | |||
| Hyundai Accent | DOT 5.1 | 1-1,5 | |||
| Volvo XC70 | DOT 4+ | 1 | |||
| Nissan Tiida | DOT 4 | 1 | |||
| Nissan Qashqai | DOT 4 | 1 | |||
| Nissan X Trail | DOT 3, DOT 4 | 1 | |||
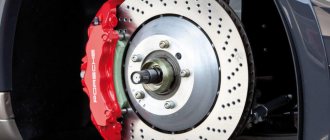
High-quality replacement of front and rear brake pads on a Ford Focus
Replacing brake pads is a standard procedure for owners of all cars without exception. On Ford cars, on models such as Focus 2 and Focus 3, brake pads are replaced as they wear out and on average this happens after 15 - 25 thousand kilometers. The mileage will largely depend on the brake pads themselves, the condition of the brake rotors, as well as driving style and traffic.
Brake pad selection
The best choice of brake pads is the one regulated by the manufacturer. Often, cars come off the assembly line with consumable spare parts from the manufacturer's brand or manufacturing supplier. One such company for Ford is Bosch. In any case, the selection of any spare part is carried out according to the VIN number of the car in order to eliminate inaccuracies in the selection.
Replacing front brake pads
On Ford cars, the focus on the front suspension is disc brakes. This means that braking occurs from the friction of the friction linings of the pads on the metal brake discs. The pads themselves are installed in the brake caliper and driven by the caliper. The replacement procedure consists of the following steps:
It is extremely important to observe all the nuances and follow the replacement steps exactly. The front wheels account for up to 70% of the braking force, which means 70% of braking safety depends on them. Do not trust the replacement of spare parts on which your health and life depends to unqualified car mechanics!
Replacing rear brake pads
The rear wheel brake system on a Ford Focus car comes in two different versions - disc and drum.
In the first case, the replacement is almost identical to replacing the pads on the front wheels, but there are some subtleties. Since the handbrake is combined with a caliper, its compression must be done with a special tool that presses the cylinder piston while screwing it inward.
If there are drum brakes at the rear, for example on cars with 1.4 and 1.6 liter engines, then the replacement process will be as follows:
Bleeding the brake system Ford Focus 2 2005-2008
- Repair manuals
- Ford Focus 2 2005-2008
- Bleeding the brake system
If the brake pedal becomes “soft” and becomes “harder” after several consecutive presses, it means that air has entered the hydraulic brake drive.
To remove air from the system, it is necessary to bleed the brakes. The procedure for bleeding the brakes is quite simple, but it is more convenient to do it with an assistant.
Bleeding the brake system is described in detail in section. 9 “Brake system” (see “Bleeding the brake system hydraulic drive”).
↓ Comments ↓
Section 1. Vehicle design
General information about the car Passport data Car keys Controls Heating (air conditioning) and interior ventilation Doors Seat belts Seats Steering wheel adjustment Rear view mirrors Interior lighting Sun visors Interior storage compartments Hood Gearbox control Roof rack
Section 2. Recommendations for use
Safety rules and recommendations What you need to have in your car Running in the car Operating the car during the warranty period Preparing the car for departure Filling the car with gasoline Using a jack Towing the car
Section 3. Problems along the way
The engine does not start Malfunctions of the fuel injection system Idle has disappeared Interruptions in engine operation Diagnostics of the engine condition by the appearance of the spark plugs The vehicle moves jerkily The vehicle accelerates poorly The engine stalls while driving The oil pressure has dropped Engine overheating The battery does not recharge Starting the engine from external power sources Malfunctions of electrical equipment Extraneous knocking noises appear Problems with the brakes Puncture of a wheel
Section 4. Maintenance
General provisions Daily maintenance (EO) First maintenance (MOT-1) Second maintenance (MOT-2)
Section 5. Engine
Design features Possible engine malfunctions, their causes and solutions Useful tips Checking compression in the cylinders Removing and installing the engine mudguard Replacing the power unit suspension mounts Installing the piston of the first cylinder to the TDC position of the compression stroke Removing, installing and troubleshooting the flywheel Replacing engine seal parts Adjusting clearances in the drive valves Cylinder head Removal and installation of the engine Lubrication system Cooling system Exhaust system Engine power supply system Fuel vapor recovery system
Section 6. Transmission
Clutch Gearbox Front wheel drives
Section 7. Chassis
Front suspension Rear suspension
Section 8. Steering
Design features Possible malfunctions of power steering, their causes and solutions Steering column Steering rods Steering mechanism
Section 9. Brake system
Features of the device Possible malfunctions of the brake system, their causes and solutions Bleeding the hydraulic drive of the brake system Checking the position of the brake pedal Master brake cylinder Vacuum brake booster Replacing hoses and tubes of the hydraulic brake drive Removing and installing the brake pedal Brake mechanisms of the front wheels Brakes of the rear wheels Parking brake Anti-lock brake system
Section 10. Electrical equipment
Design features Diagnostics of malfunctions of on-board electrical equipment Mounting blocks Battery Generator Starter Ignition switch (lock) Engine control system Lighting, light and sound alarms Replacement of the windshield window wiper motor Replacement of the tailgate window wiper motor Removal and installation of the windshield washer Replacement of the front door window regulator motor Removal and installation of the electric motor of the radiator fan of the engine cooling system Replacement of the additional resistance of the radiator fan of the engine cooling system Removal and installation of the electric motor of the heater Replacing the additional resistance of the electric heater fan Electric heating of the glass of the rear window (tailgate) Instrument cluster Instrument panel switches Replacement of the control unit for electric windows and electric mirrors Car audio system Replacement of sensors and switches
Section 11. Body
Design features Possible body malfunctions, their causes and solutions Removal and installation of the radiator lining Removal and installation of wheel mudguards and wheel arch liners Removal and installation of bumpers Removal and installation of the front fender Removal and installation of the engine compartment frame and front bumper beam Removal and installation of the air intake and drainage box grille shield Hood Side doors Tailgate of hatchback cars Fuel tank filler hatch cover Seats Removal and installation of floor tunnel lining Passive safety system (SRS) Rear view mirrors Instrument panel Heater and air conditioner Interior fittings Removal and installation of interior linings Removal and installation of trunk linings Windshield wiper windshield Windshield wiper for tailgate window Replacing fixed glazing of the body Removing and installing the battery mounting shelf Caring for the body
Section 12. Wheels and tires
Technical characteristics Marking of rims Marking of tires Changing wheels Wheel nuts Breaking in tires Storing tires Balancing wheels Snow chains Spare wheel Checking tire pressure Checking tire tread Checking valves Checking radial and lateral runout of rims
Section 13. Purchase of spare parts
Engine oil Lubricants Coolants Brake fluid Fuel filter Air filter Engine oil filter Spark plugs
Section 14. A trip to the service station
Section 15. Winter operation of the vehicle
How to prepare a car for winter Recommendations for starting the engine in severe frost What is useful to buy for winter Useful winter tips
Section 16. Preparation for technical inspection
Recommendations List of malfunctions and conditions under which the operation of vehicles is prohibited Changes to state standards regulating the maximum permissible content of harmful substances in the exhaust gases of motor vehicles
Section 17. Tips for a novice auto mechanic
Safety precautions when carrying out repair work Tools Before starting work Restoring threaded connections Tips for body repair
Applications
Appendix 1. Tightening torques of threaded connections, Nm Appendix 2. Overall dimensions (mm) of Ford Focus II cars with sedan and station wagon bodies Appendix 3. Technical characteristics of engines and performance indicators of cars depending on the type of engine used Appendix 4. Air pressure in cold tires Appendix 5. Filling volumes, l
Electrical circuit diagrams
Diagram 1. Windshield wiper and washer connections Diagram 2. Battery charging system connections Diagram 3. Brake system hydraulic drive system connections Diagram 4. Ventilation, heating and air conditioning system connections Diagram 5. Engine starting system connections Diagram 6a. Speed control system connections Diagram 6b. Speed control system connections Diagram 7a. Engine control system connections Scheme 7b. Engine control system connections Scheme 7c. Engine control system connections Scheme 7d. Engine control system connections Scheme 7d. Engine control system connections Diagram 7e. Engine control system connections Scheme 7g. Engine control system connections Scheme 8a. Air conditioning system connections Diagram 8b. Air conditioning system connections Diagram 9. Power steering system connections Diagram 10a. Anti-lock brake system (ABS) connections Scheme 10b. Anti-lock brake system (ABS) connections Diagram 11. Vehicle Dynamic Stability System connections
The process of replacing brake fluid in Ford Focus 3
- The fluid is changed in the following sequence: right rear brake - left rear - right front - left front.
- This operation, together with pumping, will take a maximum of 30 minutes. and step by step it looks like this:
- Unscrew the cap from the reservoir (expansion tank) of the master brake cylinder.
- We slowly pump out its contents with a syringe with a hose attached to its nipple.
- Fill the reservoir with new liquid up to the beginning of the neck (minimum level).
- We remove contamination from the damper of the exhaust air valves (fittings) on both circuits, remove the protective caps from them; if the latter are damaged, we replace them.
- We put the hose on the valve of the right rear wheel, lower the free end into the prepared empty vessel.
- The partner sharply presses the brake pedal 4-5 times, at intervals of 1-2 seconds; then locks it in the pressed position.
- Approximately half or three quarters of the way, use a 8 key to unscrew the valve fitting to allow the old fluid to escape (in the meantime, the pedal will gradually reach the floor itself and rest against it).
- We close the fitting after the dirty waste liquid with air bubbles has stopped flowing and it has been replaced by a fresh one, while carefully monitoring the level so that it does not fall below the minimum mark; add further portions of liquid - under no circumstances should atmospheric air enter the system!
- Using the same scheme, we change the working fluid in the brake mechanisms of other wheels, as well as in the drive.
- We hide the valves under protective caps.
- We control the travel of the brake pedal; if there are dips, we resume pumping and pump until the force becomes the same with each press.
- Add liquid to the maximum mark, screw the cap onto the reservoir.
- After this, we carefully test the brakes in motion, with some caution.
How to bleed the brakes on a Ford Focus 2: let's get to the bottom of it
Ford Focus 2. Main malfunctions of the brake system and their elimination
Increased brake pedal travel
| Increased brake pedal travel (the pedal is “soft” or “falls in”) | |
| Cause of malfunction | Elimination methods |
| Air in the brake system, brake fluid leakage through leaks in hydraulic drive connections, damage to the seals in the master brake cylinder, pressure regulator, damage to brake pipes and hoses | Inspect all lines, their threaded connections and cylinders, and eliminate leaks. Restore the normal fluid level in the brake reservoir and bleed the system. If you find damage to the brake hoses (cracks, swelling or traces of brake fluid), replace the hoses. If you suspect defects in the master brake cylinder, replace it with a good one. |
| The rubber cuffs of the cylinders are swollen due to oil, gasoline, etc. getting into the brake fluid. | Replace cylinders, hoses, completely drain the brake fluid, flush the system with fresh fluid and bleed |
| Overheating of brake mechanisms | Allow the brakes to cool. Use only DOT-4 brake fluids in the system. Replace brake fluid promptly |
| The gap between the pads and the drum has been increased (the automatic gap adjustment device does not work) | Replace the wheel cylinder, bleed the system |
| One of the circuits of the service brake system does not work | Eliminate fluid leakage from the brake system, bleed the system |
| Increased (more than 0.15 mm) runout of the brake disc | Replace both drives |
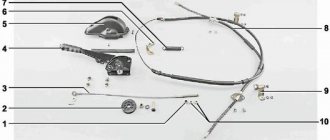
How to bleed a clutch: preparation and stages
Clutch “diseases” can lead to problems at the start and when braking. Unfortunately, it is impossible to diagnose system problems based on external signs. Monitor its operation, pay attention to your own sensations when pressing the pedal, and if you notice jerks when starting the engine and switching the gearbox, go for diagnostics.
Car clutch system
How to bleed brakes
To bleed the brakes according to the standard procedure, two people are needed. To do this, you need to pour brake fluid into the master cylinder reservoir, after which one person sits behind the wheel and presses the brake pedal from time to time. An assistant, having cleared dirt from the brake cylinder fittings before bleeding, unscrews the fitting. The first one at this time begins to smoothly press the brake. As soon as bubbles stop coming out of the fitting along with the brake fluid, and a clean stream comes out, the brake cylinder fitting is tightened.
All other wheels are pumped in the same way. At the same time, you need to remember that you should start bleeding from the farthest wheel from the driver, then the second rear one, then the passenger one, and lastly, the wheel next to the driver. During bleeding, it is necessary to monitor the level of brake fluid in the main reservoir so that it does not fall and air does not enter the system.
There are other sequences for bleeding the brakes, it all depends on the design features of your car.
Since it is often difficult to find a partner for this job at the right time, it is worth learning how to bleed the brakes without outside help.
ABS bleeding sequence
- First, we look for and remove the fuse in the fuse block that is responsible for the operation of the anti-lock braking system.
- Next, we jack up and remove one front wheel, and look for the brake wheel cylinder (BWC) fitting.
- After this, we put a hose on the fitting (from the hydraulic level, for example).
- Open the fitting one turn.
- One presses the brakes all the way and holds it in that position.
- Now turn the ignition key to turn on the hydraulic pump (the ABS indicator lights up on the instrument panel).
- The second person watches how air is removed through the hose and, after removing the air, tightens the fitting.
- We release the pedal only after tightening the fitting.
- Now, how do you know that all the air has escaped from the ABS? This shows the ABS icon on the dashboard, if it goes out after removing the air and tightening the fitting, then all the air has escaped.
The correct sequence for bleeding the ABS system
There is a specific order for properly bleeding an ABS system: right front wheel, then rear, then rear right, and then rear left wheel. If during such work the fuel fluid leaks out of the system, it is necessary to fill the system with new fluid. And to do this, you need to know what fluids can be mixed and how much brake fluid is needed for replacement.
Sequence of operation for the front wheels:
- Turn off the ignition (key position “0”).
- Remove the terminals from the brake fluid reservoir.
- Take a bottle with a small amount of brake fluid and a hose. We lower one end of the hose into the liquid, put the second on the fitting and open the fitting with an open-end wrench. It is advisable to use a transparent hose from the hydraulic level so that you can see whether air bubbles are coming out or not.
- Press the brake pedal and hold it in this position.
- The second person (at the wheel) looks to see if the air is coming out, and after the air bubbles have stopped coming out, he closes the fitting with a key.
Some features of the Ford Focus 2 hydraulic clutch
Focus car owners often ask how to adjust the clutch if the pedal “snaps” late. It should be noted that on this model the Ford GPS is not adjustable; somehow changing the operation of the unit can only be done by pumping the hydraulics.
Another interesting solution from the Ford concern, used in the design of the car, is combining the RCS with a release bearing, so to replace the working cylinder you have to remove the gearbox. Also, extra work is added when changing the clutch release, because in any case you need to pump the clutch.
When the PS is easily pressed, “pushed” to the end almost with your fingers, most likely the clutch master cylinder (MCC) is faulty. If the standard location of this part on many passenger cars is under the hood, next to the wiper panel, then on the Focus the GCS is located much lower, in close proximity to the clutch pedal, and is connected to it mechanically.
The clutch basket and disc on these cars usually last for 100-150 thousand km, much depends on operating conditions. But the release bearing may fail much earlier, and in this case you will still have to remove the gearbox and do quite serious repairs.