How to remove the intermediate cardan?
The intermediate cardan is removed from the Chevrolet Niva for repairs when the crosspiece needs to be replaced, as well as when performing other operations if its presence on the car may interfere with successful operation. The car is driven into a pit or overpass. The CV joints have four nuts, bolts securing them to the flange of the transfer case drive shaft. They are turned away. Then, using a small chisel and hammer, marks are applied to the CV joints. Mark the constant velocity joint housing and the transfer case flange. Loosen the nuts securing the supports of the power unit and use a small crowbar to move the unit a couple of centimeters. After this, it will be possible to remove the studs that the intermediate hinge has from the flange holes. This is what needs to be done.
Next, unscrew the nuts of the bolts that secure the elastic coupling to the flange of the secondary shaft of the gearbox. Then remove these bolts from their mounting sockets. If you can’t remove them with your bare hands, you can use a hammer. Now it is possible to remove the intermediate driveshaft. Installing the intermediate driveshaft on a Chevrolet Niva VAZ 2123 in the reverse order.
How to remove cardan mechanisms with your own hands?
Work is performed on a pit, lift or overpass. To replace parts you will need:
To dismantle and install the front shaft, you need to perform the following operations:
- sequentially unscrew the nuts of the bolts securing the flanges to the rear axle gearbox and transfer case. In this case, you need to hold the part so that it does not fall;
- remove the fastening bolts;
- Remove the rear driveshaft from the vehicle.
To install a new cardan you need:
- install a new part and, holding it, align the holes on the flanges;
- insert the bolts and tighten the nuts securing the axle and transfer case.
Replacing the rear driveshaft is done in the same way. The difference is that for ease of operation, the transverse rods of the bridge can be removed.
Products on crosses require periodic maintenance - injection. To do this, they have grease nipples on the crosspieces and in the area of the spline connection.
To lubricate the splines:
- remove the driveshaft;
- clean the oiler from dirt;
- Use a special syringe to squeeze out the lubricant.
The crosspieces are also lubricated with a syringe through grease nipples. The difference is that you don’t have to remove the part from the car to do this.
Advantages and disadvantages of CV joint cardan
The balls in the cage ensure uniform rotation of the shaft regardless of the bending angle. Also, the balls in the cage are more durable than the crosses. This provides cardan shafts with CV joints with the following advantages:
However, the condition of the hinge depends on the integrity of the protective cover. If the rubber is damaged, dirt and water enter the bearing, which damage the parts.
A Niva with cardan shafts on CV joints is best used on highways or in moderate off-road conditions. Otherwise, branches, stones and even dirt can tear the boot. Therefore, after overcoming difficult areas, it is necessary to check the condition of the protective covers. They must be replaced immediately if cracks or breaks are detected.
Shaft balancing
The procedure is necessary after replacing crosspieces or minor damage to the driveshaft. It is performed on a special balanced stand with sensors and control surfaces.
Important! At home, using it will not be possible to achieve the required accuracy in selecting loads. Therefore, balancing should be performed in a specialized service station.
How to choose a driveshaft
The main distinctive features of shafts for Chevrolet Niva cars produced by Belkard OJSC. Today, quite a lot of products of dubious origin appear on the secondary market. This material is intended to help car enthusiasts identify cardan shafts 2121-2201012-04 produced by Belkard OJSC.
When choosing a driveshaft, you first need to spend a little time on a visual inspection. The shaft must be painted with matte epoxy enamel, while the connecting surfaces of the flanges are protected from painting at the factory; traces of corrosion are not allowed.
Pay attention to the welding of the balancing plates; they must be installed evenly and fit snugly against the propeller shaft pipe. The absence of balancing plates and sloppy welding indicate that the shaft was manufactured in “makeshift” conditions. The propeller shaft pipe must be smooth and dents are not allowed. In the manufacture of cardan shafts at Belkard OJSC, a pipe with an outer diameter of 59 mm (inner diameter 55 mm, wall thickness 2 mm) is used.
If possible, it would be a good idea to stretch the splined joint of the propeller shaft. Free movement indicates the presence of circumferential clearance, which can lead to premature failure. If it was not possible to stretch the driveshaft, or it was necessary to apply significant force, the spline connection was not selected selectively. Find the relative position marks of the balanced set; they should be located exactly opposite one another.
Try turning the propeller shaft joints, they should not turn too tightly, check for grease nipples and rubber caps.
A distinctive feature of cardan shafts produced by Belkard OJSC are also:
1. Original self-adhesive label, which shows the date of manufacture, designation of the driveshaft, barcode (covered in the picture).
2. Duplicate self-adhesive label in the flange cavity. 3. Trademark of Belkard OJSC on the sliding fork. 4. Absence of a grease nipple in the spline joint. The spline connection design is highly reliable and does not require maintenance during operation. Advanced technologies are used for its manufacture, such as polymer coating of the spline bushing and rolling of the sliding fork splines using the cold plastic deformation method. This connection significantly reduces the load on the units mated to the driveshaft.
The absence of any of the above signs should alert you, because upon shipment, each cardan shaft undergoes strict multi-stage quality control control.
We hope that this information will help our consumers make the right choice and will resolve questions regarding the identification of original driveshafts produced by Belkard OJSC.
Send your comments to:
Device and features
A cardan transmission is essentially an iron hollow tube. The thickness of the metal tube is 2.7 mm. The following are welded to this tube on both sides:
The fork of the second hinge is brought to the splined tip and put on there. This way, a splined connection is ensured. This connection is certainly sealed with an oil seal, which is installed on the sliding fork.
What is needed is that the torque on a Chevrolet Niva car is transmitted through cardans (front and rear), alas, we are only interested in the rear. On the Chevrolet Niva, the design of both the front and rear universal joints is actually similar, the difference lies solely in the length of the device.
On redesigned models, the driveshaft design has an improved appearance, and on models since 2010, the Chevrolet Niva is equipped with a drive shaft with joints of equal angular ends. The components of the rear cardan of Chevrolet Niva models before 2010 and the CV joint shaft of models from 2010 are shown in the photo below.
Device
The fork of the second hinge is put on the splined tip, resulting in a splined connection, which is sealed with an oil seal and placed on the sliding fork.
The torque, as mentioned above, occurs thanks to the cardan, which comes in both rear and front, which have almost the same design, the only difference is in length.
Restyled versions of the Niva have an improved type of driveshaft, and on models that began to be produced in 2010, a shaft is installed that has joints of equal angular ends. And the old previous versions had a Niva Chevrolet universal joint.
Checking the serviceability of the cardan transmission
The performance check is carried out with the PP box in neutral gear. The car is driven onto an overpass or inspection hole and boots are placed under the wheels, so that the car can move, but does not roll off the overpass. Let's start testing. The check is carried out for both types of structures:
When is a device change required?
When the design of the device, so to speak, loses the balancing of the plates, otherwise all parts of the product are changed, then upon completion it is imperative to re-balance the driveshaft. On the contrary, after balancing the difficulties of the product malfunction are not eliminated, the shaft assembly with complete elements is replaced. If the shaft is not balanced, this will uniformly lead to an increase in the amount of vibration, especially at a speed of 60-80 km/h.
Balancing the cardan is done either with the help of a visit to 100, where the craftsmen will perform the related work for our client, or without the help of others, which will save money. However, that's another story.
Device and features
The cardan transmission is a hollow steel tube. The metal thickness of the tube is from 1 to 2 mm. The following are welded to this tube on both sides:
The fork of the second hinge is brought to the splined tip and put on it. This ensures a splined connection. This connection must be sealed with an oil seal, which is installed on the sliding fork.
So, torque on a Chevrolet Niva car is transmitted through cardans (front and rear), but we are only interested in the rear. On the Chevrolet Niva, the design of both the front and rear universal joints is almost the same, the only difference is the length of the device.
On restyled models, the design of the driveshaft has an improved appearance, and on models since 2010, the Chevrolet Niva is equipped with a drive shaft with joints of equal angular ends. The components of the rear cardan of Chevrolet Niva models before 2010 and the CV joint shaft of models from 2010 are shown in the photo below.
Operating principle of the drive.
By default, the SUV uses high gear with the center differential disabled. The engine transmits force to the gearbox, which is fed through the shaft to the transfer case gearbox. The transfer case contains a center differential, which connects the front and rear axles.
How does all-wheel drive work on a Chevrolet Niva if the differential is locked.
If you turn on all-wheel drive on the Niva, the cardan shafts will be blocked using a special clutch. In this case, there will be an even distribution of torque between the axles. The vehicle's cross-country ability will increase significantly, but at the same time, handling will become slightly worse.
Cardan shafts "NIVA-BELKARD"
In 2005, Belkard OJSC began producing new generation driveshafts for Niva cars: front axle drive - 2121-220 3 012-04 and rear axle drive - 2121-220 1 012-04 . Cardan shafts of this design have been supplied for several years for SUVs "TRECOL", "UAZ", "KIA Sportage". These modifications replaced the previously produced 2121-2203012-02 and 2121-2201010-02 , respectively.
Shafts of the new and old generation in comparison (from the side of the fork bearings...
... and from the bearing side of the flanges)
A distinctive feature of cardan shafts of previous modifications is a thin spline and a pipe with a large outer diameter
...as well as the “square” flange form factor
In the manufacture of modernized cardan shafts at JSC Belkard, a pipe with a smaller outer diameter is currently used - 59 mm (inner diameter 55 mm, wall thickness 2 mm) ...
...as well as flanges with a “round” form factor
The use of progressive design and technological solutions has made it possible to achieve significant advantages compared to cardan shafts of the “old” design produced by Belkard OJSC and cardan shafts from other manufacturers.
The life of the bearing unit has been increased due to the use of the crosspiece 2121-2201025-30 (with external locking) instead of the previous 2121-2201025-20 (with internal locking). The new type of crosspiece uses needle bearings СН192819НРС10 with a stamped housing and a polymer washer installed on the bottom of the bearing. Selective selection of retaining rings made it possible to minimize axial clearances in the hinges .
The crosspieces of the new modification 2121-2201025-30 come with parameters 28 x 65 mm and are secured with external locking rings, the oilers are equipped with protective caps . (while the crosspieces of the old type 2121-2201025-20 were similar to the “Moskvichevsky” 412-2201025-04 with the same parameters: 28x83.55mm, internal locking in the hinge units).
(note: there are also Ukrainian driveshafts for Niva cars with Volgov crosspieces 3102-2201025-01 and parameters 30 x 88 mm. Be careful when choosing a replacement crosspiece!)
Rice. 1 Cardan shaft for Niva cars 1 - sliding fork; 2 — seal of telescopic protection; 3 — splined bushing; 4 - flange; A - bearing with a polymer washer and locking by the outer ring.
Applying a polymer coating to a RILSAN spline bushing and manufacturing involute splines of the sliding fork using cold plastic deformation, installing special double-edge seals made of abrasion-resistant composite material made it possible to reduce axial loads in the spline joint, increasing its reliability and durability by 4-5 times.
Spline 38x2x9H/9d GOST 6033-80 is used (external diameter of splines 38 mm)
Such a spline connection does not require maintenance (lubrication) during vehicle operation, providing the required service life. In addition, due to the minimal force of axial movement in the spline connection, the load on the components of the transmission power units is significantly reduced, resulting in an increase in their durability.
The deep modernization carried out made it possible to increase the service life of cardan shafts for Niva cars by 1.5-2 times.
Produced cardan shafts undergo strict multi-stage quality control inspection. Research and development center DTR of AvtoVAZ OJSC, after a comprehensive comprehensive test in laboratory and road conditions, approved the use of cardan shafts of the design described above in the transmission of Niva cars, in addition, these shafts were approved for Chevrolet Niva cars.
Replacing the CV Joint on the Cardan Niva Chevrolet Video
The following are welded to this tube on both sides: Splined tip; Hinge fork. The fork of the second hinge is connected to the splined tip and put on.
This ensures a splined connection. This connection must be sealed with an oil seal, which is installed on the sliding fork. So, the torque on a Chevrolet Niva car is transmitted through the front and rear cardans, but we are only interested in the rear. On the Chevrolet Niva, the design of both the front and rear universal joints is almost the same, the only difference is the length of the device.
On restyled models, the design of the driveshaft has an improved appearance, and on models from this year, the Chevrolet Niva is equipped with a drive shaft with joints of equal angular ends. The components of the rear cardan of Chevrolet Niva models up to a year and the CV joint shaft of models from a year are shown in the photo below.
There is also a sliding fork 3. The image shows that the shaft consists of a tube 7 on the CV joint 5 cardan on both sides and, of course, boots.
The boot is designed to protect the connection from getting inside not only dust, but also water and dirt. It also keeps the lubricant from leaking out. Checking the serviceability of the cardan transmission The performance check is carried out with the PP box in neutral gear.
The car is driven onto an overpass or inspection hole and placed under the wheels so that the car can move without rolling off the overpass. Replacing a Qashqai Low Beam Light Bulb Every owner of a Nissan Qashqai car, there comes a time when he is faced with one of the necessary maintenance issues, changing the lamp. Such a discrepancy can take you by surprise, for example, when a person is on a long trip, in the dark and there is no service station nearby.
The only solution that is most suitable in this situation is Replacing Coolant Moskvich Never leave antifreeze in an open container or spilled on the garage floor - a deadly poisonous liquid can be removed from the Niva Chevrolet car. Repair is carried out or replaced with a new one, and then assembly is carried out in the reverse order of removal. You can not hold the shaft, but fix it with a strong rope to the bottom of the car, and or use the help of a friend.
How to correctly install the boot on the CV joint? This common rumor question is replete with its own popularity on forums; alas, sometimes not everyone pays attention to such user websites. A new boot is purchased if you need two, because there is one product on both sides.
The price of one is about rubles. The cardan is removed, the procedure is described above. We take the device out of the pit and begin to remove the old, worn boot. The plug is removed from the back of the hinge. The retaining ring is removed from the splined part, and then the hinge is removed. If you are not familiar, where the boot fits, there is an additional retaining ring installed, which also needs to be removed.
We take out the hinge, and the order of the parts needs to be clarified. The worn boot is removed.
Cardan on CV joints of Chevrolet Niva
Of course, remove the boot by cutting; this sequence of actions is needed to install a new element. The parts are washed for our client, then lubricated and put on for the area. First, the boot is put on the shaft, and then all the other parts. Clamps are installed on the boot. We disassemble the inner CV joint: Using a screwdriver, remove the retaining ring.
We remove the clip, having previously made marks on the balls and grooves. But not everything is as perfect as we would like and nothing lasts forever.
How to replace the crosspiece on a Niva SUV yourself
The Niva car is equipped with two driveshafts that are part of the all-wheel drive system. They transmit energy to the front and rear axles and are a prefabricated structure with crosspieces as their central link. If the crosspiece fails, it must be replaced immediately. This will prevent damage to the driveshaft and failure of the car’s drive system.
Causes and signs of part malfunction: how to detect
The crosspiece is the key link of the driveshaft. Thanks to it, torque is transmitted from the gearbox, causing the shafts to rotate. Usually one of the crosspieces fails, of which there are four in Lada 21213. If it is not replaced in time, the steam room will quickly become unusable. The crosspieces allow the driveshaft to rotate evenly; if they break, play appears and the car loses power.
To avoid any unpleasant surprises on the road, you need to monitor the condition of the crosses. Carry out a thorough inspection of them regularly, clean and apply lubricant at least every 10 thousand km. If a part has become unusable, it must be replaced in a timely manner.
Parts in the drive system become unusable due to play in the units, which is caused by increased loads and mechanical stress. The wear of the crosspiece is facilitated by its unfavorable location. It is located close to the road surface, so it often gets sand, dirt, water and dust. Wear depends on the following factors:
- quality of parts manufacturing;
- driver's driving habits;
- sudden temperature fluctuations;
- the quality of roads, which leaves much to be desired;
- operating conditions;
- ingress of dust, sand, dirt, stones and water.
The main signs of a faulty crosspiece:
- the appearance of grinding, creaking and crackling sounds in the area of the cardan while driving;
- knocking sound when the car starts;
- extraneous sounds when driving on uneven roads.
The crosspiece is one of the parts that have a high margin of safety, but when exposed to a large number of mechanical influences and operation in an unfavorable environment, it quickly wears out.
Inspection and replacement of the crosspiece on the VAZ 2121
To carry out a correct diagnosis, you must perform the following steps:
- Place the machine on a lift to allow access to the bottom.
- Having found where the propeller shaft is located, we hold on to it with one hand, and with the other we take hold of the drive gear hinge. It is located near the gearbox.
- Now, holding the connection with both hands, we try to turn it. If this succeeds, then there is backlash. Its presence requires mandatory replacement of the crosspiece. If this is neglected, the car may fail while driving, as control will be unreliable.
If the decision is made to replace, we purchase the necessary consumables. To carry out the work, we prepare the tools:
- jack;
- spanners;
- Phillips screwdriver;
- attachment made of aluminum or copper;
- hammer;
- thin pliers;
- tool to remove the retaining rings.
Repair work on joints can only be carried out on a removed cardan shaft. We place the car on a viewing hole or lift it using a lift. We fix the wheels with supports, turn on neutral and the handbrake.
First of all, you need to dismantle the driveshaft. We clean the removed structure from dirt and begin disassembling and replacing parts:
- Using narrow pliers, remove the four retaining rings.
- We use a chisel to mark the relative positions of the parts to each other on the cardan and the hinge body so as not to confuse them in places during assembly.
- Now we press the bearing out of the flange using a piece of pipe of a suitable diameter or a union head. Or use a puller. It is better to fix the cardan in a vice.
- We hit the mandrel until the fork hits the cross. Now remove the lower bearing bowl. We carry out a similar operation with the top one.
- If the bearings are tightly seated and it was not possible to press them out, use a grinder to make chamfers on the bearing housing.
- We turn the flange, loosen it and remove it together with the cross from the propeller shaft. And then we take out the cross from the flange.
- We wash all parts in kerosene and carefully inspect them. If the plug is damaged, replace it with a new one.
- At the next stage, we proceed to install the new crosspiece. We insert it into the eyes that have been previously cleaned of dirt and rust.
- We clamp the flange in a vice and press the bearing cups. You need to act carefully so that the needles do not fall apart.
- Before doing this, check for the presence of grease in the bearing housing; if there is none, apply it. We also lubricate the parts on the outside. It is not recommended to exceed the amount of lubricant, as it may push out the oil seal or the bowls will not fit tightly into the seat.
- After pressing, there should be room for the retaining ring.
- Next, install the retaining rings, checking them for damage. If there are defects, we replace them.
- When the assembly is completely assembled, apply light blows to the hinge with a rubber hammer to completely shrink the parts and eliminate possible gaps.
Changing the crosspiece on the steering column
Sometimes it becomes necessary to replace the steering cross. It is changed if the following signs appear:
- increased free play of the steering wheel;
- difficult to turn the steering wheel;
- intermittent rotation of the steering wheel occurs;
- when driving on bad roads, you hear extraneous sounds when turning the steering wheel;
- wheels work late.
Connections constantly experience increased loads and are negatively affected by temperature fluctuations and high humidity. Lubricant leaks, which leads to wear of parts, and seals lose elasticity. As a result, the bearing needles and crosspieces fail.
Replacing the steering column crosspiece on a VAZ 2121 is carried out in combination with bearings according to the following algorithm:
- We install the shaft in a position in which the fasteners that compress the body of the crosspiece forks will be accessible.
- Unscrew the bolts on the forks and remove.
- We slide the structure with the cross along the slots and remove it one by one from each side.
- We clamp the clips in a vice and press them out. They are fixed with a core, which is removed with a drill or knocked out with a chisel.
Possible faults
The appearance of a “trembling”, which increases with increasing speed, may indicate that the cardan cross has failed. To make sure of this, you need to drive the car into a pit and engage neutral gear. Then grab the shaft with both hands and swing it in one direction or the other with sharp movements. The presence of play indicates that it is time to change the crosspiece. If the crosspieces are in normal condition, but trembling is present, then this indicates an imbalance of the cardan. Usually, trying to balance the shaft does not have any effect, since it can be damaged when driving off-road.
Source
Malfunctions of the front and rear drives of the VAZ 2123
Regardless of the shaft design, three signs of malfunction can be noted:
- vibration while driving. The cause may be worn cross joints (CV joints) or shaft deformation;
- knocking sound when starting from a standstill, accelerating or braking the engine. This happens when CV joints or crosspieces wear out;
- Leakage of lubricant from under the boots of the constant velocity joint or spline joint.
You can check the condition of the nodes yourself. To do this you need:
- park the car on a pit or overpass;
- make sure there is no lubricant leakage;
- firmly grasp the cardan shaft with your hand near the hinge;
- swing the assembly with sharp movements in a direction perpendicular to the axis of rotation.
If there is an oil leak or play, it is necessary to remove the faulty unit and replace it with a new one. In some cases, repairs are possible - replacing CV joints, crosspieces, balancing.
Replacing cardan shafts in the field
Welcome! The driveshaft is a very important part for both all-wheel drive and rear-wheel drive cars, the car will not drive without it, thanks to this shaft, which looks like a large metal stick, torque is transmitted from the gearbox to the gearbox , well, the gearbox now starts up on the wheels themselves and thus the car moves.
Note! To replace this part on a Niva car, you will need to stock up on the following tools, namely: A set of wrenches (Exactly wrenches, others will not work), we also recommend taking a healthy screwdriver (Or a medium-sized one if you don’t have a larger one)!
Summary:
Where are both driveshafts located? As you already understood from the title of the article and from the inscription just above, there are only two cardan shafts in the Niva car, for example, if we talk about the rear-wheel drive Classic, then there is only one cardan on it, and it’s very difficult to remove them on both the Niva and the Classic easily and almost identically, that is, the nuts securing the driveshaft flanges were unscrewed and the shafts were removed from the car (we’ll talk about how to unscrew these nuts a little later), you can see more details about where these driveshafts are located in the article entitled : “Replacing cardan drive crosspieces on a VAZ”, there will be a picture in which these shafts are indicated with a red arrow, in addition, read the article linked above, since these crosspieces fail from time to time and so that you generally know what the symptoms are will be reflected on the car, read the article to which the link is given, everything is written in it.
When do you need to change driveshafts? It’s practically never necessary, unless of course you operate the car normally in urban conditions and don’t drive it in the mountains, the whole point is that the cardan shafts themselves almost never fail or fail, it may happen that you touch them and in connection why do they bend, then after that you need to change them immediately, if you don’t do this and drive on bent shafts, then firstly the power will drop and it will rotate unevenly, and therefore the crosspieces will wear out very quickly, they will start knocking and A number of other problems are yet to arise.
How to replace driveshafts on a VAZ 21213-VAZ 2131?
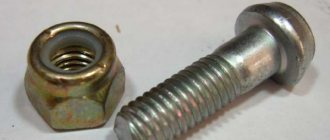
Removing it: As we have already said, there is nothing complicated in its removal, just take a screwdriver and if you have an assistant with you, then generally good, first ask him to hold the shaft so that it does not fall when you disconnect one of the sides (And without an assistant this work can be done, it just won’t be convenient), as soon as he holds one of the sides with his hands, take a screwdriver in your hands and insert it between the bolt and the cardan fork as shown in photo 2, thereby you will ensure that the bolt will no longer turn , as soon as the operation is done, unscrew the nut of this bolt that you hold with a screwdriver (see photo 1) and then remove this bolt from the hole, do exactly the same operation with the other bolts and remove them all, thereby, as soon as the bolts are removed, on the one hand, the cardan will no longer be attached to anything and will simply be in the air (the part that hangs in the air, we recommend that an assistant hold it), and then on the other hand (the cardan will be attached in both directions, in absolutely identical ways to that same) unscrew all the bolts in the same way and thereby remove the driveshaft from the car (For example, photo 3 shows the removal of the rear driveshaft, you may be removing the front driveshaft; this is already photo 4, but that’s not the point, they are removed identically), and the second driveshaft as You already understood, remove it in exactly the same way, unscrewing all the nuts of the bolts that secure the cardan on both sides.
Note! If the driveshaft rotates when you unscrew the nuts, then ask an assistant to hold it with your hand, or the best way is to insert a thick screwdriver into the very place shown in photo 2 and thereby you will ensure that the bolt does not move (so that the nut it is normal to unscrew it) and fix the cardan shaft itself in this way so that it does not rotate!
Installation: The propeller shafts are installed in the reverse order on the car and let’s say a few words about the old shafts, that is, if you decide to install the same shafts on the car (You removed them, for example, to replace the crosspieces and are not going to replace them with new ones), then be sure to make marks on shaft forks (the mark on the fork is indicated by a red arrow for clarity) relative to this mark, draw a second one on the flange to which the propeller shaft fork is connected (In the photo, the fork is connected to the flange of the rear axle gearbox, the mark on it is indicated by a blue arrow) , when reinstalling all the shafts, install them in exactly the same position (according to the marks).
Additional video: If you have bent a driveshaft and decided that it needs to be replaced, then you will have to pay quite a lot of money for it, because it costs quite a lot of money, about how to choose one for your car or another driveshaft, look in the video just below, in which employees explain which shaft is best suited for a car in urban or difficult conditions, but also on various forums, climb, as time goes on and the company can get promoted and they will use it make a fake, and thanks to the forums you can find out a lot of additional information for yourself, including reviews about a particular driveshaft you can read.
How to properly install cardans on a field
Welcome! The driveshaft is a very important part for both all-wheel drive and rear-wheel drive cars, the car will not drive without it, thanks to this shaft, which looks like a large metal stick, torque is transmitted from the gearbox to the gearbox , well, the gearbox now starts up on the wheels themselves and thus the car moves.
Note! To replace this part on a Niva car, you will need to stock up on the following tools, namely: A set of wrenches (Exactly wrenches, others will not work), we also recommend taking a healthy screwdriver (Or a medium-sized one if you don’t have a larger one)!
Summary:
Where are both driveshafts located? As you already understood from the title of the article and from the inscription just above, there are only two cardan shafts in the Niva car, for example, if we talk about the rear-wheel drive Classic, then there is only one cardan on it, and it’s very difficult to remove them on both the Niva and the Classic easily and almost identically, that is, the nuts securing the driveshaft flanges were unscrewed and the shafts were removed from the car (we’ll talk about how to unscrew these nuts a little later), you can see more details about where these driveshafts are located in the article entitled : “Replacing cardan drive crosspieces on a VAZ”, there will be a picture in which these shafts are indicated with a red arrow, in addition, read the article linked above, since these crosspieces fail from time to time and so that you generally know what the symptoms are will be reflected on the car, read the article to which the link is given, everything is written in it.
When do you need to change driveshafts? It’s practically never necessary, unless of course you operate the car normally in urban conditions and don’t drive it in the mountains, the whole point is that the cardan shafts themselves almost never fail or fail, it may happen that you touch them and in connection why do they bend, then after that you need to change them immediately, if you don’t do this and drive on bent shafts, then firstly the power will drop and it will rotate unevenly, and therefore the crosspieces will wear out very quickly, they will start knocking and A number of other problems are yet to arise.
How to replace the crosspiece on a Niva SUV yourself
The Niva car is equipped with two driveshafts that are part of the all-wheel drive system. They transmit energy to the front and rear axles and are a prefabricated structure with crosspieces as their central link. If the crosspiece fails, it must be replaced immediately. This will prevent damage to the driveshaft and failure of the car’s drive system.
Causes and signs of part malfunction: how to detect
The crosspiece is the key link of the driveshaft. Thanks to it, torque is transmitted from the gearbox, causing the shafts to rotate. Usually one of the crosspieces fails, of which there are four in Lada 21213. If it is not replaced in time, the steam room will quickly become unusable. The crosspieces allow the driveshaft to rotate evenly; if they break, play appears and the car loses power.
To avoid any unpleasant surprises on the road, you need to monitor the condition of the crosses. Carry out a thorough inspection of them regularly, clean and apply lubricant at least every 10 thousand km. If a part has become unusable, it must be replaced in a timely manner.
Parts in the drive system become unusable due to play in the units, which is caused by increased loads and mechanical stress. The wear of the crosspiece is facilitated by its unfavorable location. It is located close to the road surface, so it often gets sand, dirt, water and dust. Wear depends on the following factors:
- quality of parts manufacturing;
- driver's driving habits;
- sudden temperature fluctuations;
- the quality of roads, which leaves much to be desired;
- operating conditions;
- ingress of dust, sand, dirt, stones and water.
The main signs of a faulty crosspiece:
- the appearance of grinding, creaking and crackling sounds in the area of the cardan while driving;
- knocking sound when the car starts;
- extraneous sounds when driving on uneven roads.
The crosspiece is one of the parts that have a high margin of safety, but when exposed to a large number of mechanical influences and operation in an unfavorable environment, it quickly wears out.
Inspection and replacement of the crosspiece on the VAZ 2121
To carry out a correct diagnosis, you must perform the following steps:
- Place the machine on a lift to allow access to the bottom.
- Having found where the propeller shaft is located, we hold on to it with one hand, and with the other we take hold of the drive gear hinge. It is located near the gearbox.
- Now, holding the connection with both hands, we try to turn it. If this succeeds, then there is backlash. Its presence requires mandatory replacement of the crosspiece. If this is neglected, the car may fail while driving, as control will be unreliable.
If the decision is made to replace, we purchase the necessary consumables. To carry out the work, we prepare the tools:
- jack;
- spanners;
- Phillips screwdriver;
- attachment made of aluminum or copper;
- hammer;
- thin pliers;
- tool to remove the retaining rings.
Repair work on joints can only be carried out on a removed cardan shaft. We place the car on a viewing hole or lift it using a lift. We fix the wheels with supports, turn on neutral and the handbrake.
First of all, you need to dismantle the driveshaft. We clean the removed structure from dirt and begin disassembling and replacing parts:
- Using narrow pliers, remove the four retaining rings.
- We use a chisel to mark the relative positions of the parts to each other on the cardan and the hinge body so as not to confuse them in places during assembly.
- Now we press the bearing out of the flange using a piece of pipe of a suitable diameter or a union head. Or use a puller. It is better to fix the cardan in a vice.
- We hit the mandrel until the fork hits the cross. Now remove the lower bearing bowl. We carry out a similar operation with the top one.
- If the bearings are tightly seated and it was not possible to press them out, use a grinder to make chamfers on the bearing housing.
- We turn the flange, loosen it and remove it together with the cross from the propeller shaft. And then we take out the cross from the flange.
- We wash all parts in kerosene and carefully inspect them. If the plug is damaged, replace it with a new one.
- At the next stage, we proceed to install the new crosspiece. We insert it into the eyes that have been previously cleaned of dirt and rust.
- We clamp the flange in a vice and press the bearing cups. You need to act carefully so that the needles do not fall apart.
- Before doing this, check for the presence of grease in the bearing housing; if there is none, apply it. We also lubricate the parts on the outside. It is not recommended to exceed the amount of lubricant, as it may push out the oil seal or the bowls will not fit tightly into the seat.
- After pressing, there should be room for the retaining ring.
- Next, install the retaining rings, checking them for damage. If there are defects, we replace them.
- When the assembly is completely assembled, apply light blows to the hinge with a rubber hammer to completely shrink the parts and eliminate possible gaps.
Changing the crosspiece on the steering column
Sometimes it becomes necessary to replace the steering cross. It is changed if the following signs appear:
- increased free play of the steering wheel;
- difficult to turn the steering wheel;
- intermittent rotation of the steering wheel occurs;
- when driving on bad roads, you hear extraneous sounds when turning the steering wheel;
- wheels work late.
Connections constantly experience increased loads and are negatively affected by temperature fluctuations and high humidity. Lubricant leaks, which leads to wear of parts, and seals lose elasticity. As a result, the bearing needles and crosspieces fail.
Replacing the steering column crosspiece on a VAZ 2121 is carried out in combination with bearings according to the following algorithm:
- We install the shaft in a position in which the fasteners that compress the body of the crosspiece forks will be accessible.
- Unscrew the bolts on the forks and remove.
- We slide the structure with the cross along the slots and remove it one by one from each side.
- We clamp the clips in a vice and press them out. They are fixed with a core, which is removed with a drill or knocked out with a chisel.
Assembly is performed in reverse order. The bearing races must be inserted until they are completely submerged. After this, we apply a core to fix the bearings.
There will be no difficulties with replacing crosspieces if you follow the instructions.
How to replace driveshafts on a VAZ 21213-VAZ 2131?
Removing it: As we have already said, there is nothing complicated in its removal, just take a screwdriver and if you have an assistant with you, then generally good, first ask him to hold the shaft so that it does not fall when you disconnect one of the sides (And without an assistant this work can be done, it just won’t be convenient), as soon as he holds one of the sides with his hands, take a screwdriver in your hands and insert it between the bolt and the cardan fork as shown in photo 2, thereby you will ensure that the bolt will no longer turn , as soon as the operation is done, unscrew the nut of this bolt that you hold with a screwdriver (see photo 1) and then remove this bolt from the hole, do exactly the same operation with the other bolts and remove them all, thereby, as soon as the bolts are removed, on the one hand, the cardan will no longer be attached to anything and will simply be in the air (the part that hangs in the air, we recommend that an assistant hold it), and then on the other hand (the cardan will be attached in both directions, in absolutely identical ways to that same) unscrew all the bolts in the same way and thereby remove the driveshaft from the car (For example, photo 3 shows the removal of the rear driveshaft, you may be removing the front driveshaft; this is already photo 4, but that’s not the point, they are removed identically), and the second driveshaft as You already understood, remove it in exactly the same way, unscrewing all the nuts of the bolts that secure the cardan on both sides.
Note! If the driveshaft rotates when you unscrew the nuts, then ask an assistant to hold it with your hand, or the best way is to insert a thick screwdriver into the very place shown in photo 2 and thereby you will ensure that the bolt does not move (so that the nut it is normal to unscrew it) and fix the cardan shaft itself in this way so that it does not rotate!
Installation: The propeller shafts are installed in the reverse order on the car and let’s say a few words about the old shafts, that is, if you decide to install the same shafts on the car (You removed them, for example, to replace the crosspieces and are not going to replace them with new ones), then be sure to make marks on shaft forks (the mark on the fork is indicated by a red arrow for clarity) relative to this mark, draw a second one on the flange to which the propeller shaft fork is connected (In the photo, the fork is connected to the flange of the rear axle gearbox, the mark on it is indicated by a blue arrow) , when reinstalling all the shafts, install them in exactly the same position (according to the marks).
Additional video: If you have bent a driveshaft and decided that it needs to be replaced, then you will have to pay quite a lot of money for it, because it costs quite a lot of money, about how to choose one for your car or another driveshaft, look in the video just below, in which employees explain which shaft is best suited for a car in urban or difficult conditions, but also on various forums, climb, as time goes on and the company can get promoted and they will use it make a fake, and thanks to the forums you can find out a lot of additional information for yourself, including reviews about a particular driveshaft you can read.