How to adjust the carburetor on VAZ-2109 and 21099 cars with your own hands
On all cars of the “ninth” family, the engines were equipped with domestically produced Solex carburetors.
The only exceptions are later modifications, on which the manufacturer installed injection power units. Although far from being the most technically advanced vehicle, the Nine is still popular among car enthusiasts. This is largely due to the car’s maintainability and the relatively low cost of spare parts. In addition, a significant part of the restoration and adjustment work can be carried out by the owner himself, including adjusting the VAZ-2109 and 21099 carburetor, tuning it and cleaning it. This article will consider only those operations that every car enthusiast can perform with his own hands. Don’t be intimidated by the large number of manipulations - follow the instructions, be careful, and setting up the VAZ carburetor will go no worse than in a service station. This way you can save time and reduce machine maintenance costs.
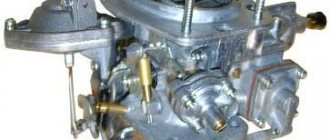
You can clean and adjust the carburetor for the VAZ nine yourself, in the garage
Preparing the carburetor for tuning
Before you begin adjusting the VAZ-2109 carburetor and other modifications of the model, you should ensure unimpeded access to its parts by removing contamination. If the car is used regularly, then the carburetor needs external flushing only in the case of adjustment procedures or to clean the moving mechanisms if they are heavily contaminated. External washing is carried out using a brush, a clean rag and a liquid that can dissolve oil (gasoline, kerosene or a special cleaning composition). This procedure does not involve removing the carburetor and consists of the following operations:
The market offers special means for cleaning the device - in the form of sprays
- cleaning and washing the outside of the carburetor;
- freeing the float chamber strainer from contamination;
- removal of possible contaminants and foreign particles from the float chamber itself;
- cleaning the jets from possible deposits;
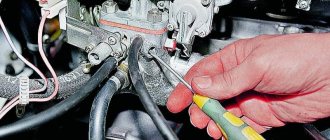
The car owner should not have any questions regarding external cleaning, but as for how to clean the carburetor on a VAZ-21099 from the inside, this issue should be considered in more detail. In this particular case we are talking about the float chamber. First you need to dismantle the air filter and remove the fuel hose. After the float chamber is dismantled, it is better not to touch the float itself, so as not to deform or damage the part. Also, do not turn the carburetor cap upside down.
Experts do not recommend washing the float chamber using a rag, since fibers may remain after it; in this case, it is more advisable to use a rubber bulb, using it to remove residual fuel from the bottom of the chamber. If necessary, remove any dirt on the bottom using a stiff, thin brush and repeat the manipulations with the rubber bulb. Removal of contaminants from the main fuel jets is carried out under the influence of compressed air. If a compressor unit is not available, you can use a conventional pump. If the nozzle is too clogged, cleaning is done using thin copper wire. From this small guide, you were able to learn how to clean the carburetor and now you can proceed directly to performing adjustment procedures.
Having cleared the unit of dirt, you can begin adjusting it.
Removing a faulty device
Carburetor repair is a simple procedure. When removing it, there is no need to replace the pump, fuel pump or battery. The device of the VAZ 21099 car allows you to quickly remove the faulty device. To do this, all you need is a standard set of keys and a little patience.
- First, remove the air filter along with the filter element.
- Then we disconnect the air damper rod. It is located on the right side of the carburetor, in the direction of travel of the car.
- There we also remove the return spring of the gas pedal drive.
- Use a screwdriver to pry up the spring clamp on the gas drive sector and remove it.
- Then we remove the throttle cable from the drive sector.
- We disconnect all the wiring connectors from the carburetor, having previously marked their connection points so as not to confuse them during assembly.
- Loosen the clamps and remove the fuel hoses.
- Unscrew the screw and remove the heating block of chamber 1.
- We remove the crankcase ventilation hose, and then the vacuum tube going to the breaker - the ignition distributor.
- Unscrew the 4 fastening nuts and carefully remove the carburetor.
- To top it off, cover the outlet hole with a clean rag to prevent dirt from getting into it.
Main unit VAZ 21099
Installation is carried out in the reverse order of removal. Now you can begin disassembling and cleaning the carburetor.
How to set up a VAZ-2109 and 21099 carburetor in a garage
According to the recommendations of experts, adjustment of the VAZ-21099 carburetor should begin with the float chamber. Using this procedure, it is possible to check and establish the optimal fuel level. You need to configure it by following the steps below step by step:
- Start the engine and turn it off after 2-3 minutes;
- After the air filter has been removed and the fuel hose has been disconnected, remove the carburetor cover (to do this, you need to unscrew five bolts). Place the lid on a clean surface with the floats facing up, being careful;
After removing the air filter, disconnect the fuel supply and remove the carburetor cap
- Using a caliper, determine the fuel level in the float chambers: the distance between the edge of the housing and the upper level should be 25.5 mm. If it turns out that the measurements do not comply with the standard, you will have to make an adjustment by bending the tongue of the float bracket and re-measuring the fuel level;
Additionally, you can check how the edges of the floats are located relative to the mating surface of the cover and, if they are not parallel, adjust by acting on the float brackets.
How to adjust the throttle valve actuator
Before you begin adjusting the damper itself, you should check the degree of cable tension. If it turns out that the cable is slack or its tension is too strong, then adjusting the VAZ-21099 carburetor involves starting to adjust the drive in such a way as to prevent the damper from completely closing. To do this, use a wrench set to “13” and tighten the end nut on the cable sheath. Next, use the same key to gradually loosen the locknut.
1 – cap; 2 – lock nut; 3 – cable nut
Now you can set the optimal distance between the carburetor and the tip of the nut. It should be taken into account that in the free position of the accelerator pedal, the damper must be completely closed. All that remains is to tighten the nut and the setting can be considered complete.
How to adjust the air damper actuator
First, the free movement of the thrust must be checked - this will require dismantling the air filter cover. The drive settings can be considered correct only if the air damper is fully opened in the “recessed” position of its handle. If deviations from the norm are detected, read the instructions on how to adjust the carburetor on a VAZ-2109 by performing a series of adjustments.
Throttle adjustment is an important part of the carburetor tuning procedure.
The drive setup process looks like this:
- Loosen the bolt that secures the rod to the lever. After this, you need to recess the drive handle and fully open the air damper, acting on its lever;
- Using pliers, pull the cable out of the sheath and tighten the fixing bolt;
- Next, you need to check how the damper closes when the handle of its drive is extended. Closing must occur completely, otherwise the adjustment operations will have to be repeated.
- The adjustment should be made until you achieve complete opening and closing of the damper in the extreme positions of the drive handle. Make sure that the lever does not come into contact with the cable jacket in any position.
So, at this stage, you have learned how to adjust the carburetor on a VAZ-2109 by setting the optimal operating position of its throttle and air dampers. Now let's move on to adjusting the starting device and idle speed.
Self-adjustment of the starting device
The most precise adjustment of the starting device by setting the values of the starting gaps requires removing the carburetor from the car. But first you need to make sure the integrity of the trigger device diaphragm. To do this, unscrew the four bolts, remove the cover and inspect the diaphragm. If it is suitable for further use, you can continue to make adjustments, otherwise the part will have to be replaced.
Below is a list of operations performed one by one, which describes how to adjust the VAZ-21099 carburetor by adjusting the starting device:
- First you need to close the air damper by turning its lever;
- Using a screwdriver, press down the starter rod;
- The gap formed between the chamber wall and the damper must be measured, and then its value must be compared with the calibration data (indicated by the manufacturer individually for each carburetor model and car);
- If the received data does not correspond to the nominal value, adjustment should be made. The locknut, which is located on the accelerator pump housing, should be loosened and the adjusting screw should be turned with a screwdriver until the required clearance is established;
- Now, having closed the air damper, it is necessary to measure the clearance of the throttle valve of the first chamber. Check the obtained data with the calibration table. If necessary, set the desired gap value by turning the damper adjusting screw.
It is likely that at this stage the adjustment of the VAZ-2109 carburetor can be completed. If you need to adjust idle speed or improve fuel consumption, you can read the relevant guide below.
How to set idle speed yourself
Adjusting the idle speed is the final stage of the instructions on how to adjust the carburetor on a VAZ-21099 and is carried out when the engine is warm and the current consumers are turned on (heater, fan or headlights). During the setup process, follow the sequence of operations described below:
- Stop the engine and tighten the quality screw all the way, then unscrew it three turns;
- Start the engine, open the air damper and, with the current consumers turned on, use the quantity screw to set the crankshaft revolutions within 750–800 per minute;
- By turning the quality screw, bring the speed to the maximum value, after which, using the quantity screw, set 900 rpm;
- Next, use the quantity screw to reduce it to 800 rpm. Keep turning it until the engine starts to run rough. After this, unscrew the screw 0.5–1 turn;
- Now, by manipulating the quantity screw, it is necessary to set the optimal speed values, which for the winter period are 900-1000 rpm, and for the summer - 800-900 rpm.
If you did everything correctly, then the adjusted carburetor ensures stable operation of the power unit in the speed range recommended by the manufacturer. At the same time, it is important that fuel consumption is minimal and only this setting on the VAZ-2109 is considered correct.
The carburetor installed on the VAZ-21099 is responsible for the process of mixing gasoline and air in precise proportions. Fuel nozzles are used as control tools, the performance of which depends on the length and diameter of their passage holes. Using jets with different characteristics, you can adjust the saturation of the working mixture. Therefore, if you have always wanted to know how to reduce the fuel consumption of a VAZ-2109 carburetor, you are ready to experiment with your own car and adjust the carburetor yourself, stock up on different jets and use this article as a guide.
How to repair a VAZ 21099 carburetor
One of the disadvantages of the VAZ 21099 model car is the unstable operation of its engine, associated with malfunctions of the carburetor. Problems can occur regardless of weather conditions or sub-zero temperatures, and the car owner should always be prepared for such a turn of events.
It is not difficult to understand that the carburetor is malfunctioning - the car does not start the first time, the tachometer shows vague revolutions, and the exhaust pipe makes an unusual noise. The car may also stall while driving, especially when accelerating or shifting the gearbox. The level of fuel consumption is higher than usual. If such signs are detected, you can try to repair the carburetor, but this requires certain skills and experience. In addition, you should purchase the necessary set of tools, which includes several types of wrenches.
In the VAZ 21099 car, the carburetor is located directly on the floor of the air filter. In order to remove it, you need to use a 10-size wrench and use it to remove the air filter cover. You also need to remove the four fasteners that support it. After this, the connecting clamps are loosened and the holding pins are unscrewed. All contact wires must be disconnected and only then remove the carburetor cover. It is very important to do this as carefully as possible, without catching the walls of the compartments.
It makes sense to put all disconnected parts in a pre-prepared container so as not to waste time and money searching for lost parts. Moreover, not every modern store can buy them.
When the VAZ 21099 carburetor is disassembled, you need to check the position of the floats in the compartments and adjust them, if necessary. Their optimal position is parallel to the walls of the compartment and free movement. The fuel fluid level must correspond to the marks on the compartments.
The carburetor of a VAZ 21099 should be disassembled and adjusted only when there is a real need for it. You shouldn't do this just for fun or right after buying a car. The car's factory settings are optimal for use; an inexperienced car enthusiast can mess them up, which will lead to additional waste of time and money.
It should be noted that after each removal and disassembly of the device, it is necessary to clean it. Dirt can get inside the carburetor and interfere with its operation.
If the car owner is not sure that he can independently troubleshoot the carburetor, then it is better to immediately take the car to a service center.
How to adjust the carburetor on a VAZ 2109
The engine in Soviet-era cars works efficiently if the carburetor unit clearly copes with its functions. The carburetor is a kind of assistant in the operation of the engine. The main role of the carburetor is to mix fuel material with air and deliver the resulting substance to the engine.
Engine performance depends on carburetor adjustment. The first thing you should pay attention to in case of engine malfunctions is the integrity of the carburetor parts.
For cars of the Volzhsky Automobile Plant, a VAZ 2109 carburetor of the Solex type was designed. The series helps save fuel and increase the dynamic performance of VAZ 2108-09 car models.
Adjustment of the VAZ 2109 carburetor is required if the vehicle accelerates poorly and twitches. Before you begin the adjustment process, you should study the section on how the mechanism as a whole works.
Carburetor VAZ 2109 - how it works
Solexes have a two-section body - a platform for the engine and an upper closing panel. The carburetor unit is of the emulsion type, when an emulsion is formed as a result of mixing air and fuel. This type of CG is considered common in the vehicle.
For optimal operation in different gears (including at idle), VAZ 2109 carburetors have several system units.
The operating principle of the carburetor is based on Bernoulli's principle (from school physics). According to this statement, the speed of the air mass and liquid substance increases in a narrow hose, and the pressure on its walls decreases. The throttle valve regulates the volume of air entering the mechanism.
Each car owner with a similar control unit has a special instruction book with which you can repair a VAZ 2109.
Carburetor design - what's inside?
The VAZ 21099 carburetor is technically very well made and is not picky about fuel quality. The device consists of 2 chambers in which fuel is distributed and further injected into the car engine. The operation of the first chamber of the carburetor ensures a smooth transition from idle to throttling mode. The main process of supplying the fuel mixture occurs in the second chamber of the device. The fuel in the chamber rises up through the tubes and mixes with air.
The main action in the operation of the second chamber is performed by the econostat - when the throttle valves are open while driving at high speed, it enriches the fuel mixture. The starting device is responsible for preparing a saturated combustible mixture when starting a cold engine. The air damper in this device is offset and opens with a flow of air, as a result of which it retracts the throttle spring and ensures uniform mixing of the mixture.
A device called an economizer is responsible for idling in the VAZ 21099 carburetor. It consists of a switch mounted on an adjusting screw, an electromagnetic valve, a control unit and a switch. The economizer shuts down during forced idle, during sudden braking of the car engine, when changing gears and while the engine is running on an incline.
This device is very useful as it prevents the release of carbon monoxide into the atmosphere. When operating at forced idle, the engine speed increases and can reach 2100 rpm. In this case, the solenoid valve is activated, which acts on the power control unit and turns it off - the fuel supply in the idle system is stopped.
Basic faults
When a car malfunctions, it begins to behave unnaturally; experienced owners notice every rustle or jerk. In order to understand that it is the carburetor that is faulty, you need to familiarize yourself with the first symptoms of damage.
- Black smoke comes out of the exhaust pipe, accompanied by “shots”. The engine does not start the first time.
- The idle speed of the vehicle increases or is unstable.
- Fuel is consumed in large quantities.
- The throttle response of the motor mechanism is noticeably reduced.
Such symptoms of car behavior have reasons that lie in damage to certain parts of the control unit:
- The jets are clogged with impurities;
- The solenoid valve stopped working;
- The accelerator pump diaphragm has ruptured and become unusable;
- Air masses enter the housing;
- The accelerator pump nozzle is clogged with dirty impurities;
- The idle speed screws are out of alignment.
The proper operation of the elements depends on the level of gasoline fuel in the chamber and the engine speed at idle. They are the ones that need to be adjusted during car repairs.
However, it often happens that the reason is not in the carburetor, but in the engine itself. Before removing the gearbox, make sure that other mechanisms are working properly.
Signs of a Solex carburetor malfunction
Before adjusting the carburetor on a VAZ 2109, you need to familiarize yourself with the associated faults so as not to repair the unit just like that.
So, the reason after which the VAZ 2109 carburetor is adjusted is considered:
Fuel mixture too rich. Experienced auto mechanics know that for an ideal ratio of fuel and air, a value of 1 to 15 is required. This means that for the combustion of 1 kg of fuel, 15 kg of air are needed. If the mixture is called rich, it means that the fuel level is higher than the nominal level.
Symptoms: the engine is difficult to start, black smoke from the exhaust pipe, spark plugs with black soot and lumbago in the exhaust system. The fuel supply system quickly becomes clogged.
The following signs can be called a consequence of the previous ones and this is:
- Unstable idle speed;
- Increased fuel consumption;
- Deterioration of starting properties;
- Reduced engine response.
The operating principle of the carburetor and fuel supply system forces car owners to perform such a procedure as adjusting the VAZ 2109 carburetor at least once every six months. The mechanism on a car with a carb needs to be lubricated once a month, unlike a car with injection, which has injectors. Everything is extremely easy to adjust.
Adjustment (step by step)
The problem with carburetor repair and adjustment is that the process must be carried out in conditions of cleanliness and maximum care. The HRV can malfunction even due to small specks in the tubes. Nevertheless, car owners can configure the control unit themselves.
What you will need
The adjustment process does not involve removing the carburetor; everything is done live. To work, you will need a flat table and a clean piece of light-colored fabric. We cover the table with fabric and place it next to the hood of the car. We lay out the necessary tools on the table: keys, pliers, Phillips screwdriver, flat screwdriver, ruler.
A vacuum cleaner and car air compressor may also be needed. A book on repairing a VAZ 2109 with a description of the components of the control unit, so that you can look there if necessary.
Below we will describe the process of adjusting the fuel level in the float chamber and setting the idle speed in stages.
Adjusting the fuel fluid level in the float chamber
There is no point in talking about fuel economy if the gasoline level is higher or lower than normal. To return to normal consumption, it is necessary to carry out a number of manipulations:
- After unscrewing the nut and opening the clamps, remove the cover of the filter mechanism housing and pull out the filter.
- Unfasten the EMG wire and hoses going to the carburetor.
- Loosen the 5 screws of the HRV cover and remove it.
- Lower a ruler to the bottom of the HRV chambers to determine the liquid level. If the measurements are 25-26 mm, then everything is normal and no adjustment is needed. If it is higher or lower than normal, we carry out further manipulations.
- Turn the removed lid over with the floats facing up and place it on the table.
- Adjust the floats by tightening the fasteners.
- Important rules for setting floats must be observed. They must be installed parallel to each other and vertically without distortion.
- Measure the gap between the floats and the gasket; it should be 2 mm. Otherwise, bend the tongue that acts on the support needle.
- Final stage. Identify the working stroke of the floats. If the floats are raised all the way up, the distance should not be more than 15 mm. A similar size should be achieved by bending the tabs.
Idle adjustment
In case of malfunctions of this kind, the engine runs intermittently at low speeds. You can also do the procedure yourself:
- Warm up the engine, then turn off and let it cool.
- Remove the filtration part of the heater and unscrew the EMG valve.
- Turn on the engine.
- Plug the idle air passage with your hand and apply the gas in this manner several times.
- Turn off the engine
- Blow out the EMG with a compressor, clearing it of dust and debris.
- Install all parts in place.
- Carry out the last manipulation to control the quality of work. To do this, you need to start the engine again. If the idle speed begins to work normally, it means the adjustment was successful.
More accurate adjustments can be made using special equipment - a gas analyzer. With its help, you can achieve not only high-quality adjustment of mechanisms, but also achieve greater environmental friendliness of the vehicle. However, such a unit is rare.
You can make the adjustment without this device, following the instructions. CU tuning depends on the car owner’s care and attention to the unit.
Methods for adjusting the carburetor
There are 2 main settings - the amount of the fuel mixture and the adjustment of the carburetor float chamber.
These adjustments are made when the engine is unstable or when the fuel system is not working properly:
- The engine does not start well;
- Low RPM power;
- Incorrect operation when accelerating.
These factors indicate improper operation of the power system.
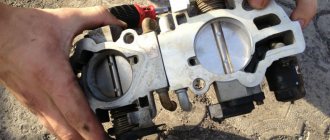
Carburetor structure and operating principle
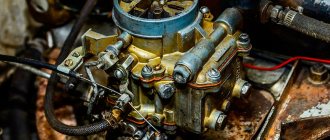
The photo shows a general view of the carburetor indicating the main components.
External view of the carburetor of the VAZ 21099(1)
External view of the carburetor of the VAZ 21099(2)
Parts and components of the external body kit of the carburetor:
- 1 – block that heats the throttle valve.
- 2 – fitting through which the engine crankcase is ventilated.
- 3 – accelerator pump cover.
- 4 – solenoid valve.
- 5 – device cover
- 6 – pin securing the air filter.
- 7 – lever that controls the air damper.
- 8 – cover protecting the starting device.
- 9 – sector where the throttle valve drive lever is located.
- 10 – EPH sensor connector.
- 11 – screw for adjusting the amount of mixture at idle.
- 12 – cover to protect the economizer.
- 13 – device body.
- 14 – fitting through which fuel is supplied.
- 15 – fitting for fuel drainage.
- 16 – screw (arrow) regulating the mixture composition at idle.
- 17 – fitting through which vacuum is supplied to the vacuum ignition regulator.
Principle of operation
- Through the needle valve and strainer, fuel is supplied to the carburetor float chamber, the level of which is maintained by the needle valve. From there, the fuel flows through the main fuel jets into the emulsion wells. Here it is mixed with air, which enters through the main air jets. The resulting emulsion enters the carburetor diffusers.
- The idle system takes fuel from the emulsion well, then it passes through the jets of this system and mixes with the air coming from the air jet and the wide part of the diffuser. The resulting emulsion enters through the hole under the throttle valve.
- Through the intake manifold, the mixture prepared in the carburetor enters the cylinders of the car engine.
Adjusting the Solex carburetor VAZ 2109
Setting up a Solex carburetor is an easy job and does not require special equipment. But in factories this work is carried out using a special template, which makes the work easier and faster. At home, you can do without factory equipment.
To adjust the VAZ-2109 carburetor with your own hands you will need:
- 2 types of screwdrivers;
- Ruler;
- Wire with a diameter of 2 mm.
With such tools you will quickly complete this job.
Recommended Method
Sequence of adjustment work:
- The outer base of the air filter is removed. To do this work, you need to unscrew the nut on the base itself, then unclip the latches and remove the base. We also take the filter and unscrew it.
- If you lift this housing, you can disconnect the rubber pipes and remove the housing.
- By loosening the clamps securing the fuel pipes, you can disconnect them.
- Remove the wire that goes to the idle air solenoid valve;
- Disconnect the choke cable;
- Unscrew the screws that hold the carburetor cover;
- After removing the cover, at the same moment we check the fuel level in the chambers. This can be done by measuring with a ruler in one of the cameras. The norm should be 25-26 mm, if you have the same then no adjustment will be needed.
A situation in which the volume of fuel in the chamber is low or, conversely, high relative to the norm, requires inspection and measurements on the floats. If necessary, we change their position.
Before starting work, the carburetor cover should be placed on a flat surface.
Initially, you should look at the elements. The side of the floats is parallel to the imprints on the gasket itself. If this is not the case, then the floats may be touching adjacent surfaces, which is why the fuel is not at the normal level. If necessary, the position should be changed by bending the fastening lever. After this, we go to measure the gap between the gasket and the float. To do this, you will need a rod with a size of 2 mm, since this is how much the gap should be.
If the gap is not 2mm, then we make adjustments on the tongue of the floats. If the previous steps have been completed, then we move on to checking the height of the floats. It should be 34mm. If the height does not correspond to the standard, we return to measuring the gap and change the position again, after which we look again at the height.
The last step of the work is to check the operation of the floats themselves. We will need to take measurements, mark the segment from the bottom corner to the lid, then slightly lift the float with our hand and fix where the bottom corner is located.
The normal float stroke is 15 mm. If there are differences, then we change the position through the bend of the tongue.
Alternative way
There is now another way to check the correct placement of the floats, in which measurements are not necessary. When the carburetor cover is lying on a flat surface, you can look at the stampings that are on the side. If the placement of the floats is correct, then the stamping in the form of strips should be parallel to the lid.
Then look at the bottom of the floats themselves; the correct location is parallel to the surface of the lid.
As usual, if there is a discrepancy, we adjust it by folding the tongue. Next, you can begin assembling the carburetor.
Idle speed adjustment
Next comes setting the idle speed. These settings come in only two types: partial and full. The partial setting is for normal power adjustment, while the full setting can change the air volume. The usual adjustment is carried out with the “amount” screw of the air-fuel mixture. This screw is designed to set the opening angle of the dampers, which provides the air-fuel mixture into the cylinders.
Setting the working stroke occurs with the machine running and with an energy load, that is, with the lights and the stove inside on. The adjustment is done with the engine running through the “quantity” screw until the idle speed returns to normal (800-900 rpm). You can monitor this using the tachometer.
In case of engine malfunction, a full adjustment is required, for which you will need a “quantity” screw and a “quality” screw.
Setup consists of the following steps:
- We wait until the engine warms up and then turn it off;
- Find a “quality” screw, tighten it all the way, and then unscrew it 3 full turns;
- We start the engine, turn on various energy consumers to create a vehicle consumption load.
- Using the “quantity” screw, the power should reach 700-800 rpm;
- Using the “quality” screw, we set it to the maximum limit of possible revolutions.
- Set the “quantity” screw to 900 rpm;
- The “quality” screw should be reduced to 800 rpm;
- Carefully unscrew the “quality” screw until an interruption occurs, then screw it in 1 turn;
- We set the power with the “quantity” screw at 800-900 rpm.
At the end, when all the adjustments are made, you need to check the operation of the carburetor. This can be done by pressing sharply on the gas pedal and quickly releasing it. The motor should respond immediately to actions, without unnecessary noise. After reducing the engine speed, there should also be no problems with its operation.
How to adjust the idle speed on a VAZ 2109 with your own hands in this video:
The secret of 99 - how is people's love justified?
The car, whose history goes back almost four decades, is still considered one of the most successful VAZ assemblies. Until 2004, all VAZ 21099 models had a carburetor engine type, and only after 2004 did manufacturers replace this device with an injector. So the carburetor 99, a symbol of the dashing 90s, is today found on the roads of post-Soviet countries no less often than modern cars.
The car has front-wheel drive, a 1.5 liter 4-cylinder engine. A VAZ car can accelerate to 160 km/h with its 70 hp. Some models have a 1.5i engine with 76 hp, although not many of these cars were produced. The carburetor of model 21099 is very economical, the average consumption of the VAZ 21099 reaches 7–7.5 l/100 km. Fuel consumption on the highway with high-quality fuel and average speed is 5.5 liters.
How to properly configure a VAZ-2109 carburetor
The majority of VAZ cars of the Samara family, and in particular the VAZ-2109, came off the assembly line with a carburetor power system, and only later a small series received injectors. The carburetor system has a simple design and is quite reliable, but its main component, the carburetor, requires periodic adjustment. The VAZ-2109 and other models of the family were equipped with Solex carburetors, characterized by a relatively simple adjustment technology that every car enthusiast can perform.
There are two main carburetor settings - the fuel level in the float chambers and the engine speed at idle (idle). These adjustments are carried out when the engine is unstable at idle and when certain symptoms of improper operation of the power system appear:
These problems indicate that the fuel level in the chamber is not normal.
Do-it-yourself carburetor float chamber level adjustment
Diagram of the float chamber with installation parameters: 1 - float; 2 - tongue; 3 - gasket; 4 - cover.
The level in the float chamber is necessary for smooth operation of the carburetor. A level that is too high will increase the fuel supply, while an insufficient level will reduce the throttle response of a carburetor engine, since the level will not be able to rise in time.
To adjust the level in the chamber, you need to turn the top cover over and bend the float as far as the antennae allow. The distance between the bottom corner and the cover should be 20 mm. If not, bend the tabs and install the top cover. This do-it-yourself adjustment of the VAZ 2109 carburetor is considered nominal. The principle of action here is simple.
Setting the fuel level
Adjusting the amount of fuel in the chambers of Solex carburetors is a simple procedure and does not require specialized equipment. Although in the factory this adjustment is performed using a special template, which simplifies and speeds up the work. But at home you can do without this template. To carry out adjustment work yourself you need:
- screwdrivers (phillips, flat);
- ruler (preferably a caliper);
- round rod with a diameter of 2 mm (wire or drill will do).
With such equipment you can quickly complete all work.
Recommended Method
Level control technology includes a number of stages:
- We dismantle the housing of the air filter element. To do this, unscrew the fastening nut of the housing cover, unclip the latches, remove the cover, take out the filter and tighten the 4 nuts that secure the housing to the carburetor.
- Raise the body and disconnect the rubber pipes. We move the body to the side.
- Loosen the clamps securing the fuel pipes going to the carburetor and disconnect them.
- Remove the wire suitable for the idle speed solenoid valve;
- Disconnect the drive cable of the air damper (the “choke” handle);
- Unscrew the 5 screws securing the carburetor cover;
- Having removed the cover, we immediately determine the fuel level in the chambers by lowering a ruler or caliper into one of them until it stops (using its depth gauge). If the measurement shows a level of 25-26 mm, it corresponds to the norm and no adjustment is required;
If the amount of fuel in the chamber is lower or higher than normal, we perform a visual inspection and a series of measurements on the floats, and if necessary, we correct their position.
To carry out adjustment work, place the removed carburetor cover on a flat horizontal surface with the floats facing up.
First, we look at the position of the elements from above. The outer side surfaces of the floats are parallel to the special imprints on the gasket. Deviations can cause the floats to touch adjacent elements and surfaces, causing the fuel level to be incorrect. If necessary, adjust the position of the floats by bending their mounting arms. The next step is to measure the gap between the floats and the gasket. A rod with a diameter of 2 mm is useful here - this is how much the specified gap should be.
If it does not correspond, we bend the tongue of the floats, with which they act on the locking needle. After this adjustment, we check the total height of the floats, which is normally 34 mm. If this is not the case, check the gap again, adjust it if necessary and measure the height again.
The last stage of setup is determining the working stroke of the floats. To do this, place a caliper near the float, mark the distance from its lower corner to the surface of the cover, then lift the float with your hand and mark where the lower corner is.
A working stroke of 15 mm is considered normal; if it differs, it is adjusted by bending the tongue.
Alternative way
There is a simpler method for determining the correct position of the floats, which does not require measurements. Place the carburetor cover on a flat table and look at the stampings made on the side surfaces. When the floats are in a normally adjusted position, these strips are parallel to the lid.
Then we lift the floats up and look at their bottom, which after lifting should be parallel to the surface of the lid. If necessary, adjust the position of the floats by bending the tongue.
After adjustment work, we assemble the carburetor.
Idle speed adjustment
The second setting of the VAZ-2109 carburetor is idle speed, it can be partial or full. The first is for minor speed adjustments, the second is for adjusting the amount of air (setting CO emissions in the exhaust gases).
Partial adjustment is performed using the air-fuel mixture “amount” screw. This screw sets the opening angle of the throttle valves, which ensures that the air-fuel mixture enters the cylinders when the accelerator pedal is released. The “quantity” screw rests on the throttle valve control lever and when screwed in, it pushes the lever, causing the valves to open slightly.
Partial idle adjustment is performed with a warm engine and creating a load on the vehicle's on-board network by turning on the high beam headlights and the interior heater at full power. The adjustment is carried out with the engine running by screwing in/unscrewing the “quantity” screw until the optimal idle speed is established, which for the VAZ-2109 is 800-900 rpm (this can be tracked using a standard or plug-in tachometer).
If it is not possible to set the required speed or the motor operates unstably at it, a complete adjustment is made, which is made by two screws - “quantity” and “quality”.
The algorithm for this adjustment consists of the following stages:
- Warm up the engine and then turn it off;
- We find the quality screw (it may be closed with a plug that will have to be removed), screw it in until it stops, and then unscrew it 3-4 full turns;
- We start the engine, turn on electrical consumers (lighting and stove) to create a load in the on-board network;
- By rotating the “quantity” screw, we achieve 700-800 rpm on the tachometer;
- By turning the “quality” screw, we set the maximum possible speed (they will increase to a certain level, and then stop. The moment the speed increase stops is considered the maximum);
- We set the “quantity” screw to 900 rpm;
- Using the “quality” screw we lower them to 800 rpm;
- We slowly tighten the “quality” screw until interruptions appear in the operation of the power plant, after which we unscrew it back 1 turn;
- We adjust the speed with the “quantity” screw, bringing it to a normal value - 800-900 rpm;
After the adjustment operations, we check that they were carried out correctly. This is done by sharply pressing the gas pedal and then quickly releasing it. With a properly configured carburetor, the engine should respond quickly to pressure, without any failures or hesitations. And after releasing the pedal, the speed will drop to the idle level, without sags or instability of the engine.
Design and principle of fuel supply
The main body of the carburetor is equipped with the following devices:
- block of fuel and air jets (main dosing system);
- diffusers with air-fuel mixture sprayers;
- 2 axles with throttle valves;
- a fuel accelerator consisting of a lever, a diaphragm and a double nozzle directed into the chambers;
- forced idle system (otherwise known as economizer).
Figure 1. Details of the VAZ-2109 carburetor.
The idle speed adjusting screw supports the primary chamber damper and is equipped with a plastic handle. The screw that controls the enrichment of the fuel mixture is hidden in a deep well made in the “sole” of the housing. A diagram of the lower part of the unit is shown in Figure 1.
Now about the functions performed by each system:
- The spring-loaded cold start flap in the closed position ensures the supply of a rich mixture. If there is a bimetallic spiral, it opens automatically as it warms up; without it, it opens manually.
- The solenoid valve closes the fuel channel upon command from the ignition key or from the EPHH unit.
- A needle valve float replenishes the gasoline in the float chamber as it is used.
- The econostat sucks fuel from the chamber and delivers it directly to the manifold through an open throttle when the engine is running at maximum speed.
- The jets of the main dosing system mix fuel with air and supply the mixture to diffusers due to the vacuum in the chambers.
- The VAZ 099 carburetor flaps regulate the amount of mixture supplied to the cylinders. It is to them that the cable from the gas pedal is connected.
- The accelerator injects an additional portion of fuel into the manifold when the accelerator is pressed sharply.
- The economizer turns off the fuel supply through the idle channels when the car is coasting with the gear engaged. Supply is restored when the engine speed drops below 1800 rpm.