07/17/2021 2 303 Alarms
Author: Victor
The instructions for using the Jaguar alarm system with auto start indicate that installation of these systems is only possible on cars with a 12-volt on-board network. Accordingly, on vehicles with a voltage of 9 V or 24 V, the use of the remote engine start function will not be possible.
[Hide]
Specifications
Jaguar signaling models EZ One, EZ Four, EZ Six, TEZ and others have the following properties:
- packet data transmission between the microprocessor unit and the pager is performed at a frequency of 433.92 MHz;
- the range of operation of the communicator in pulse transmission mode is 600 meters in open areas with a minimum of interference;
- the operating range of the main remote control in command receiving mode is 1200 meters;
- the operating range of the spare pager has been reduced to fifteen meters;
- to protect the electrical circuits of the anti-theft complex during installation, it is necessary to use safety devices with a rating of 7.5 to 30 amperes, depending on the section of the circuit;
- the current consumption when the protective mode is activated is less than 15 mA;
- activation of the protective mode can be done at intervals of five, thirty or forty-five seconds;
- to protect the car, triggers are used for the doors, trunk, hood, parking brake lever, power input of the ignition system, shock controller, auxiliary controllers and warning zone;
- the possible number of transmitters that can be connected to the system is four;
- The signaling must be powered from an electrical network with a voltage in the range from 9 to 18 volts.
Idle training
The car alarm itself controls the operation of the motor in one of three ways: by the tachometer signal, by the TACH generator terminal, or by the level of ripple in the network. The most reliable is the first method. In this case, the gray-black cord from the 18-pin connector is connected to the tachometer terminal, and function 8 from the settings table is assigned a value of 3 or 4. Another important action will be the following - the system needs to be taught “idle speed”.
Tachometer signal at startup
You need to do the training like this:
Let’s say that at the last step the siren does not go off, but instead the “dimensions” turn on five times. This means that mistakes were made. This procedure is suitable for one signaling device – Jaguar EZ Beta. One thing can be said about the A9 system: this procedure is not given in the instructions for it. In turn, for Jaguar EZ ONE alarms, “training” does not make sense - everything is configured automatically.
If autostart is not used, engine operation control is not required. In this case, there is no need to “train” the car alarm.
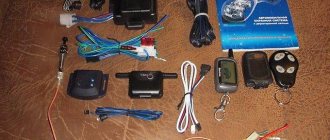
Equipment
The Jaguar package includes one limit switch, the remaining switches will have to be purchased separately.
Components included in the alarm kit:
- The microprocessor module is the main device of the car alarm.
- User's Guide to the management, use and maintenance of the alarm. If you carefully read the service manual, you can learn about additional useful functions.
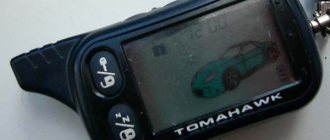
- The main console is equipped with a screen and has a two-way communication function.
- Spare remote control. It has a shorter range and is not equipped with a display.
- Transceiver equipped with a key to call the owner of the car. This device is equipped with a built-in temperature controller that allows you to measure its value inside the car. The transceiver comes with a wire and connector for connection.
- Six-tone siren.
- The impact controller belongs to the two-level class.
- A diode light bulb that functions as a status indicator.
- One limit switch for hood mounting.
- A set of connectors and wires for connecting the signaling system.
- Two batteries for installation in the main and spare transmitter. They differ in type from each other, so you won’t be able to confuse them during installation.
- Two stickers - one with the Jaguar logo, the second is used to fix the antenna module.
- Warranty card.
Key Features
Main functions of Jaguar alarms:
- Possibility of activating the protection mode with or without sound and light accompaniment.
- The ability to notify the car owner about events recorded by the security system. The key fob with feedback displays data about activated security zones.
- Protection against robbery, this function is called Anti-hijack. She is intelligent. The essence of its action is to block the motor when the car is forcibly seized. When criminals force the car owner out of the car, the alarm system can understand this by analyzing the operation of the sensors installed on the brake pedal and handbrake lever. After the car moves to a safe distance from the car owner, the engine lock will be activated.
- The consumer can independently select the signal that is played when the alarm is activated.
- Seven independent security zones provide more reliable protection.
- Disabling the protection mode is carried out in two stages.
- The ability to warn the car owner that he forgot to lock the doors before driving.
- If necessary, you can connect the steering horn to the car siren.
- Automatic start. This option will ensure the engine warms up in the cold season and will be useful for those who are constantly late. Now you don't have to waste time warming up the car.
- The memory of the microprocessor module allows you to record information about events that occurred in the operation of the security complex. Even after disconnecting the battery, information about this will remain in the memory.
- The consumer has the opportunity to additionally connect digital relays used to block the power unit.
- The consumer has the option of additionally connecting a GPS beacon to the signaling system.
Protective and anti-theft functions of the Jaguar EZ-5 car alarm:
- Enabling alarms when sensors are triggered in security mode
- Programmable 2-step engine lockout
- Immobilizer mode
- Transmission of alarm messages to a key fob with feedback
- Anti-robbery function
- Engine blocking and its preservation when dismantling the car alarm
- Programmable personal emergency shutdown code
Advantages and disadvantages
Advantages of Jaguar alarms:
- Rich functionality. In their reviews, consumers note that Jaguar alarms have many useful options that make it easier to control not only the system itself, but also other components of the car.
- Affordable price. You can buy an alarm system with auto start at a price of 5 thousand rubles and more. The cost will depend on additional features.
The disadvantages include the weak body of the key fob. If dropped regularly, the device quickly breaks down, and over time its buttons begin to sink. To prevent damage to the communicator, you can install it in a case. But it won’t help with buttons sticking.
TheAAG999 channel talked about the capabilities and disadvantages of Jaguar security systems.
How to install?
In accordance with the instructions for using the Jaguar alarm system with auto start, installation is performed as follows:
- The battery turns off. Installation and installation work must be carried out with the on-board network de-energized. If your car has a car radio with a programmed code, do not disconnect the battery until you have read the manual for the audio system or car.
- A microprocessor module is mounted in a hidden place. The main unit can be installed behind the dashboard, so the length of the wires will be minimal and the device will be hidden. Disassemble the center console and remove the steering column trim. The connectors with plugs are disconnected from the device and the fastenings are disconnected. Do not fix the unit on a metal surface, as this may cause malfunction. The device is secured using self-tapping screws or double-sided tape.
- A siren is installed under the hood, and a limit switch is mounted on the hood itself. When installing these elements, please note that they must be placed in places where moisture does not accumulate. The siren cannot be installed near the cylinder block, as it will quickly break under the influence of elevated temperatures.
- Install a transceiver with a button to call the car owner inside the car. This element should be mounted on the windshield, but there should be no metal surfaces or wires near the device. Their presence will result in interference during signal transmission. The transceiver is fixed using a sticker or double-sided tape.
- The impact controller is mounted on a partition separating the interior and engine compartment. The device is fixed to a metal surface using self-tapping screws or tape. The shock sensor must be located so that if adjustment is necessary, the driver has free access to the device.
- Install a service button in one of the bundles with standard wiring. It should be placed under the dashboard. You can additionally wrap it with electrical tape.
- The wires are laid under the car's trim; to do this, you will have to disassemble part of the upholstery. It is recommended to lay electrical circuits away from power wires (ignition system, high-voltage cables, etc.), as well as electronic devices. This may lead to signal malfunctions due to interference.
The Avtozvuk channel talked about the mistakes that consumers often make when installing car alarms.
Video “Implementing autostart on a Jaguar”
Valery Ershov demonstrated in practice how remote engine starting is performed.
After purchasing a car, every car owner wants to purchase reliable protection for their vehicle. But today there are many varieties and brands of alarms and security systems, among which it is really difficult to identify sufficiently worthy models.
The premium segment of cars has a pre-installed factory alarm system, while everyone else needs to purchase and install it themselves. The most difficult process, as a rule, is choosing a security system.
ATTENTION! A completely simple way to reduce fuel consumption has been found! Don't believe me? An auto mechanic with 15 years of experience also didn’t believe it until he tried it. And now he saves 35,000 rubles a year on gasoline! Read more"
But if you have a limited budget and don’t have time to choose a car alarm, then you should pay special attention to devices from the Jaguar line, which have managed to establish themselves as one of the best security systems on the car market. This is one of the most advanced developments at the moment!
Below we will look at the principles of working with the Jaguar alarm and provide detailed instructions for setting up autostart.
User manual
You can use all the functions of the Jaguar alarm system with auto start only after binding the remote control.
Binding procedure:
- Disable security mode, get into the car. Insert the key into the ignition, but do not turn it. The binding is performed with the ignition turned off. Click on the service key seven times.
- Within five seconds after the last press, turn the key to the On position, this will turn on the ignition.
- The siren of the complex will play seven sound signals, this indicates its readiness for binding.
- Within ten seconds after the last signal, hold down the first and second keys of the pager, they show an open and locked lock. The system will emit one signal to confirm the binding.
- To program a second pager, follow the same steps. Two beeps will sound as confirmation.
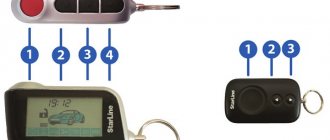
Designation of buttons and indicators on the key fob
The description of the key fob buttons is shown in the photo below.
Identification of Jaguar key fob buttons
Identification of Jaguar key fob buttons
Identification of Jaguar key fob buttons
Designation of command and mode indicators:
- A – anti-robbery option;
- B – auxiliary communication channel, available for programming;
- C – option to start the internal combustion engine based on air temperature;
- D – daily start function;
- E – indicator for enabling or disabling the remote start of the internal combustion engine;
- F – indicates activation of silent security;
- G – protective mode with sound confirmation;
- N – remote deactivation of the sensitivity controller;
- I – service mode indicator;
- J – machine status and temperature indicator;
- K – auxiliary second channel;
- L – indicator for remote opening of the trunk door.
Schematic representation of the display
Status indicators:
- Built-in battery of the communicator. By the icon you can determine whether the battery needs to be replaced.
- Auxiliary second channel.
- Option to start the internal combustion engine based on temperature.
- The power unit of the car is started.
- The tailgate is open.
- Option to notify the car owner via vibration.
- The car doors are open.
- Service mode.
- Indicator for automatic reactivation of the protective function.
- Silent security icon.
- Protective mode indicator with sound confirmation.
- The car hood is open.
- The sensitivity controller indicator turns on when there is a blow to the car body.
- Hand brake.
- Closing door locks.
- Opening door locks.
- Remote control receiver operation indicator.
- Machine communication confirmation icon.
- Car owner call icon.
- Energy saving mode activation indicator.
- Icon of activated ignition in a car.
- Alarm indicator.
- AM – first half of the day.
- PM – afternoon time of day.
- Indicator for daily start of internal combustion engine.
- A symbol indicating the temperature in the cabin and the current time.
- Temperature scale.
- Timer.
Setting up autorun
Start the motor by command:
- Click on the button in the shape of a locked pad and hold it.
- When the remote control emits a melodic signal, release the key and click on the third button labeled Ch/Prog.
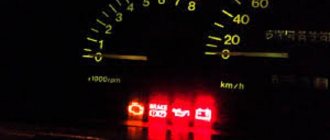
- The car's lights will blink three times, this indicates a successful start of the internal combustion engine.
- An indicator in the form of smoke from the exhaust pipe will appear on the remote control display.
Alexey Zamur showed in the video how to remotely start the engine on a Renault car.
By time
To start the internal combustion engine on time, follow these steps:
- Make sure the time on the remote control is set correctly.
- Set the alarm for the time at which the start will take place. After setup, a bell icon will appear on the remote control screen.
- Click on key 3 and hold it down until the remote control emits two beeps - one melodic and one short.
- Release the third button.
- By briefly clicking on the third key, move the remote control cursor to the screen indicator with the inscription Clock Start.
- Click on the button in the form of a key and a locked pad, this will activate the function. The lights on the car should blink once, and the remote control will emit a melodic signal.
- After it is played, an indicator with the inscription Clock Start will appear on the transmitter display next to the bell icon.
By temperature
Procedure for starting an internal combustion engine based on temperature:
- Click on the third key on the remote control and hold it down until the device plays one melodic and one short-term signal.
- Release the key. On the remote control screen in the bottom row one of the icons will begin to blink.
- With short clicks on the third key, move the cursor on the communicator screen to the icon in the form of a thermometer with the inscription Temp Start.
- To confirm that the function is enabled, click on the button with the locked lock and key. The vehicle's lights will blink once. The pager display will display an icon with a thermometer and indicate the temperature at which the engine will start.
Car alarm service functions:
- Silent security mode
- Bypassing the door area for the duration of the interior light extinguishing delay
- Silent activation/deactivation of security mode
- Security mode with engine running
- Turbo timer mode
- Turning on/off security mode without a key fob
- Remote sensor shutdown
in security mode
- Automatic return to security mode in case of accidental shutdown
- Service mode "Valet"
- Central locking control from the ignition switch
- Remote control central locking
- Possibility of implementing the “Comfort”
- Two-step door unlocking
- Car interior lighting control
- 4 additional control channels
- Panic Mode
- Protection against accidental pressing of key fob buttons
- Car search mode
- Sound and vibration mode
key fob operation with feedback
- Call mode from car
- Remote programming of new and erasing lost key fobs
- Online reset of programmable functions
- Low battery indication of key fob with feedback
- Power Saving Mode
key fob with LCD display
- Remote programming of car alarm modes and functions
- Temperature display inside the car
- Current time display, alarm clock
- LED illumination of key fob with feedback
Download Jaguar alarm installation instructions for different models in PDF format
You can download service manuals for setting up and managing Jaguar car alarms using the following links:
| Manuals in Russian for operation and installation of alarm systems | |
| Operating and installation instructions for Jaguar EZ One | |
| Jaguar EZ Four Operating Instructions | |
| Jaguar EZ Four Installation Instructions | |
| Jaguar EZ Six Operating Instructions | |
| Jaguar EZ Six Installation Instructions |
Jaguar alarm review: operating instructions and autostart setup
Author:
Maxim Markov
Date of:
2019-12-19
To protect cars from intruders, owners install reliable security systems. Often the most difficult thing for drivers is to select and install a device. The Jaguar brand produces alarms that automatically start the engine. They are reliable, easy to install and manage. The TEZ A system will protect the car from hacking. By installing it, the driver will be able to control the car from a distance.
Jaguar anti-theft systems will protect your car from break-ins. They are suitable for cars equipped with a gasoline and diesel engine. Following the Jaguar alarm instructions and the advice of the experts, the driver will be able to set up the security system. To use it correctly, the car enthusiast needs to study the manual in detail. The operating instructions describe in detail installation, connection and step-by-step configuration.