The model of the Volga Automobile Plant VAZ 2110, produced from the second half of the 1990s to the end of the 2000s, gained wide popularity among motorists. The updated design and aerodynamic properties allowed it to quickly win the hearts of its fans.
During the production process, several engine options were installed on the car in order to improve dynamic characteristics. But no matter how good the car is, the time comes when it is necessary to overhaul the engine. The average cost of its implementation in Russia is from 12,000 to 20,000 rubles .
Overhaul of 8 and 16 valve VAZ 2110 engines
The tenth model was created with extensive use of components and assemblies of the previous model - 2108. At the beginning, the car was equipped with a 1.5-liter VAZ-21083 8-valve engine with a carburetor. At the next stage, a more powerful VAZ-2111 engine with the same volume and number of valves, equipped with a direct fuel injection system, was installed.
More than 1 million cars equipped with such an engine were sold in Russia. The VAZ-21114 power plant with its volume increased to 1.6 liters made it possible to increase power and reduce fuel consumption. Over time, a more dynamic 16-valve version of the 1.5 liter VAZ-21120 engine was developed, which turned out to be not entirely successful due to design errors.
On the next modification of the VAZ-21124 engine, the cubes were increased, which made it possible to increase the power to 100 hp. and show good performance. Finally, the sixth version of the VAZ 2110 car was equipped with an imported 2-liter, injection, 16-valve Opel X20XEV CTi engine, which allowed the car to accelerate to speeds of over 200 km/h.
The service life of engines installed on the VAZ 2110 model is on average about 250 thousand km . Since such cars have been traveling on the roads for a long time and many have not only overcome this milestone, but some have surpassed it, the question arises of carrying out a major overhaul of the power plant.
What is an engine overhaul? This is work aimed at restoring the performance of the engine and bringing the technical characteristics to factory specifications. Due to the variety of types of power plants installed on a car, major repairs for each specific vehicle may differ in the degree of complexity of the work and the range of necessary spare parts.
As with most cars, a thorough engine repair is not complete without dismantling it, completely disassembling it, cleaning it, and identifying inoperable parts and components.
- Engine VAZ 2110 8 valves: breakdowns, tuning
The geometric parameters of the crankshaft and camshafts, the quality of the surfaces of the cylinders and cylinder head, and the condition of the valves are checked. Piston rings and liners are replaced, new gaskets, seals, fuel and oil filters, and spark plugs are installed. The assembled motor is returned to its place and run-in. Having finally adjusted the ignition and fuel supply systems, everything is ready to continue using the car.
Overhaul of VAZ 2110 engine 8 valves injector
Remove the plastic cover and unscrew the receiver mount
We remove the throttle cable, connectors from the diesel engine, RTD and injector harness. Unscrew the ground wires.
Receiver, MZ, explosive wires, spark plugs have been removed.
Using a 10mm wrench, unscrew the bolts securing the timing belt cover
Unscrew the ground wire and the gas pipe mounting bracket.
The front right wheel is already on a jack. Align the marks and unscrew the bolts securing the camshaft gears and the roller nuts.
Remove the gears (do not lose the keys), rollers and back cover. (You may have to remove the alternator belt pulley from the crankshaft).
Before unscrewing the bolts securing the head cover, their threads must be precipitated. Lightly hit the head with a hammer through the knob.
Having also pre-settled, unscrew the two ramp fastening bolts using a hexagon.
After unscrewing one bolt, remove the dipstick assembly with its trunk.
We take out the ramp along with the injectors, moving it to the right and towards ourselves.
We put it to the side without unscrewing the hoses
Remove the head cover.
This bracket is in the way and needs to be removed
We unscrew a bunch of bolts securing the pastel camshafts and remove the middle part of the head. Mine came off along with the camshafts.
Carefully remove the camshafts and spark plug wells.
Using a good magnet, we take out the hydraulic compensators, put them in a clean, dust-free place so that then we can put each one in exactly its place.
The seals didn't leak, but they didn't have long to live. We replace them with new ones.
The wells were flowing. The lower part turned into a thin, snotty substance.
Due to the importance of the moment, I forgot to take a photo of the process of unscrewing the head bolts. They must first be seated and unscrewed with a GOOD hexagon. Remove the head from the engine. We begin to dry out the valves.
We take out the crackers with tweezers and an awl, remove the old MSKs with toothed pliers, and put on new ones using a mandrel.
The MSCs became stiff and the internal diameter increased. Timely replacement
The inlet valve is very dirty. We clean it with a knife and sandpaper.
Similarly, there is an outlet hole in the head.
Using a sharp knife and sandpaper, remove the remaining gasket from the surface.
From this side we remove the remaining sealant. We thoroughly rinse the head with gasoline.
Overhaul of VAZ 2110 engine 8 valves
In one of the previous articles, we carefully covered the “typical” Oka engine repair. In this report, we talked about ways to increase engine life, borrowed from our experience in engine tuning, which we use during standard complete repairs.
Below we would like to tell you about the complete repair of the eight-valve VAZ 21083 VAZ 2109 car . Let us remind you once again that tuning is not always advisable or necessary for the client. Often the budget is limited, and the service life of the serial engine is exhausted. a high-quality overhaul is needed without large investments. We offer different options for engine repair or tuning, and the client selects the most convenient one in terms of engine power or financial costs.
What determines the cost of overhauling a VAZ 2110 engine?
The cost of repair work depends on the following main factors:
- Models of the installed engine.
- The degree of wear of its components and parts.
- Number of spare parts to be replaced.
- Availability of additional work on repair of cylinder head, shafts, cylinders.
- Car mechanic qualifications and workshop equipment.
During the overhaul process, it may be necessary to replace or repair other engine-related components and assemblies, requiring additional financial costs.
The main stages of overhauling the VAZ 2110 engine
The process of restoring the performance characteristics of the power plant takes place in several stages:
- Dismantling of the internal combustion engine, complete disassembly, washing of parts.
- Inspection of rubbing surfaces and abutment planes, identification of damage.
- Control of the geometry of the crankshaft and camshafts.
- Determination of replacement parts.
- Processing of crankshaft journals, cylinders, coating.
- Elimination of geometric defects of shafts.
- Refurbishment of cylinder head.
- Complete with new liners, piston rings, gaskets, seals.
- Assembly and return of the engine to the car.
- Replacement of filters, connection of all systems.
- Run-in and final adjustment.
The need for additional work may become clear during the repair process. So sometimes there may be a need to repair the fuel or oil pump, clean the carburetor, and in the case of injection, repair the injection system.
How much does it cost to overhaul a VAZ 2110?
Depending on the type of engine, the estimated cost of removing/installing an 8-valve engine is from 3,000 rubles , and a 16-valve engine is from 4,000 rubles . The approximate cost of cylinder head repair, excluding the cost of parts, is from 3,500 rubles and from 5,500 rubles , respectively. On average, boring a cylinder block will cost from 1,200 rubles. Replacing sleeves will cost from 2500 rubles .
The average cost of a major overhaul of a VAZ 2110 engine equipped with 8 valves will be from 12,000 rubles . Repairing an engine with 16 valves will cost from 19,000 rubles .
Stages of overhaul of the VAZ 2110 engine with 8 valves
When it becomes clear that a major overhaul of the VAZ 2110 engine is inevitable, the price of such work for the car owner is of great importance. Services for the restoration of vehicle power units are provided on favorable terms. We will promptly restore an engine that has 8 valves and an injector; you will also be pleasantly surprised by the cost of overhauling a VAZ 2110 engine. Units with 8 valves with a volume of 1.5 liters are most often found in “Ten”, but there are also engines with 16 valves - 1.6 liters. We also repair such engines quickly and efficiently.
Disassembly and repair of the VAZ 2110 engine
Video on overhauling and assembling an engine, a VAZ 2112 car, as well as detailed instructions with photos on disassembling a VAZ 2110 engine. Video on overhauling and assembling an engine, a VAZ 2112 car, as well as detailed instructions with photos on disassembling a VAZ 2110 engine.
Repairing a VAZ 2110 engine, like any other car model, is not an easy job, but it can still be done. If you know even a little about technology, you will be able to do it. To carry out repairs, you must at least disassemble the engine. We bring to your attention a hint on how and in what sequence to perform such work.
Tools
To repair a VAZ 2110 engine without a service station, you will need serviceable tools. It is prohibited to use keys that do not fit the size and keys with worn edges.
The handles of the tools used must be plastic or wooden with a smooth and sanded surface. Tools with wooden handles should be reinforced with metal rings - this will prevent the tool from splitting when unscrewing engine elements.
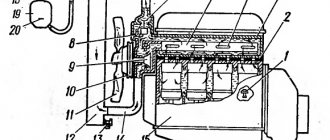
Schematic cross-sectional representation of the engine.
Security measures
When unscrewing nuts, do not use a chisel or hammer.
To avoid unforeseen situations during engine repairs, there should be a sign on the steering wheel of the VAZ: “Do not start the engine - repair work is in progress.”
The inspection pit must be equipped with sides. Vehicle entry into the inspection pit is permitted only if there are no people in the pit. Inspect the vehicle using an electric carrying lamp with a safety net and a voltage of no more than 36 volts.
Before starting engine repairs in a pit, you must put the car in handbrake and first gear.
To repair a Lada 2110 with the removal of wheels, you need to install metal stands.
Overhaul or engine replacement, what to choose?
Major renovation
When approaching a mileage of 150,000 km, the VAZ 2110 engine begins to act up. This period is considered optimal for overhauling the power unit. Timely replacement of consumables and their quality have an important impact on engine life.
The figure of 150,000 km may change downward if maintenance schedules are not met and the quality of the oil and filters is poor. To delay overhauls, it is necessary to carry out engine diagnostics.
The technology for engine overhaul requires removing the engine from the vehicle.
Engine overhaul is the restoration of components and parts of the power unit to factory specifications. To compare the performance of the engine in use with the factory specifications, you will need special measuring instruments.
Before starting major repairs, you must read the repair instructions and evaluate the scope of work. The repair process itself is simple, but takes a lot of time.
Overhaul of the VAZ 2110 Engine with Your Own Hands
Repair of VAZ 2110 engine
The main advantage of slot machines for power units of Russian cars in terms of engine repair
a lot of information.
This allows for repairs.
VAZ 2110
engine from their Hands
.
Restoring the engine
Currently, the 1.5-liter 8-valve engine is in demand in the top ten. The VAZ 2110 injector runs only on gasoline, with 4 cylinders located transversely.
tools
The handles of the tools used must be plastic or wooden with a smooth and clean surface. Tools with wooden handles should be reinforced with metal rings. This will prevent the tool from cracking when unscrewing engine components.
External view of the engine section.
Security measures
Do not use a chisel or hammer when loosening nuts.
To avoid unforeseen situations when repairing the engine, there should be a sign on the steering wheel of the VAZ: “Do not start the engine. renovation work continues"
The inspection pit must be equipped with sides. A vehicle can only enter the inspection hole if there are no people in it. Inspect the vehicle using an electric lamp with a protective grid of no more than 36 volts.
How to overhaul a vase with an engine 2109 |
Before you begin repairing the engine in a pit, you must put the car on the handbrake and in first gear.
For Lada repair 2110
With the wheels removed, metal stands must be installed.
Capital renovation
or engine replacement, what to choose?
Overhaul of the VAZ 2110 engine (part 1)
Let's show you how to repair an engine
what is needed, and approximate spare parts and prices.
repair
Approaching a mileage of 150,000 km, the VAZ 2110 engine begins to waste. This period is considered optimal for major repairs of the unit. Timely replacement of consumables and their quality have a significant impact on the service life of the engine.
The figure of 150,000 km may change downwards in case of non-compliance with operating conditions and poor quality of oil filters. To postpone major repairs, it is necessary to perform engine diagnostics.
Technology that requires capital engine repair
requires removing the engine from the car
Engine overhaul. This is the restoration of transmission components and parts to factory settings. Special sensors will be required to compare the performance of the used engine with the factory specifications.
Do-it-yourself engine overhaul, VAZ 2114.
Before starting a major overhaul, read the repair instructions and evaluate the scope of work. The repair process itself is simple, but takes a lot of time.
When to do a major overhaul
Major repairs are carried out in the event of persistent engine malfunctions. First, you must check the engine yourself and replace the faulty parts. If the power supply failure cannot be repaired or reappears soon after repair, a major repair is required.
Major repair signs
On the following grounds, you can determine the need for a major overhaul of the unit:
- Increased oil consumption. piston rings or valve guides may fail. First of all, you need to check for cracks that lead to oil leakage.
- Noises and knocks in the engine. Possible cause of the malfunction. failure of the connecting rod or main bearings.
- Loss of engine power. There are many reasons for losing power. Unstable engine operation can be caused by a lack of compression.
- Engine failures.
If several symptoms appear together, it is an urgent capital .
Features of engine assembly and installation on Lada 2010.
Overhaul of parts
Spare parts should not be purchased in advance. First of all, the engine is analyzed and the condition of its elements is checked. In the absence of equipment, the condition of the parts is checked by a service station. Finally, experts indicate which parts need to be changed during a major overhaul and which can be repaired.
Signs of major repairs
Based on the following signs, you can determine the need for overhaul of the power unit:
- Increased oil consumption - the piston rings or valve guides may have failed. First of all, you need to check for cracks leading to oil leakage.
- Noises and knocks in the engine. A possible cause of the malfunction is the failure of the connecting rod or main bearings.
- Loss of engine power. There are many reasons for loss of power. Unstable engine operation may be due to lack of compression.
- Engine failures.
If several signs appear together, urgent major repairs are required.
Features of engine assembly and installation on Lada 2010.
Overhaul methods
What kind of capital does your engine need? First, it would be necessary to carry out control measurements of everything and everyone - start with the condition of the cylinders and the play of the pistons in them, inspect the liners and measure the diameter of the crankshaft journals, evaluate the play in the pins, etc. Simply limiting yourself to replacing the piston rings would, of course, be good, but if the wear has already exceeded certain limits, then this will not yield results.
With partial capital, they usually change:
With full capital, the following are added to the above:
- pistons;
- oil pump;
- valve bushings;
- the valves themselves.
Plus - boring the cylinders, grinding the heads and, possibly, repairing the crankshaft.
Spare parts for major repairs
There is no need to purchase replacement parts in advance. First of all, the engine is disassembled and the condition of its elements is checked. In the absence of equipment, the condition of the parts is checked at a service station. In conclusion, experts indicate which parts should be changed during a major overhaul and what can be restored.
We repair a VAZ 2110 car ourselves:
- Repairing the VAZ 2110 gearbox yourself
- Replacing the fuel filter on a VAZ 2110 yourself
- Replacing the thermostat VAZ 2110
The engine is overhauled in the following cases: destruction of the pistons due to a broken timing belt; natural wear of the piston group; compression loss in the cylinders.
Before starting work, you can think about tuning (improving) the engine. Whatever the car, it is possible to increase the number of horsepower, and without significant costs. Let's look at the main stages of repair work so that you have an idea of what you will have to face.
Overhaul of internal combustion engine VAZ 2110 8 valves
Our workshop is not idle.
On Monday I arrived for repairs on a 2000 10. with injection engine. I have had this car in service since it was purchased by the current owner in April 2021. During this time, a lot of things were done, incl. inspection and repair of electrical wiring, replacement of fuel filters and restoration of the tightness of the fuel injection pump (the pressure in the rail dropped for 10 seconds - the reason was a loose fit of the hose on the fuel pump - a clamp solved the problem). And finally, the customer collected the necessary amount to repair the internal combustion engine and, at the same time, the steering rack. Symptoms for opening the internal combustion engine were: Troubling of the internal combustion engine and compression in the first cylinder that was too low in relation to other cylinders (compression in cylinders 2,3 and 4 was 12, and in cylinder 1 - 8 kgf/m). And since we decided to open the internal combustion engine, then all the seals and gaskets must be replaced in one go. The customer bought in advance all the spare parts that do not require knowledge of the dimensions (after all, I did not know whether the block was bored out or not), and it was also not known whether the pistons or valves needed to be replaced. Surprisingly, all the nuts came off quite easily. During the disassembly process, the collective farm from the previous assembly was discovered in the form of sealant wherever possible and not possible. The entire collective farm was eliminated before assembly. After opening, the reason for the reduced compression was found, or rather two: 1 - 1 valve is too tight; 2 - The upper compression ring turned out to be damp and I was able to turn it into a figure eight. When checking the valves for leaks, only 1 valve was allowed to pass, the rest were kept as they should. The first valve was thoroughly ground in, and the rest were ground in with finishing paste for reliability. After grinding in, the valve seals were replaced.
Source
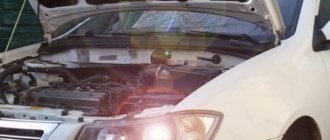
Removing the engine from the car
This procedure cannot be avoided, since the motor must be removed, otherwise it simply cannot be completely disassembled. During the preparation stage, disconnect the battery to de-energize the power supply system. All attachments must be removed - carburetor, air filter, generator, starter, exhaust manifold, etc. Before dismantling the engine, you can also unscrew the cylinder head. Work with it will be carried out separately. Drain the oil from the crankcase, after which you will need a winch and assistants.
Four bolts secure the gearbox to the engine block. The engine and body on VAZ 2108-21099 cars are attached using one cushion. Suspend the engine on a cable and unscrew all the bolts, pre-treating the connections with penetrating lubricant to make work easier. For convenience, you can remove the hinges at the very beginning and move the hood to the side, this way you will have more space. After the final removal of the engine, you begin to disassemble it.
Now it’s worth talking about the requirements for each element of the motor.
We do a major engine overhaul on a VAZ 2111
Part 1.
Drain the antifreeze and oil
Remove the plastic cover and unscrew the receiver mount
We remove the throttle cable, connectors from the diesel engine, RTD and injector harness. Unscrew the ground wires.
Receiver, MZ, explosive wires, spark plugs have been removed.
Using a 10mm wrench, unscrew the bolts securing the timing belt cover
Unscrew the ground wire and the gas pipe mounting bracket.
The front right wheel is already on a jack. Align the marks and unscrew the bolts securing the camshaft gears and the roller nuts.
We remove the gears (do not lose the keys), rollers and back cover (you may have to remove the pulley for the alternator belt from the crankshaft).
Before unscrewing the bolts securing the head cover, their threads must be precipitated by gently hitting the head with a hammer through a wrench
Having also pre-settled, unscrew the two ramp fastening bolts using a hexagon.
After unscrewing one bolt, remove the dipstick assembly with its trunk.
We take out the ramp along with the injectors, moving it to the right and towards ourselves.
We put it to the side without unscrewing the hoses.
Remove the head cover.
This bracket is in the way and needs to be removed.
We unscrew a bunch of bolts securing the pastel camshafts and remove the middle part of the head. Mine came off along with the camshafts.
Carefully remove the camshafts and spark plug wells.
Using a good magnet, we take out the hydraulic compensators, put them in a clean, dust-free place so that then we can put each one in exactly its place.
The seals didn't leak, but they didn't have long to live. We replace them with new ones.
The wells were flowing. The lower part turned into a thin, snotty substance.
Due to the importance of the moment, I forgot to take a photo of the process of unscrewing the head bolts. They must first be seated and unscrewed with a GOOD hexagon. Remove the head from the engine. We begin to dry out the valves.
We take out the crackers with tweezers and an awl, remove the old MSKs with toothed pliers, and put on new ones using a mandrel.
The MSCs became stiff and the internal diameter increased. Timely replacement!
The inlet valve is very dirty. We clean it with a knife and sandpaper.
Similarly, there is an outlet hole in the head...
Using a sharp knife and sandpaper, remove the remaining gasket from the surface.
From this side we remove the remaining sealant. We thoroughly rinse the head with gasoline.
VAZ-21113, manufactured in 2000, engine 1500, 16-ve, mileage 95,000 kilometers. Costs: 1. Male rings - 710 2. MSK Elring - 190 3. Head gasket - 220 4. Manifold pipe gasket - 60 5. Pan gasket - 40 6. Hydraulic compensators 2x60 - 320 7. Camshaft seals 2x60 — 60 8. Sealant “red, silicone” — 70 9. Motor oil — 528 10. Oil filter — 89 11. Fuel filter — 91 12. Air filter — 76 13. Guide for MSK — 50 14. O-rings. into wells - 210 15. Breather pipe - 50 16. Clamps 6 pieces - 72 17. Receiver stud - 25 19. Pump tee gasket - 3
Total: 2864 rubles.
Part 2.
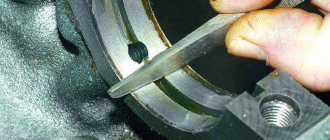
Let's move on to the block. Using a sharp knife and fine sandpaper, remove the remnants of the old gasket and clean off the carbon deposits.
Remove the oil pan and oil pan.
Unscrew the two connecting rod nuts and pull out the piston and connecting rod upwards. Arrows indicate rubbing surfaces.
The crankshaft crankpin is in excellent condition.
There are no scratches on the cylinder mirror. Traces of hone are still visible. Great!
Mileage 95,000 kilometers. There is no wear.
Remove the first compression ring from the piston and insert it into the pot.
Below, in the middle and above...
We measure the gap in the ring lock. Correct clearance.
We also measure the second compression and oil pumps.
Using an old ring, broken in half, we clean the grooves in the piston.
We insert new rings. First the oil scraper...
...then the second compression...
... then the first compression. Put the rings on carefully, otherwise you can break them, especially the second one, the cast iron one.
Here they are - four handsome men!
We insert the piston using a mandrel, positioning the connecting rod correctly...
... gently tapping the handle of a hammer.
We replace the rubber ring on the oil receiver and lubricate it with sealant.
Apply a thin layer of sealant to all surfaces of the pan, the new gasket and the block. We install the pallet in place.
It is better to replace the pump tee gasket, then it will be much more difficult to do.
We clean the holes for the cylinder head mounting bolts.
We put a new gasket on the exhaust pipe and on the block. Carefully place the head in place and tighten the bolts in four steps.
We clean the middle part of the cylinder head from rubbish.
After generously lubricating it with engine oil, we insert the hydraulic valves and camshafts into place. Apply red silicone sealant around the perimeter.
... and in the center, where the bolts on the mating part are too. Be sure to check all three TDC marks and tighten the bolts.
Candle wells. We put on rubber bands, apply sealant...
.. rubber bands in place, more grease and wells in place.
Having coated the upper cylinder head cover with sealant, we install it in place.
Let's collect everything else
Let's start the engine and enjoy our increased self-esteem
Cylinder block
In any case, it needs to be repaired. First of all, clean the entire surface of oil, dirt and other deposits. The repair consists of boring the sleeves to the required size. You cannot carry out this procedure yourself; it is better to trust a specialist. The lathe who carries out the boring must have the skills to operate the machine. Do not trust such a task to an inexperienced person. Its reliability depends on how correctly the overhaul of the VAZ 2109 engine is done.
There are two boring options: under the mirror and with a fine mesh. In the second case, honing is done - the entire inner surface of the liners is covered with thin lines. Some people claim that this gives a boost in power. But in reality, the picture is the opposite - the wear of the piston rings increases, since the surface of the cylinder is similar to an ordinary file. Fortunately, this continues for 10-20 thousand km, after which the sleeve takes on a mirror-like appearance. Moreover, the geometry is not always ideal. For this reason, it is better to carry out boring under a mirror.
What is a major overhaul and why is it needed?
Overhauling a VAZ engine is quite a labor-intensive job that requires knowledge of the structure and operating principle of the unit.
This process will take a lot of time. You will have to remove the engine from the car and completely disassemble it. All removed spare parts are checked for suitability for further use and, if necessary, replaced with new ones. Particular attention is paid to the crankshaft: it is restored and brought into perfect condition. The existing systems are also checked: cooling, lubrication, fuel supply, and the crank mechanism is repaired.
During repair work, internal combustion engine parts and components are brought to perfect condition. After assembling the unit, its condition and performance should be identical to a new engine just released from the assembly line. Capital is needed if the engine has fully or partially exhausted its service life, and corresponding signs have appeared indicating this. It is impossible not to pay attention to them. With further use of the car, the engine may completely fail and cannot be restored. There is only one option left - purchasing a new part. Naturally, purchasing spare parts is more expensive than repairing them.
The service life of the engine before overhaul can be extended if you follow simple rules when operating the machine.
- Monitor the oil level and change it regularly.
- Monitor the coolant level to prevent the machine from overheating.
- Fill with high-quality fuel recommended by the manufacturer.
- Operate the machine wisely and avoid overloading.
- Limit the vehicle's idling time to a minimum.
- Avoid extreme driving that requires high speeds. Do not allow the tachometer needle to enter the red zone.
Engines
Manufacturers offered five power units for the model, depending on the modification:
- A modification of the VAZ 21122 was equipped with a 1.5-liter 8-valve engine 2111;
- The 1.5-liter 16-valve engine 21120 was equipped with a modification of the VAZ 21120;
- A modification of the VAZ 21121 was equipped with a 1.6-liter 8-valve engine 21114;
- The 1.6-liter 8-valve engine 21124 was equipped with a modification of the VAZ 21124;
- 1.8-liter 16-valve engine with 100 hp. offered for modification of VAZ 21128.
16-valve engines do not have protection against timing belt breakage. The engines are reliable in operation. The average service life of engines before major overhaul is 150,000 km.
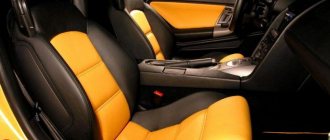
Salon
Convenient adjustment of the rear seatbacks - the backrests fold down to transport large loads. In the normal position of the seats, the volume of the luggage compartment is 334 liters, with the backrests folded - 425 liters.
During operation, the stove breaks down - the fault cannot be repaired; a complete replacement of parts is required.
To repair it yourself, you need to read the step-by-step instructions.
The rear spoiler is a poor decision by the manufacturer. Reduces visibility through the rear window and makes noise in potholes.
This is interesting: How and how to check the compression of a car engine with your own hands
Body
The VAZ 2112 has a hereditary disease of all domestic models - corrosion. The lower part of the doors and the entire tailgate and sills are most prone to rust.
You can fight car corrosion on your own. To do this, you need to treat the body elements with anti-corrosion agents. The repair manual lists recommended products to prevent or remove corrosion.
When opening the trunk, the rear reflector often breaks.
Is it worth lightening the pistons?
If you are interested in the idea of tuning in order to increase power, then the answer is clear: it is necessary to lighten the pistons! But if it is in your interests only to make repairs, then it is enough to install new ones. In any case, the increase in horsepower will be noticeable, as engine compression will increase. It is best to entrust the work of lightening to the same turner who is engaged in boring the cylinder block. As you can see, you cannot do a major engine overhaul with your own hands; you will have to resort to the services of specialists.
The essence of the process is to get rid of the “excess” metal in the internal part. To do this, the aluminum from the piston skirt is carefully ground off. Pay attention to whether there are scrapes - recesses for valves in the upper part. If they are present, then purchase repair ones with the same attributes. Otherwise, you will need to rebuild the engine every time the timing belt breaks. And don’t forget that each piston requires rings of the appropriate size - all values can be found in the car’s owner’s manual.
Engine repair VAZ 2110, 2111, 2112
Actually, it all started with the fact that the engine began to absorb too much oil, I constantly had to top it up, almost every two or three days a liter was wasted, and the oil I poured was not cheap (Mobil 1 extendet live), since the engine should always be in perfect condition and eat good oil and good gasoline. Actually, after such crap, it was clear that we had to get into the engine and figure out what was what, but unfortunately, there was no time. After driving like this for a week, the car began to leave puddles of oil underneath and the normal oil level began to last for 4-5 hours. That day there was nowhere to go, I went to a friend’s garage, because... he himself doesn’t have a pit, but his garage had a pit. I took off the protection, climbed everywhere, wiped it with a cloth, and here’s the problem - the crankcase protection rubbed the crankcase itself in several places, in short, micro cracks appeared, from where all the oil actually escaped. The solution to the problem, of course, is the simplest - weld the pan, you only need to weld a couple of drops there. Well, or buy a new pan, but this turned out to be not enough, I’m just not looking for easy ways, and I decided to remove the pan and climb in the engine itself, after which I gradually decided to change the config.
And so the engine is uninstalled and scattered, cleaning and washing of all parts begins. After completely disassembling the block, it was taken to a car wash and washed with all sorts of chemicals, but unfortunately it was not possible to wash the block thoroughly; I had to work a lot by hand with a cloth, a brush and a screwdriver in the end...
VAZ 21083 cylinder block, block height 194.8 mm.
he doesn't look so great, kind of shabby
Cylinder block VAZ 21083 top view
Next we will have the ShPG (connecting rod-piston group) nominal (standard) dimensions (piston 82 mm, 3 rings - 2 compression and one oil scraper, compression height of the piston 37.9 mm, connecting rod 121 mm, piston pin 22 mm).
ShPG VAZ 2112 (82*121)
Piston with groove
counterbores in pistons for valves
As you can see in the photo, the pistons are made with counterbores for the valves, as they also say, pistons with a groove, i.e. the same ones that do not bend the valves when the timing belt breaks.
Crankshaft 2112 (heavy) - such crankshafts are preferably used in tuning our cars when turbocharged, this crankshaft has proven itself well, is considered more reliable and durable compared to Prioro or Kalino-Kalen, there are also other options, for example 80- e elbow with double oblique drilling of oil channels, which is also in demand in tuning, but it is for higher cylinder blocks.
Crankshaft and its relief
This is perhaps the most massive element of the entire engine. If you only need to carry out a major overhaul of the VAZ engine, then you can limit yourself to replacing the main and connecting rod bearings. But if you are looking to increase power, you will need to do a lot of work. Moreover, it will again be impossible to do without the services of a turner. After all, only by using professional equipment can you get rid of “excess” metal on the surface of the crankshaft.
But don’t forget about one feature. The crankshaft has an axis of rotation, its center of gravity is located in such a way that no beating occurs. When you grind off metal, the alignment is disrupted. And by installing such a crankshaft, you will simply destroy both the bearings and the cylinder block housing. Therefore, after lightening, it is necessary to do balancing in order to restore the alignment of the shaft. But after a major overhaul, the engine will be much more powerful, which will surprise you beyond words.
Crankshaft gear and its malfunctions
The crankshaft sets the operating rhythm of the components and mechanisms of the internal combustion engine using belt or gear drives. All internal combustion engine units operate in time with the crankshaft.
Crankshaft gear: structure and functions
The crankshaft gear is the gear through which the engine equipment rotates. Depending on engineering solutions, it has the shape of a gear with teeth for a chain or belt.
As a rule, timing gears (lower) and oil pump drives are installed on the crankshaft. The gears are mounted with a tight fit, fixed on the keyway, and pressed with threaded fasteners.
Engine design with chain drive of oil pump and timing belt
Crankshaft gear malfunctions
Common crankshaft gear problems include:
Oil pump and cooling system
Improving these components is extremely necessary when carrying out tuning. Lubrication of all units may be insufficient, as torque and power increase due to the lighter weight of the main elements. Carefully troubleshoot the oil pump gears so that the gaps are minimal. As for the cooling system, it would not be a bad idea to install a more efficient pump and a radiator with a larger area. A major overhaul of the 2109 engine, provided that there is no need to do tuning, can be done without these procedures.
Block head repair
This unit is responsible for the quality of sealing of the combustion chamber at the moment of ignition of the mixture. Therefore, you should achieve maximum contact between the valve surfaces and the seats in the cylinder head. To do this, it is necessary to carry out grinding. The work is not difficult, but tedious and long. You will need a drill with reverse (even a hand-held one will do), a piece of rubber hose, two clamps, a metal rod, lapping pastes - finishing and coarse. Please ensure that after carrying out the work there are no abrasives left on the surface of the cylinder head. Clean everything and blow it out with compressed air.
First, a rough lapping paste is applied to the seat. Using a drill, rotate the valve in different directions (it is highly desirable that there be an equal number of revolutions). After getting rid of large surface irregularities, you need to apply finishing paste and grind in until shiny. Maximum contact between valve and seat is now ensured. The main thing is to install them as they were ground in; elements cannot be swapped. In this case, it will be impossible to achieve maximum tightness.