As a rule, novice motorists encounter the first difficulties when servicing an internal combustion engine precisely when it comes to the lubrication system. The fact is that many drivers know well where the oil is in the engine, but not everyone knows what the engine oil level should be and how to accurately check it.
No less difficult is the selection of oil, as well as the determination of its replacement intervals. In this article we will talk about what needs to be done to accurately check the lubricant level, as well as how often the engine oil is changed, taking into account various factors, the characteristics of the vehicle’s operation and the properties of the lubricant itself.
Engine oil level. How to check, why and how often?
Absolutely any car owner should be able to measure the engine oil level.
It seems like there is nothing complicated, but many people manage to do it incorrectly, which can lead to engine damage. I decided to make this post after I saw the measurements of my work colleague. Firstly, he measures it once every 5,000 mileage, and secondly, he does not wipe the dipstick, citing the fact that frequent measurements with wiping themselves reduce the level. It even became interesting: how many times do you need to wipe the dipstick to get from o to “min”? The source of the problem of incorrectly measuring the oil level is most often the motorist's acquaintances who incorrectly showed how this is done. Then the person takes measurements with this error for many years, the correctness of this method is established, and he subsequently passes it on to other motorists. But all you had to do was read the operating instructions for your car.
“Hot” / “cold”
The most common mistake in measuring is incorrect temperature when taking measurements. From a school physics course we know that liquids expand when heated.
So if you measure when it’s cold and the mark shows at maximum, then when the engine reaches operating temperature, the oil level will cross this mark and begin to go where it shouldn’t due to an increase in pressure. Therefore, it would be correct to measure “hot”.
So you need to check after the trip. If you want to check the level before driving: start the engine and wait until the speed drops and the temperature sensor indicator is in the middle.
The second important rule is that the oil level must be measured exclusively on level ground. Everything is logical here: on a slope, the oil in the crankcase flows and leaves an incorrect mark on the dipstick.
There is another problem with inclines: with a minimum oil level in the engine, driving over mountainous terrain, the internal parts of the engine are lubricated unevenly, which leads to increased wear and possible breakdown.
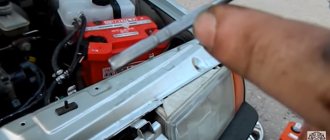
Many will simply answer with a “rag.” But in fact it is not entirely true. The dipstick should be wiped with a cloth that does not leave fibers or with napkins. Otherwise, fibers may get into the engine, which could damage it.
1. Find a level area, stop the car and turn off the engine. Or warm up the engine on a level surface until the engine operates at operating temperature.
2. Wait about 15 minutes for the oil to drain into the crankcase.
3. Carefully remove the dipstick, wipe it with a napkin or cloth that does not leave lint, and insert it back.
4. After a few seconds (3-5 is enough), carefully remove the dipstick again.
5. The oil mark should be between o and “Max” (or between two notches/grooves) at the end of the dipstick. If it is difficult for you to see the oil trace, place the dipstick on a napkin, paper or cloth so that the oil leaves an imprint, and move the dipstick slightly to the side to see at what level the print is.
6. Wipe the dipstick again and reinsert it.
You need to check the engine oil once every 2 weeks. Then you will be able to notice the problem before it makes itself felt.
How to troubleshoot
Failures associated with the indication on the instrument panel can lead to serious problems and expensive repairs of the internal combustion engine in the future, so do not be lazy to find and eliminate the cause of the failure in a timely manner.
Some drivers drive without a lamp, but not everyone is lucky and not always.
Replacing a light bulb
Often, after diagnosing the wiring, it turns out that the malfunction is not related to the contacts, sensor or circuit, but to a burnt-out lamp.
In this case, all that remains is to replace the light bulb, maybe the LED. The element itself is located in the dashboard.
On domestic cars, replacing a lamp is not difficult. The hardest part is removing the dashboard.
On domestic machines, all these operations can be done independently. On modern foreign cars, it is better to entrust the work to specialists or watch video instructions.
Diagnosis or replacement of oil pressure sensor
There are two types of sensors - electronic and mechanical.
The electronic one consists of a housing, a membrane, contact elements, a pusher and a lamp in the cabin. When the motor is not running, the membrane inside the housing is straightened.
The pusher is in the normal position, and the contacts are in the closed state. After the car owner starts the engine, the lamp lights up, and in the lubrication system the oil presses on the membrane. The membrane through the pusher causes the contacts to open.
The electronic sensor can be diagnosed with a multimeter and indicator light.
Working with a multimeter comes down to the following steps:
- The multimeter is set to dialing mode;
- One probe is connected to the central contact of the sensor, and the second to ground;
- The pump creates a pressure of approximately 1-1.5 atm;
- If the multimeter does not beep, then the sensor is working. If it beeps, the sensor is faulty and needs to be replaced.
The mechanical sensor is designed differently. It also consists of a body, a membrane with a pusher, a slider and a nichrome winding. The oil acts on the slider. As a result, it rises or falls. Each such movement is recorded and sent to the light display in the cabin.
You can check a mechanical sensor with a pressure gauge, but you need an electronic device. What need to do:
- On the pressure regulator you need to find a terminal that supplies an impulse to the oil pressure warning light;
- Find the contact from which the signal is sent to the pressure indicator;
- Connect the positive and negative power wires, as well as the impulse from the pressure gauge (there are three contacts on the sensor);
- Create a pressure of approximately 1-2 atm. If the sensor is working normally, the dial pressure gauge will indicate this by moving the arrow. If the sensor does not work, the arrow will remain motionless.
If, as a result of the check, it turns out that the sensor does not work and requires replacement, then it must be unscrewed with the appropriate key and a new one installed in its place.
You must remember to connect the terminal to the sensor contact. After this, the lamp will burn as intended by the manufacturer.
How to check oil pressure
To make sure that the lubrication system is working properly, you can check the actual situation using a pressure gauge.
The engine is started and warmed up to operating temperatures. Then the internal combustion engine is turned off. Next, remove the standard sensor and install a pressure gauge in its place; you may need an appropriate adapter for this.
Next, the engine is started again and the current values should be displayed on the pressure gauge - usually they are compared with the values from the instructions for the car.
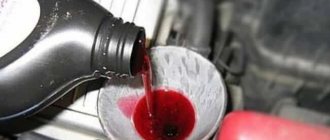
Checking the quality of engine oil and oil filter
Problems in the oil system are also related to the quality of the oil. Under heavy loads and low-quality lubricant, the pump simply cannot produce performance characteristics.
Motorists have come up with a lot of ways to check the quality of fuels and lubricants. If you drop oil on paper, then after a few hours the edges of the stain should be smooth, and the stain itself should spread across the sheet.
The filter in the oil system is compressed paper. When oil moves through it, the filter element must trap debris. In low quality filters, the paper quickly tears.
And most importantly, never forget to check the oil with a dipstick. Constant level monitoring will avoid a lot of serious problems.
Let's touch it, try it on...
Taking long breaks in TUV construction is harmful - details are forgotten. For example, I was absolutely sure that I had a lower hose to the radiator, I just needed to embed a sensor into it... It turned out that this was a false memory, and there was a hose, but not the right one... In general, I removed the hose, but did not replace it for want of it. It was already too late to go after him.
I had to do all sorts of nonsense instead.
For example, do you know how long your oil dipstick in the crankcase is? Don't rush to answer, the answer is not at all obvious. The fact is that, due to the wide variety of UAZ engines and oil crankcases for them, the length of the dipsticks can also be quite varied. My dipstick, moved from the previous engine, was obviously short and at the maximum oil level it touched its very tip. This, of course, is a disgrace, you need to know the level exactly - a low one is fraught with oil starvation, a high one - bubbling from the crankshaft. But the simplest solution that suggests itself - to go and buy a new dipstick - does not work. Because they will sell you a dipstick from a new engine, and when asked to find a “dipstick for a 414 block with an old-style crankcase” they will naturally look at you as an idiot. Information on exactly what length the dipstick should be was not easy to find - as you understand, this is not the parameter that is indicated in the technical specifications, along with the oil sump capacity and valve clearances. I had to go to UAZBUK with an ambiguous request: “Let’s get it and try it on...”
Why do you need to know the amount of oil in the engine?
Automating helps the engine run smoothly, without jerking or knocking. It lubricates rubbing surfaces, cools the engine and washes away dirt deposits. Due to leaks in the internal combustion engine, oil starvation occurs, which leads to overheating, burning of pistons, scuffing of liners and cylinders, wear of bearings, etc. Even if there are no leaks, oil is consumed, for example when driving at high speed or towing a trailer.
Car maintenance will help prevent emergency situations in the unit. It is enough to measure the amount of lubricant in the crankcase once a week and monitor its condition. The less oil, the faster it becomes dirty, ages and loses its properties. But at the same time, you cannot overfill the norm “for reserve”, since excess lubricant harms the operation of the unit.
Forum → Operation
The engine oil level dipstick is broken. I tried to resuscitate him and began to suspect that he was not my own.
New to order 850 RUR. If it’s not difficult, anyone who has an American automatic transmission Ford Focus SE 2000 (Zetec 2.0 16V), could you give its dimensions:
From the point where the handle stops to the end of the iron rod From min to the end of the iron rod
Now everyone will run
measure the probes.
kandys:
New to order 850 RUR. #
If it’s expensive, take it from a disassembly site and you can try it on. I would not recommend installing from another car (even one similar in size).
Here https://ffclub.ru/topic/125245/ we measured it, I found this link using the part number of the probe. And there about another engine. Taking it from disassembly is also not certain that it will be original. On the forum, I hope they won’t tell you the dimensions from another car