The VAZ-2101 belongs to the family of “classic” models produced by the Volzhsky Automobile Plant since 1970. The operation of the cooling system used in the “classic” is based on general principles, but each model has its own characteristics that should be taken into account when operating and maintaining the vehicle. The VAZ-2101 was the firstborn of the family, so most of the technologies implemented here served as the foundation for their further development in subsequent generations of cars produced by the leader of the Soviet and Russian automotive industry. All this fully applies to the cooling system and its key component - the radiator. What do VAZ-2101 owners need to take into account if they want this system on their car to work reliably and uninterruptedly for a long time?
Necessary diagnostic measures
It probably won’t be difficult for the driver to determine that the heating system has failed. The following signs will indicate the need to replace the heater radiator on a VAZ 2114:
- There is a significant temperature difference between the pipes for heat supply and removal.
- The heating system works with obvious interruptions. Heat simply does not flow into the cabin.
- You can observe a leak from the heating circuit. Antifreeze will leak from the radiator.
Repairs should not be put on the back burner, especially if the onset of persistent cold weather is just around the corner. If the heat generator is faulty, the heater radiator on the VAZ 2114 needs to be replaced.
This is interesting: Repairing car thresholds with your own hands
How to choose the best heater radiator for VAZ-2107
To optimize the operation of the stove, VAZ-2107 owners quite often replace the standard radiator with a heat exchanger from another domestic model or a foreign car.
Radiators of other VAZ models
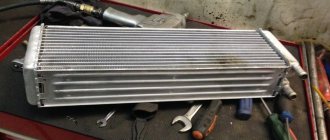
An alternative to the factory radiator of the VAZ-2107 stove can be a similar product from the “five”. In general, for the “classics” there are two types of stove radiators - VAZ-2101 and VAZ-2105. Of course, the seventh model is suitable for a “five” heat exchanger. The standard size of a standard radiator from a “kopek” is 185x215x62 mm, from a “five” - 195x215x50 mm, i.e. the product from a VAZ-2101 will not fit into the plastic casing of a “seven” due to its thickness.
Video: which stove radiator is suitable for the “seven”
If the car owner decides to replace the entire stove, then the most acceptable option is a heater from a VAZ-2108.
From a foreign car
Instead of the “native” heater radiator on the VAZ-2107, you can install a “foreign” one, if it fits in size. Practice has shown that a copper heat exchanger from Mitsubishi turned out to be quite suitable for installation in the “seven”.
I had several classic VAZs, and different radiators in the stoves and in the cooling system. Based on operating experience, I can say one thing: the heat transfer is almost the same due to the metal tanks and an additional row of cassettes; it is almost not inferior in heat transfer to an aluminum radiator. But aluminum weighs less and is practically not subject to thermal expansion. Yes, its heat dissipation is better; when you open the heater tap, brass produces heat in almost a minute, and aluminum in a couple of seconds. The only negative is the strength, but in our country everyone is trying not to attract masters, but to do something themselves with crooked hands using a crowbar and a sledgehammer. And aluminum is a delicate metal, you need to be gentle with it, and then everything will be fine. And many say that the pressure in the cooling system is vomiting them. So, if you monitor the valves of the expansion caps and the cooling radiator, then there will be no excess pressure.
Madzh
Refinement using a new snail
To radically change the airflow of the stove and make it quieter, you can install a snail from the VAZ-2108 on the VAZ-2101.
What to buy
To do this you will need:
- New airflow mode switch.
- Resistance from a VAZ-2108 car.
- Snail from VAZ-2108.
- Wires, bolts, nuts, aluminum or any other corners.
- Thick plexiglass for the box.
- Industrial hair dryer to bend plexiglass.
Work step by step
As a result, we will get an improvement in all heating indicators - the cabin will be warm, and the most pleasant thing is that the noise will be significantly reduced.
- We make a housing for attaching the “snail” from plexiglass. That is, we cut it, bend it with a hair dryer, getting the desired shape. To reduce the size of the case, you can cut off the snail plugs.
- The side walls can be made of duralumin (1.5 mm thick). If cracks or crevices appear in the joints during work, they should be sealed with silicone sealant.
- We make collapsible air channels through which the flow will go to the air duct openings.
- Turns must be made smoothly to reduce air resistance in the flow and direct the air straight.
- If you want to bring airflow to your feet, make slots with flaps in the right places. If desired, you can install a variable resistor for adjusting the speed of the cochlea instead of the backlight brightness resistor.
If you do everything correctly, you will get a stove that operates almost silently, especially at low speeds. Despite the large number of bends in the design, the air flows will be sufficient to quickly heat the interior, and the second and third speeds can be turned on only in emergency cases - when you need to heat the interior very quickly.
Improvement by replacing the fan
Since the radiator in a VAZ gives off a sufficient amount of heat, poor interior heating is associated with deficiencies in the fan. Simply put, there is not enough air to heat the entire interior of the car.
To solve this problem, it is worth replacing your fan, which is too small and not productive, with a better fan - from a VAZ-2108 or VAZ-2109, which have a higher rotation speed.
Refinement of the VAZ-2101 stove is carried out in several steps.
Step-by-step instruction
- In the cabin, we remove the shell of the lower part of the heating, where the fan is located.
- We remove, in fact, the fan, which we will no longer need.
- If you install a part from a figure eight, you need to cut the ridge that supplies air to the floor of the car.
- We remove the fan with two blades, since a fan with five blades will work instead.
- Don’t forget to check the new fan before installation - connect it and see if the blades move and there is air flow.
- We fix the new device instead of the old one and securely fasten the entire structure.
- Along with the fan, it is worth reinstalling the resistor, buttons and regulators - we also take them from the figure eight. This must be done, since due to the difference in currents the elements will quickly become unusable.
Tuning the VAZ-2101 stove, based on replacing the fan and other elements, although it will not make the stove work quieter, will allow it to heat the interior faster and better.
For what reasons does a malfunction occur?
It must be said that there can be quite a lot of reasons for this, but the most common of them are the following circumstances:
- There is a blockage in the radiator duct. During long-term use, this is a completely natural phenomenon in which the pipes simply become clogged with dirt.
- Factors contributing to natural wear and tear of the radiator. These include the following points:
- dynamics of temperature changes;
- the influence of atmospheric factors that lead to corrosion;
- internal pressure.
- Air ducts are not sealed.
- Heater motor malfunction.
- Resistor fault.
Naturally, metal wears out over time. A hole may simply form through which antifreeze will escape. All this dictates the need to take measures to replace the radiator heater on a VAZ 2114.
On average, a new stove radiator will serve its owner well for 5-8 years.
What to do if the radiator is leaking?
You sit behind the wheel, and you have to chatter your teeth, trying to turn on the heating harder. But it was not there! The cold is the same, and even a puddle from the radiator has formed under my feet. This situation is familiar to every tenth car owner, and all because the sled, according to the saying, had to be prepared in the summer.
Fortunately, this problem can be fixed fairly quickly. Let's start with what could be the reason for antifreeze leaking from the stove? It is hidden either in a rusted heater, in a stove tap or in a metal pipe. The damage can only be determined by inspection.
If the problem was rooted in the tap or pipe, then the situation is quite simple. You don't even have to disassemble the bar panel and radiator casing. However, if the fluid leak is due to a faulty radiator, you will have to solve the problem in one of two ways.
If your car was equipped with an old-style stove (copper radiator), then it should be cleaned, washed, soldered and tinned. Usually it is not so easy to cope with this task yourself, and therefore it is recommended to look for a car specialist specifically “for radiators”.
If the radiator turns out to be made of aluminum, then it is unlikely to be repairable. Experts advise not to patch or repair anything, but to immediately run to buy a new heater.
Heater design features
It must be said that the eighth and ninth family of VAZ cars have an identical heating system. In each case, the heat source is the main element of the car, which is represented by the engine. But the generated heat still needs to be conveyed, as they say, to the consumer. In this case, the coolant is antifreeze, which is supplied to the cooling system. It warms up the stove radiator. He himself is in a closed casing. It is blown by a stream of air, which is pumped by the heater turbine.
There is an air duct for warm air to enter the cabin. If the heater radiator is cold, then we can definitely say that it is “sick.” This unpleasant situation can occur in all VAZ cars without exception. If the clogged radiator of stove 2114 is made of copper, then it will still last for some time. The case with an aluminum radiator requires immediate replacement.
This is interesting: We reduce diesel fuel consumption on our own
Replacing the heater radiator on a VAZ-2101, VAZ-2102, VAZ-2106, VAZ-2107 car
Motorists often remember about the heater radiator only when the autumn-winter period begins. No, there are times when they remember him earlier. For example, the unexpected appearance of antifreeze or water (depending on what is poured into the cooling system) under the feet of the driver or front passenger. The reason for this phenomenon is a leak in the car's heating system. But, most often, the driver learns about the malfunction of the heater radiator only when cold weather sets in. When you want warmth and comfort in the car interior. You pull the heater switch knob towards “heat”, turn on the fan and suddenly, instead of a warm flow of air from the air ducts, you get a flow of cool air or another option – the formation of a puddle of antifreeze in the car’s interior. And as a result, a spoiled mood and a cool, uncomfortable environment in the car.
But, everything can be fixed (for any car) and quite in a short period of time (this is said about the VAZ-2101 and VAZ-2102 ). In principle, replacing the heater radiator and other troubleshooting of the heating system on other Zhiguli - VAZ-2105, VAZ-2106, VAZ-2107 - is not much different, a little more fiddling with the radio panel (bar), but this article will describe the process repair of the heating system and replacement of the heater radiator on the VAZ-2101, VAZ-2102.
Causes of heating system malfunction:
- The cause of an antifreeze leak in the car interior may be a rusted heater radiator or a metal pipe or heater tap . The exact cause can be determined by visual inspection. If the whole “trouble” lies, for example, in the stove tap or pipe, then they can be replaced without disassembling the radiator casing and the “Bar” panels. If the culprit of the coolant leak is the radiator itself, then there are two options for solving the problem. First, if you have a copper radiator (an old model), it can be repaired - cleaned, soldered, tinned, etc. The main thing is to find a specialist - a radiator technician. The second option is that you have an aluminum heater radiator . Everything is simpler here, it is better to replace it with a new one, it cannot be repaired.
- When the heater is turned on, cold air continues to blow from the air ducts. The reason is a violation of the circulation of coolant in the car system, due to the fault of a non-working heater tap (it is constantly closed) or the radiator itself is “clogged”. If the faucet is jammed, it should be replaced, but point “1” of this article will help us choose the right solution for the radiator (see above).
The reasons have been sorted out. Now about the main thing - how to change the heater radiator on a VAZ-2101, VAZ-2102, VAZ-2105, VAZ-2106, VAZ-2107?
The tool required for this is a pair of screwdrivers (Phillips and regular), socket and open-end wrenches for “7”, “8”, “10”. You also need to buy rubber gaskets (three pieces), a liter of coolant, and silicone sealant.
Next, point by point, is the process of replacing the heater radiator on a VAZ-2101, VAZ-2102, VAZ-2105, VAZ-2106, VAZ-2107 .
- If you wish, you can drain the coolant from the engine block, but you don’t have to drain it, the losses will be insignificant. Moreover, you have 1 liter of coolant in stock.
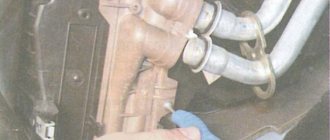
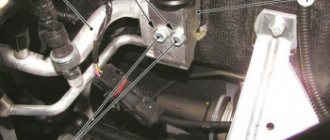
- From the engine compartment, unscrew the two clamps on the radiator pipes and tighten the hoses (photo 1).
- Unscrew the fasteners of the rubber seal and remove it (photo 2 and photo 3).
- Inside the car, remove the radio panel photo 4 (in my case it is screwed on with two self-tapping screws).
- Using a key “7” or a screwdriver, unscrew the fasteners of the heater tap drive cable (photo 5) and disconnect the cable from the tap.
- We find four spring clips on the fan casing (photo 6) and remove them using a screwdriver.
- We lower the casing down and move it to the left. To remove the casing completely or move it further you will not be given the power wires for the electric motor.
- Pull the heater radiator out of the casing (photo 7).
Next, we carefully inspect the radiator, metal pipes and heater tap. Metal tubes must be free of obvious signs of severe corrosion and leakage (in my case I had to replace the tube, the reason is clearly visible in photo 8). The stove tap should be replaced if the tap handle is jammed (does not open or close) or signs of coolant leakage are visible. If you had to change the heater radiator itself, then the tap and tube from the old radiator should be twisted to the new radiator. Don't forget to install new gaskets (photo 9). Having lubricated the gaskets with silicone sealant, tightly (without fanaticism, otherwise you can crush the gasket or break the thread) screw the outlet pipe and tap to the radiator (photo 10). We also lubricate the radiator tubes with silicone sealant when connecting the rubber coolant supply hoses to them.
How to change the stove in a VAZ 2107
Having found out that the heater needs repair, it will require complete or partial dismantling. If there is a problem with the motor, then it is enough to remove the lower part of the assembly. If there is a problem with the radiator, you must first drain the coolant from the engine cooling system. To carry out repair work you will need the following tools:
- Phillips and flathead screwdrivers;
- set of open-end and socket wrenches.
To replace the stove you will need a set of keys and screwdrivers
Heater removal
After the coolant has drained and the necessary tools have been prepared, you can begin disassembly. It is carried out in the following order:
- Remove the negative terminal from the battery.
- In the engine compartment, loosen the two clamps that secure the hoses to the heater pipes. When the hoses are pulled together, a small amount of antifreeze will leak out.
Unscrew the clamps and pull the hoses off the radiator tubes - Unscrew the screws and remove the rubber seal.
Unscrew the screws and remove the rubber seal - We move into the cabin, unscrew the fastening of the shelf under the glove compartment and remove it.
To remove the shelf located under the glove compartment, unscrew the fasteners in the form of screws - Remove the panel with the clock and cigarette lighter by unscrewing the screws on the right, left and bottom.
To remove the panel with the clock and cigarette lighter, you will need to unscrew the corresponding screws - Disconnect the wires from the cigarette lighter and the clock, and then move the panel to the side.
Disconnect the wires from the cigarette lighter and clock - We dismantle the internal cavity of the glove compartment in order to move the right air duct aside and provide access to the heater valve. The left air duct is also dismantled (when the stove is completely removed).
It is necessary to disconnect the right and left air ducts from the heater - Using a 7 key, unscrew the bolt that secures the crane control cable.
Using a 7 key, unscrew the cable fastener - To partially disassemble the stove, you will need to dismantle the lower part of the housing. To do this, use a screwdriver to pry up the metal latches (2 on the right and 2 on the left).
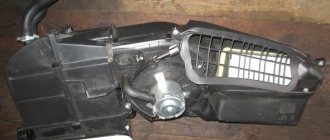
To remove the lower part of the heater you will need to pry off 4 latches with a screwdriver - After removing the latches, pull the lower part towards you and gain access to the motor. If repair or replacement work is required for this unit, we will carry it out.
After dismantling the lower part, access to the heater fan opens - To dismantle the radiator, we take it out of the housing along with the tap.
To remove the radiator, simply pull it towards you. - To completely dismantle the stove, remove the upper part of the body, which is secured with four 10mm wrench bolts.
To completely remove the stove, you need to unscrew 4 10mm wrench bolts. - We unscrew the 2 bolts securing the heater control bracket and loosen the screws that hold the rod mounting brackets.
- We remove the remaining part of the stove.
When the fasteners are unscrewed, remove the upper part of the stove body
Video: replacing the heater radiator on a VAZ 2107
In most cases, complete removal of the heater is not necessary. As a rule, the radiator, faucet or motor are replaced.
If you are only replacing the radiator, it would be a good idea to inspect the electric motor and lubricate it.
Installing a new stove
Assembling the heater does not cause any difficulties, since all actions are performed in the reverse order of disassembly. However, there are some points to consider. When replacing a radiator, new rubber seals must be installed. They are pre-coated with silicone sealant. The nuts should be tightened without exerting much effort, so as not to squeeze out the seals, thereby breaking the tightness.
When installing a new radiator, it is recommended to replace the rubber seals
When the heat exchanger is installed in place and the stove is completely assembled, the edges of the inlet and outlet tubes are lubricated with sealant. If the pipes are in normal condition, that is, the rubber is not cracked, leave them after wiping the internal cavity with a clean rag. Then put on the hoses and tighten the clamps. After assembly, all that remains is to fill in the coolant and check the tightness of the connections.
While operating the vehicle after repair, you should also monitor the connections for leaks.
If problems arise with the “seven” stove, you can fix them yourself, which is due to the simplicity of the unit’s design. To remove and replace the heater, you will need to prepare a tool kit and follow step-by-step instructions.
Preparation
If the stove needs repair, then before replacing its radiator you should prepare everything necessary.
- sets of wrenches, both open-end and socket;
- hacksaw blade;
- coolant collection tank (it must be completely drained);
- silicone based sealant;
- wiping ends or rags.
At the same time, it is advisable to replace the pipes leading to the heater. Over time, they crack and also begin to leak antifreeze.
Next, care should be taken to empty the cooling circuit. Without this procedure, it is impossible to dismantle the main element of the stove. The standard method is used here. The coolant is first drained from the main radiator, and then from the cylinder block. It makes sense to reuse the fluid only if more than a quarter has passed since its last replacement.
After this, the air filter and the pipe leading to it, as well as the battery, are dismantled in the engine compartment. Only then will you be able to gain access to the hoses leading to the stove. Loosen the clamps holding them in place, place the container and remove - there is usually about a liter of antifreeze left in the pipes.
Near the hoses, in the wall between the passenger compartment and the engine compartment, there is another nut - it secures the retaining plate located in the cabin. Unscrew it - otherwise it will interfere with removing the radiator. Move into the cabin, here you need to remove the accelerator pedal (three bolts hold it in place), and before that the cable drive is removed from it.
When all the described work is completed, the decorative panel located on the right side of the center console is dismantled. On the 1st Kalina you will have to raise the brake pedal as much as possible. To do this, you need to completely unscrew its rod.
Causes of car radiator failure and repair
The most common cause of radiator failure is a broken heater valve. Either it doesn't turn, or the radiator is clogged. We think you can replace the faucet without any prompting from us. Now let’s talk about how to install a new radiator.
Gather the tools: Phillips and regular screwdrivers, open-end and socket wrenches "7", "8" and "10", silicone sealant, coolant and rubber gaskets.
1. Drain the coolant from the engine block, although this is not necessary.
2. Unscrew the rubber seal.
3. Remove the radio receiver (panel) in the passenger compartment, which is usually secured with two self-tapping screws.
4. Using a screwdriver or wrench, unscrew the drive cable fasteners and disconnect the radiator valve from the cable.
5. Find the 4 spring clips on the fan casing and remove them using a screwdriver. Having lowered the casing down, tilt it to the left, but not too much, as the motor power wires will interfere with you.
6. Remove the radiator from the casing.
7. Inspect its metal tubes and tap. The metal should not have too obvious signs of corrosion. There should also be no leaks.
8. It is advisable to replace the faucet, and also do not forget to change the rubber gaskets, even if outwardly they do not seem worn out: why do the same work after a while?
9. Lubricate the gaskets with silicone sealant, and then screw the outlet pipe and tap to the radiator. It is advisable to lubricate the radiator tubes with sealant before the rubber hoses supplying coolant are connected to them.
10. Reassemble in reverse order. When everything is done, fill the radiator with antifreeze, start the engine and check the tightness of the connections of the pipes and hoses.
Pay attention to all the plastic parts of the heating system, or more precisely, to the plastic tanks that are located on the sides of the heater “core”. Over time, the tanks crack, and although these cracks are almost invisible, liquid will still constantly leak onto the floor from the tank. If you turn a blind eye to constant puddles, then all this may end in car engine failure. This problem affects most cars, even the most modern ones. There is, of course, the option of installing metal tanks, but, firstly, they cost the same as the entire radiator, and, secondly, metal tanks, according to manufacturers, cannot be repaired.
Home →
With your own hands →
Removing and replacing the heater radiator on VAZ 2101, 2102, 2103, 2104, 2105, 2106, 2107
Hello, from this article you can learn how to replace the heater radiator on a VAZ 2101, 2102, 2103, 2104, 2105, 2106, 2107. In fact, leaking heater radiator is a fairly common problem in old Russian cars, especially if it happens in cold weather. time of year, the problem becomes even worse, it’s cold in the cabin, the windows sweat. The first signs of failure of the heater radiator are the smell of antifreeze in the cabin and the damp carpet at the passenger's feet, since that is where the heater radiator is located. Another situation is also possible: the heater radiator may not leak, but produce little heat, this is due to the fact that over time it becomes heavily clogged with various dirt and rust and its heat output decreases. We will consider replacing the heater radiator using the VAZ 2107 as an example; on other rear-wheel drive VAZ cars, this procedure is carried out in a similar way. Together with the heater radiator, you can change the heater valve at the same time, because you still have to remove it. To replace the heater radiator you will need: a 7 and 10 wrench, a flat screwdriver, antifreeze, a new heater radiator. First of all, place some rags under the heater radiator on the interior side so that the antifreeze does not drip onto the carpet. Next, take a screwdriver and loosen the clamps of the heater radiator hoses under the hood
After this, we remove the hoses from the radiator pipes; you can place a bottle under the hoses to collect the draining antifreeze.
Next, take a key or socket 7 and unscrew the 2 bolts that secure the seal to the shield and remove it
Then we disconnect the drive rod from the heater valve and remove the heater fan casing. The next step is to remove the heater radiator pipes from the holes in the engine shield and remove it
Now, using a 10mm wrench, unscrew the bolts securing the outlet pipe and remove it from the radiator
Installing the heater radiator on a VAZ 2107 is done in the reverse order. After installing a new radiator, add antifreeze to the max level in the expansion tank. Now you need to expel the air from the cooling system, to do this, warm up the engine to operating temperature and accelerate, if this does not help, then you will need to stand on some hill, the steeper the better, with the front up and also accelerate.
Simple rules that, if followed, will extend the life of the heater radiator
In order for the radiator to last a long time, you need to follow a number of rules:
- When purchasing, you should not save money and buy a low-quality unit. You should pay attention to the material of manufacture and the manufacturer.
- Only high-quality liquids should be poured into the system. Do not pour water and mix antifreeze with antifreeze. No lubricant or fuel should enter the system.
- When idle during the warm season, when the heater is not in use, you need to open the heater tap at least twice a month so that liquid enters the radiator. Thus, the unit will not dry out and the heater tap will not stick.
If you carefully operate the heating system and fill it with high-quality antifreeze or antifreeze, then its components will last for many years.
More serious damage
A car is an expensive pleasure and any breakdown costs a pretty penny.
Among the “expensive” breakdowns of the cooling system are the following:
- Radiator clogged.
- Destruction of the head gasket.
Moreover, the second reason turns out to be more significant, much worse when liquid is thrown out of the tank. Although a clogged radiator is difficult to clean properly. But if you arm yourself with the experience of US police officers, you will find a way out.
Pour black carbonated water into it (we won’t advertise), let it sit for a while. And that's it, the insides are perfectly clean. Or you can simply replace the radiator. It’s much worse if you start to notice that the liquid is bubbling in the expansion tank.
This is a clear sign that there is a breakdown somewhere in the gasket. It needs to be changed immediately to prevent this breakdown from progressing. Otherwise, repairs can cost a pretty penny.
But why does the liquid bubble? Look carefully at the operation of the engine in this mode. Antifreeze seeps into the cylinder through the crack. And it can get into both the lubrication system and the combustion chambers. Symptoms:
- Presence of white smoke from the exhaust pipe.
- Traces of antifreeze in the oil, an increase in the level.
That's the whole problem, it's outrageously simple. The antifreeze is seething, boiling, the temperature is constantly rising. And this causes a lot of problems. The liquid boils due to the formation of air pockets. But it bubbles because air under high pressure enters the cooling system from the combustion chamber. There is only one way out - replace the gasket. And if liquid is thrown into the tank under strong pressure, you immediately need to blame the cylinder head gasket.
Coolant replacement
A certain amount of water in antifreeze can cause corrosion of the radiator from the inside. In this regard, it is necessary to periodically flush the radiator so that its permeability does not decrease and the heat transfer properties do not deteriorate. To flush and clean the radiator, various chemicals are used, which are poured into the tubes and remove scale and rust from the walls. In addition, it is necessary to completely replace the coolant after a certain mileage (usually less than every 40 thousand km).
If the thermostat is empty, the car will heat up. Then you need to turn off the small circle, otherwise the entire coolant goes through it, bypassing the radiator. The most productive way is to drain all the old fluid, remove both the main radiator and the stove radiator and take it home, rinse it in the bathroom both inside and out. It is advisable to pour something like fairy stuff inside. There will be a lot of dirt, I did this myself before winter. Then you put it all in place, fill it with water and flush the cooling systems, run it for 10 minutes, then drain it, fill it with water, run it again and then fill it with clean antifreeze.
To avoid getting burned during operation, the coolant should be changed on a cold or warm engine. Replacing antifreeze (or other coolant) is performed in the following sequence:
- The control lever for supplying warm air to the cabin is moved to the extreme right position. In this case, the heater valve will be open.
The control lever for supplying warm air to the cabin must be moved to the extreme right position
- The radiator cap is unscrewed and removed.
It is necessary to unscrew and remove the radiator cap
- The expansion tank plug is removed.
The expansion tank plug must be unscrewed and removed
- At the bottom of the radiator, the drain plug is unscrewed and the antifreeze is poured into a previously prepared container.
When unscrewing the radiator drain plug, you must remember to place a container for taking antifreeze.
- In place of the plug there may be a fan switch sensor, which must be unscrewed with a 30 mm wrench.
In the latest VAZ 2101 models, in place of the plug there is a fan switch sensor
- Using a 13 key, unscrew the drain plug of the cylinder block and all the waste fluid is drained into a substitute bottle.
The drain plug of the cylinder block can be unscrewed with a 13mm wrench
After the old antifreeze is removed from the system, it is necessary to replace the drain plugs of the radiator and cylinder block. New coolant is poured into the radiator and then into the expansion tank 3 mm above the min mark. To eliminate air pockets, the hose is removed from the intake manifold fitting. As soon as liquid begins to flow out of it, it is installed in place and tightly clamped with a clamp.
To remove air pockets, remove the hose from the intake manifold fitting
At this point, the procedure for replacing antifreeze can be considered complete.
Video: DIY coolant replacement
Replacing a VAZ heater radiator
The stove and the car are one thing for me, since in winter only a well-functioning stove provides comfort in the car.
But since nothing lasts forever, and the stove radiator can leak or become clogged, and you inevitably have to change the stove radiator, the question arises of going to a workshop where they will take money for the work. Or change it yourself, and thereby save money. If you decide to change the stove radiator yourself, then this article is for you. I will explain and show you how to replace the heater radiator on a VAZ 2109 yourself, although this method can be used to change the heater radiator on any VAZ car from 2108 and higher, the principle is the same.
But first you need to choose which stove radiator to buy, since in Russia we have a lot of fakes, and you can run into a low-quality stove radiator. I advise you to buy a stove radiator, the first sign of a quality radiator is the packaging and warranty card, while a fake is usually sold in a plastic bag. Typically, a Kraft stove radiator costs around 500 rubles, but the price may be higher or lower, depending on the region, and what markup the store will add.
The heater radiator had to be replaced due to the fact that the radiator did not leak when the engine was hot, but as soon as the car cooled down, antifreeze leaked onto the car mats in the morning. But the radiator is not always immediately to blame; it happens that the clamps on the radiator hose do not hold well, so before you decide to change the radiator, check to see if antifreeze is leaking from under the hose.
Photo. Radiator for the "Kraft" stove with packaging.
Before you start replacing the heater radiator, you need to drain the antifreeze from the engine block, but you do not need to drain the antifreeze from the main cooling radiator.
Photo. The arrow shows the bolt that must be unscrewed to drain the antifreeze; on the injector this bolt is located under the ignition module.
There are two ways to remove the heater radiator. The first method is to completely remove the panel and then change the heater radiator, but this takes a long time and a lot of troubles.
Photo. The arrow shows the heater radiator hose clamps.
But I like the second method of replacing a stove radiator, although it is not very convenient, but it is fast.
Photo. The arrows show where the panel bolts need to be unscrewed to remove the heater radiator.
But I like the second method of replacing a stove radiator, although it is not very convenient, but it is fast. But it also depends on what panel is on the car, if the panel is high, then it is easier to change the heater radiator, but if it is low, then you will have to unscrew two bolts on the left side of the panel, and an assistant must pull it back, then you can get to the heater radiator and pull it out and also insert it .
Photo. It shows how to pull back the panel to remove the heater radiator.
We unscrewed the panel, laid it down as shown in the photo, an assistant pulls the panel, unscrew the clamps and the three bolts that hold the heater radiator, and pull out the radiator.
Photo. It is shown in what position it is necessary to change the heater radiator if the panel is not removed.
Now everything is the other way around, insert a new heater radiator, and tighten the bolts that hold the heater radiator, but in this position it is very difficult to tighten the outermost bolt of the heater radiator, you don’t have to tighten it, the radiator holds perfectly well with two bolts.
That's it, we replaced the heater radiator ourselves and saved money on a technician.
Replacing the radiator of the VAZ 21099 stove. Video.
Replacing a heater radiator with a high panel
With a high panel everything is much simpler, you don’t need to unscrew it and pull it back, the radiator comes out with a little difficulty and is also inserted.
The stove doesn't heat well
If the stove does not heat well, and this can be due to several reasons.
This mainly happens due to the fact that the heater radiator itself is clogged, the method for flushing the radiator is as follows, the first method is to disconnect the heater hoses in the engine compartment and connect one of the hoses to the hose from the water supply, open the water as loudly as possible and let it flow through the heater radiator for a minute , then change the direction of water flow, connecting it to the other end of the radiator stove, and also let the water flow for about a minute.
The second method, swap the hoses connecting to the heater radiator so that the coolant begins to circulate in a different direction, also helps a lot, and the heater begins to heat well.
Heater radiator repair
You can also repair the stove radiator yourself if it is leaking from the edge under the plastic or at the joint of the tube; this method is suitable for aluminum radiators, but brass radiators need to be soldered.
Press the bends of the radiator and remove the plastic cover, carefully remove all stuck rubber from the radiator, dry and clean the place where the rubber was removed.
Take American sealant and fill the place where the rubber was, dry for half an hour, apply sealant again, put the lid in its place and tighten the clamps. If you do everything correctly, the stove will not leak.
What does the stove consist of?
Before you start improving the stove, you need to understand what elements it consists of. Any VAZ stove consists of:
- radiator;
- air flow distributor;
- three-blade or 5-blade fan and its shell.
If the theater begins with a hanger, then the stove begins with an air intake duct. It is located at the rear of the engine block. It is here that the air coming from the street is purified from moisture. The box is protected from a hot engine by special gaskets - they act as a partition.
After the air is cleared of moisture, it enters the heating system. The steam then comes out. There is a device above the dashboard that allows some of the air to escape when driving.
The heating housing is located in the interior of the car: it is fixed to the partition with the engine.
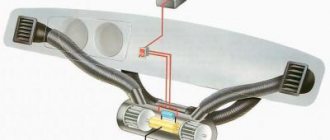
The heater radiator has inlet and outlet channels. These channels are connected to each other by tubes. The first tube has a built-in heating valve that regulates the supply of cooling liquid. Using a lever located on the dashboard, the flow of fluid into the machine's ventilation system is reduced or increased.
At the bottom of the radiator there is a heating system fan with a small motor that allows you to adjust the fan speed (there are two speeds in total).
The exhaust device allows the incoming air to be distributed throughout the cabin.
In order for the improvement of the VAZ-2101 stove to be justified, it is necessary to understand why the stove is not working well. If you are satisfied with your car, the stove is working properly, but you want to improve its performance, then it’s time to do tuning.
Refinement by sealing joints
The first method is the simplest, but it will not bring big changes to the interior temperature. It consists of sealing the air outlets, so that air will flow better into the cabin.
This will allow you to optimally adjust the air flow, and the windows will be cleared of steam and icing faster. Sealing all existing connections helps to avoid unnecessary air loss, but this does not make the car any warmer.
If this modification is not enough for you, then it’s time to take the bull by the horns and tune the entire stove. It may sound scary, but in fact, modernization is not as difficult as it might initially seem.
Replacing the heater motor
The following sequential steps must be performed:
- The electrical network is completely de-energized.
- The positive wire should be disconnected from the motor. It is located under the dashboard.
- It is necessary to unscrew two bolts located in the engine compartment. They serve to hold the stove casing.
- Then you need to disconnect the mass.
- Unscrew and remove two bolts that serve to secure the fan to the heater housing.
- The air duct grille is being dismantled. To do this, the element is rotated 90 degrees and removed from the casing.
- The device should be assembled using the reverse sequence. The power supply contacts must be securely fixed. Otherwise, the assembly will have to be disassembled a second time.
The stove blows slightly warm air
Every owner of a VAZ classic has probably encountered this phenomenon, because all big problems begin with small ones.
However, even with diagnostics, things are not so simple here, because there can be many reasons why warm or cold air is blowing from the VAZ 2101-2104 stove.
For example, due to the fact that the heater fan motor rotates much slower than the nominal operating mode. This malfunction is a consequence of oxidation/contamination of the collector. Cleaning the commutator brushes or completely replacing the electric motor are possible repair options.
Bearing jamming usually leads to the same results - it is diagnosed by the appearance of creaks from the side of the stove, which intensify over time, up to the jamming of the armature shaft.
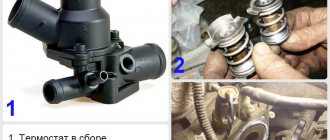
The second common reason why the VAZ-2101 stove heats poorly is insufficient warming up of the engine. If the temperature gauge needle does not rise to the required 90 degrees, it can be assumed that the thermostat is jammed, and in a position where coolant is constantly circulating through a large circuit. In this case, you will need to replace the thermostat, which can be done independently on a penny:
- you need to work with a cooled power unit installed on a level surface;
- unscrew the plugs of the main radiator and expansion tank;
- pour the antifreeze into a previously prepared container of suitable volume (about 3 liters);
- tighten the drain plug;
- Using a flat-tip screwdriver, loosen the clamps of the pipes connected to the thermostat;
- dismantle the thermostat;
- We replace it with a known working one;
- We carry out all other work in reverse order.
After the coolant is added to the norm, we start the engine and monitor how the thermostat behaves by feeling its pipes - the lower one should remain cold until the engine warms up to 85-90 degrees.
Another common reason why the VAZ-2101 stove does not heat is contamination of the stove radiator. As a result, the heat transfer of the device is sharply reduced (which is facilitated by both the deterioration of antifreeze circulation and the decrease in heat transfer due to the adhesion of scale and other contaminants on the external and internal walls of the tubes).
How do you know if a clogged radiator is to blame for the lack of heat? It’s very simple: with the engine warm, check the inlet and outlet hoses by touch. If the first one is hot, and the second one is much colder, it is obvious that heat loss occurs precisely in the stove radiator.
It can be revised, but it is better to replace it with a new one - the decision is made after its dismantling based on the results of the inspection.
Here is the algorithm for dismantling the “kopek” stove:
- the user instructions recommend draining the antifreeze, but in this case, due to the loss of a small volume of liquid, this may not be done (no more than a liter of antifreeze will spill out);
- From the engine compartment side, loosen the clamps on the radiator flanges and pull off the pipes. You need to work carefully - the hoses usually stick, and it will take a lot of effort to remove them;
- unscrew the cover of the rubber seal and dismantle it;
- go to the interior, unscrew the screws holding the car radio panel (if any);
- loosen the fasteners for the heater faucet drive, disconnect the cable;
- unscrew the brackets securing the fan casing;
- we move the casing down and to the left - it will not be possible to completely dismantle it due to the electrical wiring;
- remove the stove radiator from the casing.
Now you can begin a thorough inspection of the radiator, as well as the stove faucet. If the tubes have traces of through or almost through corrosion, further inspection can be stopped - it will not be possible to repair such a radiator.
If the condition of the radiator is more or less tolerable, you can try to clean it using store-bought or “folk” remedies.
We also check whether the faucet handle is stuck - this usually happens if the stove has not been used for a long time (it has not been turned on throughout the warm season). We replace the faucet if traces of leakage are also found on its surface.
When installing a new or restored radiator, do not forget to install new gaskets, which can be pre-lubricated with silicone - this will prevent possible leaks. We perform the same operation in relation to the rubber pipes connected to the radiator. Add the required amount of antifreeze and check the operation of the stove, as well as the tightness of all connections.
Work order
Before starting work, you need to fully read the instructions on how to repair the device. A complete understanding of the process will allow you to act more confidently. The technician must first understand how to remove the fan. First you need to prepare the car for work: remove the gear shift lever, remove the radio and all the blocks with wires. Now you can start working:
- To gain access to the device, carefully remove several parts. First you need to remove the shelf on the passenger side, it is secured with 4 bolts.
Now you need to remove the panel with the cigarette lighter, it is removed with a screwdriver, you need to pry the corners one by one until it clicks.
Then you need to dismantle the console with the buttons; it can be easily lifted with a screwdriver and moved upward. This makes the two fasteners located underneath accessible; they need to be removed. Now the part is completely free, it can be removed and put aside.
- Also, access to the motor cooler is blocked by air ducts; to dismantle them, you need to pry off the plastic latches with a screwdriver. But you need to understand that the fasteners are made of fragile plastic and must be bent carefully. Access to the bottom of the heater is now open. There are four latches on the stove - two on each side. You can bend them with your fingers or a screwdriver, but be careful - the latches spring strongly and fly off far away.
- Now access to the required unit is open, and you can begin to remove the VAZ 2107 heater fan. The electric motor and cooler are secured with two steel latches, one on top, the other on bottom.
You can bend them with a screwdriver with a thin and long tip. The dismantled unit is removed and a new device is installed in its place. - Now you can perform assembly in the reverse order of disassembly.
You can also see the procedure for replacing the stove fan on a VAZ 2107 in this video:
We adjust the damper of the VAZ 2114 stove
All work is performed in the following sequence:
- It is necessary to remove the bracket holding the cable sheath to the housing.
- On the left is a yellow galvanized lever. It should be taken over. This position indicates his maximum openness.
- To adjust the length, the cable should be pulled. The correct arrangement is when the long lever, when moved to the right position, is on the lever block. In this position, the device is considered to be maximally open.
- When the adjustment is completed, the cable is securely fixed.