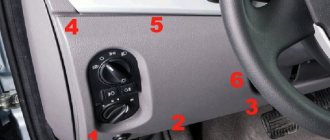
Polo sedan doors, Removal and installation, Door upholstery, Replacement of limiter
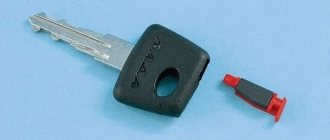
You will need: TORX wrench TZ0, flat-blade screwdriver.
1. Disconnect the wire from the negative terminal of the battery.
2. Pry it out with a screwdriver.
3. . and remove the decorative trim of the armrest.
4. Squeeze the latch.
5. . and disconnect the wiring harness connector from the outside rear view mirror control unit.
6. Squeeze the latch.
7. . Disconnect the wiring harness connector from the central locking switch and remove the trim.
8. Remove the two central screws.
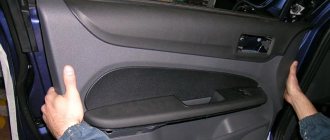
9. . and one screw for the lower door trim fastening.
10. Overcoming the resistance of the latches, move the upholstery away from the door.
11. Disconnect the cable end and sheath from the outer handle. 12. Squeeze the latch. 13. Disconnect the wiring harness connectors from the power trunk lid lock switch and from the power window control unit.
16. Remove the plug for the service window of the inner door panel.
17. Install the front door trim in the reverse order of removal.
Replacing the door stopper Polo Sedan
You will need: TORXT30 key, XZN “8” key.
1. Raise the glass to its highest position and remove the front door trim
2. Remove the screw securing the limiter to the body pillar.
3. . and two screws securing it to the front end of the door.
4. Remove the stopper through the hole in the inner door panel.
REPLACING THE FRONT DOOR LOCK SWITCH
Replacement of the left door lock switch is shown. The right door lock switch is replaced in the same way.
You will need: TORX T20 wrench, flat blade screwdriver.
1. Using a screwdriver, use a screwdriver to remove the decorative trim of the door lock switch,
Removing the door handle of the Polo Sedan
Replacement of the left door outside handle is shown. The right door handle is replaced in the same way. You will need a T20 TORX key. 1. Raise the glass to its highest position and remove the front door trim
2. Remove the door lock switch
3. Remove the outer handle by removing its front end from the bracket.
4. Remove the screw securing the outer handle bracket.
5. . and remove the bracket from the technological window.
6. Disconnect the door lock cable sheath and end from the outside handle bracket.
REPLACING THE FRONT DOOR LOCK
You will need an XZN "8" key. 1. Raise the glass to its highest position and remove the front door trim
2. Remove the door lock switch
3 Remove the outer handle
4. Remove the plug.
5. Remove the two screws securing the door lock.
6. . and remove the lock from the door cavity.
7. Disconnect the drive cable from the lock lever and remove the lock.
8. Install the front door lock in the reverse order of removal.
REPLACING THE FRONT DOOR GLASS
You will need a TORX TZO key.
1. Remove the front door trim
2. Remove the hole plug in the inner door panel and, having connected the power window control wiring harness block to the power window control unit, install the front door glass in a position in which the front screw securing the glass to the power window will be located opposite the opened hole.
3. Turn out the front one.
4. . and rear screws securing the glass to the window lifter slides.
5. Remove the glass from the door by lifting it up.
Pay attention to the glass markings. To replace, purchase glass with the same markings.
6. Install the front door glass and all removed parts in the reverse order of removal.
We disassemble doors to repair door elements
Removing the rear door trim
Unscrew the lock button by hand
Having turned the inner handle so that the screw securing it to the lever is accessible, use a Phillips screwdriver to unscrew the screw and remove the handle.
Using a screwdriver with a thin blade, pry up two decorative plugs and remove them from the holes in the armrest handle.
Using a Phillips screwdriver, unscrew the two screws securing the armrest handle
Remove the handle
Use a screwdriver to press out the window handle socket.
Pull out the latch and remove it.
Remove the handle and socket from the shaft.
Using a screwdriver, placing soft material under it, we press the lower edge of the upholstery away from the inner door panel, overcoming the resistance of the pistons.
It’s better to start from the bottom, gradually moving the screwdriver around the entire perimeter of the upholstery.
Removing the rear door trim
The location of ten pistons on the inside of the upholstery
Install the rear door trim in the reverse order.
Replacing rear door glass
Remove the rear door trim.
We lower the glass so that we can unscrew the screw securing the decorative glass trim.
Use a flat-head screwdriver to pry up the edge of the inner glass seal.
We lift the seal up, applying the necessary force, and remove the inner glass seal from the inner door panel.
Having bent the edge of the seal, use a Phillips screwdriver to unscrew the self-tapping screw securing the decorative glass trim.
Using a slotted screwdriver, press out the upper corner of the decorative trim and remove it.
Remove the lower part of the seal from the door.
We raise the glass.
Using a 8mm socket, unscrew the bolt securing the glass guide at the end of the door.
We take out the guide. Roll down the window
From the outside of the door, use a slotted screwdriver to pry up the decorative retainer of the glass seal.
To avoid damaging the paint, place a soft material under the screwdriver, for example, a piece of fabric folded several times.
Pull the retainer out of the outer seal and remove it.
We remove the outer glass seal by pulling it off the front decorative clamp and lifting it up.
Using a 8mm head, unscrew the two bolts securing the glass holder to the window lifter slider
We remove the glass from the door. Install the rear door glass in reverse order
Replacing the rear door window lift mechanism
Remove the rear door trim.
Putting the handle on the shaft, set the glass to the upper position, and then remove the handle.
Remove the vibration damping element from the window handle shaft.
We fix the glass in the raised position by installing two wooden wedges between the glass and the inner door panel.
Using a 8-mm socket with an extension, unscrew the two bolts securing the glass holder to the guide slide of the window lift mechanism.
Using a socket or a size 8 wrench, unscrew the three nuts securing the window lift mechanism.
Using a socket or a 10mm wrench, unscrew the three nuts securing the guide of the window lift mechanism.
We remove the window lift mechanism through the lower technological hole in the inner door panel
Install the rear door window lift mechanism in reverse order
Install the rear door window lift mechanism in the reverse order.
Replacing the rear door lock and outside handle
The outer handle can be changed without removing the lock.
Removing the door trim
Using a 8-mm socket with an extension, unscrew the nut and bolt securing the handle and, moving the handle forward, remove it.
To remove the door lock, disconnect the wire terminal from the negative terminal of the battery
Using a Phillips screwdriver, unscrew the screw securing the intermediate lever of the locking rod, and remove the lever together with the rods from the rectangular protrusion, removing the locking rod from the plastic holder (shown by the arrow).
Using a Phillips screwdriver, unscrew the screw securing the base of the inner door handle and remove it. together with traction from a hollow pin.
Remove the decorative glass trim and take out the glass guide.
Using a Phillips screwdriver, unscrew the three screws securing the door lock.
We remove the electric lock through the technological hole in the inner door panel
Squeezing the two clamps of the wiring harness block, disconnect the block from the electric drive and remove the lock with rods.
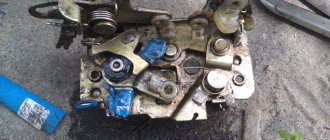
Rear door lock with electric drive and rod assembly
Install the rear door lock in the reverse order.
Removing and installing the rear door
It is more convenient to disassemble and reassemble the door when it is installed on the car.
At the same time, there is less chance of damaging the paintwork.
The sequence of disassembling the rear door is the same as when removing the front door. An assistant will be required to complete the work.
1. Remove the window regulator.
2. Remove the glass from the door.
3. Remove the outer door handle.
4. Remove the door lock.
Disconnect the corrugated hose of the wiring harness from the rack.
Disconnect the wiring harness connectors.
When disassembling the door, remove the corrugated hose from the wiring harness and remove the harness through the door opening.
Disconnect the door opening limiter from the pillar.
We turn the axles out of the hinges and remove them in the same way as shown on the front door. How to repair the front door of a Lada Kalina
Having coated the working surfaces of the hinges and axles with grease, install and assemble the door in the reverse order
To ensure reliable contact in the connecting block of the door wiring harness, we treat its terminals with a special agent for cleaning and protecting electrical contacts.
Fastening the front door trim
The casing is secured with three screws and hidden plastic fasteners.
The screws for fastening the casing are located - two under the handle trim, one under the speaker.
Tools you will need:
- a thin slotted screwdriver or a knife , preferably with a blunt blade;
If you prepare plastic spatulas instead of a knife, there will be less chance of damaging the plastic.
To unscrew the screws you need a 30mm Torx.
It is convenient to use this plastic spatula. The large hook is great for resuscitating clips, the small one is for snapping off the trim.
If you do not have a torx t30 key, do not try to remove the screws with another tool. It is unlikely that you will be able to unscrew the screw, but to rip off the edges of the head and create additional problems for yourself.
How to disassemble the trunk lid on a hatchback and station wagon
The interior lining of the Kalina rear hatch in hatchback and station wagon bodies is held on by 4 regular clips, 2 special black plastic fasteners (installed after installing the panel) and 2 screws securing the handle. In addition, the panel is hooked onto a metal protrusion by two brackets located in the lock area.
Handle screws
The procedure for removing the upholstery is as follows:
- Unscrew the 2 screws with a Phillips screwdriver and disconnect the handle.
- Place a flathead screwdriver under the glass side of the panel and unlock the lock. Release the remaining latches with your hands, pulling the panel along the contour.
- Remove the trim, lastly releasing the staples near the trunk lock.
The panel is detached from the glass side
Note. You need to start snapping the pistons away from the glass, because you won’t be able to remove the lining from the lock side without damaging the clips. This is prevented by 2 brackets hooked to the metal frame of the hatch.
The mounting brackets for the trunk hatch are located near the lock.
As practice shows, it takes no more than 10 minutes to remove the trim of one door of a Lada Kalina car. The operation is really simple, but if you lack experience, it is better not to rush, so as not to break all the fasteners and scratch the plastic facing panels. The door cards are installed in the reverse order: first, the clips are snapped on, then the handles are installed, and finally the plastic elements are attached. Don't forget to connect the connectors to the power window buttons.
Withdrawal algorithm
Before starting work, according to safety rules, it is necessary to remove the negative terminal from the battery.
- To provide access to the two fastening screws, you must first remove the decorative trim on the door handle . To do this, carefully, so as not to damage the casing, insert a screwdriver or a knife blade into the gap between the handle and the trim and pull it towards you. On some models, on the decorative trim there is a control unit for adjusting the outside mirror, from which you need to disconnect the connector with wires.
After snapping the clip, the card must be pulled up to pull out another clip from the groove. You can see it by slightly bending the trim.
Click off the part indicated by the red arrow. The opposite part (yellow arrow) is simply disengaged.
Sheathing installation
Before starting installation, make sure that the plastic fasteners are intact.
When removing the trim without a clip remover, the clips remain in the door in the unlocked position. If the clamps are not damaged, before installing the casing, they must be “cocked” using a spatula, first inserting it between the membrane and the washer, and then pushing it up.
Broken or defective clips must be replaced with new ones, otherwise a loose fit of the trim to the door will contribute to the appearance of extraneous unpleasant sounds when the car is moving.
Installation of the casing is carried out in the following sequence:
- Connect the door lock release cable.
- Secure the electrical wiring harnesses and connect all previously disconnected connectors to the central locking, power window and mirror control units.
- Connect the speaker.
- By connecting the negative terminal of the battery, check the functionality of all electrical mechanisms. A preliminary check will allow you to correct any problems in time before the door is fully assembled.
- Place the trim in place and make sure that the clips align with the seat. Secure the clips with light blows or hand pressure.
When installing the trim, you should pay attention to this protrusion that fits into the groove of the door near the glass. The plastic here is very soft, often bends and stands up unevenly.
All work must be carried out carefully without the use of brute force.
And these are the same ill-fated clips, the two on the right are broken - the result of removal without a clip cutter.
Small problems often arise when removing electrical connectors, which should be pulled out by rocking from side to side when the latch is completely unlocked.
Instructions for removing the front door trim (door cards) on the Lada Priora
Before carrying out work, it is recommended to disconnect the negative terminal from the battery. This will eliminate the possibility of a short circuit occurring during the process. After this, we arm ourselves with the above-described set of tools and carry out the following actions:
- First you need to unscrew the top part of the car door lock - the flag.
- Remove the mat from the bath by prying it with the plastic pry bar from the kit.
- Using a TORX screwdriver, unscrew the two screws that secure the plastic tray (on the driver’s side with the power window control console and side mirror adjustment).
- At the bottom of the casing, unscrew the three screws with a Phillips screwdriver.
- The decorative trim of the door opening handle is attached with a self-tapping screw with a cross-shaped head. We unscrew the screw.
- Pry off the decorative panel of the door handle with a plastic crowbar from the kit, and then remove it. You need to pry it off from the front side (there is a latch in the form of a tongue), and this must be done carefully so as not to damage the casing. The photo shows how the master pries it out with a screwdriver, but this is not recommended, as the plastic casing can be scratched. If you use a screwdriver, it is recommended to first insulate its tip with electrical tape.
- We remove the cover.
- It is not necessary to remove the power window control console from the door card if you do not plan to change the trim. However, after separating the card from the door, you must remember to disconnect the power cable. If you prefer to dismantle the console, then you need to pry it off with a plastic spatula.
- Using the plastic spatula from the kit, insert it between the card and the metal part of the door, and then carefully snap off the trim around the perimeter.
- To dismantle the front door trim on a Priora, it is not necessary to remove the triangular decorative element of the side rear view mirror.
- Disconnect the power supply terminal of the electric locking drive.
- We remove the map, and if the car is in a luxury configuration, then it is important not to forget to disconnect the power cable for the illumination of the exit area of the car.
After performing the necessary operations with the inside of the doors or trim, we return the card to its place. Assembly is carried out in the reverse order of removal. It is important to consider some important points:
- Before installing the casing in place, check the condition of all the clips (there are 8 of them on the front cards). Products with damaged legs or caps must be replaced. It is better to replace them immediately than to re-do dismantling work later due to the appearance of creaks in the doors;
- connect the block to the backlight;
- remove the console power cord if it is removed. If not, then also connect the chip to the console connector on the back side;
- insert the door lock into the hole in the card, and then install it by pressing on the trim at the locations of the pistons.
Only after all the clips are connected to the door (engage with the mounting holes), you can continue the procedure for installing the dismantled parts, and finally screw in the screws.
This completes the process of dismantling the front doors on the Priora. The video below shows in detail the procedure for dismantling products for the right and left doors, respectively.
Instructions for removing the door trim on a Volkswagen Polo Sedan
Door trim wears out over time, but not every car enthusiast knows how to remove the door trim on a Polo sedan. This element allows you to give the body part an attractive appearance; its replacement is required if the material is damaged or the internal gasket is cracked. Regardless of the reason, you will have to disassemble the entire structure, but with our instructions you will understand how to do this.
How to remove the left and right door trim
For each brand and model, the fastenings of the left and right door trims are different, but if you know the principle of disassembly, you can remove the trim on any car.
The basic rules are:
- if it is frosty, then carry out the work in the garage, as there is a risk that the light and fragile plastic on some elements will crack (in an unheated garage, as a rule, it is 10 degrees warmer);
- prepare tools;
- dismantle so that you can put it back.
What is door trim and its purpose?
The door trim is made of leather or leatherette at the factory. The fastening elements are clips. The material is used to cover the body element in the inner part. To make it easier to understand how to remove the door trim on a Volkswagen Polo sedan, it is worth finding out the purpose of the part.
The cladding gives the door structure a presentable appearance. It is often dismantled to install speakers for music or change the facing material. You will have to remove the trim along with the entire door panel.
The door card is part of the body element; without it, the inside of the door is hollow. Under the fabric there is a foam pad. It is designed for sound insulation and increased thermal conductivity. Rupture or damage to the fabric lining requires replacement of the fabric. Sometimes damage leads to the fact that it becomes problematic to close the door structure. In addition to the lining, the door card contains a handle, an armrest, a pocket and other niches. If this is the driver's door, then there are also buttons for raising the windows of all four doors.
An example of removing door trim on a Kalina car
How to remove the left front door trim:
- Unscrew the door lock (lock button).
- Remove the cap and unscrew the casing bolt with a Phillips screwdriver.
- Unscrew bolts 4 and 5.
- Carefully remove the Lada Kalina door trim from the retaining clips. Disconnect the connectors with wires from the door module.
The procedure for removing the right door trim (Lada Kalina):
- Unscrew door lock No. 4.
- Unscrew bolts No. 2 with a screwdriver.
- There is a decorative lining on car door handles. You need to remove this cover and unscrew two screws No. 3 and remove handle No. 1.
- Detach the trim from the door. Disconnect the wire connector.
To dismantle the rear door of a VAZ LADA Kalina 2, you will need two screwdrivers: a Phillips screwdriver and a flathead screwdriver.
The rear door must be disassembled in this order:
- Unscrew door lock latch No. 2.
- Remove the handle cover. Unscrew 2 screws No. 1 with a screwdriver. Remove the door handle.
- Using a flat screwdriver, remove decorative element No. 6, handle No. 7 and window socket No. 5.
- Detach and remove door trim.
Removing the door trim
Removing the trim on the front or rear door panel of a Volkswagen Polo VW sedan will require fasteners and available tools, you will need:
Disassembly instructions:
- The bolts on the inside and outside of the handle are unscrewed.
- Disconnect the wire from the negative terminal of the battery using a thin screwdriver.
- The armrest pad is removed.
- Additional wiring is disconnected from the outside rear view mirror control unit.
To do this correctly, you will need to squeeze the latch.
- The central locking system is being disconnected. To do this, unscrew two small screws at the top and bottom.
- The clips still hold the upholstery, so you need to move it to the side carefully to unscrew the tip and the cable sheath from the outer handle.
- By squeezing the latch, the wiring harness blocks from the trunk lid lock power switch are removed.
- The wire is separated from the window regulator and the retainer.
- The latch is released and the casing is removed.
- The technological window plug is removed from inside the panel part.
If a speaker is installed in the door, it is removed last.
On Volkswagen, a clip is used as a fastening. The universal item is easy to install and comes with a special puller. Market price – 200 rubles. The clips have different tips:
Threaded fasteners are used to connect body fragments, and herringbones are suitable for fastening the trim. If you have to disassemble the door card, these elements will break, which means they will need to be replaced during subsequent assembly.
The replacement is also due to the fact that the old fasteners will provide a loose fit, which will cause extraneous sounds when the car moves.
Instructions for removing the cladding on Kalina
The first three operations are performed the same way for all Lada Kalina doors. The exception is the trunk hatches of hatchback and station wagon cars, where the disassembly procedure is much simpler. Here's what to do:
- By hand, unscrew and pull out the cap of the latch designed to lock the door lock from the inside.
- Using a Phillips screwdriver, remove the 4 screws holding the music system speaker.
- Remove the speaker and disconnect the wires from it.
Unscrewing the blocker and acoustics
Advice. The acoustics can be attached either to the door card itself or to the metal door frame. If, after removing the speaker, you observe the first option, then during assembly it is better to redo the fasteners by drilling holes for self-tapping screws. The acoustics should be mounted to the door, not to the upholstery.
Attaching the speaker to the casing is wrong
The further procedure of work differs depending on the location of the door that you are disassembling.
Front passenger door
Here the decorative panel is held on by 8 clips, 2 screws securing the internal handle and two self-tapping screws located under the plastic pocket. The algorithm for dismantling it is as follows:
- Using an awl, carefully pry the edge of the plastic plug hiding the screw in the door handle and remove it. Remove the second screw cover in the same way.
- Remove both handle screws.
- Pull the door opening handle towards you, unscrew the fastening screw and remove the lever. After which you will be able to remove the entire handle.
- Unscrew the 2 screws at the bottom of the door card, under the plastic pocket.
- Take a flat head screwdriver and pry the top right corner of the trim panel to disengage the first tab. Grab the casing with your fingers and release the remaining pistons manually.
- After separating the panel from the door, disconnect the wires coming from the power window button. To do this, pry the connector tab with a screwdriver and pull the block out of the button block. Dismantling of the cladding has been completed.
Passenger side panel removed
Advice. When prying up the edge of the door card with a flat-head screwdriver, you should place a rag under it so as not to scratch the paintwork on the inside.
Photo instructions for disassembling the door trim on a Lada
Video: How to properly remove the trim
Nuances of disassembling the driver's door
On this side, the decorative panel is removed in the same order as on the passenger side. But due to small differences in the design, it is necessary to take into account the following nuances:
- To make the trim easier to remove, you need to remove the plastic panel covering the rear-view mirror adjustment lever;
- the first screw for securing the armrest is located under the plug, and the second is in the recess of the handle;
- the door opening handle is located on top of the armrest and is removed after unscrewing the fastening screw.
The plastic socket for the mirror drive can be easily removed by hand
The panel on the rear view mirror adjustment is removed using a flat screwdriver, which is used to pry it off from below. On vehicles equipped with electrically controlled mirrors, there is no adjustment lever, and instead there is a plug on the panel.
On the driver's side, the screw is hidden in the armrest
Reference. Some drivers unknowingly try to pick out this plug to disconnect the panel. The action is useless, since the element is easily removed by hand, but unsuccessful attempts leave unsightly scratches on it.
Screw securing the lever for opening the door
Removing the driver's side trim - video
Rear door trim
Here the upholstery is pressed to the door by 10 plastic clips and 2 screws securing the handle. The disassembly technology is as follows:
- The first step is to remove the mechanical window lifter handle. Use an awl to pry up the plastic half-ring that secures the lever to the axle. Pull it out and remove the handle.
- Pull out the 2 plastic plugs on the door handle and remove the fastening screws. After this, the element will be easily removed.
- Using a flat-head screwdriver, pull out the lower far corner of the decorative panel and snap out the first piston.
- Grab the door card with your hand and remove it, releasing the remaining clips along the contour. The casing has been successfully dismantled.
Installing new door trim
When the old upholstery is removed, it is left for cutting out a fragment when making an insert in the door. Markings are made on the part: cutting lines, places for standard holes for handles, fasteners, music speakers.
If the casing does not require replacement, then cutting out a new part according to the pattern is not provided.
Instructions for installing the panel on the driver's door:
- The cable for opening the door fragment lock is connected.
- Electrical wiring harnesses are secured.
- Connectors are connected to the control panel, power windows and mirrors.
- The battery terminal is connected.
- The functionality of all electrical mechanisms is checked.
When installing the panel, it is important to make sure that the latches match the seat. The clips snap into place by simply pressing in the middle. At the end, the handle is mounted with two screws from the bottom and top.
Video: the process of dismantling the door trim on the Lada Kalina
On average, dismantling a car door trim takes about 10 minutes. However, the simplicity of this operation is accompanied by the need to be careful in its implementation. Haste in movements and carelessness can provoke not only the deterioration of the latches, which is quite easily compensated for, but also more dangerous scratches on the plastic facing panels or on the paintwork of the metal doors. With due care and precision, removing the door trim on the Lada Kalina is possible even for not very experienced motorists.
Problems with the front door on Volkswagen Polo
Volkswagen Polo is a budget car with a reliable body, in which the trim elements and door mechanisms are made without frills.
The simple design of locks and door fastenings ensures their easy replacement and repair in case of breakdowns with your own hands, and the cost of components is low in comparison with other representatives of the German automobile industry.
During warranty service of the new Polo, problems with doors, as a rule, do not arise, with the exception of minor defects caused by sudden temperature changes in winter. Typical problems may appear in the third year of operation.
Typical front door malfunctions
The most common defect in Polo doors is wear of the seals. Rubber seals lose their elasticity over time, as a result of which moisture begins to get into the body gap, and in sub-zero temperatures the doors often freeze.
The sound of the front door closing changes; further operation with a worn seal leads to the lock breaking, the fastenings becoming loose and the doors sagging. The reason for the rapid wear of seals is road reagents and sub-zero temperatures.
To avoid such problems, experts recommend additional treatment of the seals with silicone grease on a new car, and if they are completely worn out, a complete replacement with original ones.
Another weak point of the front doors on the Polo is the main lock latch. It manifests itself as knocking and rattling while driving on uneven roads. The knocking occurs due to a malfunction of the “cracker” in the locking mechanism - during closing it does not fall into place, weakening the latch itself.
The problem is solved by tightening the annular return spring of the latch and adjusting it: the “cracker” of the latch must move freely in the open position over the entire working length. This malfunction most often occurs with the driver's door, so if you hear a muffled knock in the cabin while driving, the reason is most likely in the latch.
A malfunctioning latch can also cause the front doors to not lock properly, requiring a push or force before they close completely. This is due to the fact that during operation the latch moves relative to the fastenings by 1-2 mm when the lock cam pusher is not fully activated. This defect can be easily eliminated: loosen the fastening bolts of the clamp, moving it outward by a distance of 2 mm, and tighten it again.
Sagging of the front doors on the Volkswagen Polo is observed in the fifth or sixth year of continuous operation. The hinge joints wear out, the fastenings on the body are broken (weakened). It is almost impossible to prevent such a disease, so when buying a used car, pay attention to the geometry of the door gaps, the condition of the hinge components and mounting hinges.
Door sagging can be easily determined by the internal joints on the seals - traces of road dirt remain there; these places are often susceptible to corrosion.
A breakdown of the window lifter mechanism leads to loose closure of the glass, which begins to vibrate during movement, or to failure of the electric drive of the lifting mechanism.
A possible cause of the failure may be plastic guide clips (one or several at once), which must be replaced. If the mechanical parts of the window regulator are intact, without visible damage, then the electric drive itself is broken or the wiring in the circuit is broken.
Removing the front door and trim on a Volkswagen Polo
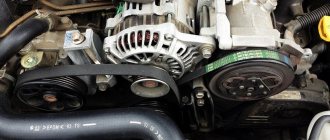
To remove and install the front door, you will need TOR E8 keys, a simple one with an “8” adapter, and a flat-head screwdriver. Before doing this, you need to turn off the ignition and remove the negative terminal wire from the batteries. To support the front door during dismantling, use a special support, and in the absence of such equipment, install a jack and a simple wooden block:
- Unscrew the mounting bolts and remove the stops.
- Remove the axial clamps on the door hinges.
- Disconnect the electrical wiring connector at the front of the door.
- Knock out three axles on the door hinges of the body with a punch or a special tool (puller 1355B).
- Remove the front door.
Installation (hanging a new door) is carried out in the reverse order.
Removing the front door trim to repair the lock or install additional equipment (window lifter, acoustics) is done without removing the door from the car body:
- Carefully pry the casing around the perimeter with a screwdriver (the latches on which it is attached should work), then pull it up until it stops.
- The window lifter guide clips should be removed from the brackets.
- Disconnect the wires and lock cable.
- Release the latch holding the door handle and remove it from the trim.
- Disconnect the lower fastening of the handle by unscrewing one screw under it.
- Remove the trim from the front door.
When reassembling, it is necessary to pay attention to the correct location of the window lifter guide rods - each cable must pass exactly into the groove between the petal and the guide clip limiter.
Instructions for removing the rear door trim on a Priora
If it becomes necessary to dismantle the rear door cards on a Priora, then the procedure is almost identical, and even somewhat easier. The rear door trim on a Priora is removed in the following order:
- Unscrew the self-tapping screw securing the decorative trim of the door handle.
- Remove the cover, preferably prying it off with a plastic spatula. You can do this with a screwdriver, but in order not to damage the surface, it is recommended to wrap it with electrical tape.
- Unscrew the top part of the door lock - flag.
- Unscrew the two screws using a TORX screwdriver.
- Pry up and remove the plastic tray along with the power window control console.
- Don't forget to disconnect the power supply.
- If the car has manual windows, then you need to dismantle them as follows: first, lightly press on the trim at the location of the window raise/lower handle, and with the other hand you need to remove the plastic ring. After removing the ring, you can pull out the handle.
- Now you can pry the card using a plastic spatula in one place, and then manually unclip all the other clips that secure the casing. There is no need to remove the plastic triangle at the top, as in the case of the front door.
This completes the process of removing the rear door trim on the Priora. All that remains is to carry out the necessary work inside the opening or replace the casing, and then install it in place in the reverse order of removal. At the same time, it is also important to first check the integrity of all clips and replace faulty pistons immediately. Please note that the rear cards use 10 pistons. Below are their traditional locations.
Below is a video with a detailed overview of the process of dismantling the rear door panels on a Priora.
Doing the work yourself is not at all difficult, and besides, the design is quite simple, and it is simply impossible to break anything (except for the pistons). Often, manipulations to remove door cards on a Priora are carried out with the aim of applying soundproofing materials, but that’s a completely different story. An expert description will help you not only perform the manipulations correctly, but also quickly.
Selecting a used front door
Replacing front doors on a Volkswagen Polo in the event of an accident involves choosing a new or refurbished used one. The price of a new original front door on a Polo sedan starts from 11,000 rubles. You can buy a used door for 2,500 rubles. However, when purchasing any used body hardware, you need to take into account that more than half of such spare parts on the market are sold reconditioned after accidents or long-term use.
It is almost impossible to determine violations of the geometric parameters of the front doors during a visual inspection.
All defects will be noticeable only after installation on the car - it will not be possible to achieve standard clearances even with subsequent adjustment. Even a slight deviation in the geometry of the front door subsequently leads to a reduction in its service life and problems with the lock, seals, and window lifter.
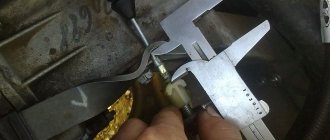
When choosing a used front door, determine, first of all, the presence of straightening marks, the thickness of the coating (using a thickness gauge) and possible treated areas of corrosion. The coating should be checked in good lighting, paying attention to the places where the hinges are attached (the presence of putty on the grooves), welds in corner joints and the condition of the metal around the perimeter (especially in the glass guides).
If the door is sold with standard trim, it should be removed to inspect all internal elements. It is best to purchase a used front door without any equipment installed on it (glass, window lifter and lock), and install them after installing the door on the car and adjusting the gaps. You should also pay attention to the remaining factory markings: the article must correspond to a certain generation of the car according to VIN.
Budget coup
As promised, I attended the presentation of the new budget Volkswagen.
Polo sedan Trendline – Overview of the standard equipment (excerpt) Body and wheels - Steel wheels 5J x 14 with full-size hubcaps, 175/70 R14 tires - Bumpers painted in body color - Galvanized body - Green athermal glazing - Suspension for bad roads - Halogen headlights in a single unit with turn signals under a transparent lens - Radiator grille with chrome trim - Towing eyes front and rear Interior - Driver's seat with height adjustment - Fabric seat upholstery, `Metric' design - 3-seater rear seat with integral cushion and backrest, folding - 3-spoke steering wheel - Two cup holders at the front - Chrome trim on the inside door handles, gear lever handle, air guides - Design for smokers (removable ashtray and cigarette lighter at the front) - Pockets in the trims of all doors (front with compartments for 1-liter bottles, rear for 0.5-liter) - Hooks for clothes in the cabin - Fabric trunk trim Safety - Airbags for the driver and front passenger - Three-point seat belts on all seats, front with height adjustment - Front headrests with height adjustment - 3 headrests rear, height adjustable - Disc brakes at the front - Electronic immobilizer - Isofix mounts for installing child seats in the rear seat - Indication and sound alarm for driver's seat belt not fastened Functional equipment - Steering column with height and reach adjustment - Electromechanical power steering with variable performance depending on speed - Electric windows for all doors - Central locking - White instrument lighting; red night illumination of switches - Instrument cluster with speedometer, tachometer, odometer, trip meter and clock - Multifunction display (displays average and instantaneous fuel consumption, range, travel time, distance traveled, external temperature) - Manually adjustable outside side mirrors from the inside - Windshield washer and cleaner with variable mode - Rear window heating - Interior heating and ventilation system with fan and air recirculation mode - Make-up mirror in the sun visor on the right - Radio preparation, incl. 4 speakers and antenna - Dust filter - Remote trunk opening with a button from the interior - Full-size steel spare wheel - On-board tools and jack - Luggage compartment lighting - Interior lighting with delayed shutdown, contact switches on all doors - Comfort mode for turn indicators (one press - three beeps) Warning buzzer for lights not turned off Polo sedan Comfortline – List of equipment that differs from the Trendline configuration (excerpt) Body and wheels - Steel wheels 6J x 15 with full-size caps, tires 185/60 R15 - Exterior mirror housings and door handles painted in body color - Body paint in metallic pearl color - no extra charge Interior - Rear seat 3-seater, backrest asymmetrically divided, folding Safety - Anti-lock braking system (ABS) Functional equipment - Outside mirrors electrically adjustable and heated - Heated front seats - Heated windshield washer nozzles glass Polo sedan Highline - List of equipment that differs from the COMFORTLINE configuration (excerpt) Body and wheels - Alloy wheels 6J x 15, tires 195/55 R15 - Chrome edging of the air intake and fog lights Interior - Additional chrome trim on interior parts (parking brake button, switch headlights, deflectors of the ventilation system and the control unit on the center console) - Fabric seat upholstery, `Livon' design - Central front armrest with box, cup holder for rear passengers - Fabric trim for door armrests Safety - Front fog lights Functional equipment - Central locking with remote control controls, 2 folding radio keys - Air conditioning - Radio “RCD 30” radio/CD/MP3, 4 x 20 Watts - Windows on all doors with comfortable opening and pinch protection ADDITIONAL EQUIPMENT A wide selection of additional equipment allows you to tailor the new Polo sedan to individual needs. In addition to classic individual equipment, Volkswagen offers special packages that intelligently combine individual options. Classic optionsClassic individual equipment includes such additional equipment as tinted windows from the B-pillar to the rear of the car (with light absorption of 65 percent), 15-inch alloy wheels ("Riverside"), manual air conditioning with recirculation mode, heated windshield, various special paint and varnish coatings - “metallic” and with pearlescent effect. Also, starting with the Comfortline package, the “Park Pilot” system is available to order, which includes rear parking sensors, audible obstacle warning and an additional visual obstacle warning on the audio system display (only in combination with RCD 310). Infotainment/Entertainment systems In the Polo sedan, two multimedia systems will be available to order. The multimedia system "RCD 30" (4 x 20 Watt) offers the essentials: AM/FM radio with built-in CD player and the ability to play MP3 and WMA files. The system "RCD 310" (4 x 20 Watt, four speakers) combines AM/FM radio functions with built-in CD player, with the ability to play MP3 and WMA files and display track names on the display. Also, the “RCD 310” multimedia system includes a USB connector in the glove box, display of climate control settings and visual prompts of parking sensors (when ordering the appropriate options), a dual tuner with phase diversity for improved radio signal reception. Premium package The Premium package is available as an additional option when ordering the new Polo sedan in the Highline configuration. The Premium package allows you to make the Polo sedan as comfortable as possible and profitably purchase the following equipment: - Combined seat upholstery, Sereni fabric with velor inserts - Chrome lining on the trunk - Automatic climate control "Climatronic" with recirculation mode - Side airbags for the driver and front passenger - Electronic stabilization system (ESP), incl. ABS with emergency braking assist, ASR and EDS - Anti-theft system with electronic immobilizer, internal volume sensors and autonomous siren - Multifunction steering wheel with leather trim and chrome insert - Leather trim on the gearshift levers and parking brake - Rear parking sensors - RCD radio 310" radio/CD/MP3, 4 x 20 Watt, 4 speakers front and rear - MDI interface (USB input including adapter cable) Colors Volkswagen offers the Polo sedan in seven different colors. The range includes two plain paint coatings, four metallic coatings and one coating with a mother-of-pearl effect. Below is a list of all the colors of the Polo sedan: - gray “Urano” (plain paint) - white “Candy” (plain paint) - silver “Reflex” (metallic paint) - red “Wild Cherry” (paint) metallic”) - blue “Night Blue” (paint and varnish “metallic”) - silver “Silver Leaf” (paint and varnish “metallic”) - black “Deep Black” (paint and varnish with pearlescent effect)