The knock sensor on Niva 21214 is a special device used to detect and prevent possible detonation of an internal combustion engine during operation.
Many people are interested in where this sensor is located on the Niva-21214 car. It is located next to the oil filter. Below is a table showing the most common models of knock sensors used in the Niva-21214 car, as well as their cost.
| Knock sensor | Cost, in rubles |
| DD Lada Kalina/ Priora/Vesta, VAZ | 360 |
| DD Eng. dv. analogue 18.3855,0261231046 VAZ | 340 |
| DD Lada Kalina/ Priora/Vesta, VAZ | 390 |
There are other models of sensor injectors used on the Niva-21214. The car owner can independently decide which device he will need and purchase it.
How to check the functionality of the sensor
The knock sensor, like other devices installed in the car, tends to periodically fail. This can be caused by various reasons, and often a minor breakdown can be accompanied by a complete failure of such an important component as the engine.
Among the most popular reasons for failure of the knock sensor are:
- wire break;
- insulation damage;
- breakage of the shielding braid;
- problems in the operation of the sensor itself;
- breakdowns in the software or hardware of the internal combustion engine control unit.
Checking the knock sensor will allow you to diagnose the malfunction. This is carried out using special measuring instruments or through visual inspection of the device.
So, for example, if there is a suspicion that a short circuit has occurred during the operation of the sensor, you will need to turn off the ignition and disconnect the device from the electronic control unit (ECU). Only after this will it be possible to begin checking the structure using an ohmmeter.
Sometimes the functionality of the wiring connected to the sensor is checked using a voltmeter. This is done with the ignition on. The device measures the indicators between the socket contacts and ground.
It is recommended to check the sensor itself using a multimeter. To do this, during testing, you should create artificial vibration by knocking on the device body. If the device data does not change, it means the element has failed.
Location of fuse and relay blocks Lada 4×4
If during the inspection it turns out that the camshaft position sensor itself has failed, then it must be replaced. As a rule, these units are non-repairable, since their body is sealed and cannot be disassembled. The sensor is inexpensive, and the replacement procedure is simple, and even a novice car enthusiast can handle it.
The sensor replacement algorithm is as follows:
- With the engine not running, disconnect the negative terminal from the battery.
- Disconnect the “chip” from the camshaft position sensor (as when checking).
- Depending on the vehicle model, it is necessary to remove parts that prevent access to the sensor. For example, on modern cars like the Lada Vesta, it is necessary to remove the bracket for auxiliary units.
- Using a wrench, unscrew one or two mounting bolts, depending on the type of fastening. The size of the wrench can be different, usually for VAZs it is a 10 mm wrench.
- After dismantling the mount, you must similarly remove the sensor from its seat.
- Installing a new sensor is performed in reverse order.
- Connect the negative terminal to the battery.
Error P0340 appears on the self-diagnosis system if the crankshaft rotates. Code P0342 - the camshaft electrical circuit shows a low signal and code P0343, accordingly, shows a high signal. It is necessary to check the wiring - for this purpose it is good to use an oscilloscope or other testing device.
Mechanical specialists, even if the sensor is in good working order, still recommend changing it every 4-5 years - such prevention will protect you from breakdowns and accidents, especially since the part is very cheap despite its importance. After all, the semiconductors inside the sensor react poorly to temperature fluctuations - remember your school physics course
There is a special offer on our website. You can get a free consultation with our corporate lawyer by simply submitting your question in the form below.
The preparatory stage will require the collection of certain tools:
- additional lighting, if required;
- Phillips screwdriver;
- rags;
- new controller;
- key to 10.
The sequence of actions is described as simply as possible:
- First open the hood.
- The tie from the rubber pipe of the air duct must be released.
- We remove the air duct itself.
- The controller is easy to find in the first part of the block.
- Remove the terminals and unscrew the bolt. The main thing is that the phase is maintained.
- All that remains is to remove the sensor and replace it with a new part.
- We put on the terminals and mount the air duct pipe back.
Symptoms of sensor failure
As already noted, damage can be determined visually. If the knock sensor is faulty, it will affect the performance of the entire vehicle.
Among the most common symptoms indicating a breakdown in the knock sensor are:
- Reduced engine power. Compared to ordinary situations, it will be quite noticeable. So, for example, when operating a car when transporting goods or passengers, the movement of the vehicle will be difficult, the engine will practically stop responding to the accelerator pedal.
- Increasing the length of acceleration. Basically, this symptom is considered a consequence of the previous point.
- Increased fuel consumption. This is explained by the fact that the engine control unit ceases to control the ignition angle level.
- Smoky exhaust. A large amount of smoke from the car's exhaust pipe can signal a problem. However, such a symptom may not always be associated with a malfunction of the knock sensor.
- The occurrence of detonation effect in the internal combustion engine. A fairly striking sign that should serve as a signal to the car owner about the necessary replacement.
Also, symptoms of a motor failure include a lighted indicator on the dashboard. The “Check-engine” icon can indicate several types of breakdowns, but it is recommended to check the knock sensor first.
More information about testing and troubleshooting
Practice shows that a malfunction of the camshaft position sensor does not lead to engine failure and immobilization of the vehicle. The engine continues to operate with some deviations that interfere with the normal operation of the car. Symptoms of DPRV failure are quite vague and similar to problems with other measuring elements:
- Unstable engine operation at idle and while driving.
- Instead of dynamic acceleration, after pressing the gas pedal, there is a series of small jerks and a sluggish increase in speed.
- The power of the power unit decreases. The effect becomes noticeable when the load increases - on a hill, sharp acceleration, while towing a trailer.
- The Check Engine light on the dashboard does not always come on. But many drivers note that if the meter is faulty, the display flashes after the crankshaft speed increases to 3000 rpm or more.
- Fuel consumption is naturally increasing.
If the measuring element is faulty, the control unit prepares and supplies an enriched air-fuel mixture to the cylinders. This results in an increase in gasoline consumption and unstable idling. Jerks and drops in power are caused by untimely supply of a spark - the controller “does not see” the end of the compression stroke in the cylinder and cannot clearly determine the ignition timing.
On various car models, additional symptoms of a malfunctioning camshaft sensor are noted:
- the engine suddenly stalls while driving, but starts without problems;
- cold starting of the engine becomes difficult;
- on cars equipped with a robotic gearbox, difficulties arise with automatic gear shifting;
- the engine “troits” - skipping ignition cycles is heard, sometimes popping sounds are observed in the exhaust manifold;
- On some cars, the power plant fails due to lack of sparking.
Driving with a broken air pressure sensor is acceptable for a short period. Jerking, rich fuel mixture and electronic errors accelerate the wear of spark plugs and engine parts. After detecting the listed symptoms, you should send the car for diagnostics or find the source of the problem yourself.
Replacing the sensor
If a malfunction is detected in the operation of the knock sensor, the owner of the Niva-21214 must begin repairing or replacing the device. You can perform the procedure yourself by deciding where the sensor is located and preparing the necessary tools before starting work. These include:
- screwdriver;
- wrench;
- 13 mm head.
You will also need to stock up on a new knock sensor.
The procedure for replacing the DD is as follows:
- The car owner places the vehicle in a convenient position for work.
- Turns off the engine and disconnects the terminals from the battery. This is necessary for the safety of further work.
- After this, you will need to remove the wire from the sensor and unscrew the bolt that secures it to the engine. The procedure is performed using previously prepared instruments.
- Once this is done, you can replace the old knock sensor with a new one. It will also need to be secured with a bolt (no need to tighten it too much) and a terminal attached.
- The final step involves reassembling the car structure in reverse order.
After the procedure for replacing the knock sensor is completed, the owner of the Niva-21214 will need to start the engine several times to check the functionality of the sensor and the entire car as a whole. First of all, you should pay attention to the symptoms of breakdown that were indicated above. Naturally, they shouldn't exist.
Based on this, we can conclude that the process described above is not complicated, and to replace the sensor it is not at all necessary to contact a service station. However, in order to protect yourself from possible malfunctions, you should regularly diagnose and maintain all components of the car.
The other day Jackie Chan caught fire, but I didn’t feel any changes in the engine’s performance.
Opendiag generated error P0327: Knock sensor 1 (Block 1 or one sensor), low signal level.
After the reset, if you lightly press the gas pedal, the error appears in the memory again, and later the light on the dashboard lights up. On our Internet they write that the error is not terrible, at most fuel consumption will increase slightly. But it’s still not in order, which means we’ll fix it...
Google says that this error may have several reasons: - the sensor mounting bolt is loose; — faulty wiring from the ECU to the sensor; — oxidation of contacts; - malfunction of the sensor itself.
Most of the sensors sold in stores are a lottery. They are not expensive, but there is a very high percentage of defects. Moreover, there are cases of counterfeiting, so-called “dummies”. And considering that the knock sensor in the Niva is located in an extremely inconvenient place, I didn’t really want to experiment. Solution - BOSCH knock sensor, art.: 0261231046
.
In addition, there is an opinion that it is better to install the knock sensor on a stud, and place a locking washer under the nut. When I bought the sensor, I talked with the seller - he also said about the pin. He also showed me this letter:
The result is this set:
Now to the most interesting part... The knock sensor is located under the exhaust manifold and covered by the starter shield:
To get more or less convenient access to it, I removed the air filter housing, the air pipe, unscrewed and moved the starter shield a little to the left, unscrewed and moved to the side the intake manifold extension:
The sensor was tightened well and the contacts were clean. I screwed the pin onto the lock. The nut was tightened to a torque of 20 Nm.
Before starting it, I reset the ECU with initialization. While driving home the error no longer appeared.
Reg.: 12/06/2004 Threads / Messages: 4024 / 23192 From: Moscow Age: 67 Car: 21214M, 2013
Alexey aka ALER.
Name: Sergey Reg.: 09/13/2014 Messages: 708 From: Russia, Buy Age: 59 Car: VAZ 21214 2004.
Reg.: 07/14/2014 Messages: 9 From: Pskov Age: 49 Car: VAZ 2131 2006 BOSCH m7.9.7+ (B120ER19) BC STATE 115x24M
Name: Sergey Reg.: 09/13/2014 Messages: 708 From: Russia, Buy Age: 59 Car: VAZ 21214 2004.
Reg.: 07/14/2014 Messages: 9 From: Pskov Age: 49 Car: VAZ 2131 2006 BOSCH m7.9.7+ (B120ER19) BC STATE 115x24M
Name: Sergey Reg.: 09/13/2014 Messages: 708 From: Russia, Buy Age: 59 Car: VAZ 21214 2004.
Reg.: 07/14/2014 Messages: 9 From: Pskov Age: 49 Car: VAZ 2131 2006 BOSCH m7.9.7+ (B120ER19) BC STATE 115x24M
Name: Sergey Reg.: 09/13/2014 Messages: 708 From: Russia, Buy Age: 59 Car: VAZ 21214 2004.
Reg.: 07/30/2009 Messages: 449 From: Vologda Age: 47 Car: VAZ 21214M 2013.
Name: Sergey Reg.: 09/13/2014 Messages: 708 From: Russia, Buy Age: 59 Car: VAZ 21214 2004.
Reg.: 03/10/2015 Messages: 346 From: Kazakhstan Shchuchinsk Age: 55 Car: VAZ 21214 2007
Reg.: 12/26/2011 Topics / Messages: 1 / 826 From: Ryazan region Age: 45 Car: VAZ-2131 2011, Bosch ME 17.9.7, Multitronics TC 50UPL, 27.135 MHz.
Name: Yaroslav Reg.: 03/21/2012 Threads / Messages: 3 / 8260 From: Taganrog Age: 29 Car: VAZ-21214-50-120 (06/01/2012), SHTAT UniComp 400L (firmware 3.3.1), VAZ-11173 2012, VAZ-21112 2006
Reg.: 07/30/2009 Messages: 449 From: Vologda Age: 47 Car: VAZ 21214M 2013.
Is it really possible to check without removing it from the car?
I think you need to attach a tester to it and use a 32-slot key to hit the block not far from the sensor? I'm right?
pick up the tester and use a 32-slot key and hit the block near the sensor
Greetings to forum participants!
1. If it is faulty and does not give signals, will the check light light up? I disconnected the wire from it and turned it on - the check did not light up... 2. How to check its serviceability? 3. How does the system (ECM) behave if the DD is closed?
Why am I talking? There is a suspicion that at 1900 rpm in any gear there is detonation (vibration of the engine, body, gear knob is felt), especially under load. Yes, and the engine pulls kinda bad.
Yes, I also need to change the clutch; my predecessor was sold the left Valeo. Shopis vibes.
By the way, off topic - how much did it cost to replace the clutch?
Several decades ago, gasoline car engines were practically not equipped with any additional electronics. Everything was banally simple - a distributor, a high-voltage coil, ignition wires with tips and spark plugs. Of the sensors, there was a sensor: oil pressure and a temperature sensor were present. This was especially true for Soviet-made cars - the GAZ, VAZ and AZLK models were equipped with primitive equipment.
Over time, technological progress began to develop. All motors are now controlled electronically. Not a single engine can operate without an electronic control unit. Accordingly, the power units acquired additional sensors and other electronic components.
The Smart system now monitors not only the order of cylinder operation, but can itself automatically adjust the ignition timing to certain road sensors. conditions also monitor the quality of the combustible mixture - according to their readings, the electronic engine control unit (regulates) the ECU, the proportion of gasoline and air, depending on the engine load.
Sensors in modern gasoline engines
principles Let's consider the operation of sensors in gasoline internal combustion engines (ICE). On modern fuel-injected internal combustion engines, the following are installed as standard: mass fuel flow sensor (sensor), mass air flow sensor, throttle position sensor (MSP), idle speed control (IAC), knock sensor (DS), oil pressure sensor, temperature sensor. Often, instead of a mass air flow sensor, an absolute pressure sensor (APS) is used in modern internal combustion engine systems.
The air flow sensor monitors the air flow and, depending on the amount of fuel injected by the injectors, transmits data to the ECU, according to which the control unit sets the required proportion of the combustible mixture.
The TPS monitors the smoothness of the car when the gas pedal is pressed at any time, if this sensor malfunctions, the car will move jerkily.
The IAC influences the stability of operation and controls the internal combustion engine's fuel consumption at idle speed.
The temperature sensor notifies the driver about the degree of heating of the cooling of the internal combustion engine systems, the oil pressure sensor shows the pressure in the lubrication system.
The knock angle sensor controls the ignition depending on road conditions and engine load.
Tool for the job
Before proceeding directly with the replacement, you need to collect all the necessary tools and materials:
- A set of keys of various diameters “10”, “13”, “17”, “21”.
- Screwdriver.
- Pliers.
- New coolant.
- Container for coolant.
- Clean rags.
- New consumables (depending on the purpose of the work being performed - approx.).
- Anti-recoil shoes.
For ease of work, it is best to use an inspection hole or a lift.
Removing the cylinder head on a VAZ-2112 - work procedure
Before you begin, make sure that the vehicle is on a level surface, the handbrake is on, and the wheel chocks are placed under the rear wheels.
Attention! Work must be carried out only on a cold engine
First of all, disconnect the negative terminal from the battery. In a pre-prepared container, on the heater radiator. Using a “10” wrench, unscrew the four bolts securing the decorative engine casing. Mounting points for the decorative cover of the 124 motor. Editor's car in the photo! Then remove it and put it aside. The next step is to remove all high-voltage wires, and also disconnect them from the clamp on the receiver. We disconnect each wire from the spark plug in turn. The ignition module also needs to be dismantled by unscrewing the two fixing bolts using a “10” key. Then we move on to the exhaust pipe from which we should unscrew the six nuts connecting it to the exhaust manifold. We dismantle the bracket cover that secures the exhaust pipe. When all the elements are removed, disconnect the pipe from the manifold. After . Go to and disconnect the terminal from it
Pay attention to the number of traces of corrosion. Unscrew the nut that secures the ground wire to the inlet pipe stud on. Don’t forget about the two negative wires located on the cylinder head. We loosen the clamps, after which we remove all the hoses from the throttle assembly, as well as the coolant supply. We dismantle the pipes of the crankcase ventilation system (small – approx.), air duct, as well as the adsorber purge hose. We remove all sensor pads, including TPS (throttle position sensor - approx.) etc. The idle speed sensor is close to the editorial VAZ-2112. From the receiver we disconnect the hose of the vacuum brake booster and the fuel pressure regulating hose. Loosen and then remove the throttle position adjusting cable from its seat.
Pull out the cable according to the arrows. Remove the end of the cable from the throttle body, then move it to the side. Remove the 2 bolts that secure the motor harness to the receiver and remove it. 2 more nuts should be unscrewed on the cylinder head cover. Next, we loosen and then dismantle the four clamps that hold the receiver and the inlet pipe, after which we remove the receiver itself, and put a clean rag in the cavity of the pipe to prevent dirt from getting in. We remove the receiver to the side (it will be either steel or plastic. For example, on a 124 engine the receiver is made of plastic). In photo 21120 The next step is to disconnect the fuel supply system from the fuel line. To do this, unscrew the fuel hoses from the connecting pipes using a wrench set to “13”. Using two wrenches, unscrew the fuel line
Keep the small tube washers in a safe place. Remove the screw that secures the pipe bracket to the cylinder head. Place the unscrewed bolts in a safe place. Disconnect the injector power supply blocks and unscrew the bolts securing them to the cylinder head. The block has been removed. Using a screwdriver, loosen the connection of the clamp of the crankcase ventilation system pipe from the cover located on the cylinder head. Unscrew one bolt that secures the oil level guide together with the dipstick, and then remove them. It is also necessary to dismantle all the nuts that secure the thermal screen, and then remove them. We loosen the clamp from the crankcase ventilation system pipe from the air filter pipe. Inspect the hose for damage and replace if necessary.
The final step before working directly on the cylinder head will be to loosen the 5 clamps from the thermostat and exhaust pipe. Please note that there is coolant in the thermostat, so do not get scalded. When they are loosened, disconnect them in order. Next, we proceed to dismantling the cylinder head cover; to do this, using a “10” key, we remove 15 bolts located on its upper part. The location of the bolts is indicated by a marker.
Knock sensor
Many car enthusiasts have encountered this problem - after filling the car with bad gasoline, their fingers begin to “knock”, that is, detonation appears in the engine. This happens due to the fact that the fuel is of poor quality and has a lower octane number than it should be with good gasoline. Such detonation can also occur if fuel that is not suitable for technical conditions is poured into the gas tank. Let’s say the car is supposed to be filled with AI-95 and gasoline with AI-92. So, so as not to “knock”, the fingers also serve the knock sensor.
Detonation may not only occur from low-quality fuel, it is possible due to overheating of the engine. Severe road conditions and large internal combustion engine loads also affect the detonation process. Detonation is extremely unpleasant for the engine and can lead to engine malfunctions, as it is accompanied by cylinder impacts - micro-explosions cause knocking of the cylinders inside. As a result, parts of the piston group may be damaged: cylinders, pistons, piston rings, cylinder head. The knock sensor is designed to prevent detonation explosions by providing data about what is happening to the control unit. The ECU corrects the ignition angle (doing it later), and the detonation disappears. True, when the ignition is late, the car “doesn’t pull”, but it’s not as if the internal combustion engine is going to break down.
The knock sensor is a housing in which a piezoelectric case is placed. When detonation occurs on the plate, this appears on the plate. voltage is a signal for Causes.
There are few problems with the sensor in the ECU - either there are problems with the wiring and the power supplied to it, or the sensor itself is faulty.
Knock sensor Niva 21214: where is it located, replacement - AutoExpert
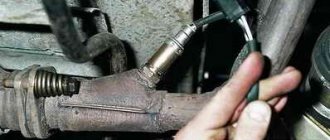
...disconnect the sensor connector.
Using a 13mm spanner, unscrew the bolt securing the sensor to the cylinder block...
- ...and remove the sensor.
- In photos 1–3, the exhaust pipe and air filter housing have been removed for clarity.
- Before installing the sensor, clean the surface of its contact on the cylinder block.
Install the sensor in reverse order. The tightening torque of the sensor mounting bolt is 20–25 Nm.
The knock sensor is removed for replacement or when repairing the engine.
- Where is DT located?
- — It is installed in the upper part of the cylinder block, on the right side, in the area of the 2nd and 3rd cylinders (more about this sensor)
- Turning off the ignition...
...disconnect the sensor connector.
Using a 13mm spanner, unscrew the bolt securing the sensor to the cylinder block...
...and remove the sensor.
Before installing the sensor, clean the sensor contact surface on the cylinder block.
How to check the sensor
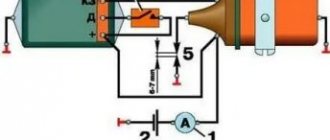
Connect a tester connected in voltage measurement mode to the sensor terminals. Tap the sensor body against a solid, massive object (for example, a hammer).
In this case, the voltage should change. If the voltage remains constant, the sensor is faulty and needs to be replaced. (More accurately, the serviceability of the sensor can be checked while the engine is running using the DST-2 diagnostic tool.)
In photos 1–3, the exhaust pipe and air filter housing have been removed for clarity.
Before installing the sensor, clean the surface of its contact on the cylinder block.
Install the sensor in reverse order. The tightening torque of the sensor mounting bolt is 20–25 N.m.
1200 rub. for the photo report
We pay for photo reports on car repairs. Earnings from 10,000 rubles/month.
Write:
The knock sensor (DS) is designed to detect the occurrence of detonation in the cylinders of gasoline piston engines.
The piezoceramic element of the knock sensor, reacting to vibrations of the cylinder block, sends a signal to the controller.
Lada Kalina ground wire
The controller (ECM), in turn, processes this signal and, in the event of detonation, reduces the ignition timing. In this case, the ignition timing changes for each cylinder separately. This is due to the fact that the temperature of the cylinders, when arranged in a row, is different. The coldest is the first, the hotter is the fourth or last, then the second and the hottest is the third.
From the driver’s point of view, the presence of a detonation elimination system makes it possible, if necessary, to use low-octane gasoline (keep in mind, the controller will assume that you have A-95).
Another advantage is maximum efficiency and excellent dynamic properties when using gas-cylinder equipment.
Indeed, in this case, you can safely set the maximum acceptable ignition timing for starting, without the risk of running into “knock of fingers” (the popular name for the sound that occurs during detonation).
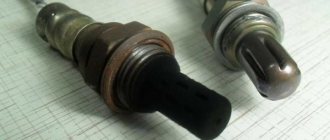
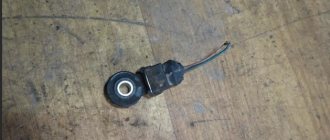
The sensor is mounted on the cylinder block (see photo).
1 — knock sensor on engines 21126, 11194
Knock sensor on engine 21214.
Replacing the knock sensor
Removal
- To replace the knock sensor, first turn off the ignition.
- Then remove the wiring harness block by first pressing the latch.
- Unscrew the fastening bolt with a replaceable head x13 or an appropriate wrench (the head is preferable to prevent “licking the edges”).
Installation
Install the sensor in place so that the connection block is directed towards the free space.
Touching hot engine parts may damage the insulation of the wiring harness. Touching cold elements is a point of chafing due to the natural vibration of the engine in relation to the body.
Try to keep the block “looking” down in case of water ingress. Make sure the pad is clean and dry - the fastening bolt is wrapped in a block and thus connected to ground. Contact between the bolt and the pad through a layer of dirt that has been exposed to oil or water will lead to engine malfunctions.
The fastening bolt must be tightened using a torque wrench with a replaceable head of 13. The tightening torque is 15. 24 N.m. In this case, the correct tightening torque affects the sensitivity of the sensor to engine vibrations. Incorrect tightening leads to malfunction of the motor.
Knock sensor malfunction
The most common fault is “low signal level” code 0327 . With the ignition off, the integrity of the circuits from the sensor block to the controller, and from the block to the sensor, is checked. It’s a good idea to check the tightening torque. If the torque was insufficient and it was necessary, you can restore it and test for the absence of code 0327.
Symptoms of a faulty knock sensor:
- - loss of engine power,
- — sluggish car acceleration,
- - increased fuel consumption,
- — smoky presence,
- - detonation exhaust,
- — the Check lamp in the interior of the car lights up.
It is not at all difficult to identify a sensor malfunction; its functionality can be checked with a digital multimeter.
First of all, you need to measure the contacts for resistance DD. If it differs from what you need, you need to replace the sensor. All that remains is what kind of resistance this Else should have, to clarify.
DD brands are checked by measuring the voltage at the contacts. To do this, the sensor is unscrewed from the cylinder block, voltage is applied to contact one, and its negative mass is connected with a wire. The DD is clamped in the hand, and the surface is struck with either hand. After an impact, a voltage of 30-40 millivolts should appear between the sensor contacts. Absence of voltage indicates a malfunction of the DD. It is important that the multimeter can detect such a small voltage.
A knock sensor is required to ensure proper operation of the internal combustion engine. This is a small device that monitors the load on the engine. To replace it, you do not need to be an experienced car mechanic, you just need to know how to handle wrenches. But in order to clearly determine the malfunction of this unit, you will need to know the main symptoms that appear if it breaks down.
Sensor Features
This is a small electronic device that sends a signal about engine operation to the control system (ECU). It works in conjunction with other reading devices. And their total number in VAZ cars is more than ten. The VAZ knock sensor monitors the entire engine operating cycle, and if detonation occurs, it sends a signal to the control unit. In addition, it determines the cause of detonation. After the signal has been received by the control unit, adjustments are made to those characteristics that affected the operation of the engine.
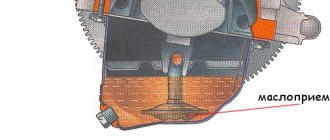
Where is the knock sensor located in cars? It is installed directly on the engine cylinder. This location allows the control system to instantly respond to detonation and get rid of the reasons why it occurred. On VAZ cars, the installation location of the sensor is the engine block, between the third and second cylinders. It is not easy to get close to it to replace it, but this procedure is carried out extremely rarely, since the reliability of the device is very high. VAZ cars of the latest models are equipped with both broadband and resonant sensors.
How to check the knock sensor of a VAZ 2114-2115 at home?
I’ll start today’s article with a story about what a knock sensor (DS) is and why a car engine needs it. This sensor is necessary, as the name implies, in order to monitor detonation in the engine, as well as knocking noises that indicate malfunctions.
Each knock causes the sensor to produce a pulse with a certain voltage. After this, the pulse goes to the controller, which performs subsequent processing. The controller adjusts the ignition timing depending on the size of the received impulse; the whole process takes a few fractions of seconds, so most often we simply cannot feel anything.
DD belongs to that category of automotive sensors that fail very rarely, for which a HUGE driver’s THANK YOU to him and his creators!
Where is the knock sensor located?
The VAZ 2114-2115 knock sensor is located between the second and third cylinders on the engine block; it can be one- or two-contact.
Signs of malfunction of the knock sensor VAZ 2114-2115:
- The engine is tripping;
- Dynamics deteriorates, poor acceleration;
- When starting off and when moving downhill, the “Check Engine” lights up;
- During acceleration, the “Check Engine” light comes on;
- The computer displays a knock sensor error.
To your attention errors in the knock sensor VAZ 2114
- Error code 0325 - there is a break in the wiring that supplies power to the DD. Most often, the cause of this error is oxidized contacts of the knock sensor; a wiring break occurs extremely rarely. It is necessary to clean the contacts, this will give a positive result, at least it will not get worse. In addition, this error can be caused by the timing belt, so if after cleaning the DD contacts the problem remains, check the timing belt, most likely it has jumped a couple of teeth. Align the belt to the marks and check again if the error appears.
- Error code 0328 - as a rule, indicates faulty high-voltage wires. However, the possibility of the timing belt jumping cannot be ruled out.
- Error code 0326 , as well as 0327 , mean an excessively weak (low) signal from the knock sensor. To eliminate errors, it is necessary to clean the VAZ 2114 DD connection contacts. The tightening torque of the sensor is also important; if the tightening is weak, the above errors may appear.
Principle of operation
The sensor is based on a piezoelectric element - a plate that, under the influence of vibration, generates electrical impulses. This is called the piezoelectric effect, and the device operates on its principle. Moreover, the voltage at the output of the device depends on the oscillation frequency when the engine block vibrates. In other words, as vibration increases, the stress generated by the plate also increases.
When the engine shakes, the knock sensor, the symptoms of which will be discussed below, begins to generate a small voltage. This signal immediately goes to the control unit. The latter contains an algorithm by which the microprocessor determines what to do in a particular case. It analyzes the level of vibration, and then makes adjustments in the right direction: first it sets the ignition timing, and then changes the quality of the mixture (ratio of air and gasoline) to the current settings.
What is detonation?
This issue should also not be ignored. After all, in order to study the entire process of the sensor, you need to know what it measures. On modern cars that have such devices in their circuitry, external signs of detonation may not be noticed. But they are clearly visible on early models that used carburetors. Fingers pounding is the first sign that can be felt. The reason for this sound lies in the fuel system and ignition.
The combustion process is destabilized, and the ignition timing remains at the same level. This is the root cause. The result is that small explosions occur in the combustion chambers of all engine cylinders. Gasoline mixed with air ignites on its own, and the blast wave hits the walls of the combustion chamber with force. From the outside you can’t even tell that this is a micro-explosion. When the engine is running, it sounds more like a metallic knock, as if someone is hitting an anvil with a hammer.
Why does detonation occur?
Having understood a little about what this phenomenon is, we can talk about the reasons for its appearance in the engine. The most common are low-quality fuel or low octane number. Try to refuel only at proven gas stations. Moreover, gasoline must be of the brand recommended by the manufacturer of your car. Often the cause of metallic knocks is an incorrectly set ignition timing. Visit a service station so they can set the timing correctly for you using modern equipment.
A mixture that is too lean is also the cause of detonation knocks. In this case, the combustion temperature in the air-fuel mixture chamber increases sharply. To make sure that adjustments to the quality of the mixture are really necessary, remove the spark plug from any cylinder. Pay attention to the color of the electrode. If it is light gray or white, then this is a clear sign of a lean air-fuel mixture. The cause of this phenomenon was the knock sensor. Signs of its malfunction are the appearance of metallic knocks due to a malfunction of the fuel system and ignition.
Sensor failure
In fact, the presence of this device guarantees that metallic knocks will not be heard. But if they appear, then try to repair the unit as soon as possible. But don’t rush to immediately remove the sensor and run to the store for a new one. It is quite possible that there is no malfunction of the knock sensor, the reason is in the wiring. Therefore, first of all, inspect all the wires that go to it. If they are torn or oxidized, the sensor will not work. The signal sent to the ECU is incorrect or absent altogether.
Therefore, clean the contacts first. You can use a rust converter or penetrating lubricant. These solutions do a good job of fighting oxide. But if the damage to the contacts is significant, it is better to replace it. The cost of a female connector is no more than one ruble, and you may need a maximum of two of them, depending on the design of the sensor itself. But if there is no damage to the wiring, then we can conclude that the knock sensor is broken.
Removing the sensor and checking
It’s not a lot of work, you just need to use a 20 or 13 key. It depends on which sensor is installed on your car. Unscrew the mount, having first disconnected the wires from the device. That's all, now you just need to check the serviceability. For this purpose you need to use a voltmeter. Moreover, the measurement limit should be 0.2 V. If the sensor has one output, then the voltmeter is connected with a plus to it, and a minus to the metal part of the case.
If the sensor has two contacts, then you need to connect a measuring device to them. Now we need to remember what function this sensor has. That's right, it measures the level of detonation, which means that you need to apply several sharp blows to its body. The voltmeter needle should deflect (if you are using a digital one, the voltage value will appear on the display). The stronger the impact, the more the arrow deviates from the zero value. If this does not happen, then you need to purchase a new knock sensor and install it.
The Chevrolet Niva SUV, produced by VAZ, is popular among car enthusiasts due to its good cross-country ability. To overcome muddy roads, steep climbs, and various obstacles, it needs impeccable engine coordination. One of the negative factors that negatively affects the performance of a car’s heart is detonation. Its increased level creates strong vibration of the vehicle, leading to increased wear and breakdown of internal engine parts. To avoid this, a knock sensor is used on a Chevrolet Niva car, which monitors and normalizes the fuel combustion process in the engine, eliminating potential malfunctions.
Verification methods
It is easy to check the inoperability of the DD yourself without dismantling it by conducting preliminary testing.
How to do it:
- put the engine at idle speed (about 2000 rpm);
- lightly tap with a hammer near the sensor.
A drop in engine speed (which will be audible) will indicate the serviceability of the part . If the speed remains unchanged, then the piezoelectric element is tested additionally. To do this, the DD will need to be removed by unscrewing the mounting bolt and disconnecting the block.
Then use a voltmeter or multimeter .
The procedure is as follows:
- connect the tester to the DD contacts;
- set constant voltage mode;
- Using light taps on the sensor, monitor the meter readings.
Voltage fluctuations of up to 0.2 volts are a sign of the operating condition of the DD . If there are no voltage surges, it means it is damaged and must be replaced.
Engine operating principle
Detonation very often occurs when going uphill. In this case, the car is moving slowly, and the speed is increased. But do not worry, since this phenomenon is called glow ignition, and it does not indicate that the engine is not working properly.
Any internal combustion engine works according to the following principles:
- A mixture of gasoline and air is supplied to the combustion chamber of the cylinders, where it is ignited by a spark on the spark plug. Moreover, the piston should be literally a few millimeters from top dead center. As soon as the piston reaches the top position, the greatest pressure is generated in the cylinder. At this moment, the entire air-fuel mixture will completely burn.
- During normal operation of the knock sensor on the Chevrolet Niva, signs of this phenomenon will not appear. This device will help get rid of the manifestation of detonation. And it appears when the mixture begins to ignite much earlier than it should. This usually happens halfway to top dead center. And when the air-fuel mixture burns, a force is exerted on the upper part of the piston, which pushes it in the opposite direction. At the same time, the engine power is reduced, and significantly, and its parts wear out.
Phase sensor - DF
It's also a camshaft sensor. The VAZ phase sensor is designed to determine the angular position of the camshaft. The main function is that when the engine is running, the phase sensor provides a pulse signal to the controller synchronizing fuel injection with the opening of the intake valves. Failure of the phase sensor switches the fuel supply to pairwise-parallel mode, which leads to a slight (up to 10%) increase in fuel consumption. And I’ll also add this “miracle of nature” is a headache and a source of a lot of errors, for example the famous 0301, 0302.... In my humble opinion, this is the same disgusting and abomination as the old-style hydraulic compensators. But what has grown has grown. (How to get rid of it forever, lambda, roll sensor - will be written in the article about chiptuning). The only normal manufacturer of this sensor is Avtovazagregat. The logo is visible in the photo.
On any four-stroke engine, a complete cycle is completed in two revolutions of the crankshaft - once the piston approaches top dead center at the end of the compression stroke, and a second time at the end of the exhaust stroke. This allows injection engines to use only the counting moment from the crankshaft position sensor as a reference signal. In this case, the operation of injection and ignition is called non-phased. At the end of exhaust, a second (idle) spark occurs, and the injector opens twice, part of the fuel is supplied to the open intake valve, and part to the closed one.
Thus, the injection system is simplified without losing any qualities that are actually noticeable to the owner. Instead of individual ignition coils, you can use a pair of fused ones, as is done on eight-valve VAZ engines. If we take Renault, then even on engines with individual ignition coils it is not phased: the coils of cylinders 1-4 and 2-3 are connected through the primary windings in series and fire simultaneously.
see also
Comments 15
Old man, what is the effect?!
The error disappeared, but a few weeks later it appeared again. She disappeared and reappeared, and so on until May of this year. The Ignition Module burned out, and after replacing it, the error disappeared on its own. So far she has been gone for a little over a month.
What a wild dog! And what did she want?!)
Maybe he wasn't just swearing? Maybe there really was some kind of detonation.
There is a lot of truth in your words!
No matter how much I knocked on the sensor, I still didn’t understand what it was showing, but if I squeeze it or press it on both sides, for example, even with my fingers, then it begins to change readings.
When I tapped it on the hammer, small voltage surges appeared, and when I squeezed it with my fingers, it also appeared.
No matter how much I knocked on the sensor, I still didn’t understand what it was showing, but if I squeeze it or press it on both sides, for example, even with my fingers, then it begins to change readings.
Not long ago I wrote about this diagnostic method.
Fault detection
Even if you don’t have a deep understanding of the internal workings of your car’s mechanisms, you have the power to ensure their smooth operation. Who, if not you, can first of all detect the instability of the functioning of some nodes. Considering that trips with individual malfunctions can have serious consequences, any driver must have at least a minimum knowledge of the principles of operation of the parts of his car, know their service life, and be able to identify and eliminate trivial problems, regardless of the make and model of the car.
Most modern cars operate using a mass of sensors, the malfunction of which can mainly be determined through computer diagnostics on service equipment. However, some sensors make themselves felt quite clearly, and with due care of the driver it will not be difficult to determine which one has failed.
Sensors and the nuances of replacing them with your own hands on the famous Niva
Elements such as the VAZ 21214 speed sensor can be replaced without much difficulty. It seems possible to quickly change this and other system parameter determinants and regulators with your own hands. You will learn how to do this from our article.
On products of the domestic automotive industry such as UAZ and Niva, various sensors are needed to transmit information to the dashboard. Also, some of them perform additional functions. And each has its own characteristics of dismantling and installation.
Detonation combustion of the fuel-air mixture
Problems rarely arise with the knock sensor, but you should never rule it out. It serves to control the level of engine knock. The fact is that a small part of the fuel-air mixture in the engine cylinders burns out precisely with detonation. This happens provided that the mixture is somewhat removed from the spark plug and, when heated, burns with the formation of an “explosion”. In this case, a characteristic knocking sound occurs in the crank mechanism of the engine; some drivers say that “the fingers are knocking.”
The occurrence of detonation combustion is usually influenced by the chemical composition of gasoline (fuel with a higher octane number is somewhat more resistant to detonation) and the design features of the engine (as a rule, the higher the compression ratio in the cylinders, the higher octane fuel the car needs).
Knock sensor malfunction
The principle of operation of the sensor is that when the above phenomenon occurs, it sends a signal to the engine control unit, which adjusts the ignition settings to eliminate the resulting detonation.
If the knock sensor fails, the car has poor acceleration dynamics, the engine idles unstable, and the “Check Engine” signal lights up on the instrument panel. In addition, fuel consumption increases, and, as a result, smoky exhausts appear.
Basic principles of system operation
The Hall effect is the principle of reading electromagnetic pulses. There are magnetic marks on the car shaft, the impulse from which is read by the sensor. A certain number of shaft rotations is programmed into the control unit, corresponding to the kilometer traveled, equal to 6004. As the speed increases, the interval between pulses is reduced, the information is processed and displayed on the instrument panel.
The vehicle's on-board network is designed so that all components and assemblies function smoothly, and control is as comfortable as possible. According to international standards, the voltage is 12V to be compatible with most consumers.
The circuit itself is single-wire. In practice, this means that the “negative” terminal is connected to the car body, and each individual device is powered by a “positive” wire. This greatly simplifies the routing of wires along the body and reduces the number of wires required. It also reduces the likelihood of cable damage and, as a result, a short circuit.
Consequences of knock sensor failure
If the sensor is faulty, the engine continues to operate, but the control unit can no longer correctly set the ignition timing. This is fraught with dangerous consequences. During detonation combustion of fuel, high shock loads occur and the heat transfer of the crank mechanism increases. In general, all this provokes significant wear of engine parts, and therefore increases the likelihood of engine breakdowns. To protect your car engine, it is enough to identify the problem in a timely manner and replace the knock sensor.
A knock sensor is a device designed to determine the moment of detonation in internal combustion engines. It continuously sends signals to the electronic engine control unit (ECU), which responds by changing the quality of the working mixture and the ignition timing.
During the operation of the car, malfunctions , for example, the engine does not pull (loss of power). These signs may indicate problems with the knock sensor. In this case, the “Check Engine” lamp will light up on the instrument panel, and diagnostics will reveal one of the following errors :
- P0325 - Knock sensor circuit open;
- P0327 - Knock sensor signal low;
- P0328 - High signal level of the knock sensor.
The knock sensor on LADA cars is located in the cylinder block, number 16 in the diagram:
Replacing the knock sensor on all LADA models is performed in the same way:
- Press the latch and disconnect the block with wires from the sensor.
- Remove the sensor by unscrewing the mounting bolt (13mm wrench).
- Installation in reverse order (tightening torque 11-24 Nm)
The process is also shown in the video:
To check the knock sensor you will need a multimeter (in voltmeter mode with a measurement limit of up to 200 mV):
- Connect the probes of the device to the sensor;
- Tap the metal base of the sensor with a metal object.
- If the knock sensor is working properly, the multimeter will show voltage surges.
A more accurate test of the knock sensor can only be done on a special stand.
Sometimes the cause of a sensor malfunction is poor contact of the sensor connector. In this case, we treat the contacts with a special means for cleaning electrical contacts and clean the contacts from oxides. We clean the knock sensor and the surface around the sensor from dirt.
If detonation occurs when the engine is running under heavy load, then, in addition to a malfunction of the knock sensor, the following reasons may additionally contribute to the occurrence of detonation:
- Incorrect heat number of spark plugs.
- Inconsistency with the required octane number of gasoline.
- Incorrect adjustment of the base ignition timing.
The knock sensor on the 16-valve VAZ-2112 has the same causes of malfunction as some GAZ, Toyota, Gazelle, Priora and Kalina cars. Of course, not every motorist will be able to determine that this is exactly the sensor, but you can consider the direct and indirect causes of the malfunction.
The video provides an overview of the main faults and diagnostics of the wide-band knock sensor on the VAZ-2112:
How to make sure the DPRV is working?
The easiest way to check the camshaft sensor is to connect a car scanner or a computer with an installed program corresponding to the make of the car to the diagnostic connector of the car. If the element is faulty, then after starting the engine the device will display the following error codes:
- P0340 – there is no signal from the camshaft position detector;
- P0341 – valve timing does not coincide with the compression/intake strokes of the cylinder-piston group;
- P0342 – the signal level in the electrical circuit of the DPRV is too low;
- P0343 – the signal level from the meter exceeds the norm;
- P0339 – an intermittent signal is received from the sensor.
Since the vast majority of car enthusiasts do not have scanners and laptops with software at their disposal, a more affordable method is practiced - checking with a digital multimeter. Diagnostics is carried out in 3 stages:
- Visual inspection of the wiring and continuity of the circuit for breaks.
- Measuring the outgoing current at the control contact of the DPRV.
- Testing functionality by approaching a metal object.
At the first stage, you need to ensure the integrity of the wiring and reliable contact of the connecting block. Carefully inspect the supply cables for kinks, cracks and melted insulation. Testing the current-carrying conductors and searching for a break is performed with the same multimeter. Don't forget to clean the connector contacts from oxidation.
After checking the electrical wiring, proceed to diagnosing the camshaft sensor itself. Instead of standard alligator clips on the tester, you need to use wires with needles so that you don’t have to be tricky with connecting to the connecting block. Diagnostic work is carried out in the following order:
- Open the hood and look for the DPRV on the cylinder head. Usually the element is placed on the end of the engine or the side wall of the cylinder head next to it.
- Using the vehicle's electrical diagram or data for a specific sensor model, determine the location of the two power contacts and the third wire going to the controller.
- Turn on the ignition and measure the voltage between the vehicle ground and the control contact of the element (on VAZ cars this is the middle wire, marked “C”). Normal multimeter readings are at least 90% of the supply voltage, that is, 12 * 0.9 = 10.8 V.
- If the obtained values are below normal, the sensor is faulty and must be replaced. Otherwise, perform the third stage of verification.
For final diagnostics, the part will have to be removed from the engine.
Typically, the element is inserted into a hole in the cylinder head and secured with one bolt. Unscrew it, remove the DPRV and wipe off the engine oil. Do not disconnect the block with wires. After connecting the multimeter to the middle contact and ground of the car, turn on the ignition again. Bring a steel object (for example, an open-end wrench) close to the end of the element, monitoring the display readings. A working sensor should respond to the approach of metal with a voltage drop to 0.2–0.4 V.
If checking the camshaft sensor with an iron object does not change the tester readings, the DPRV should definitely be changed. When purchasing a new part, keep one thing in mind: even original spare parts can be sold without a thin O-ring. You will have to find and buy it separately or use an old seal, provided that the material is not cracked or “dull.”
Where is the Chevrolet Niva camshaft sensor located and malfunctioning?
To make driving a car quite comfortable and safe, you need the measured operation of its engine. One of the characteristics of its operation will be the camshaft sensor.
Signs of a malfunctioning knock sensor
Resistance that should be in the sensor in good condition
Before considering the causes, it is necessary to look at the symptoms of the malfunction. So, let's look at what could be a warning sign that the knock sensor has failed:
- The engine is losing power.
- Overclocking potential drops.
- Fuel consumption has increased.
- The CHECK light came on on the instrument panel.
- Smoky exhaust.
- Presence of detonation.
- The engine started to stall.
Of course, an important reason for the failure of the knock sensor is the fuel mixture, namely the quality of gasoline itself. The lower the octane number, the lower the resistance to detonation. If the fuel detonates, it will not completely burn through the engine and you will hear the muffler firing.
Knock sensor diagnostics
The sensor is checked with a multimeter. In this case, the sensor is “knocked” with a screwdriver
To diagnose the knock sensor, it is removed from the engine and a voltmeter with a measurement limit of up to 200 mV is connected to it.
Next, they “knock” the sensor on a hard surface and look at the voltmeter readings. When tapping, the readings should change. If they do not change, this means that the sensor is not working. If they change, then the sensor readings change, but whether they are correct is in question!
ECU signal about malfunction
Failure of the sensor will be immediately obvious by a characteristic knocking sound. Many motorists simply reset the “minus terminal” to reset the readings of the electronic control unit, but it is worth understanding the very reasons for the effect and eliminating them. Let's look at the ECU error codes that signal a failure of the knock sensor:
- code-0325 hints at network problems. For example, a break in the wiring or acidification of the plug contacts. In this case, we call the electrical circuit connecting the sensor, clean the electrical contacts ;
Error 0325 on the BC STATE screen (Open circuit of the knock sensor)
Type of knock sensor