Frequently encountered problems when pressing the accelerator pedal of a carburetor engine are the so-called “failure”, “jerk”, “twitching” and “swaying”.
A failure is when, when adding gas when starting or accelerating a car, sluggish engine operation is observed, a slow increase in speed up to a deceleration lasting from half a second to several seconds.
A jerk is the same failure, but shorter, up to half a second.
A twitch is a series of several jerks.
Swinging - several failures following one after another.
It is worth noting that before eliminating these malfunctions by changing the settings of the carburetor itself or disassembling it, you need to make sure that the reason lies precisely in it. The technical condition of the engine is of great importance. Incorrect installation of the gas distribution mechanism, wear of the camshaft, incorrectly set ignition, violation of compression in the cylinders: too low or unacceptably different in different cylinders. All this disrupts the normal operation of the engine, increases fuel consumption, and leads to clogging of the carburetor with deposits and resins.
It is also necessary to check the fuel supply system to the carburetor for blockages in the fine filter, the fuel pump strainer, the fuel intake, the tightness of the fuel pump, as well as the ignition system. At idle or at low loads, the engine can operate normally, but when the load increases, disturbances in the fuel supply may appear.
We will assume that the ignition, gas distribution, cylinder and fuel supply systems are fully operational and the reason lies in the carburetor. Let's consider the possible causes of dips and jerks in the Solex 21083 carburetor and ways to eliminate them:
Dips when starting
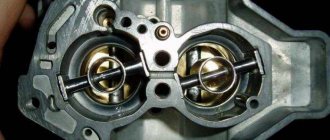
The outlet of the transition system is clogged.
Holes for Solex carburetor transition systems
The size of the holes can decrease over time due to deposits reducing fuel flow and leaving the mixture lean. To clean the holes in the transition systems, you will have to remove the carburetor, turn it over and clean it with a sharp stick or copper wire (it is impossible to clean the holes with anything harder than the carburetor material to avoid damaging the holes), rinse with acetone and blow out.
Low fuel level in the float chamber. This situation makes the fuel mixture leaner. To find out the fuel level in the chamber, let the engine run for a while, then remove the upper half of the carburetor and measure the fuel level, for example, with a caliper; for Solex 21083 the level should be 29 ± 1 mm. Gasoline tends to evaporate quickly, so remove the cap and take a measurement quickly. The needle valve may stick, thereby interfering with the flow of fuel into the float chamber; you can return the needle to its place by gently tapping, but it is better, of course, to replace it. If the fuel level is not correct, adjust the float mechanism.
Leaky tube supplying vacuum to the ignition vacuum corrector . Check the tube for cracks and breaks; the tube should fit tightly onto the appropriate fittings; replace the tube if necessary.
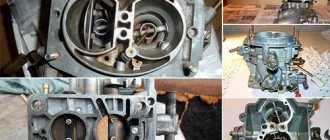
Location of Solex carburetor components
Dips and jerks when driving the car
The accelerator pump , econostat or economizer is faulty
The accelerator pump accounts for most of the problems associated with failure. As the name suggests, the function of the accelerator pump is to enrich the fuel-air mixture in all operating modes except idle.
The operation of the accelerator pump must be checked. To do this, remove the air filter and observe the streams of fuel from the nozzles in each of the chambers. When you press the pump lever, even streams will spray from both spouts, and they should not fall on the walls of the chambers. Experienced craftsmen take out the nozzle of the “elephant” accelerator pump and bend its tubes in such a way that the jets precisely fall into the gap between the chamber wall and the damper, and they must try to do this with the damper opening as small as possible. It is also necessary to take into account the thickness of the heat-insulating gasket under the carburetor; the jets should not touch its internal surfaces.
You should not try to improve the carburetor by bringing both spray tubes into the first chamber. In this case, mixture formation worsens and additional resistance to air flow appears in the first chamber, so such a modification will only worsen the performance of the carburetor. It would be more correct to replace it with a carburetor spray nozzle 21073-1107010 (for Niva) with one tube. If fuel jets are not observed, inspect the accelerator pump. On carburetors with a high mileage, it is possible that there may be wear in the area where the flag contacts the accelerator pump pusher, in which case parts will need to be replaced.
Signs of failure in the fuel system
The presence of possible malfunctions in the operation of the vehicle’s power system can be judged by the characteristic signs of the vehicle’s behavior on the road:
- Failure - while pressing the gas pedal, the car continues to move at the same speed (or deceleration) for a short period of time (from 1 to 30 seconds), and only after a while begins to pick up speed;
- A jerk is reminiscent of a failure, but it is more short-lived;
- Rocking - periodic failures;
- Twitching is several jerks that follow each other;
- Sluggish acceleration is a reduced rate of increase in vehicle speed.
In addition, you can judge the presence of malfunctions in the engine power supply system by the following signs:
- Increased fuel consumption;
- The engine does not start;
- Idle speed is reduced or increased;
- Difficulty in starting a hot/cold engine;
- Difficult operation of the car engine in cold mode.
Shift in gas distribution phases, wear on the camshaft cams, incorrect adjustment of heat clearances, reduced or uneven compression in the cylinders, as well as burnt valves significantly reduce the vehicle’s power, cause vibration and increase fuel consumption.
The carburetor and its malfunctions also play an important role. Let's look at the most common carburetor malfunctions using Solex as an example. How to properly clean, check and adjust the carburetor, using the VAZ 2109 as an example, is described in the article. So.
If the cylinder-piston group is worn out, then crankcase gases, oil vapors and tarry substances can enter the carburetor area, clog the filter element of the filter, and also settle on the jets and other elements of the carburetor, thereby disrupting the operation of the engine.
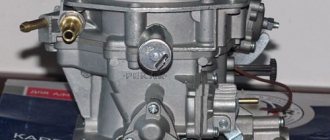
A little about the Solex carburetor
Initially, VAZ equipped its cars with carburetors of the Weber family. These carburetors were completely mechanized. They lacked any electrical wiring and were not very reliable. Practically, they constantly needed attention, since the main struggle of car owners was aimed at returning the engine to idle speed. Only rear-wheel drive cars of the Zhiguli family VAZ 2101, 2103 and 2106 of the early versions were equipped with it.
“Weber” was replaced by “Ozone”, which began to be successfully used on VAZ 2105-07 cars. It was a perfect design, which was equipped with idle economizers and an autonomous system. The idle problem has been resolved. Ozone was also used on Niva cars.
With the advent of the front-wheel drive VAZ 2108 on the assembly line, a perfect design was required, aimed at reducing exhaust toxicity and maximizing fuel economy. This is how Solex was born.
Initially, it was a French design, which was purchased under license and was successfully installed not only on Samaras, but also on Zhigulis. Its design took into account all the mistakes of previous units, and efficiency increased to the limit. A properly tuned mechanism lasts a long time, and maintenance and repairs are cheaper than many modern cars. Unlike the Ozone family, it uses a long rod drive or cable, which significantly softens the accelerator pedal when depressed.
Almost all domestic carburetors are called DAAZ, and an index is written through a dash, the beginning of which corresponds to the car model.
Typical carburetor malfunctions
_If the engine does not start or stalls immediately after starting._ This may be due to the fact that there is no fuel in the float chamber or the composition of the mixture is incorrect (for example, the mixture is too rich or vice versa).
_The engine idles unstable or regularly stalls._ If other carburetor systems are functioning properly, more details, malfunctions are possible due to the following factors:
- Clogged channels or idle jets;
- Malfunction of the solenoid valve;
- Malfunctions in the operation of EPHH elements and the control unit;
- Malfunctions and deformation of the rubber sealing ring - a “quality” screw.
Difficulty starting the engine and fuel consumption
_Difficulty starting a cold engine_ can be caused by incorrect adjustment of the starting mechanism. Partially closing the air damper can cause the mixture to become leaner, which in turn will cause a lack of sparks in the cylinders, and opening it incorrectly after starting the engine enriches the mixture quite richly, so the engine “chokes.”
_Difficulty starting a car when the engine is warm_ can be caused by the fact that a rich mixture enters the cylinders due to the high level of fuel that is in the float chamber. The reason for this may be a maladjustment of the fuel chamber or the fuel valve is not sealed well enough.
_Excessive fuel consumption._ This “defect” is the most difficult to eliminate, since it can be caused by various reasons. Initially, you should make sure that there is no increased resistance to the movement of the vehicle, which is facilitated by braking of pads on drums or discs, violation of wheel mounting angles, deterioration of aerodynamic data when transporting large cargo on the roof or loading the car. Driving style also plays a significant role.
Malfunctions of the carburetor can lead to high fuel consumption:
- EPH system malfunction;
- Clogged air jets;
- Loose closure of the solenoid valve (fuel leakage between the channel walls and the nozzle);
- Incomplete opening of the air damper;
- Economizer defects.
A deep dip until the engine stops completely when the throttle valve of one chamber is open can be caused by a clogged main fuel jet. If the car engine is idling or under light loads, then the fuel consumption of the engine is quite low. Trying to reach full load mode, fuel consumption increases sharply, fuel nozzles that are clogged do not have enough flow, and failures occur in engine operation.
_The car jerks while driving_, as well as sluggish acceleration when “smoothly” pressing the gas, often provokes a low fuel level if the float system is incorrectly adjusted. Rocking, dips and jerking of the car are common phenomena under increased loads, which disappear when switching to cold running. As a rule, they are associated with interruptions in the fuel supply system, as well as the following factors:
- Fuel pump valves are not sealed;
- The fuel intake and carburetor strainers are clogged;
_Disruptions when pressing the gas sharply_, which disappear when the car engine is running for five seconds, in the same mode can be caused by a malfunction of the accelerator pump.
A carburetor failure is usually called a pronounced and fairly long-term decrease in the acceleration of a vehicle. This can happen right up to complete deceleration, despite the openness of the dampers. The longitude and waning phase also determine the depth of the hole.
Why do dips appear when you press the gas sharply?
Classification of failures on the Solex 21083 carburetor:
- Short dip - the car does not respond to the gas pedal for about 2-3 seconds;
- Deep failure - the car does not respond to the pedal for about 10 seconds, sometimes stalls;
- Jerking – The car jerks every second and as the speed increases, the jerking stops.
Before considering the carburetor problem, it is necessary to remember that this can be influenced by a contaminated power system (air filter, fuel hoses and fine filter), as well as an ignition system that is not configured correctly. If you are sure that their operation is correct, then you can conclude that the carburetor is faulty.
The phenomenon itself may be due to a lean or too rich mixture that enters the cylinders. Further diagnostics depend on the symptoms of the malfunction and the problem can be eliminated at the lowest cost.
Ways to eliminate failures
ATTENTION! A completely simple way to reduce fuel consumption has been found! Don't believe me? An auto mechanic with 15 years of experience also didn’t believe it until he tried it. And now he saves 35,000 rubles a year on gasoline! Read more"
Before you interfere directly with the design of the carb with the intention of eliminating failures, you need to make sure that there is an uninterrupted supply of fuel fluid to the carb. It is also recommended to ensure that the ignition is functioning without failure. It is imperative to test the cleanliness of the fuel intake and the gasoline supply line from the fuel tank to the carburetor, as well as the serviceability of the filters and their tightness.
There are also some other recommendations that you must follow.
- It is especially important to check the ignition system at the UOZ, the tightness of hoses and tubes, the serviceability of spark plugs, etc. Only after all the tests can you remain convinced that the cause of the problem was a problem in the carburetor.
- It is also recommended to carefully evaluate the housing of the fuel mixing device in order to determine the presence of various defects.
If no problems were found, the carb should be removed and then the cover should be removed. Continue a thorough inspection.
- The fittings must have a seal. If, for example, there is no rubber seal on the screws, then the element will not be able to function normally, and all attempts to adjust the quality of the mixture or engine speed will remain fruitless.
- The filter mesh must be clean a priori and not have any breaks.
- The outer part of the needle valve is a tight fit on the lid. In other words, it must be firmly fixed.
- The needle ball is free to go in and out.
- The floats should not have any jamming or distortion.
- The jets must be clean, the channels must not be clogged, otherwise this will negatively affect the operation.
- The valve must tightly close the inlet hole, and it must turn without jamming. It has a lever, as you know, which it is desirable not to have even the slightest play.
- The needle that locks and opens access to fuel must not leak and be sealed.
- The jets are marked. So, it must fully comply with the values given in the manual of a specific car model. The channel cross-section should not be smaller or larger. Often jets are changed in order to reduce fuel consumption, but this affects failures during acceleration in the future.
- Valves or jets are screwed in thoroughly.
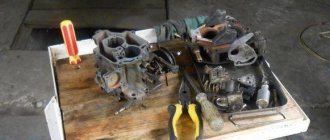
Dismantling, disassembling and cleaning the carburetor
In order to restore the functionality of the Solex carburetor, you must:
- remove the device from the engine;
- take it apart;
- clean and rinse;
- replace faulty elements;
- assemble and install on the engine;
- make adjustments.
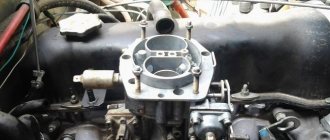
Removing the Solex carburetor from the engine
- slotted and Phillips screwdrivers;
- keys for 7, 8 (2 pieces), 10, 13 (preferably a cap).
- Raise the hood.
- Using a 10mm wrench, unscrew the air filter cover fixing nut.
- We snap off the latches (4 pcs).
To remove the filter, you need to unscrew the nut and press the latches
To remove the filter housing you need to unscrew 4 nuts
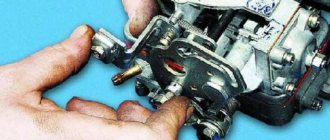
Disconnect the wire tips from the valve and from the quantity screw contact
Disconnect the vacuum hose from the fitting
Disconnect the fuel hoses
Disconnect the crankcase ventilation hose
Remove the air damper drive rod
Disconnect the throttle valve cable
Remove the carburetor from the studs
There should be three gaskets under the carburetor: top (thickest), middle (heat insulating) and bottom (sealing).
Video: dismantling the Solex carburetor
Disassembling the Solex carburetor
- crosshead screwdriver;
- hammer;
- drill (knitting needle) with a diameter of 2.5 mm;
- keys for 11, 13, 14;
- tweezers;
- awl;
- toothpicks.
- Unscrew the five screws securing the cover with a Phillips screwdriver. Disconnect the cover.
Unscrew 5 screws
Disconnect the float axis
Carefully remove the cardboard spacer
Unscrew the needle valve
We unscrew the valve, remove the jet, seal, cup from it
Unscrew the plug and remove the filter
Removing and disassembling the starting device
Removing the air damper
Remove the seal on the fuel channel tube
Unscrew the air jets
We remove the sprayer by prying it with a screwdriver
We unscrew the fuel nozzles (if necessary or, for example, in order to reduce fuel consumption, they can be replaced later)
We remove the diffusers using pliers
Disassembling the accelerator pump
We disassemble the economizer of power modes
Disconnect the tip of the screw wire, then unscrew the screw itself
Removing the throttle control sector
Remove the accelerator pump drive cam
We disconnect and remove the throttle valves - the carburetor is completely disassembled. Assembly is carried out in reverse order
Important: do not disconnect the dampers or remove their axles unless necessary! If installed incorrectly, they may become skewed, which will lead to incomplete opening or closing!
Cleaning and flushing the Solex carburetor
- a compressor or pump with a tapered fitting at the end of the hose;
- carburetor cleaning liquid in an aerosol can or acetone;
- toothbrush (preferably a children's one);
- thin wooden spatula;
- toothpicks;
- clean rag.
Before washing the carburetor, it is recommended to soak the disconnected elements in a special washing liquid for 8–10 hours. This does not apply to rubber and plastic products!
If you don't have that much time, spray the parts on the outside and inside with carburetor cleaner and wait 30 minutes.
Carburetor cleaning fluid
The most convenient way to remove external stains is with a toothbrush. Dirt deposits on the inner surface of the carburetor cover and body are removed using a thin wooden spatula wrapped in a clean rag.
After washing, parts with internal openings (nozzles, diffusers, tubes, and internal channels of the carburetor cover and body) must be blown with a stream of compressed air (preferably at least 6 atmospheres).
Replacement of faulty elements and assembly of the Solex carburetor
When completely disassembling the carburetor, it is recommended to replace all its elements that show signs of damage or deformation. The best solution when repairing a device yourself is to purchase a repair kit, which includes all the parts that may need to be replaced:
- jets;
- springs;
- seals;
- diaphragms;
- gaskets (carburetor covers and housings);
- needle valve;
- filter;
- screws (quality, quantity);
- repair studs, etc.
Assembly/cleaning or other actions with the carburetor are carried out using the Solex carburetor repair kit.
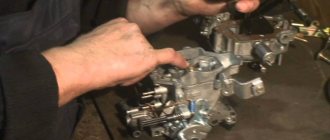
Having replaced the rejected elements, we proceed to assembling the carburetor. We produce it in the reverse order to that described above. We do not screw the carburetor cover to the body!
The concept of failure, their varieties
What does failure mean? How does it differ from jerking, twitching or swinging? Let's try to understand this in more detail.
- The automotive term “slump” means sluggish operation of the power unit when the driver presses the accelerator pedal. The same can happen when starting, accelerating, etc. The engine reacts so poorly that the speed may not increase at all for several seconds in a row.
- Rocking - several failures following each other. Terrible and unpleasant situation on the road.
- A jerk is the same failure, but short, lasting no more than 500 milliseconds.
- A twitch is a series of several jerks.
It is also recommended to be able to distinguish failures by their nature. In accordance with this, it is possible to draw conclusions about one or another cause of the malfunction.
Failures at start
If dips are observed only at start, this clearly indicates a clogged transition system, low fuel level in the chamber or poor sealing.
- Over time, the size of the holes on any carb decreases due to deposits. Accordingly, the supply of fuel decreases and the fuel assembly becomes depleted. To clean the transition system, you need to dismantle the carb, turn it inside out and clean it with something sharp, for example, a soft wire. It is highly recommended not to clean the holes with hard material, as this may damage the holes. At the final stage, the working surfaces are washed with acetone and blown.
- A low level of fuel in the chamber makes the fuel assembly poorer. To accurately determine this situation, you need to do this - let the power plant run for a while, then remove the upper part of the carb and measure the gasoline level with a ruler, then compare with the recommended values. For example, for Solex the value is 29 mm. It is necessary to carry out the measurement procedure quickly after removing the cap, since gasoline tends to evaporate in a fraction of seconds.
- The tube supplies discharged air to the ignition vacuum corrector. First, it must be tested for the presence of chips or tears, and then for tightness of fit onto the fitting.
Dips during driving indicate a malfunction of the accelerator pump, econostat or economizer. It is also possible that the lower part of the housing may become bent due to over-tightening.
In addition, you need to be attentive to the behavior of the car while driving. For example, if the car jerks and there is sluggish acceleration, this may indicate insufficient fuel either in the chamber or in the tank.
Forget about fines from cameras! An absolutely legal new product - Traffic Police Camera Jammer, hides your license plates from the cameras that are installed in all cities. More details at the link.
- Absolutely legal (Article 12.2);
- Hides from photo and video recording;
- Suitable for all cars;
- Works through the cigarette lighter connector;
- Does not cause interference to radios and cell phones.
Solex 21083 on classic. Dips. — DRIVE2
The essence of the problem:
short dip when pressing the gas quickly (starting off, after changing gears, after changing engine braking to acceleration). This means the quick opening of the first chamber from 1/3 or more, and not when “slippers hit the floor”. The failure is accompanied by a short-term thoughtfulness of the car on universal themes, then inspiration comes, and it rushes off like crazy. Needless to say, this behavior of the iron horse is incredibly annoying, especially in the urban cycle.
Search for truth.
It was decided to start by replacing the EKXX fuel nozzle with a smaller one. Initially it was set at 42. At 40 - a little better; at 38 - a little more; ignition earlier is a little better; a richer mixture... Result: the same nonsense, but with a different sauce. The overall improvement in the picture is extremely negligible, plus we have too early ignition (sea trials showed). By the way, a simple way to determine the correct setting of the ignition timing on the go: on a horizontal, flat and clean section of the road at a speed of 50 km/h in 4th gear, put the gas to the floor and listen (coolant temperature 90 degrees, tires inflated, good gasoline). 1) If a booming low engine sound accompanies acceleration, it means late ignition; 2) if you hear constant detonation (a loud knock) - early ignition. 3) if short-term detonation is replaced by a booming sound during acceleration - everything is ok.
So, let's dig further. Replacing the EKXX with a new one, then a used one, didn’t give anything either. Replacing spark plugs, explosive wires, distributor cap (BSZ installed), switch, gas station - similarly did not bring success.
Solution.
Adjusting the “kettle” in the carburetor. Firstly, transfer both spouts to the first chamber (why would it pour onto the closed valve of the second chamber). Secondly, adjusting the jet so that it hits exactly the gap between the chamber wall and the slightly opening damper of the first chamber. As close to the chamber wall as possible. And so that the streams do not intersect. Vroom-vroom)))