Solex carburetor 21053 20 calibration data
I thought for a long time about the Solex
for the classics, compared prices, there is DAAZ 21053-1107010-20 and PEKAR K178I.21053-1107010-20, I almost bought PEKAR, but DAAZ unexpectedly
dropped in price
from 3990r to 3790r, and then completely to 2990r
so what did I know about carburetors for classics with an engine capacity of 1.5-1.6:
1) for classics (2105, 2107, 2104) with an engine volume of 1.5-, 1.6, a SOLEKS type carburetor is intended 21053-1107010-20
- no options! (no 083 - catch the crap, catch it, catch it!)
2) consumption with a SOLEKS carburetor compared to a standard carburetor 2107-1107010 will be MORE!
, the car is more responsive, but you have to pay for everything - on average 0.5 liters more per 100 km
I didn’t install it myself - I installed it without an economizer, I don’t know yet whether it’s better or not
I recommend
to watch the blog of carburetor engineer from Dmitrovograd
Nail Poroshina
- very interesting! Video blog of Nail Poroshin (Dmitrovograd)
About Carburetor 21053-20 (SOLEX)
so that Solex does not clog
(they have such a disadvantage) you can install a mesh and not have any problems at all, as well as a cut 4th “cam from Nail”
1) the car has become a little faster2) you need to warm up less to get moving3) yes, the car is responsive! (smooth ride when changing gears) 4) even the consumption seemed to decrease, even without an economizer - I think the standard carb was a little clogged and ate gasoline very well
and the result: an injection engine is not needed, Solex-a 21053-20 is enough for the ears
I recommend installation!
continuation of a story
How to adjust carburetor idle speed
I drove for a day, I looked at the idle speed of 1000 somewhere, turned it up to 750, and the next day the idle speed disappeared altogether, as soon as the car stopped at the intersection... I turned it back up... but the idle speed floated 850-1200, so I drive (it was decided - the plug flew out in manifold, plugged it in with a new one and carefully set the speed with the screw - everything was fine)
PLEASE COMMENT on the installation, how should it be done?
Comparative analysis of calibration data and parameters of Solex carburetors 2108-1107010, 21081-1107010, 21083-1107010
Issue price: 3,500 ₽
Delivery by Russian Post (cash on delivery, no prepayment)
Advantages: the most widespread network in Russia, delivers to any corner of the country, including remote ones. Flaws:
- high cost of delivery of heavy or large parcels, as well as the weight of one parcel should not exceed 20 kg;
- long delivery times and queues in large cities for receipt.
To send your order by Russian Post:
- Place an order in our online store by phone or on the website (registration is not necessary);
- After we receive it, our manager will contact you by phone to clarify the cost, delivery time and your wishes. Next, we will pack your order carefully and then send it to you;
- You will receive the tracking number of the shipment via SMS from us and from the Russian Post; the message will indicate the full cost of the purchase, including delivery to your locality (that is, the cost of your order plus the cost of delivery by cash on delivery). You can control the status of the order coming to you using our tracking service, as well as independently, on the Russian Post website using the track number;
- To the Post Office, you will only have to pay the cost, including delivery.
Delivery time may vary depending on how far your locality is from Togliatti and usually ranges from 5 to 14 days.
The cost of delivery is calculated based on the volume, weight of the selected product and the distance to the recipient's settlement.
Required for sending:
- indicate full name recipient;
- Your mailing address;
- Your phone number (contact);
- Post office code.
Russian Post commission for cash on delivery service:
- purchase price up to 1,000 rubles. – 70 rubles + 5% of the amount;
- purchase price from 1,000 to 5,000 rubles. – 80 rubles + 4% of the amount;
- purchase price from 5,000 to 20,000 rubles. – 180 rubles + 2% of the amount;
- purchase price from 20,000 to 500,000 rubles. – 280 rubles + 1.5% of the amount.
Russian Post - Delivery of goods up to 20 kg throughout Russia. https://www.pochta.ru
Delivery time and cost Track the parcel Calculate delivery by mail
What jets to put on Solex 21053 for engine 21011
- Registration
- Entrance
- To the beginning of the forum
- Forum Rules
- Old design
- FAQ
- Search
- Users
Bellamy
In general, this carb is designed for engines of 1500 and 1600 cc
you can try to do this. 1 camera 97.5/165 2 camera 97.5/125
21081-1107010 — designed for 1.1 engine 2108-1107010 — designed for 1.3 engine
I would try to install jets from 2108-1107010.
you can try to do this.
1 camera 97.5/165
Checking and repairing the ehph system of carburetor 2105, 2107 ozone
2 camera 97.5/125
I don’t think it will work at all. at 107.5/165 this is already a complete vegetable.
1cam:107.5/140ZD and 2cam:110/165ZC.
Beer
Yes, I was already thinking about un from the Niva. All that remains is to get a normal one. otherwise I bought it from the eight... and there are holes in the spouts as if they were picked with a fork)))))))
There are twitches when driving in first place, if you are almost rolling and the pedal is pressed slightly. If you don’t press at all or press a little more, then there is no twitching.
95 jet. Mmm. I wonder how it will run on a 23 diffuser and on a 1200 engine. But I’ll ask a chisel friend for one. I'll put it out of interest. compression 11 in all cylinders.
Source
Switches located on the steering column
The turn signal switches are located under the steering column, and the hazard warning light button is on the column itself. The blinking of the direction indicators with a frequency of 90±30 times per minute is provided by the alarm relay at a voltage of 10.8–15.0 V. If one of the direction indicators malfunctions, the blinking frequency of the other indicator and warning lamp doubles.
Scheme for switching on the hazard warning lights and direction indicators: 1 - headlights with front direction indicators; 2 - side direction indicators; 3 - mounting block; 4 - ignition relay; 5 — ignition switch; 6 — relay-interrupter for direction indicators and hazard warning lights; 7 - turn signal indicator lamp located in the speedometer; 8 — rear lights with direction indicator lamps; 9 — alarm switch; 10 - turn signal switch in a three-lever switch; A - to terminal 30 of the generator; B - numbering of plugs in the hazard warning switch; C - order of conditional numbering of plugs in the turn signal and hazard warning relay interrupter
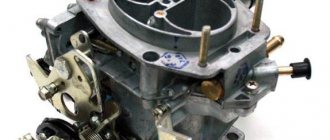
Carburetor VAZ 2105
What is a carburetor and what are its functions? Today, carburetor modifications of vehicles are considered to be “outdated”, since they have been replaced by more “tenacious” injection ones.
So, the carburetor is the most important mechanism in a car engine. Its main purpose is to prepare the fuel-air mixture and supply it to the engine cylinders. Simply put, a carburetor is needed to ensure that the engine receives fuel in the doses necessary for operation.
The air filter was removed for demonstration; the carburetor is located directly below the filter housing.
Carburetor design
The engines of the VAZ 2105 car are equipped with carburetors of type 2105–1107010. This number must be indicated on a black plate, which is attached to the cover of the carburetor itself.
The device has two chambers so that the processes of formation of the fuel-air mixture and its supply to the cylinders occur quickly and correctly. In fact, structurally, the carburetor has a huge number of small parts interconnected, but technically the device is not considered complex.
The cast body combines many small parts, each of which performs its own function
In order for the engine to operate in different modes (warm-up, idling, medium load and high speed), the carburetor consists of three main parts:
- The upper one consists of the device cover and fittings for fuel supply.
- The middle one is the carburetor body itself, which houses two internal combustion chambers and diffusers.
- Lower - includes the float chamber and throttle valves.
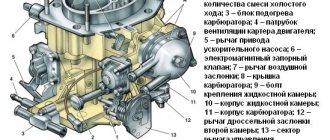
Parts of the carburetor body 2107–1107010: 1 — rod of the pneumatic drive of the second throttle valve; 2 — pneumatic drive housing; 3 - diaphragm; 4 — pneumatic drive cover; 5 — fuel jet of the transition system of the second chamber; 6 — fuel nozzle body; 7 — small diffuser of the second chamber; 8 — accelerator pump nozzle; 9 — screw valve of the accelerator pump; 10 — main air jet of the second chamber; 11 — emulsion tube of the second chamber; 12 — main air jet of the first chamber; 13 — emulsion tube of the first chamber; 14 — main fuel jet of the second chamber; 15 — main fuel jet of the first chamber; 16 — accelerator pump adjusting screw; 17 — fuel jet of the idle system; 18 — fuel nozzle body; 19 — return spring of the accelerator pump; 20 — accelerator pump diaphragm; 21 — accelerator pump cover; 22 — small diffuser of the first chamber; 23 — lever return spring; 24 — three-arm air damper control lever; 25 — connection rod with the throttle valve; 26 — throttle valve return spring bracket
The essence of the operation of the carburetor unit on the VAZ 2105 comes down to the following processes:
- A strictly limited amount of gasoline enters the float chamber through a special valve.
- Fuel is directed through the jets to chamber No. 1.
- Here, gasoline is crushed into tiny pieces and mixed with parts of air.
- If the maximum amount of fuel is required (for example, during acceleration), then chamber No. 2 begins to work in the same way.
- After the fuel-air mixture is formed, the accelerator pump directs the fuel to the diffusers and then directly to the cylinders.
see also
Comments 68
Since now I’m having complete troubles with the carb, I’m thinking about replacing it with 21053-1107010-20, please tell me since this carb has a gas drive on the other side. Is it possible to screw sector 08 there since I now have my own carb 2106 converted to cable gas.
hi, I won’t tell you, it was given
Regarding EPHH. It is best to choose a jet that will suit you in terms of performance (if the standard one suddenly doesn’t suit you for some reason) and no needle biting. In terms of connection - according to the circuit from the switch (if BSZ) - the most correct option. From the coil either in an emergency (wire break) or during contact ignition. Correctly connected EPHH, albeit slightly, nevertheless reduces consumption. When the gas is abruptly released, it closes the XX channel and prevents the vacuum created in the throttle space from greedily sucking out the fuel. Verified. Carburetor adjustment: 1. NO flags No. 4 nafik are needed, standard No. 7 works perfectly and correctly. 2. We install the elephant correctly (after maybe fucking for a couple of hours) 3. We stock up on jets of different sizes and select the optimal sizes for OUR engine. From “tuning” it really helps (during the tuning process) to drill holes in the upper part so that the jets can be changed without removing the carb. Sticks for Lyulya Kebab help in removing the jets and everything is done in a few minutes. In general, there is comrade Evgeniy Travnikov (WerWolf-DVS), who made a stunning series of videos about Solex with theory, practice and advice. On YouTube channel ICE Theory. After watching these videos, questions about Solex no longer arise.
On mine, replacing the Weber with a Solex, I also installed cable throttle. Some people think this is unnecessary, but I liked it better than the old inadequate traction.
Thanks for the good advice on finding a carburetor. We should try to find one too. Only one thing is interesting: which jets are best installed on 21061 (1.5) so that the flow rate is closer to optimal?
Immediately use the jets according to the book, and then use the butt meter to select a comfortable flow/injection ratio. Even the same engines behave slightly differently and what is good for one is not so good for another. I advise you to pay attention to 21081 near Tavria. Once in my Moskvich it turned out to be the most economical and at the same time very cheerful. How this will show itself at a VAZ - I don’t know.
What is the fuel level in the float chamber? Make it about 27-29 mm. As a last resort, take another carb from a friend and check how it goes. Is there any air leakage anywhere near the stove?
Save your friend! I don’t know where to write anymore... I have a seven 1.6 and this carb is 21053-20, I’ve been driving for 1.5 years already, the whole car has been serviced, the consumption does not drop below 11, and this is only in a very quiet mode (((When I got to the carb, I noticed that the jets there are from carb 21083, which seems to be generally under 1.3 and decided to look for relatives (last column in the photo). Only there were none left anywhere. 140 air never found, I only have 145 or 150, I installed them and went for adjustment. The carburetor guy just opened the carb and asked, where are the jets, what were there? I showed him what was there and he installed them again, no matter how I argued with him, he convinced me that this was the best option... there’s also a pump from the Niva into one chamber at 45. What do you think about my situation? and what was your consumption with this carb, so that I can navigate?
Replacing jets
You can't just change the jets. you must understand why and how this is done. Therefore, you should familiarize yourself with what you have to work with. Fuel jets supply a certain amount of gasoline to the engine, which is drawn there thanks to diffusers. The amount of gasoline drawn through the nozzles directly depends on the engine size. It follows that for proper fuel consumption it is necessary to install smaller jets on a larger engine volume.
Adjusting the fuel level
Select jets first for fuel, and then for air. Do not touch the secondary Solex chamber until you select the jets for the first one. The easiest way would be to find a factory Solex, which already has the required jets designed for a similar engine size. However, do not forget that not all Solexes are suitable for VAZ engines.
For some, the Solex will work immediately, while for others it will not work at all. Therefore, you don’t need to think that you can take jets for your Solex from any other carburetor of a similar volume. Find one that is suitable for Zhigulis, and buy the same jets as on it. So, Solex 21053 for classic is installed and configured. Don't forget to clean it regularly to ensure quality performance.
Solex 21083 on Zhiguli
The 83rd Solex is in great demand among Zhiguli owners. However, not everyone knows that this Solex is not intended for engines of the VAZ 2101 -2107 model range. Such incompatibility can be expressed in gas failures and insufficient power developed by the engine.
In particular, there may be problems during transient operation of the carburetor. This manifests itself at low throttles: the car begins to twitch and lose traction. The second point is the loss of power at maximum throttle. Solex 21083 prepares a leaner air-fuel mixture than required by the Zhiguli engine. Simply put, Zhiguli cars do not have enough fuel.
The solution to the problem is to replace the jets. First of all, you need to replace the main fuel jets of the first and second chambers. Fuel nozzles marked 100 have proven themselves well, which corresponds to a hole diameter of exactly 1 mm. We install such jets in both the first and second chambers of the carburetor. Attention!
Most carburetor repair kits are sold with NON-WORKING jets (the hole diameter does not match the markings). Therefore, you need to purchase only original, factory jets.
If it is not possible to purchase such jets, you can make them yourself. To do this you will need a drill with a diameter of 1 mm. However, here too there is a danger that you will get a drill with a diameter that does not correspond to the marking. Therefore, before drilling a hole in the nozzle with a drill, it is strongly recommended to check the diameter of the drill with a micrometer.
We screw the manufactured jets into the carburetor and go check the driving performance of the car. If gas dips and twitching at low throttles do not disappear, then the hole in the idle jet should be enlarged. Thus, we will increase the fuel supply in the transition system of the first chamber. A thin wire with a diameter of no more than 0.4 mm is suitable for this. Attention!
Be careful, the idle jet hole should be widened by only 0.02-0.03 mm. We put everything in place and wrap it tightly. valve with a key (without fanaticism, of course). Adjusting idle speed.
You can read how to adjust the idle speed here
.
If the dips do not disappear, you should check the serviceability of all carburetor and ignition systems.
If you want to get more dynamic vehicle performance, you can replace the accelerator pump nozzle. We replace the original sprayer with two “spouts” with a single “Nivovsky” (installed in the Solex 21073 carburetor, jet number 45).
In addition to modifying the carburetor, the dynamic characteristics of the car and its efficiency are greatly influenced by the correctly set ignition timing.
Main malfunctions of the electrical equipment of the VAZ 2104
The main faults in electrical wiring are short circuits and broken wires. When a short circuit occurs, fuses blow, relays and devices fail. Sometimes a fire may even occur. When a wire breaks, the nodes to which this wire is connected stop working.
Mounting block
All electrical equipment is connected through fuses located in the mounting block and providing protection for this equipment in case of a short circuit. On the VAZ 2104, mounting blocks made in the Russian Federation or Slovenia are installed. The latter cannot be disassembled and cannot be repaired.
Table: fuses in the VAZ 2104 mounting block
| Fuse (rated current) | Protected circuit equipment |
| 1 (8A) | Reversing rear lights; Heater motor; Warning lamp, rear door glass heating relay. |
| 2 (8A) | Electric motors for windshield wiper and washer; Electric motors for headlight cleaners and washers; Windshield wiper relay. Relay for headlight cleaners and washers (contacts). |
| 3 (8A) | Spare. |
| 4 (8A) | Spare. |
| 5 (16A) | Heating element and rear door glass heating relay. |
| 6 (8A) | Cigarette lighter; Socket for portable lamp; Watch; Signal lights for open front doors. |
| 7 (16A) | Sound signals and signal activation relays; Engine cooling fan electric motor and electric motor switching relay (contacts). |
| 8 (8A) | Switch and relay-breaker for direction indicators in emergency mode. |
| 9 (8A) | Generator voltage regulator (on vehicles with a GB222 generator). |
| 10 (8A) | Turn indicators when turned on and corresponding warning lamp; Fan motor activation relay (winding); Control devices; Battery charge indicator lamp; Indicator lamps for fuel reserve, oil pressure, parking brake and brake fluid level; Parking brake warning light relay; Carburetor solenoid valve control system. |
| 11 (8A) | Rear brake lights; Interior lighting. |
| 12 (8A) | Right headlight (high beam); Coil of the relay for turning on the headlight cleaners (with the high beams on). |
| 13 (8A) | Left headlight (high beam); Indicator lamp for turning on the high beam headlights. |
| 14 (8A) | Left headlight (side light); Right rear light (side light); License plate lights; Engine compartment lamp; Indicator lamp for turning on the side light. |
| 15 (8A) | Right headlight (side light 2105); Left rear light (side light); Cigarette lighter illumination; Instrument lighting; Illuminated glove compartment. |
| 16 (8A) | Right headlight (low beam); Coil of the relay for turning on the headlight cleaners (with the low beam on). |
| 17 (8A) | Left headlight (low beam 2107). |
Now about the setup itself
Maintaining the required fuel level in this device is ensured by a float mechanism.
Setting the float mechanism
- Start the car engine and let it idle for 2-3 minutes;
- Remove the carburetor cover;
- Check the fuel level in the float chamber. It should be 28 mm.
In case of deviation, we perform the following actions:
- Measure and adjust the distance between the cover gasket and the float when the float tongue touches the needle valve ball. It should be 6.5±0.25 mm. Adjust by bending the tongue;
- Check the maximum valve needle travel. It should be 8 mm. To check, it is necessary to measure the distance between the cover gasket and the maximum retracted float. It should be 14±0.5 mm. The deviation is eliminated by acting on the bracket;
- Visually check that the tongue of the needle valve axis is perpendicular and that the float is parallel to the bottom plane of the cover. If there are any violations, correct them.
If all of the above steps fail to achieve a stable fuel level (28 mm) in the float chamber, then the needle valve must be replaced.
Adjusting the starting device of the VAZ 2105 carburetor
- Using the thrust handle located in the cabin, close the air damper;
- Check that the rod shank is at the end of the carburetor trigger rod groove. If there is a violation, correct it by bending the rod;
- Remove the cover and measure the gap between the edge of the air damper and the chamber wall with the starter rod recessed (we recess the rod using a screwdriver with the rod disconnected). It should be 5.0-5.5 mm. We adjust by rotating the adjusting screw of the starting device.
Idle adjustment
This type of work should be carried out on a warm engine.
- Use the mixture quantity screw to bring the engine to 850 rpm;
- Use the quality screw to bring the speed to the maximum level;
- Use the quantity screw to reduce the speed to 850;
- Use the quality screw to bring it to maximum again;
- Having thus achieved 850 rpm, tighten the quality screw until the engine “shakes”;
- By unscrewing the quality screw, achieve stable engine operation.
With proper adjustment of the VAZ 2105 carburetor, fuel consumption in the summer should not exceed:
- outside the city on the highway at a speed of 90 km/h – 7 – 7.5 liters per 100 km;
- during the urban driving cycle - 8.5 - 9 liters.
If you cannot do this work on your own, it is better not to torture yourself and the car, but contact the AvtoVAZ service center.
In 1980, the automobile plant in Tolyatti released a new modification of the Fiat bestseller of the mid-60s, the VAZ 2105. The model differed from its predecessors in a more modern appearance, front rectangular block headlights, a characteristic angular appearance, new rims that were not designed to install hit wheels caps, as well as a more comfortable interior and a spacious trunk. The car also had technical innovations, one of which is the subject of our story today - the VAZ 2105 Ozone carburetors.
Adjusting the fuel level in the float chamber of the carburetor 2105, 2107 Ozone
If the fuel level in the carburetor float chamber is incorrectly adjusted, it is likely that the car’s engine may not start at all (both cold and hot), or will start and stall; power and throttle response may deteriorate, and unstable operation will appear in all modes.
The correct operation of the carburetor depends on the correctness of this adjustment. Tools required for adjustment
- round probe or drill with a diameter of 6.5 mm
- template (strip) made of metal or plastic 15 mm wide
Before making adjustments, check the parallelism of the side surfaces of the float relative to the imprint of the walls of the float chamber on the cardboard spacer. This will prevent the float from possibly touching the walls of the float chamber.
checking the parallelism of the side surfaces of the float relative to the imprint on the cardboard gasket of the carburetor cover 2105, 2107 Ozone
In addition, it is advisable to check the serviceability of the needle valve before making adjustments, since if the valve is faulty, adjusting the fuel level loses all meaning.
Adjusting the fuel level in the float chamber of carburetors 2105, 2107 Ozone
1. Remove the carburetor cap.
The image shows the approximate fuel level you should see when you remove the carburetor cap. The line runs in the middle of the inclined plane of the float chamber.
approximate fuel level in the float chamber of carburetors 2105, 2107 Ozone
2. Place it vertically, with the fuel supply fitting facing up.
The float should hang, barely touching the spring-loaded ball at the top of the needle with its tongue, but not recess it. The tongue itself must be perpendicular to the axis of the needle valve. If not, bend it with pliers. This operation must be carried out very carefully, since there should be no nicks or dents left on it.
distance from the float to the cardboard spacer (carburetor cover is vertical)
3. Measure the distance from the carburetor cover gasket to the float. It should be 6 -7 mm. In this case, the gasket should be pressed tightly against the carburetor cover body. The most convenient way to measure is with a drill with a diameter of 6.5 mm.
If the measured distance does not correspond to the required one, achieve the required value by bending the float bracket. To prevent the float from knocking on the bottom of the float chamber, another adjustment must be made.
1. Place the removed carburetor cover in a vertical position again. 2. Use your hand to move the float to the farthest position. 3. Measure the distance between the removed float and the cover gasket.
It should be 15 mm, which corresponds to a float stroke of 8 - 9 mm. If it does not correspond to this size, then it is necessary to bend or bend the stop (tongue) located on the float bracket, which rests on the needle valve body and limits the travel of the float.
measuring the full stroke of the float
The measurement can be carried out with a pre-prepared strip of metal or plastic 15 mm wide.
After adjusting the fuel level, replace the carburetor cover. It may be necessary to adjust the idle speed.
source
Device Description
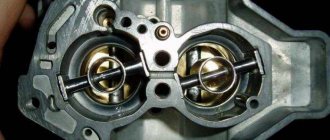
The carburetor design is quite simple, if you do not delve into additional details. There are two pass-through chambers on top. Their main task is to suck air into the apparatus for further mixing it with gasoline. Gasoline is injected through jets, and it is mixed with air through diffusers. Those, in turn, are located right in the center of the Solex cameras. They create the necessary vacuum in pressure for fuel to be drawn in. The fuel comes from a float chamber located to the right of the diffusers. The level of gasoline in them must correspond to the standard, which will be discussed below. It is regulated using a special float and a locking needle.
This is all the top part of the carburetor. The last part is the cover located directly above the float chamber. It must be removed during work. The function of the lower part is to ensure the operation of the upper part. Everything below the float chamber is called the carburetor body. Its components are the lower ends of the primary and secondary chambers (the same ones that serve for air flow) and the throttle valves located inside them, the task of which is to open and close the through movement of oxygen. The dampers begin their work one by one, first opening the primary and then the secondary chamber.
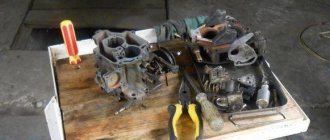
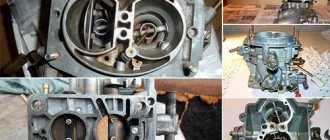
Dismantling, disassembling and cleaning the carburetor
In order to restore the functionality of the Solex carburetor, you must:
- remove the device from the engine;
- take it apart;
- clean and rinse;
- replace faulty elements;
- assemble and install on the engine;
- make adjustments.
Removing the Solex carburetor from the engine
- slotted and Phillips screwdrivers;
- keys for 7, 8 (2 pieces), 10, 13 (preferably a cap).
- Raise the hood.
- Using a 10mm wrench, unscrew the air filter cover fixing nut.
- We snap off the latches (4 pcs).
To remove the filter, you need to unscrew the nut and press the latches
To remove the filter housing you need to unscrew 4 nuts
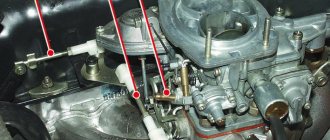
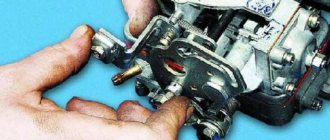
Disconnect the wire tips from the valve and from the quantity screw contact
Disconnect the vacuum hose from the fitting
Disconnect the fuel hoses
Disconnect the crankcase ventilation hose
Remove the air damper drive rod
Disconnect the throttle valve cable
Remove the carburetor from the studs
There should be three gaskets under the carburetor: top (thickest), middle (heat insulating) and bottom (sealing).
Video: dismantling the Solex carburetor
Disassembling the Solex carburetor
- crosshead screwdriver;
- hammer;
- drill (knitting needle) with a diameter of 2.5 mm;
- keys for 11, 13, 14;
- tweezers;
- awl;
- toothpicks.
- Unscrew the five screws securing the cover with a Phillips screwdriver. Disconnect the cover.
Unscrew 5 screws
Disconnect the float axis
Carefully remove the cardboard spacer
Unscrew the needle valve
We unscrew the valve, remove the jet, seal, cup from it
Unscrew the plug and remove the filter
Removing and disassembling the starting device
Removing the air damper
Remove the seal on the fuel channel tube
Unscrew the air jets
We remove the sprayer by prying it with a screwdriver
We unscrew the fuel nozzles (if necessary or, for example, in order to reduce fuel consumption, they can be replaced later)
We remove the diffusers using pliers
Disassembling the accelerator pump
We disassemble the economizer of power modes
Disconnect the tip of the screw wire, then unscrew the screw itself
Removing the throttle control sector
Remove the accelerator pump drive cam
We disconnect and remove the throttle valves - the carburetor is completely disassembled. Assembly is carried out in reverse order
Important: do not disconnect the dampers or remove their axles unless necessary! If installed incorrectly, they may become skewed, which will lead to incomplete opening or closing!
Cleaning and flushing the Solex carburetor
- a compressor or pump with a tapered fitting at the end of the hose;
- carburetor cleaning liquid in an aerosol can or acetone;
- toothbrush (preferably a children's one);
- thin wooden spatula;
- toothpicks;
- clean rag.
Before washing the carburetor, it is recommended to soak the disconnected elements in a special washing liquid for 8–10 hours. This does not apply to rubber and plastic products!
If you don't have that much time, spray the parts on the outside and inside with carburetor cleaner and wait 30 minutes.
Carburetor cleaning fluid
The most convenient way to remove external stains is with a toothbrush. Dirt deposits on the inner surface of the carburetor cover and body are removed using a thin wooden spatula wrapped in a clean rag.
After washing, parts with internal openings (nozzles, diffusers, tubes, and internal channels of the carburetor cover and body) must be blown with a stream of compressed air (preferably at least 6 atmospheres).
Replacement of faulty elements and assembly of the Solex carburetor
When completely disassembling the carburetor, it is recommended to replace all its elements that show signs of damage or deformation. The best solution when repairing a device yourself is to purchase a repair kit, which includes all the parts that may need to be replaced:
- jets;
- springs;
- seals;
- diaphragms;
- gaskets (carburetor covers and housings);
- needle valve;
- filter;
- screws (quality, quantity);
- repair studs, etc.
Assembly/cleaning or other actions with the carburetor are carried out using the Solex carburetor repair kit.
Having replaced the rejected elements, we proceed to assembling the carburetor. We produce it in the reverse order to that described above. We do not screw the carburetor cover to the body!
Jets and accelerator pump
SAVING FUEL gasoline WITH YOUR OWN HANDS.
SOLEKS 21083 CARBURETOR jets. A jet (injector) is a device for supplying fuel in a certain amount. The engine draws in air through the opening of a large diffuser. At the same time, fuel is dosed through the nozzle. The amount of air sucked in through the diffuser, as well as the amount of gasoline drawn in, depends on the engine displacement. Because of this, on engines with large volumes, carburetors with small jets are installed.
In order for the jet to produce a normal fuel assembly, not lean, it is necessary to find a carburetor that was initially designed for a certain engine volume or as close as possible to it. First, select the fuel and then the air jet. They are selected for the first camera, then the second camera is configured.
The accelerator pump is necessary to supply additional fuel when the throttle is opened, this provides more efficient acceleration. The pump operates through a special cam mechanism. On engines with Solex, you need to install the largest possible cam for the accelerator pump.
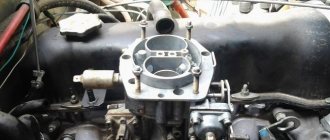
Removing and installing carburetor 21053 on a VAZ car
The sequence of installing the Solex 21053 carburetor on the engine of a classic, rear-wheel drive VAZ car is identical to installing other types of devices.
Removing the carburetor
At the beginning of the entire process, it is worth preventing foreign particles from entering the fuel supply system. Before replacing the unit, the engine compartment is thoroughly washed and all dirt is removed from the engine. There is no need to achieve perfect cleanliness. It is enough to remove dirt in the area where the carburetor is located.
After cleaning the engine, you need to disconnect all the rods and hoses from the old carburetor. Particular attention should be paid to the fuel hoses and heating system. Then the throttle cable is disconnected. After disconnecting all cables and lines, you can finally dismantle the old unit. After dismantling, you need to clean the place where Ozone stood and prepare a site for a new carburetor. All possible unevenness or cracks found on the site should be sealed with sealant. The next step is to create a thermal insulation layer for the new carburetor. To do this, gaskets of different thicknesses are used, and a carburetor is installed on top of the insulating layer.
When the carburetor is installed on the engine, you need to connect all the rods and lines. This must be done strictly according to the instructions. First, all pipelines are connected. Then the length of the throttle cable is adjusted and the carburetor cover is closed.
Important! During installation, only new gaskets are used. Using old ones is not recommended.
Next, a connection to the cooling system is made to the tee of the unit. The solenoid valve is connected to the light relay. Then the air filter housing and filter element are installed. After installation, the carburetor will serve for a long time and reliably, provided that it is cleaned and adjusted in a timely manner.
How to disassemble a carburetor
Types of carburetors
It should be said that there are only three types of carburetors on VAZ. These are Weber, Solex and Ozone carburetors. All three are successfully used on domestic cars, since almost all of them were developed for this purpose. The exception is the Weber carburetor. Its history begins in Italy, and since some Russian cars also have these roots, the Italian carburetor feels the best in them. The creator is Eduard Weber, the man who gave the world improved dynamic performance of cars, as well as lower fuel consumption.
The next carburetor is Ozone. The main goal in its development was to reduce fuel consumption. At the moment, Ozone can still be found on many cars, but they are becoming less and less common. The fact is that the carburetor often breaks down. Of course, it cannot be called completely useless, because it fulfilled its task (to create lower fuel consumption compared to Weber) perfectly. And if you configure it correctly, then the dynamic performance will also be quite good.
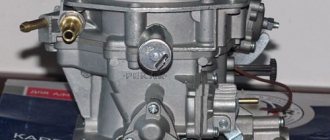
The next carburetor is Solex 21053 1107010. 21053 1107010 20 is a Solex carburetor of the fifth modification. Solex is a French company that has long ceased producing its products. Her business was picked up by DAAZ (Dimitrovsky Avtoaggregatny Zavod), which continues to do so to this day. The difference between Solex and Ozone is minimal, but significant. It lies in the fact that the carburetor does not break. At the same time, its performance is not bad, they can be improved by properly setting up the device. However, the process of setting up the carburetor is not the easiest, and it is for this reason that the Solex 21053 1107010 carburetor is mentioned above. The fact is that the modification 21053 1107010 20 has already been adjusted to the maximum, and you simply need to install it correctly. By the way, you can also slightly adjust the characteristics of the device.
Types of carburetors used
For classic VAZ cars, only three types of carburetors have been developed:
All these models of components are successfully used on classic cars of domestic production. As an exception, there is a carburetor model called Weber. The history of this device originates from Italy. Its creator was Eduard Weber, who improved the dynamics of cars and allowed them to spend less fuel. And since Russian-made cars begin their history from the same country, this carburetor fully works with them.
The second carburetor used is called OZONE. When developing this device, the designers had a goal - to reduce fuel consumption, which, in the end, they succeeded in doing. This carburetor is still found on classic cars today and produces good indicators of efficiency and dynamics. But due to the low reliability of the unit and frequent failures, it is increasingly being replaced with more successful modifications.
The third type of carburetor and the most popular is the Solex fifth modification 21053 1107010 20. The founder of the product was a French company that has long ceased to exist, but has made an enormous contribution to the global automotive industry. Today, under the manufacturer’s license, this carburetor is produced by the Dimitrov Automobile Unit Plant (DAAZ). The main difference between Solex and Ozone is that the former does not fail. At the same time, it is possible to change the performance characteristics of Solex by calibrating it. The model is maximally adjusted from the factory and only correct installation is required from the user.
Setting up Solex 21053
This is the part of the carburetor
Anyone looking for installation instructions for Solex 21053 1107010 20 is encouraged to read them. The carburetor is perhaps the most important part of the car. After all, it determines how much fuel the car will consume. In addition, its dynamic performance also depends on this part of the car, which will certainly increase as the quality of the carburetor improves.
Weak carburetors, typical of small cars, will choke powerful engines larger than 1.5 liters. This will prevent the car from accelerating as much as possible. Even if you have installed the correct carburetor for your car, it will not be fully useful if it is not tuned. Setting it up is not difficult, but to do this you need to have a little knowledge that will help you achieve your goal.