Suspension and steering
Excessively worn car suspension parts greatly affect how the car contacts the road. Ball joints, steering rods, and wheel bearings have a certain amount of play. As they move, they can cause imbalance. This is why the steering wheel shakes at speed.
View gallery
Sometimes all suspension elements are subject to deformation: silent blocks, levers, stabilizer. If everything is fine with tires and wheels, but the steering wheel shakes at low speeds, then it is necessary to check and replace worn parts of the chassis. Vibrations at low speeds often occur due to play in the rack. It is recommended to check the tie rods.
terms of Use
If the car is used in harsh climatic conditions, you should not rely on the guaranteed period established by the manufacturer. The fact is that when braking, the disc heats up quite a lot, and if the temperature outside is quite low, it will be subject to sudden cooling. This, in turn, will lead to deformation of the surface and subsequently a groove or complete replacement of the brake disc will be required. A similar situation can occur at very high temperatures, but here the cause will be excessive heating.
How does wheel runout manifest itself?
In practice, the driver most often notices the beating when driving. Moreover, the wheel begins to beat even on a flat road, and the higher the speed, the more intense the impacts. In many cases, the steering wheel begins to hit, which may begin to vibrate. The car becomes less controllable. The relationship between speed and beat amplification is explained by a simple reason. The imbalance has a certain period, for example two meters. The faster the car moves, the more often the cause of the beating is repeated; accordingly, the higher the speed, the more noticeable the problem. The magnitude of the imbalance also affects. In some cases, it may occur during braking. Here we are talking more about static imbalance of the wheel. This is often evidenced by vibration of the wheels when applying the brakes. The cause is often the destruction of the hub bearings or problems with the brake mechanism. Separately, it is worth examining the reasons for the appearance of imbalance. Let's list the main ones.
- Mechanical damage and deformation of suspension parts. In fact, a wheel consists of more than just a disc and a tire; there is also a hub, a brake caliper, and a disc. If they are deformed, this can also cause wobbling.
- Deformation of the wheel rim. During operation, the geometry of the disk may change.
- Uneven tire wear. First of all, we are talking about tread wear within one wheel. But, in practice, there is also the problem of uneven tire wear on different wheels of the same axle. If one wheel has more than 1.5mm of pattern wear, it will also cause runout.
- Incorrect wheel replacement. In fact, the reason is quite common. When installing a spare tire, drivers often perform the final tightening of the wheel after lowering the jack. This can cause the disk to shift by millimeters relative to the axis, and accordingly, runout appears.
How to measure the thickness of a brake disc
When it comes to measuring rim thickness, you simply need to follow the detailed testing procedure per any factory service manuals. Most procedures say that you can simply use a micrometer to measure the thickness of the rotor in 8-10 different places. When measuring, keep a distance of about 10-20 mm from the edge of the disc. It is important to note that all readings must be above the minimum thickness requirement. Moreover, it must in no case exceed the minimum braking parallelism values specified in the vehicle's manual. This is essential to ensure stable and smooth braking.
The instructions for measuring the thickness of the brake disc are as follows:
- Raise the car on a jack.
- Remove the wheel and rim from the desired disc.
- It is advisable to remove the block.
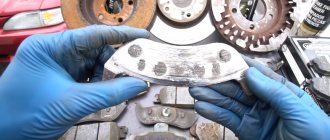
- Wipe the upper part of the brake disc from dirt and dust - these deposits can “add” the missing millimeters to the rotor, which will have a bad effect on the measurement.
If rust has accumulated on the sides of the discs, increasing the thickness of the disc, then you can try to clean it off with a soft sandpaper. - Take a caliper or micrometer and measure the rotor in several (8-10) different places. Deepen the caliper a couple of centimeters from the edge of the rotor.
If you couldn’t clean off the “sides” and you don’t have a micrometer, then you can do this: place a coin on each side of the disk in the center of the surface and measure it in this state, then simply subtract the thickness of the coins - this will give you the required thickness of the rotor.
- All measurements must be above the minimum disc thickness. If at least one of the indicators is lower, you need to replace the disk as quickly as possible.
There is no universal minimum wheel thickness; it depends on the make and model of the wheel, the vehicle and its engine. For example, for the Lada Kalina the maximum thickness is 17.8 mm, for the TRW front discs - 21.8 mm, for the Skoda Octavia 1.8 and 2.0 TSI - 22 mm, and so on. All this data must be taken from the technical manual for the car or the disc itself.
Useful video instructions:
Types of brake discs
The starting material for most budget cars is chromium, magnesium, and cobalt. If there is a car in the garage that is of a higher class, capable of going from a standstill to a hundred km/h in a few seconds, then you will need carbon or ceramic products.
According to their design, they are divided into:
Ventilated
Ventilated - the two outer parts of the disk are connected to each other by special cells (cavities) through which air passes and provides better cooling of the part.
Non-ventilated - solid blank.
With perforation
The presence of perforations on the surface of the product provides additional air supply to the rubbing parts and removal of gases. During braking, the material heats up greatly, and so does the air in the space between the two parts - the pad and the disc. Heating creates an air cushion that prevents the close interaction of rubbing surfaces.
But in this seemingly positive point, there is also a negative side to perforation:
- the presence of holes leads to rapid wear of the product
- When driving in the urban cycle, where there is a moment of repeated braking, the holes become clogged with dirt. Therefore, they have to be cleaned from time to time.
Given this feature, manufacturers of brake systems began to make small channels and notches instead of holes, but this resulted in a slight decrease in useful efficiency, although the strength became better.
Composite disks
It is a product of two parts: the main ring and the hub. These two parts are connected to each other by bolts. This design provides better strength, withstands heavy loads and does not deform.
What is the minimum thickness of a brake disc?
The minimum thickness of a disc brake is the minimum safe operating thickness of the brake rotor before it must be replaced. Continued operation at or below minimum rotor thickness may result in brake system failure. When the rotor reaches its minimum thickness, the braking distance increases, sometimes up to 4 meters.
With the minimum permissible thickness of the brake disc, driving becomes dangerous
As the thickness of the rotor decreases, its ability to absorb and dissipate the heat generated during braking decreases. Once the rotor reaches its minimum thickness, its ability to absorb and dissipate heat is reduced to such an extent that it can lead to a significant reduction in braking performance. This can be noticeable by a premature increase in braking distance.
Causes of beating and its correction
The most likely causes of runout when a vehicle is braking are:
- wear and slight deformation of the surface of the brake disc;
- disruption of the vehicle's chassis;
- wheel nuts not fully tightened;
- deformation of the wheel disc;
- the occurrence of a hernia on the tire.
How to check a car brake disc for runout and fix it yourself?
- The brake caliper is removed without disassembling and secured with wire.
- The brake disc is attached using hub nuts.
- Install the device at a distance of 5 mm from the edge of the brake disc and take measurements.
The value should not exceed: for the front wheel – 0.06 mm, for the rear – 0.08 mm.
If the measurement result is higher than the maximum permissible, the adjustment (correction) should be made in the following order:
in the place where the beating is heard more clearly, make chalk marks on the hub;
- remove the disk and use a dial indicator to measure the play, moving the hub in the axial direction. The work is considered complete if there is no play. If play is detected, the wheel hub is dismantled for further inspection and the steering knuckle is removed with it;
- Next, change the position of the brake disc and begin measuring the runout.
It happens that the runout does not go away even after changing the position of the brake disc. In this case, there is only one solution - installing a new brake disc.
Work on grinding the surface of a new disk must be done very carefully. To do this, you need to place M12 washers with adapters on the threaded rods. The washers will prevent the disc from deforming during grinding if it is done poorly. All nuts must be tightly tightened diagonally.
Before drawing any conclusions, you need to carry out some measures and determine what caused the brake discs to start beating.
| Subject of inspection | Causes |
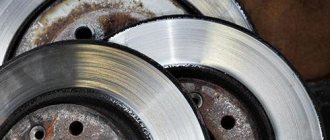
| The presence of damage on the surface of the disc in the form of scratches and rust, as well as moisture in the friction linings and their wear | The presence of rust on the disc can be caused by the car being idle for a long time. This may cause noise and vibration in the future. If micro grooves and scratches are not sanded out during initial installation, this results in moisture between the pad and disc. Over time, this goes away as the two contacting surfaces wear in. |
| Wheel runout when braking | The brake discs begin to hit the pistons of the brake cylinders, and therefore the pressure on the brake pedal increases. |
| Change thickness | A rocking pedal means a significant change in disc thickness. |
| Deformation | Improper operation of the brake system when the vehicle is moving can lead to overheating of the disc, its sagging and curvature. |
How to check the condition of brake discs yourself
1. How to check brake discs for runout
Disc runout may occur when the car is braking if:
- the disc is worn out or its surface is slightly deformed;
- the chassis of the car is not functioning correctly;
- the nuts on the wheel are not tightened;
- the disk is curved;
- There is a hernia on the tire.
You can check the brake discs yourself using a runout measuring device:
- first remove the brake caliper (without disassembling it first) and secure it with wire;
- then the brake disc is attached using the hub nuts;
- the device for measuring runout is fixed 5 mm from the brake disc. Now you can check it: for the front wheel the value should not be higher than 0.06 mm, and for the rear wheel - 0.08 mm.
Such a device is sold in automotive supply stores and looks like this:
If after measurements the values are higher than acceptable, you need to do the following:
- the place where the beating is heard especially well is marked with chalk (on the hub);
- then the brake disc is dismantled;
- take a dial indicator and use it to measure the amount of play; to do this, you need to move the hub along the axis;
- if play is found, remove the wheel hub and steering knuckle;
- then change the position of the disk and measure the runout.
If the runout is not eliminated even after the brake disc is installed differently, you will have to buy a new one.
2. How to check brake discs for deformation
The deformation of the brake disc is usually visible: there may be ribs, waves or bumps on it. But diagnosing curvature can be much more difficult.
Deformation of brake discs occurs when the vehicle is not used properly. For example, when the disks are very heated and suddenly cooled. This can happen while driving in a big city with heavy traffic and traffic jams, or when braking for a long time and hard, followed by water getting on the discs. Sudden cooling of the disk after severe overheating leads to distortion of the metal. And this can seriously affect the performance of the vehicle.
How to check brake discs for deformation? You need to jack up the car. When turning the wheel, you need to pay attention to how it rotates - calmly or slightly braking. In the first case, the disk will be fine, but if it slows down in the same place, it indicates the presence of curvature.
When you need to check which wheels - rear or front - affect the steering wheel wobble, you should use the parking brake. If vibration is noticeable when using it, this indicates a problem with the rear wheels.
It is easier to check the front brake disc for deformation than the rear one. Actually, the car owner will feel its curvature immediately. But a problem with the rear axle wheel rims may not be immediately noticed and you may drive with this problem for quite a long time. Often, the driver is able to feel something is wrong only in a situation of braking at high speed.
There is another way to check the brake disc for curvature. If there is constant beating, especially during braking, the disc is rotated directly on the hub. If he is the leader, then they spin the wheel, starting the engine. Next, press a screwdriver against the caliper and move it to the upper side surface of the disc until friction becomes obvious. This sound is used to determine the presence or absence of curvature: a uniform sound indicates the absence of a problem, and an intermittent sound indicates that the disk is curved. The degree of curvature can be checked by eye based on the size of the gap, but it would still be better to use a special device.
In some cases, a turner can correct the situation. If the disk is new and quite thick, a specialist will remove a layer of metal on a machine, due to which it will become even. However, such manipulation leads to thinning of the brake disc, which in itself is not very good. Sometimes turners also work with thin discs, performing transfusion, but this procedure is not the safest for the further operation of the car and it is better to avoid it.
Fix defects or replace?
When the measurements are completed and the exact diagnosis is clear, the car owner is faced with the question of whether to restore the old product or purchase a new one. It should be remembered that the disc can be sharpened only if there is residual thickness (from 22 millimeters). This is true for ventilated discs. Many experts recommend replacing only. However, if the price of a new disk is too high, and there is a spare thickness, you can try to restore it.
Small beads and grooves can be removed by grooving using special equipment. Some even do the grooving with a file, but this is unreliable. The essence of the operation is that a thin layer is removed from each side of the disc. Then the product receives a perfectly flat surface.
Before boring the disc, the cause that caused the deformation or beads on the surface should be resolved. Otherwise there is no point in restoration. Among the causes of uneven wear, brake pads are in first place. If they are of poor quality or installed incorrectly, they can easily damage the surface of the disk.
When to check brake disc thickness
A rotor thickness check should be done whenever you replace brake pads. This will ensure there is enough metal on the rotors to brake safely. It is recommended to do this every time you change your brake pads, regardless of the interval between changes. The verification process will take you less than 5 minutes and will be a good security measure.
To check the thickness of the brake disc, you only need any caliper
What to do and how not to “over-save” with brake discs
Without a doubt, any case must be considered individually, and not one article on the Internet can give an exact recipe
But, nevertheless, you must understand the general concept - the word “save” must be used very carefully when referring to the braking system
You can save on the cost or replacement of brake pads or brake discs, you can save by doing not one, but several grooves of the brake discs. The main thing is that such savings along the way do not cause brake failure or brake disc destruction, with all the ensuing consequences. And it’s okay if these consequences are only a crumpled body. Body repair is not a problem. What if health or life?
Therefore, before you begin repairing brake discs, carefully read the manufacturer’s requirements for disc life. Replacing brake discs also requires a serious approach to choosing a manufacturer.
Do not try to change brake discs individually, only in pairs on one axle. Brakes are not a system whose quality should be neglected for the sake of the momentary joy of saving a few hundred rubles.
There is one important piece of advice for those who want to extend the life of their brake discs - try changing your driving style to a more sedate and calm one. You will see firsthand how this will help you save on brake disc repairs.
Grooving can be done in two ways. Cheaper on a regular lathe, or more expensive, but using special equipment. The inexpensive method has a significant drawback. The fact is that even if the craftsmen do their job well, a visually perfectly smooth brake disc, after installation on the hub, can begin to “beat” when braking. This is due to the fact that the disk is machined from the machine reel, and not during rotation of the hub. By choosing a method with special equipment, you can eliminate such problems. A special grooving machine is attached directly to the disc instead of the brake caliper; nothing needs to be removed. As a result, the possibility of subsequent runout is virtually eliminated.
The thickness of the metal that will be removed during turning depends on the degree of wear of the brake disc, it will take from half an hour to one hour, the cutter must pass over the entire surface, sometimes several passes are required
Also, for a high-quality groove, it is important to make sure that the wheel bearings are in good condition; if there is play, you can forget about the quality of the groove. After restoration, the brake pads need to be replaced
Some craftsmen solder or screw on special linings, thereby restoring braking efficiency without drilling the discs. You can’t do this, the linings can fly off, and besides, a worn disc becomes fragile and can simply collapse.
Good luck to you, and may your brake discs wear out over time.
Why TRW is counterfeited
Before we talk about TRW discs and pads and how to distinguish a fake, we should discuss the issue of the reasons for the origin of counterfeit products.
It all starts with the operation of the car. Depending on the driver’s style and how carefully he drives, the brake unit can last for a different period of time. Moreover, it is not only the quality of the elements themselves that is important here. It also happens that the most effective and expensive brakes wear out after 500-1000 kilometers. And some calmly travel 50-100 thousand kilometers. And at the same time, the brakes do not begin to squeak and lose efficiency. The part continues to cope with loads.
But there always comes a time when the system needs an update. That is, the brake discs need to be replaced.
There is a need to make a choice. It is logical that the driver will turn to a manufacturer that has a good reputation, reasonable prices and a wide range of products.
One such option is TRW. These are long-proven brake systems. High quality, reasonable pricing policy and a number of other advantages have made TRW one of the market leaders. Yes, there are still the same Brembos, but the price is completely different.
We can highlight several advantages of TRW originals, which is why counterfeit discs began to actively appear:
- it is based on high-quality cast iron, on which the brake discs are based;
- long service life;
- minimal wear even under heavy impact;
- ability to withstand aggressive driving style;
- high degree of rigidity;
- exemplary strength indicators;
- minimum amount of manufacturing defects;
- complete set that already includes fasteners, which makes installation easier.
That is, counterfeit discs appeared for a completely understandable reason. The brand has become popular and also in demand. Fraudsters wanted to grab their piece of someone else's popularity.
Using TRW's achievements and the hellish work done to popularize the brand, as well as demonstrate their capabilities, bad people, let's call them that, simply copy the products and sell them under a famous brand.
You can talk endlessly about how bad and base an act this is. But instead, let’s study how a fake TRW pretends to be.
Engine mounts, traction and other problems
If it feels strong, accelerate the car a little more than usual. vibration occurs while increasing speed
intensifies, then its cause may be a breakdown of one of the engine mounts.
Also causes wheel vibration
The gearbox may break down. If at speeds of 80 km/h and above the car begins to shake more strongly, then try to diagnose the presence or absence of this problem as follows:
- Accelerate the car to 85 km/h;
- Depress the clutch pedal and listen for vibration sounds;
- Engage third gear and smoothly release the clutch, not forgetting the gas pedal.
If during these actions the vibration of the wheels
is not missing, then the box has nothing to do with the problem. And it’s good, because replacing or repairing it is quite expensive.
If the shaking becomes stronger, then you will need to check whether the box is involved in the problem with professionals at the service station.
For automatic transmissions, you can check the box in the same way. Just instead of third gear and clutch, switch modes in the following sequence: 3, 2, D, N and listen to the vibration sounds.
If, in the process of independent actions, it was not possible to identify the problem, and it continues, specialized help from professionals will be required.
It’s not worth saving, because even the smallest breakdown can lead to serious consequences and expensive repairs. Above all, do not forget about your safety and the safety of your passengers.
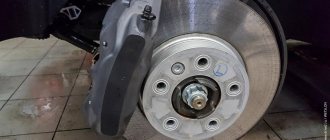
What to look for when removing a wheel to determine brake disc wear
- When removing a wheel, pay attention to the color of the rim. A blue surface indicates oxidation of the part.
- The presence of cracks, pits, and bumps on the disc is a serious malfunction. Continued use will lead to jamming of the brake system and costly repairs.
- With the wheel removed, spin the disc forcefully. Look at the evenness of its revolutions. If the disc makes oval movements, then we can safely recognize such a defect as warping of the disc.
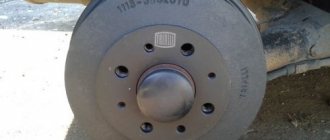
- The ovality of the drum can be recognized by looking closely at the tire tread. Uneven wear of the pattern (more in one place, less in another, as if the pattern appears in spots) indicates precisely this defect.
When buying a new car, you need to check the brake system using the methods described in order to have an idea of its condition and make the right decision. In order to avoid troubles in the further operation of the vehicle.
The brakes in your car are for the safety of you and your loved ones. That is why every driver should know how to determine brake wear in order to carry out maintenance on time.
There are different brake systems (disc and drum), different parts (pads, discs, drums) can wear out in them, so this article describes methods for detecting problems in all possible cases.
VAZ 2109 - replacing front brake discs
The front brake discs on a VAZ 2109 car are replaced in case of mechanical damage or when the thickness of the working part becomes less than the maximum permissible - 10.8 mm. Operation of a worn-out disk, with cracks or less than the permissible thickness is not allowed.
If there are various small scratches and nicks on the working surface of the disk, you can get rid of them by sharpening the disk using special equipment in a specialized workshop. If you do not have this option or the damage is more significant, then we will replace it.
To carry out repair work, prepare a standard set of tools and perform the following sequence of actions:
- We put the car in first gear or turn on the handbrake. Then loosen the wheel bolts.
- Raise the car and remove the wheel.
- From the inside of the brake mechanism, unscrew the bolts securing the guide pads to the steering knuckle.
- We remove the steering knuckle and hang it from the stand using a wire, while making sure that the brake hose is not twisted or too tight.
- We clean the surface of the brake disc and wheel pins from dirt. If necessary, treat the surface of the connection between the disk and the hub and the bolts themselves with a liquid such as WD-40, if there are significant traces of metal corrosion on their surface.
- Then use a spanner to unscrew the wheel pins.
- We knock the disc off the hub by hitting it with a hammer from the inside through a wooden spacer.
At this point, the repair work on removing the front brake disc of the VAZ 2109 is completed. Replace and install in reverse order. If you do not plan to replace the disc, then before installing a new one, use a file to file away the curb formed by friction with the pads. Use the file carefully so as not to touch the work surface.
Signs of fake brakes
Now specifically about TRW devices - how to distinguish fake brake discs.
Let's start with one nuance. Brake discs of this brand are coated from the factory with black paint with anti-corrosion properties. This allows you to give the products a more attractive and presentable appearance.
Plus, anti-corrosion paint does not require applying an additional layer of oil. Therefore, installation can begin immediately, without pre-washing.
Most fakes do not take this nuance into account. If you see that the disc is covered in oil, then it is almost certainly a fake product.
Don’t forget that brake discs are far from the only spare parts and consumables that are copied and counterfeited by scammers.
Quite often, motorists complain about fake spark plugs that imitate Denso and NGK products. Repeatedly, Russian drivers have had to deal with parodies of the LUK clutch. That is, the problem exists. And we need to fight it.
Let's return to TRW. There are several points that indicate a fake:
- package;
- marking;
- weight;
- symmetry;
- quality of surfaces.
Now we will try to briefly study each point. This will answer the main question related to TRW brake discs - how to distinguish a fake.
What does the packaging say?
Take your time to buy the product, unpack it, and start installing the brake elements. First look at the packaging. You can already tell from the packaging material whether it is a fake or not.
Original parts are packed in red cardboard. Smooth and clear inscriptions are applied to the surface of the box. There should be no blurred elements or errors.
Fake packages are also red. But the shade is lighter and also brighter.
The copy also betrays itself by the excessive number of inscriptions. Compared to the original, there are approximately 3 times more TRW inscriptions on the fake box.
Product weight
Also, counterfeit discs reveal their illegal origin due to their mass.
Low quality materials are used in the production of copies. They are lightweight, wear out quickly, and do not have a long service life.
But here you can understand the difference only if you held the original in your hands, or if you have 100% genuine discs for visual comparison.
Fake parts always weigh noticeably less. The reason is simple. This saves on materials.
Look at the markings
There is nothing difficult about checking the markings.
First, study the information that is printed on the packaging. Now read the markings, but on the brake disc itself.
The first and most obvious sign of a fake is a discrepancy between the information on the box and on the spare parts.
But even when the data coincides, do not rush to conclusions. On replicas, markings are often uneven. The letters are crooked. The marking recesses are made unevenly. The depth of characters and letters is different. This does not happen with original TRW brake discs.
Symmetry
If you take an original part, then all the elements will be adjusted perfectly. This is due to the use of high-tech equipment. All stages are monitored by numerous sensors and cameras. Any unevenness is immediately recorded and the brake disc is sent for adjustment. Or he goes to marriage.
Now compare the thickness of the inner and outer sides of the brake disc you are purchasing. If the thickness is noticeably different, then the conclusion is obvious. It's a fake copy.
Surface inspection
It is not necessary to use any measuring instruments here.
Just run your hand over the surface. Remember the oil treatment first. If greasy traces of oil remain on your fingers, then you can already suspect fraud.
The equipment of underground production is not of high quality or accuracy. Therefore, defects are formed during casting. This manifests itself in the form of a non-uniform surface and roughness.
The power of the rings
Today you can find spacers of different sizes, to suit any. The simplest ones are plastic. But they are also made from various aluminum-based alloys (from silumin or duralumin). Despite the fact that the load on the centering rings is small, they sooner or later wear out or become deformed, which means they need to be changed periodically.
You cannot drive without spacers if the diameters of the hole in the disk and the seating belt on the hub do not match. Otherwise, incorrect installation of the wheel rim will put a large load on the suspension and can lead to serious damage, including destruction of individual suspension parts.
What are car brake discs?
The safety of the driver and passengers, as well as other road users, depends on the condition of the brake system, in particular the discs. Emergency braking, stopping on a slope - there are a lot of situations in which the brakes must function without the slightest complaints. According to traffic rules, a driver has no right to drive a vehicle if the brakes are in a faulty condition.
In short, it is extremely important to check the car in a timely manner, diagnose any problems associated with the brake discs, and fix them
The brake disc is part of the hydraulic brake unit. The disk itself is made of metal. While driving, it rotates parallel to the wheel at the same speed, and when the driver presses the brake, it is pressed against the brake pads.
What is a disc brake system? Firstly, it is the brake disc (rotor) itself, which is located on the axis of the car’s wheel. Secondly, a caliper consisting of two brake pads (the pads move under the influence of hydraulic pressure). When you press the brake, the pads come into contact with the brake disc on both sides, friction leads to a decrease in speed. If we compare disc brakes with drum brakes, the former are considered more reliable and efficient, especially in conditions of high temperatures and humidity.
We recommend
However, such brakes have one drawback: the disc can overheat, which ultimately leads to a decrease in the effectiveness of the entire braking system. To avoid this, manufacturers create ventilated and perforated disks: heat is removed from them using a system of internal channels or through holes. Perforated discs are considered more efficient in terms of cooling; in addition, due to their design, wear products of friction linings disappear from the friction zone of the pads and disc.
What affects wear?
Each manufacturer prescribes brake disc wear standards. These parameters are obtained based on engine power, vehicle weight and other factors. But it is very difficult to calculate the mileage after which you will need to change the discs. Wear is influenced by various factors that cannot be taken into account.
First of all, it's your driving style. If the car owner prefers to drive more extreme, where sharp accelerations are replaced by equally sharp braking, then the service life of the disc is significantly reduced.
Mechanical factors also affect the service life. The material from which the brake disc is made is important here, as well as the quality of the pads. Often, discs are made from cast iron and its alloys - the material wears out more often than ceramics. The use of low-quality pads (for example, with asbestos) also leads to uneven wear.
Wheel runout - what is it? Types of wheel runout
Wheel runout is the displacement of the disk during movement, can be radial or axial. Either way, you will get vibration or shock. The higher the speed, the more noticeable the problem becomes. Let's look at the varieties in more detail.
- Axial runout is the horizontal displacement of the wheel. Typically this disk behavior is called “figure eight”. Usually caused by an imbalance in the distribution of mass on a plane.
- The cause of radial runout is static imbalance. At the same time, the disk begins to resemble an egg in shape. Oscillatory movements occur up and down. Usually accompanied by variable torque.
It is worth considering what could be a consequence of such a phenomenon. With axial runout, the main consequences are the following:
- damage to the steering mechanism and chassis;
- increased tread wear, which leads to rapid tire failure.
Radial runout leads to approximately the same consequences, only the main load falls on the suspension. It is also worth separating dynamic and static imbalance. There are some peculiarities here, primarily in terms of how to solve the problem. With static imbalance, the torque is created by the weight of the unbalanced mass. Simply put, the wheel will rotate without interference until the unbalanced mass is in its extreme position. Thus, the movement of the wheel resembles a pendulum. In the case of dynamic imbalance, the wheel rim is unbalanced in width. It can only be observed while rotating. In case of such a problem, the axis of rotation is completely misaligned with the main central axis of inertia. In fact, a certain angle is formed between the axes. At the same time, the presence of two centers of mass in different parts of the wheel causes a dynamic imbalance. During movement, centrifugal forces arise, they act in opposite directions and manifest themselves in the form of wheel beating.
How to replace a brake disc
You can replace the brake discs yourself. Of course, this will require certain knowledge, skills and tools. As already mentioned, the ideal option is to buy new discs and pads from a reputable manufacturer and check them for certificates and markings. Spare parts must be suitable for a specific car brand.
The installation algorithm is as follows:
First, loosen the nuts on the wheel and then dismantle it. Of course, you can’t do without removing the wheel, since replacing disks requires free access to them. Then remove the caliper. To do this, use a screwdriver to unscrew the bolts that are located on the inside of the disk. The caliper is removed carefully. It may “stick”, so you may have to lightly tap it with a hammer
It is important not to touch the connection between the caliper and the brake pipe; it is best to tie the caliper to the car body. The fact is that there is pressure in this system, and a violation of the seal can lead to a leak of brake fluid - you will have to “bleed” it. Next, dismantle the old pads and plates
In some cases, you will also have to remove the caliper seat mount. To do this, you need to unscrew the screws with a screwdriver. Then remove the brake disc itself. It happens that the disk and hub are connected by a castle nut, which must be unscrewed to remove the disk. But what often happens is that the hub and the disk “stick” to each other (high temperatures in the wheel area contribute to this). To fix this problem, you need to lightly tap the disc with a hammer through a wooden block. At the end of dismantling, check the hub mount; it must be intact.
Now you can install a new brake disc:
if the installed disk needs to be cleaned of rust or any plaque, use only special products; then wipe the disc with a dry cloth; after these manipulations, carefully secure it to the hub; Next, install and secure the caliper seat; Untie the previously attached caliper, mount the pads to it (they must be released and installed on the brake disc); secure the caliper with bolts from the inside of the disc; then install the wheel, remove the car from the jack; Finally you need to tighten the wheel nuts.
This will complete the replacement of disks. Of course, before you start using the car, you need to check that everything is functioning properly.
This is done in a place where there are no obstacles to the movement of the car, and it is important to start slowly.
To check the functionality of the brake system, you need to gently press the brake. The car should stop smoothly: jerking, pedal failure, vibration, heating of the discs, their beating - a bad signal indicating some kind of malfunction.
I would like to advise beginners to still seek help from car service specialists. After all, checking and replacing brake discs in general is not so easy; experience and dexterity are required. And the well-functioning operation of the brake system is the key to safety on the road.
Determining the degree of wear
You have received basic information about the maximum and permissible wear. Now you need to find out exactly how the wear of a part is determined and what is required for this.
Not a single specialist or auto parts manufacturer can say 100% exactly how long a brake disc will last or how many kilometers it can travel. There is only a calculated resource, which is influenced by many additional factors. Yes, for starters it’s worth focusing on the quality of the disc itself, the raw materials used and adherence to technology. This is a question for the manufacturer. It's definitely not worth saving on brake discs. It is better to give preference to more expensive, but reliable and proven parts from leading manufacturers.
But there are other factors that provoke gradual or rapid erasure of the disk, exceeding the calculated values. These are driving style, condition of the brake unit, pad wear, climatic conditions, road surface condition, etc.
All this suggests that diagnosing discs is the task of the car owner himself.
It is unlikely that it will be possible to carry out an accurate diagnosis without removing the wheel. You can only visually try to take a closer look at the condition of the element through the wheel rim and roughly assess its current condition. But it will not be possible to check the disk for curvature or accurately determine the degree of wear.
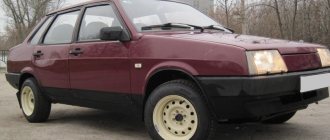
And it doesn’t matter what kind of car we’re talking about. Brakes wear out everywhere, be it:
- VAZ 2110;
- Mercedes E-Class;
- Skoda Octavia;
- Subaru Forester;
- Daewoo Lanos;
- Chevrolet Aveo;
- VAZ Niva;
- Chevrolet Niva;
- Nissan Qashqai;
- Mitsubishi Galant;
- Chevrolet Captiva;
- Lada Kalina;
- Opel Astra, etc.
The first step is to remove the wheel from the side where there is a potentially problematic part.
Another feature is that it is recommended to replace both wheels at the same time, even if the second disk is in better condition and has not completely worn out.
Measurements are taken first and then a visual inspection is performed. Then an appropriate decision is made. You may need to groove the discs, which in theory can be done with your own hands.
Curvature of brake discs and how to solve this problem
This phenomenon occurs due to overheating of the surface of the disk material. This is caused by poor operation of the car: prolonged and strong braking of the car, as well as frequent driving around the city in a dense stream of vehicles. When a car drives through water with an overheated brake disc, it begins to cool quickly and the disc itself becomes distorted.
If the discs are not yet very worn out, then a qualified turner can correct the situation.
However, after such processing, a significant part of the metal surface will be removed, which entails rapid wear of the part. There is another way to avoid turning work - to purchase used discs, but this option may not bring a guaranteed effect. The most effective method for correcting curvature is to purchase completely new parts and then replace them, and doing the work yourself will not be particularly difficult.
You need to choose a product depending on the power unit of the car, since they differ in size from each other.
Source zapchasti.expert
I continue the “slow” topic) I would like to tell all the “scorpion drivers” why new brake discs hit the steering wheel after a couple of thousand km, mind you, it is the steering wheel, and not the brake pedal.
To do this you will need several measuring instruments. Dial Indicator With Tripod.
Micrometer or caliper.
It is important to take measurements on well-cleaned hubs
At the rear there are new brake discs on a cleaned hub.
The LEFT rear hub was damaged by a disc hitting a curb, the disc runout is 0.20-0.30 millimeters, which is unacceptable!
The rear RIGHT hub with the new disc has a runout of 0.03 mm, which is acceptable.
Deviation should not exceed 0.06 mm
and ideally 0.01 on the front axle!
On the front axle, I measured the runout on old discs and on an uncleaned hub, i.e. this was their daily state. Moreover, the steering wheel was shaking at speeds above 60 km/h.
Nobody hit the front hubs against the curb; they suffer from deformation from large potholes throughout their lives. Initially, this hub is flimsy and, as a result of overheating, impacts and fatigue, it moves along with the disk. New brake discs help only for a while, while the surfaces are not yet ground in and there are relatively large gaps.
If the brake pedal jerks when braking, it is necessary to measure the thickness of the disc at different points with a micrometer or caliper. Brake discs worn down to a minimum thickness lose strength. Under the pressure of the brake piston, old discs can be pressed through and become thinner in places; this can be clearly felt on the brake pedal.
Front rims from Scorpio II Cosworth 2.9L should be 24mm thick on new rims, minimum thickness 22mm. Those. We are given as much as TWO millimeters for wear! The manufacturer took care of making money for the service station
The thickness of my purchased used wheels is 23mm and they are rusty on all sides! The cool front discs have not yet worked. The old hub will not be level in any case. Grinding these discs directly on the hub is a pointless exercise. won't last long.
I’ll try to solve the problem by turning the brake discs directly on the hub, or by installing new, even hubs! Who is better and cheaper - decide for yourself
Who has what brand of wheels on the front axle? This applies to sierra breeders and scorpion breeders with calipers from “Kosogo”. How do cheap cross-drilled wheels perform?
The main causes of brake disc wear
The technical serviceability of the brake disc and its normal thickness, not reaching the minimum values, are one of the main requirements for the performance of the entire braking system. However, this part may be subject to rapid wear. Next, we will look at why this can happen.
- Brake pads
The brake disc can quickly reach its minimum thickness even on new cars. It happens that after a short period of use, drivers already notice the appearance of a specific edge on this part. One of the reasons is the pads. To extend their service life, manufacturers use various fillers. They are placed in pad linings, and they can also contribute to the rapid thinning of the disc to a minimum thickness. Well-known companies most often use sawdust made from soft metals, such as copper, as a filler. The less hard material wears out first: the pad wears out first, and the brake disc wears out much more slowly. Manufacturers who do not care about their reputation use sawdust of any metal, regardless of its hardness. Copper is an expensive material, in contrast to the steel waste supplied from metalworking enterprises. The difference in price is colossal. If the brake pad manufacturer saved money and placed hard metal filings in the pads, the disc will quickly reach the minimum thickness. Greed in this matter can have a negative impact not only on your wallet, but also on your driving safety. Pads with hard filler are less effective, resulting in slower braking. - Brake Caliper
A faulty caliper can cause the disc to wear down to its minimum thickness too early. Hydraulic pressure forces the pistons out of the caliper cylinder, causing the pads to stop the disc during braking. The system works normally if, after braking, the caliper pistons return to their original position, and as a result the pads move back into place. The malfunction entails the adhesion of the pads to the disc even outside the braking process. This can happen due to jamming of the bracket in the caliper guides or the piston inside the cylinder. Because of this, all elements of the system heat up and wear out faster to a minimum thickness. In case of problems, the caliper is removed and the elements subject to wear are replaced. Most often, the cause of the malfunction is a rupture of one of the caliper parts: protective covers on the fingers or boots on the pistons. - Wheel hub
If one of the hub bearings is broken, the brake pads are pressed unevenly. A “stepping” effect occurs, due to which braking becomes less effective. With such a malfunction, runout of the brake disc occurs due to uneven thinning of the part down to a minimum thickness.“What kind of lubricant to lubricate calipers: choosing the best composition” Read more
- The brake disc itself
A high-quality brake disc must be marked on the end indicating its main parameters: diameter, initial and minimum thickness, etc. Such information is placed on original products and replicas of well-known manufacturers. Lack of marking means a violation of production technology. Most often, unscrupulous manufacturers use cheaper, unsuitable metal and do not carry out protective treatment.
Such products are more susceptible to wear: they heat up more and, as a result, become deformed and wear out faster to a minimum thickness. As a result, the driver feels the steering wheel wobble. The car becomes less safe, and repair costs increase. It is important to take care of the quality of components already at the purchase stage, so as not to spend even more on solving problems later. The seller of quality products can provide certificates for them. Ask to see these documents before purchasing the item. It is important to regularly diagnose the car’s brake system so as not to miss a malfunction of any of the elements and immediately replace the part whose thickness has become minimal.
Results
If the problem could not be detected, and during acceleration the presence of vibration in the car body or steering wheel is still noted, then there is only one way out - contact a specialist. This problem should not remain, as it can cause more complex breakdowns or a dangerous situation for the driver and passengers of the car while driving on the road. It is necessary to respond as quickly as possible to all possible problems in order to eliminate them by replacing machine elements that have failed.
And specialists are ready to come to your aid at any time of the day and fix the problem as quickly as possible right at the site of your car breakdown. All necessary equipment is always with you.
: high quality and affordable prices 24/7!
Every driver has encountered vibrations and impacts on the steering wheel while driving; in many cases, the wheel runout, or rather its incorrect balancing, is to blame. The wheel must be perfectly shaped. Size and other factors may also have an impact. But, most often the problem is solved by simple balancing. Let's look at what balancing is, what it is like and how to do it correctly.