Diagnostics and repair of gearboxes
The gearbox in a car is one of the most loaded components, the operation of which directly affects the operation of the chassis of the car as a whole.
A gearbox is a unit that transmits and converts torque from the engine to the wheels, changing the speed of rotation of the driveshaft. Gearboxes are used to transmit torque in rear-wheel drive and all-wheel drive vehicles. In all-wheel drive vehicles, instead of a front axle gearbox, an angular gear is also used to transmit torque to the front axle.
Our car service repairs gearboxes and provides motorists with a full range of professional and high-quality services for maintenance, diagnostics and restoration in the shortest possible time. The following types of work are carried out:
Factors influencing the price of the service - rear gear replacement in Moscow
It is common knowledge that the cost of car repairs depends on several aspects. Among them are the following:
- cost of spare parts (original, China, alternative manufacturers);
- personnel qualifications;
- level of equipment of the service station (availability of painting booths, lifts, special tools and equipment, etc.).
For example, the price of the service - replacing the rear gearbox in Moscow will also depend on factors such as the age, make and model of the car. We are confident that car services will compete for your order and offer the best conditions. The centers have a system of discounts for regular customers.
The first signs of gearbox failure
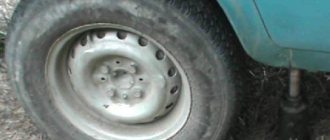
Rear axle gearbox
To identify a malfunction of the rear axle gearbox, it is recommended to regularly check for oil leaks, damage and deformations, as well as pay attention to extraneous knocks and noises.
So, the first signs of problems may be:
- Increased knocking or noise from the rear axle
- Noise when accelerating a car
- Noise when accelerating or braking the engine
- Noise when turning
- Knocking and jerking when starting or changing gears
Problems with the rear axle gearbox most often occur due to untimely maintenance or careless operation of the vehicle. If you find the listed signs of malfunction, it is advisable to contact a service center as quickly as possible, since identifying them at an early stage will save a fairly large amount of money. Repair and adjustment of the gearbox should be carried out by competent people who understand how it works and works.
Our craftsmen perform a complete disassembly of the gearbox, after which all failed and unusable parts are restored, or, if it is impossible to restore them, they are replaced with new original parts.
Front axle gearbox
Repair of gearboxes in front-wheel drive cars is more complex, due to its design features. However, our specialists are ready to repair the front axle gearbox of any complexity, while completing it in the shortest possible time. Our technicians will replace bearings, restore or replace gears, replace seals and change oil.
Scheme of work when repairing gearboxes
The masters of our Topgear77 workshop professionally restore the operation of any type of gearbox through partial replacement of failed components. In order to save your time, we can install a pre-rebuilt gearbox on your car, since high-quality repairs of the front and rear axles require a lot of time.
An important stage of work is diagnostics to identify extraneous noise in the components and assemblies of the car.
The source of noise can be not only the gearbox, but also the hub bearing, driveshaft or suspension bearing, gearbox or transfer case.
The set of activities that our technicians carry out when repairing gearboxes includes the following operations:
- Dismantling from a permanent location.
- Disassembling the system with subsequent cleaning of various contaminants.
- Assessment of the condition of parts and their suitability for work.
- Restoration or replacement of heavily worn and unusable parts.
- Changing the oil in the gearbox.
- Installation of parts and carrying out control tests.
Various loads on the gearbox during vehicle operation occur regularly, regardless of what road the vehicle is driven on and with what load on the vehicle. Therefore, gearbox maintenance must be carried out in a timely manner.
When carrying out repair work and restoring the gearbox, our craftsmen use exclusively original parts and branded consumables. All this together makes the repair of gearboxes of the highest quality, thereby allowing you to extend the period of operation of the vehicle before any possible malfunctions occur. As a confirmation of their quality, all work performed in our car service center is covered by a 12-month guarantee.
Reasons for the appearance of hum in the gearbox
A number of reasons that cause hum and lead to the destruction of the gearbox:
- bearing wear;
- wear of the main pair;
- loosening the shank nut.
There is nothing special to say about the wear of the bearings, but about the wear of the main pair gear, there is something to pay attention to. Incorrectly selected oil can lead to accelerated wear of the working surface of the rubbing gear teeth. As a result, an oil wedge does not form on the working (rubbing) surfaces, which protects them from wear. The gears of the main pair contact each other not only under pressure, but also through sliding. Therefore, the correct selection of oil and the formation of an oil wedge are very important conditions for the operation of this unit.
The following also leads to accelerated wear of the bearings and gears of the main pair:
- loss of oil level in the gearbox;
- water entering the gearbox.
Loss of oil level in the gearbox usually occurs through the seals, so we recommend periodically checking the parking space for oil stains that indicate a problem. The seals in the gearbox need to be replaced in such a situation, but you should not trust this work to the first car service you come across.
Many services try to repair gearboxes, but not everyone knows the subtleties and nuances for proper assembly and configuration of the unit. Structurally, everything looks simple: two gears (drive and driven), a differential, several bearings, and perhaps that’s all at first glance. But, you need to know something else important when operating the unit before undertaking repairs, namely all the necessary clearances when operating rubbing surfaces. This is a very important subtlety on which the resource (service life) of the spare part depends.
Water enters the gearbox most often through the breather when the car drives into a deep puddle or pond. The water cools the gearbox and compresses the air inside, as a result of which water is sucked inside through the vent. The ingress of water into the oil leads to loss of lubricity and, as a result, parts are subject to increased wear.
Another common problem and cause of gearbox failure is a loose shank nut . As a result, play appears along the axis of the input shaft, leading to devastating consequences. During operation, the play increases, and ultimately the shaft rests against the differential and destroys it.
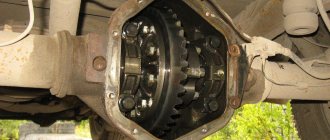
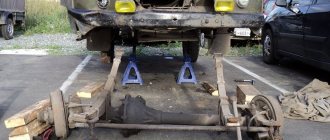
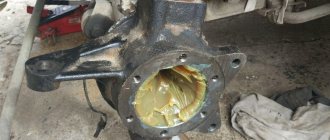
Disassembling the rear axle gearbox
Before removing, clean the gearbox from dirt. We install the dismantled gearbox on a workbench.
Using a 10" wrench, unscrew the bolt securing the locking plate of the adjusting nut of the right bearing of the differential box...
...and remove the plate.
Similarly, remove the locking plate of the left bearing adjusting nut.
Using a center punch we mark the location of the differential box bearing caps on the gearbox housing.
Using a 17mm spanner, unscrew the two bolts securing the right bearing cover of the differential box...
...and remove the bolts.
Remove the right bearing cover.
Remove the adjusting nut...
...and remove the outer race of the differential box bearing.
Similarly, remove the cover, remove the adjusting nut and remove the outer ring of the left bearing of the differential box. If we do not change the differential box bearings, then we mark their outer rings so as not to mix them up during assembly.
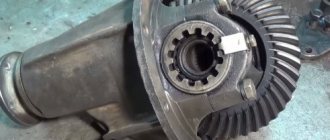
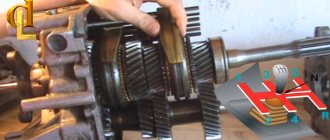
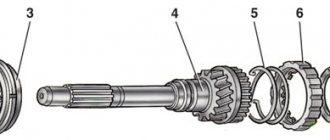
Remove the differential box assembly with the main drive driven gear, inner rings, cages and bearing rollers.
From the gearbox housing we remove the drive gear assembly with the adjusting ring, inner ring, separator and rear bearing rollers and spacer sleeve.
Remove the spacer sleeve.
By striking with a hammer through a drift on the inner ring of the rear gearbox bearing,...
...remove the inner ring with the separator and rollers.
Remove the drive gear adjusting ring.
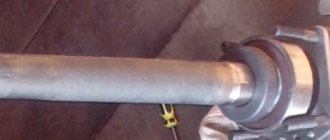
We remove the oil seal from the gearbox housing socket (see Replacing the main gear drive gear oil seal).
We take out the oil deflector...
...and the front bearing inner ring with cage and rollers.
Use a drift to knock out the outer ring of the front bearing of the drive gear...
...and take it out.
Turning the crankcase over, similarly knock out the outer ring of the rear bearing of the drive gear. To disassemble the differential...
... using a puller we press the inner race of the differential box bearing.
If there is no puller, insert a chisel between the end of the inner bearing ring and the differential box.
By striking the chisel, we move the inner ring of the bearing.
Insert two powerful screwdrivers (or mounting blades) into the resulting gap and press together...
...inner ring of the bearing with cage and rollers.
Similarly, we press the inner ring of the other bearing.
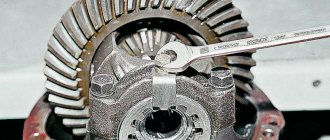
Clamping the differential box in a vice with soft metal jaws,...
...using a 17mm spanner, unscrew the eight bolts securing the driven gear to the differential box.
Using a hammer with a plastic striker, we knock the driven gear off the differential box...
...and remove the gear.
We take out the satellite axis.
By turning the satellites, we remove them from the differential box.
We take out the side gears...
...and their support washers.
Before assembly, we wash the gearbox parts in kerosene and inspect them. We check the condition of the main gear gear teeth. Damage to at least one tooth (chipping, scuffing of the working surface) is unacceptable. Using fine-grained sandpaper, we eliminate minor damage to the pinion axle, axle gear journals and their mounting holes in the differential box. In case of serious damage to parts, we replace them with new ones. If even minor damage to the surfaces of the axle gear support washers is detected, we replace the washers with new ones (with a selection of washers thickness). The bearings of the drive gear and differential box must be wear-free, with smooth working surfaces. Poor bearing condition causes noise and gear teeth sticking. We press the inner rings of the differential box bearings with cages and rollers onto the box using a suitable piece of pipe. We fix the driven gear on the differential box. When assembling the differential, lubricate the axle gears with support washers and satellites with transmission oil and install them in the differential box. We rotate the satellites and axle gears so as to align the axis of rotation of the satellites with the axis of the holes in the differential box, and insert the axis of the satellites. The axial clearance of each axle gear should not exceed 0.1 mm. If the gap is increased, we replace the axle gear support washers with new ones of greater thickness. The moment of resistance to rotation of the differential gears should not exceed 14.7 N. m (1.5 kgf. m) - the gears are turned by hand.
Check the ease of rotation of the differential gears.
Using a tool head (a piece of pipe) of suitable diameter, we press the outer ring of the front bearing into the crankcase socket.
Similarly, press in the outer ring of the rear bearing.
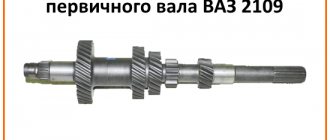
The correct position of the drive gear relative to the driven gear is ensured by selecting the thickness of the adjusting ring installed between the end of the drive gear and the inner ring of the rear bearing. When replacing the main gearbox pair or drive gear bearings, select an adjusting ring. To do this, we make a device from an old drive gear: we weld a plate 80 mm long to the gear and grind the plate to a size of 50–0.02 mm relative to the end of the gear (the plane of contact of the adjusting ring).
A device made from an old drive gear.
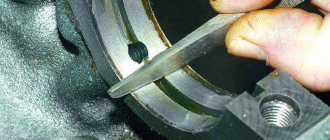
We grind (or use fine sandpaper) the place where the rear bearing is installed on the drive gear so that the inner race of the bearing is installed in a sliding fit. We install the inner ring of the rear bearing with a separator and rollers on the manufactured device and insert the device into the crankcase. Then we install the front bearing inner ring with the cage and rollers and the drive gear flange. Turning the gear by the flange to correctly install the bearing rollers, tighten the flange mounting nut to a torque of 7.9–9.8 N.m (0.8–1.0 kgf.m). We fix the crankcase on the workbench so that its mating plane is horizontal. We install the pattern ruler in the bearing bed with its edge so that the contact of the bed ruler occurs along the line.
Using a set of flat feeler gauges, we determine the size of the gap between the ruler and the device plate.
The thickness of the adjusting ring is determined by the difference between the gap and the deviation from the nominal position of the new gear (taking into account the sign of the deviation).
The deviation from the nominal position is marked (in hundredths of a millimeter with plus or minus signs) on the conical part of the gear shank. For example, the measured gap is 2.90 mm, and the deviation from the nominal position is marked on the gear -15. We convert the deviation into millimeters: –15 x 0.01 = –0.15. The required thickness of the adjusting ring will be: 2.90–(–0.15) = 3.05 mm. We install the adjusting ring of the required thickness on the new drive gear. We remove the device from the gearbox housing and remove the inner rings of the front and rear bearings with cages and rollers.
Using a suitable piece of pipe, press the inner ring of the rear bearing with the cage and rollers onto the new drive gear.
We insert the drive gear into the gearbox housing. We install a new spacer sleeve, the inner ring of the front bearing with a separator and rollers, and an oil deflector. Having lubricated the working edge of the new oil seal with Litol-24 grease, we press it into the crankcase socket. Install the drive gear flange.
Having locked the flange, we gradually tighten the nut securing it with a torque wrench to a torque of 118 N.m (12 kgf.m).
We control the preload of the drive gear bearings with a dynamometer,…
...periodically checking the moment of resistance of the bearings to the rotation of the drive gear.
If the moment of resistance to rotation is less than 157 N. cm (16 kgf. cm) - for new bearings, and for bearings after 30 km - less than 39.2 N. cm (4 kgf. cm), then tighten the flange mounting nut, not exceeding the tightening torque. After this, we again check the moment of resistance to rotation of the drive gear. If the moment of resistance turns out to be more than 197 N. cm (20 kgf. cm) for new bearings, and for run-in bearings - more than 59.0 N. cm (6 kgf. cm), then the preload of the bearings is exceeded. In this case, it is necessary to replace the excessively deformed spacer with a new one and reassemble and adjust. We install the differential assembly with bearings and adjusting nuts into the gearbox housing so that they come into contact with the outer rings of the bearings. Tighten the bearing cap bolts to the required torque. We make a special wrench from a steel plate 49.5 mm wide and 3–4 mm thick for tightening the adjusting nuts. We adjust the lateral clearance in the meshing of the main gears and preload the differential box bearings simultaneously, in several stages.
Using a caliper we measure the distance between the bearing caps.
We tighten the left adjusting nut (from the side of the driven gear) until the gap in the meshing of the main gear gears is completely eliminated.
We tighten the right nut until it stops and tighten it by 1-2 teeth of the nut.
By tightening the left nut, we set the required lateral clearance of 0.08–0.13 mm in the meshing of the main gears. With this gap, when rocking the driven gear, with our fingers we feel minimal play in the meshing of the gears, accompanied by a slight knock of tooth on tooth. When the nuts are tightened, the differential box bearing caps diverge and the distance between them increases. To set the preload of the differential box bearings, tighten both bearing adjusting nuts sequentially and evenly until the distance between the covers is 0.15–0.20 mm. Having established the preload of the bearings, we finally check the lateral clearance in the meshing of the main gears, which should not change. For this,…
...slowly turning the driven gear three turns, using your fingers to control the play in the meshing of each pair of teeth.
If the gap in the mesh is larger than required (0.08-0.13 mm), then by rotating the adjusting nuts we bring the driven gear closer to the drive gear or move it away if the gap is smaller. In order to maintain the set preload of the bearings, we move the driven gear by tightening one of the adjusting nuts and loosening the other by the same angle.
After adjustment, install the locking plates of the adjusting nuts and secure them with bolts.