If you need to remove the rear axle gearbox yourself at home, but don’t know how to do it, then this is the place for you. The gearbox is removed from the axle to be replaced with a new one, or for repairs; usually it is removed when it begins to howl or hum, but it can also be due to a breakdown of the gearbox gear, pinion, replacement of satellite gears or bearings. In principle, the design of the rear axle is the same for all cars, therefore the removal principle is the same, but there may be some minor nuances. I will show an example of removing the rear axle gearbox on a VAZ-2103, although all VAZs from 2101 to 2107 have the same axle, the difference can only be in the gearbox, but any VAZ gearbox can be installed on any Zhiguli, one gearbox is designed for traction, and the other for speed.
Enough of the introduction, let's move on to removing the gearbox from the bridge; I will remove the gearbox without a pit.
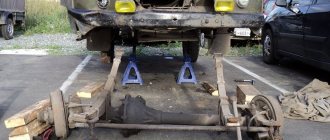
First of all, place stones or bricks under the front wheels to prevent the car from accidentally rolling. We jack up the rear wheels to such a height that it is convenient to crawl up to the rear axle, it is advisable to secure the jack with some kind of block or stack of bricks, so that if the jack suddenly comes off, the car rests on the insurance, but it is better to lower the jack on the insurance so that the car also rests on the insurance.
Photo. Removing the wheel
In order to remove the gearbox from the axle, you must first remove the wheels and axle shafts.
But before removing the axle shaft, you need to get to it, and after removing the wheel, remove the brake drum, unscrew the guide pins from the drum and remove the drum. But it’s not always easy to remove the brake drum; often it sits very tightly on the axle shaft and you can’t just tear it off; many people start hitting the edge of the brake drum with a hammer, breaking the edges. There are special threads on the drum (but they are often torn off or torn off during removal) into which bolts are screwed and they push the brake drum out of the axle shaft. But if the threads are missing or torn off, there is a way to remove the drum from the axle shaft. Since the rear wheels are removed, unscrew the guide bolts from one drum and leave them on the other and, just in case, tighten one wheel bolt for greater rigidity. Start the car, turn on first gear and press the brake with a little gas; the drum without guide bolts will break off. Then unwind the twisted drum and twist the torn one, and tear off the second drum in this way.
Photo. Brake drum, arrow indicates guide bolt
The brake drums have been removed, we remove the brake pads, they are easy to remove, only hard springs, so remove the springs, you can remove the top spring with pliers, and the bottom one, place a screwdriver on top of the spring hook and hit it to the bottom. Just remember right away how the spacer was located under the upper spring, so as not to rack your brains later.
Photo. Brake pads
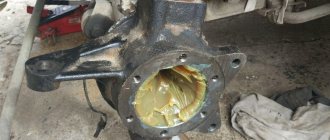
The brake pads have been removed, we begin to remove the axle shaft, the arrow in the photo shows which nuts need to be unscrewed, unscrew them, there are 4 of them in a circle.
Photo. Nuts that need to be unscrewed to remove the axle shaft
Unscrew the nuts, pull out the axle shaft, if the axle shaft does not come out, you can attach the brake drum slightly so that it has some movement on the bolts, pull the brake drum towards you, from the axle shaft towards you, you will get a small blow and the axle shaft will come out.
Nut tightening
Now the most important point is tightening the nut. To properly tighten the nut, you need to do the following preparatory work:
- hang up the rear of the car;
Remove the rear wheels and brake drums.
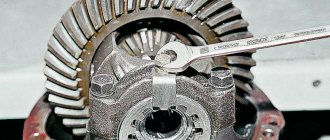
Tighten the nut until you feel a slight stop. Thus, we brought the bearings to the new spacer, but we had some play in the flange. He must be. This is normal with a new spacer. We tighten the nut 10-20 degrees and check the play. Tighten the nut until there is no play. Next, we check the force to break the flange using a digital scale. We insert the “ear” of the scale into the hole on the flange and pull it at a right angle. The breaking force should be within 1.5 kg. If the force is less than 1.5 kg, tighten the nut literally by degree and control the force.
The tightening torque of the nut should be from 12 to 26 kg/m when the required force is achieved. If, after eliminating the flange play, the force is significantly more than 1.5 kg, then you have received a defective spacer sleeve.
Next we reassemble:
- We fasten the cardan according to the marks;
- Fill in new oil (you need to pour oil with API GL-4/GL-5 approvals, volume 1.5 liters);
- We install brake drums and wheels.
The process of replacing the rear axle gearbox seal of a VAZ 2107 is clearly shown in this video:
Assembly procedure
After the repair has been completed and all the damaged elements have been replaced, it is necessary to reassemble the rear axle and make sure that the gearbox no longer makes noise when driving.
The process looks like this:
- the new node is fixed in the place intended for it;
- return the axle shafts to the bridge;
- the gear flange is attached to the cardan;
- install wheels and brake drives.
It is necessary to test the car both at low speeds and at high speeds. First of all, leaving the car in neutral gear, press the gas. Then accelerate smoothly, and then turn off the engine. In a situation where the noise is still heard, an unambiguous conclusion should be drawn: you made some mistake or the reason was not in the gearbox.
When the car moves without any extraneous sounds, you can safely operate it as usual.
Important nuances in work
- When driving the oil seal using a mandrel, do not overdo it. Apply gentle blows and control the depth of the oil seal. If you hit it hard, you can easily damage the oil seal;
- Before installing the oil seal, lubricate the rim and sealing edge with fresh oil;
- Before installation, inspect the flange for wear in the area where the sealing lip of the oil seal meets. If there is a “groove,” the flange must be replaced.
As you can see, the process of replacing the VAZ 2107 gearbox seal is quite simple and does not take much time. The most important thing in this job is to properly tighten the rear axle flange nut.
How to determine a breakdown
The cost of the VAZ-2107 gearbox is very high, and repairs are difficult. Not every driver can handle servicing this mechanism. Therefore, before starting work, you need to make sure that it is this gearbox that makes the noise. Follow these steps:
- On a flat stretch of road, accelerate from 20 to 90 km/h. Listen for any strange noises coming from the rear of the car. Do this carefully, acceleration should be smooth.
- Then you need to release the gas and apply engine braking. Pay attention to whether any extraneous sounds appear from the rear gearbox.
- After this, accelerate the car to 100 km/h, turn on neutral speed and turn off the engine. At the same time, while the car is moving by inertia, note for yourself whether any extraneous noise occurs.
A continuing hum, both with the speed turned on and off, indicates that the gearbox is fully operational and there are no problems with it. In the same case, when noises are heard only while driving at high speed, it is necessary to replace or repair the rear axle.
Common faults
In most cases, disassembling the gearbox is required to replace the oil seal. Like all rubber gaskets, it often begins to leak because:
- loses elasticity over time;
- may have a manufacturing defect;
- was initially installed incorrectly.
In particular, the following signs indicate problems with the oil seal:
- oil stains are periodically detected at the rear axle;
- a backlash (always radial) is formed at the gearbox shank.
The latter also indicates wear of one bearing or several at once.
An atypical noise coming from the trunk will also tell you that the rear axle is faulty. It is important to find out at what speed it occurs. For this:
- accelerate to 20 km;
- continue to accelerate smoothly to 90;
- record the engine speed at the moment the noise appears;
- release the gas, but do not engage the gear;
- When braking with the power plant, pay attention to the nature of the sounds.
The following test accurately indicates that the gearbox is broken:
- accelerate the VAZ-2107 to 100 km;
- set to “neutral”;
- turn off the ignition.
If you still hear a hum, then the gearbox is to blame.
Gearbox diagnostics
In order to finally make sure that there is no problem with the rear axle gearbox of the VAZ-2107, you must perform the following steps:
- Stop the wheel chocks under the front wheels.
- The entire rear of the vehicle must be raised using jacks so that the axle is suspended. Be sure to place the machine on supports.
- Start the engine, then shift into gear and add gas. The main thing is to ensure that the speedometer shows the same speed that you reached while driving.
In the case when, during acceleration without load, extraneous noise still remains, you should understand that there are no problems in the gearbox itself. It is necessary to carefully review all other mechanisms included in the drive design. But if, when there is no load, noise does not come from the gearbox, you will have to repair it. The fact is that when gears wear out, they only make noise under load.
Symptoms of a problem
As soon as the driver notices any changes in the operation of the rear axle (for example, extraneous sounds appear that were not there before), he must respond to these changes as quickly as possible so as not to aggravate the possible malfunction. The most typical sign of such problems may be increased noise levels:
- coming from the rear wheels;
- during operation of the rear axle;
- when accelerating the car;
- when braking with the engine;
- during engine acceleration and braking;
- while the vehicle is turning.
In addition, a knocking sound when the car starts moving and an oil leak may indicate a malfunction of the rear axle.
Oil leakage indicates a malfunction of the rear axle of the VAZ 2107
Grinding noise when moving
The causes of a grinding noise from the rear axle when the vehicle is moving can be:
- wear or destruction of axle or differential bearings;
- deformation of the beam or axle shafts;
- incorrect adjustment, damage or wear of gears or bearings of the gearbox and differential;
- wear of the spline connection with the semi-axial gears;
- incorrect adjustment of the gear teeth of the main gear;
- insufficient amount of oil.
The cardan spins, but the car does not move
If the driveshaft rotates while the vehicle is stationary, the cause may be a failed axle spline or wear on the teeth of the differential or final drive gears. In any case, if the cardan spins, but the car does not move, this indicates a fairly serious breakdown and, most likely, replacement of the axle shafts, bearings or gears will be required.
Oil leakage from the housing and from the shank side
The most likely causes of oil leakage from the rear axle housing:
- wear or damage to the drive gear seal;
- wear of the axle shaft seal, determined by oiling of the brake shields, drums and pads;
- loosening the bolts securing the rear axle gearbox housing;
- damage to sealing gaskets;
- axial play of the shank;
- breather jamming.
Wheels are stuck and won't rotate
If the rear wheels are jammed, but the drum and pads are in order, the cause of this malfunction may be failure of the bearings or the axle shaft itself. Most likely, in this case, the bearings have crumbled or the axle shaft has become deformed (for example, due to an impact) and the parts need to be replaced.
A little leaked oil from the axle through the axle seal + dust from the pads = good “glue”. Bottom line: remove the drum and look. If all the springs are in place and the block is not torn, then take sandpaper and clean the drum and shoes. Pre-wash them with carburetor cleaner or similar liquid. Sold in cylinders.
underwater snake
https://auto.mail.ru/forum/topic/klassika_zaklinilo_zadnee_koleso_odno/
Why does the gearbox break?
The gearbox on the “seven” is very reliable; on many cars it covers both 100 and 300 thousand km. Moreover, not a single repair was carried out during this period. But on some vehicles, gear wear appears much earlier, usually due to improper operation.
Reasons why gearbox gears fail:
- The lubricant in the gearbox is not replaced.
- Poor quality oil is used. Only high-quality transmission oil must be filled into the rear axle, as well as into the steering gear of the VAZ-2107.
- Extreme vehicle operating conditions, heavy loads and frequent slipping.
- Insufficient amount of lubricant in the gearbox.
In other words, if you monitor the condition of the VAZ-2107 gearbox seals, the oil level, and most importantly, do not allow excessive loads on the drive, then the mechanism will last for many years.
Reasons for failure of the VAZ 2107 gearbox
- untimely replacement of transmission oil;
- use of low-quality oil;
- operation of the bridge with insufficient oil level;
- Frequent vehicle slipping or operation under extreme load conditions.
To repair the rear axle of a VAZ 2107, you will need:
Work must be carried out on a lift or inspection pit.
Before removing the gearbox, it is necessary to drain the transmission oil that is poured into the rear axle of the VAZ 2107. To do this, place an oil container under the drain hole of the axle and unscrew the drain plug.
What tools are needed for removal
In order to make repairs, you need to remove the rear axle. To do this you will need the following tools:
- Socket and open-end wrenches.
- Punch and chisel.
- Hammer.
- Bearing ring puller.
- A simple pencil (or better yet, a core).
- Torque wrench.
- Set of probes.
- Container for draining lubricant.
- Calipers.
It is advisable to carry out repairs by placing the car on a viewing hole or lift. But if there are no such amenities, you can raise the entire rear part as much as possible above the ground. Just make sure that the front wheels are secured as securely as possible.
How to remove the gearbox
Before starting the removal procedure, you need to completely drain all the oil that is in the rear axle. To do this, place a suitable container over it and unscrew the plug. Be sure to fill in new oil after all repair work and installation of the gearbox in place.
The repair procedure is as follows:
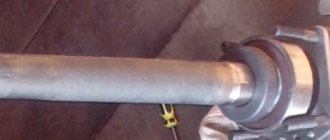
- Unscrew the bolts that secure the propeller shaft to the rear gearbox flange.
- The rear half of the driveshaft must be disconnected and lowered down so that it does not interfere with work. During assembly, tightening is carried out with a torque of 18 kgf/m.
- Remove the rear wheels.
- Unscrew the guides that are located on the brake drums.
- Completely dismantle the brake drums and unscrew the four bolts that secure the axle shaft.
- Only after this can the axle shaft be pulled out.
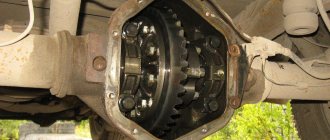
- To dismantle the gearbox, you need to unscrew the 8 bolts that secure it to the rear axle.
- After all the measures taken, you can completely remove the gearbox from the car.
Be sure to check the condition of the rear axle bearings. If they become unusable, then they need to be replaced.
Gearbox repair
When making adjustments and repairs to the rear gearbox, you must have certain skills, as well as follow technology. A mandatory requirement is that you must have special tools, pullers and stands at your disposal. If you do not have all these tools, then it is better to have the rear gearbox repaired by a professional.
If you have never tried to repair rear gearboxes, but really want to do it, it is better to first learn from experienced mechanics. Disassembling the VAZ-2107 axle gearbox is not difficult, but this is a vehicle component that requires very high-quality maintenance. You shouldn't skimp on this.
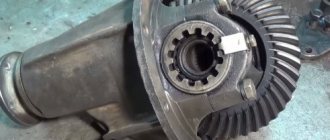
Disassembling the unit
To disassemble the gearbox, you will need to do the following:
- Unscrew the shank securing nut.
- Remove the flange, then remove the drive gear along with the adjusting rings.
- Remove the oil seal, inner race on the bearing and oil deflector.
- Using a puller, remove the outer rings from the bearings.
- Disassemble the drive gear along with the differential mechanism. Subsequently, the spacer sleeve must be replaced.
When disassembling the mechanism, be sure to mark the bearing caps so that they can be installed in the same way during reassembly. It is recommended to use a pencil or core to make marks. Label the right and left covers to avoid confusion during installation. It is advisable to mark these covers using a core.
Using a drift and a hammer, you need to remove the separator and the inner rings. Please note that you should not knock too hard. The rings are knocked out by lightly tapping in a circle. If you hit only one point, the ring will not come out. When repairing a rear gearbox, the bearings or the main pair are usually replaced. These are the most vulnerable elements of the system.
About replacing the rear axle gearbox of a VAZ 2107
Extraneous noises that arise under the bottom while driving signal the occurrence of troubles with the gearbox “adjacent” to the rear axle. Even timely replacement of lubricant in the axle does not affect the failure of its parts, so replacing the rear axle gearbox of the VAZ 2107 is inevitable. In order to verify whether the “diagnosis” is correct, it is necessary to dismantle the gearbox, disassemble it, if necessary, carry out repair work, reassemble it, reinstall it and configure it. But here's the question...
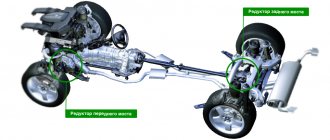
What is the rear axle made of?
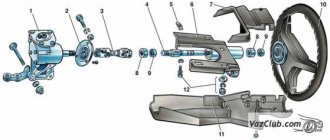
The design of the rear axle of the “seven” includes a fairly large number of elements, including:
- Brake drum mounting bolts.
- Guide pins.
- Axle bearing oil deflector.
- Brake drum.
- Drum ring.
- Rear brake cylinder.
- Brake bleeding fitting.
- Axle bearing.
- Bearing lock ring.
- Bridge beam flange.
- Stuffing box.
- Spring support cup.
- Bridge beam.
- Suspension bracket.
- Axle guide.
- Differential bearing nut.
- Differential bearing.
- Differential bearing cover.
- Breather.
- Satellite.
- Driven gear of the main gear.
- Left axle shaft.
- Axle gear.
- Gearbox housing.
- Drive gear adjusting ring.
- Spacer sleeve.
- Drive gear bearing.
- Stuffing box.
- Mud deflector.
- Flange-fork of the cardan joint.
- Screw.
- Oil deflector.
- Main gear drive gear.
- Axle of satellites.
- Axle gear support washer.
- Differential box.
- Right axle shaft.
- Axle shaft brackets.
- Axle bearing thrust plate.
- Rear brake shield.
- Rear brake pad.
- Friction lining.
- Axle shaft flange.
- Locking plate.
- Bearing cover mounting bolts.
The rear axle consists of the components of axle shafts, gearbox and final drive
Frame
All working mechanisms of the rear axle are located in the beam, as well as in the gearbox housing. The beam is made of two casings connected by longitudinal welding. The bearings and seals of the axle shafts are located in flanges at the ends of the beam. In addition, the suspension fastening elements are welded to the beam body. In the middle the beam is widened and has an opening in which the gearbox housing is fixed. A breather is installed in its upper part, through which the connection between the bridge cavity and the atmosphere is maintained, so that the pressure in the cavity does not rise above the permissible level and dirt does not get inside the part.
All working mechanisms involved in transmitting torque are located in the axle beam and gearbox housing
Gearbox
The main gear consists of drive and driven gears that have hypoid gearing, i.e. the axes of the gears do not intersect, but intersect. Thanks to the specific shape of the teeth, simultaneous engagement of several of them is ensured and, as a result, the load on the teeth is reduced and their durability increases . A two-satellite bevel differential, in addition to the satellites located on a common axis, includes a box and two gears, while the satellites are in constant mesh with the gears.
The rear axle gearbox of the VAZ 2107 contains a differential and final drive
Half shafts
The “Seven” is equipped with so-called semi-balanced axle shafts of the rear axle, which take on bending forces in both the horizontal and vertical planes. The axle shaft, in essence, is a shaft made of 40X steel, with splines on the inner end and a flange on the outer end. The inner end of the axle shaft is connected to the differential gear, the outer end is located in the flange of the beam, to which the brake drum and wheel are attached. The axle shaft is held in place by a thrust plate of the bearing, which is also fixed to the beam.
The VAZ 2107 is equipped with semi-balanced axle shafts of the rear axle, which take on bending forces in both horizontal and vertical planes
Where is the gearbox located?
On the "sevens", as on all representatives of the rear-wheel drive family, the gearbox is located at the rear, under the bottom of the car. It connects the cardan to the VAZ 2107 axle and causes the wheels of the car to rotate. Rotation occurs thanks to axle shafts engaged in the gearbox, which, due to the technical features of the rear axle of the VAZ 2107, will have to be removed later. If the car is lifted, or when viewed from a garage pit, the gearbox is simply impossible not to notice.
Signs and malfunctions of the classic rear axle gearbox
Replacing a gearbox with your own hands is a labor-intensive process, which includes not only the purchase of a new unit (quite expensive), but also time costs. Therefore, before you start, you need to make sure that the gearbox is faulty. You can define the signs like this:
- gradually accelerating the car, listen carefully and remember at what moment the noise appears;
- while driving, start engine braking (remove your foot from the gas pedal at speed), at this time listen to the gearbox and note the moment the noise appears;
- accelerate the "seven" to hundreds, switch to neutral and turn off the engine - listen to how the gearbox behaves while coasting.
Checking the oil in the gearbox
For the rear axle gearbox of the “seven”, semi-synthetics with viscosity parameters 75W-90 are suitable, for example:
- CASTROL Syntrans Transaxle 75W-90 API GL-4;
- "Lukoil 80W90 GL-5" and others.
1.35 liters of oil is poured through a special filler hole on the gearbox housing. If you need to drain the used oil, there is a drain hole in the bottom of the gearbox for this purpose. Before draining the old oil, it is recommended to warm up the car, place it on a flat surface and jack up the right side of the car . If there are metal shavings in the waste, you should rinse the gearbox container with a special liquid or spindle oil.
For the rear axle of the VAZ 2107, CASTROL Syntrans Transaxle 75W-90 API GL-4 oil is suitable
It is convenient to fill in new oil using a special syringe, which can be purchased at a car store. Both plugs (drain and filler) should be securely tightened, and then check the condition of the breather, which should move freely. If the breather jams, the contact of the container with the atmosphere will be disrupted, which will lead to an increase in internal pressure, damage to the seals and oil leakage. The oil level in the rear axle gearbox is considered normal when the liquid reaches the lower edge of the filler hole.
Video: changing the oil in the gearbox yourself
Repairing and adjusting the most critical components of the rear axle, as a rule, requires some practice, so it is best to perform it under the guidance of an experienced specialist. If you hear extraneous sounds from the rear axle while driving, you should immediately determine the cause of their occurrence. By ignoring such noises, you can “start” a breakdown and subsequently face complex and expensive repairs. Following simple rules for operating and maintaining the rear axle will extend the life of the vehicle for many years.