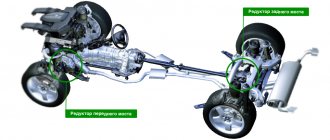
Device
In order for the car to move, it is necessary to transfer the rotation of the engine to the wheels. But the engine speed is too high, and in order to correctly distribute the torque, a mechanism is needed that changes the gear ratio. Due to the gearbox and different engine speeds, the speed of movement changes, and the main pair of the rear axle takes over the rotation and transmits it to the wheels through gears.
- flange, it is fixed on the drive gear (shank) of the RZM, and is an intermediate link between the driveshaft and this gear;
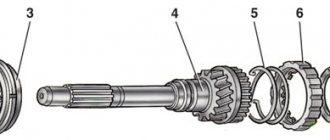
- the shank of the main pair, at one end of which there are splines for pressing the flange, at the other end there is a bevel gear with a small number of teeth;
- driven gear (planet gear), it is in mesh with the drive gear, and it is with it that it forms the main gear;
- center differential, allowing the rear wheels to spin at different angular speeds.
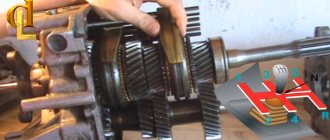
The differential design is very simple - the mechanism consists of two axle gears, two satellites and a satellite pin. From the gearbox, the movement is transmitted to the axle shafts, on which the wheels are mounted.
Differences in VAZ rear axle gearboxes
RZMs differ in the gear ratio of the main pair; in total, there are four types of gearboxes on the VAZ classic:
The slowest one is the RZM 2102, its drive gear has 9 teeth, and the driven gear has 40 teeth. To calculate the gear ratio, you need to divide the number of planetary gear teeth by the number of teeth on the drive shaft; for the VAZ 2102 the drive gear is equal to 4.44.
The “penny” gearbox (2101) accordingly has the number of teeth on the gears 10/43, so its IF is 4.3. The next, faster one is RZM 2103 - it has a ratio of 1041, which means the gear ratio is 4.1. And finally, the “fastest” will be the 2106 gearbox, with the number of teeth 11/43 and an inverter frequency of 3.9, respectively.
Many VAZ 2101-07 owners strive to install the fastest gearbox, but this is not always necessary. If the car often carries cargo, that is, the car is a “workhorse”, high speed is of no use, but high-torque power will be very useful. It should be noted that RZM 2102 was not supplied as spare parts; it was installed only on station wagons.
Reasons for failure of the VAZ 2107 gearbox
- untimely replacement of transmission oil;
- use of low-quality oil;
- operation of the bridge with insufficient oil level;
- Frequent vehicle slipping or operation under extreme load conditions.
To repair the rear axle of a VAZ 2107, you will need:
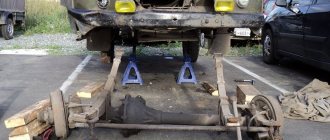
Work must be carried out on a lift or inspection pit.
Before removing the gearbox, it is necessary to drain the transmission oil that is poured into the rear axle of the VAZ 2107. To do this, place an oil container under the drain hole of the axle and unscrew the drain plug.
The next procedure is as follows:
Adjusting and repairing the gearbox requires some skills and careful adherence to technology. It is also necessary to have pullers, stands and special tools. If the above is not the case, you should entrust the work to professionals.
Disassembling the gearbox is performed in the following sequence:
When disassembling the gearbox, it is necessary to put marks on the bearing caps in order to then install them in their original position. To do this, you can use a core (which is more reliable) or a pencil. Marks must be placed on the covers and on the body, so that later during assembly they can be aligned. You should also mark the left and right covers so as not to confuse them.
The inner rings with the separator are removed using a hammer and drift. You need to knock out the rings by lightly tapping them in different places. If you hit only one place, you won’t be able to pull out the ring.
The main pair is available in several variations and determines the gear ratio. The higher the gear ratio, the greater the traction; the lower, the higher the maximum speed of the machine. There are three standard versions of the main pair, used on different VAZ models.
Reference: the VAZ 2102 axle had the maximum gear ratio (4.44). After this model was discontinued, finding pairs with this ratio became problematic, but as practice shows, the best option is installation on a VAZ 2107 with a 1.5-1 engine ,6 gearboxes with 2103 (4.1 gear ratio). When choosing this gearbox in conjunction with a five-speed gearbox, traction and speed are maintained.
Replacing the rear axle gearbox of VAZ 2106, 2107
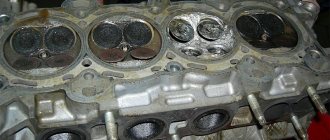
The main disease of REM is increased noise (hum), and the gearbox can hum for various reasons:
- there is insufficient oil in the bridge, or it is completely missing;
- the gap between the gears of the main pair is not adjusted;
- the gears are worn out, they have chips and other damage;
- the main pair has a manufacturing defect, the gears are not ground in from the factory;
- the shank nut has become unscrewed or loosened;
- bearings are worn out.
The main malfunction of the center differential is the wear of the gears of the axle shafts and satellites, when the surfaces of the parts are heavily worn, play forms between the differential gears, but the rear axle usually does not make noise due to wear of the differential gears.
ZM gearboxes on VAZ classics can be repaired, but only if there is no wear on the gears. If the mechanism can no longer be repaired, it needs to be replaced. We replace the rear axle gearbox of a VAZ 2106 on a “seven” as follows:
- we install the car on a pit or a car lift; changing the gearbox on the ground is extremely inconvenient;
- if the car is installed on a pit, it is necessary to jack up both sides; in any case, the rear wheels must be removed. If the work is not done on a lift, you should install stops under each side of the car (in the rear);
- unscrew the drain plug in the REM, drain the transmission oil, having previously prepared a container for it;
- remove the rear brake drums (two guide bolts on each side), after first removing the car from the handbrake. The drums can be difficult to remove; they are dismantled by tapping them from behind with a hammer through a wooden block. You cannot hit the drum with a metal hammer; the drum may break;
- remove the brake pads;
- unscrew the fastenings of the rear axle axle shafts on each side, each axle shaft is secured with four nuts;
- we press out the axle shafts, for this you will need a special puller, you can also make a homemade device;
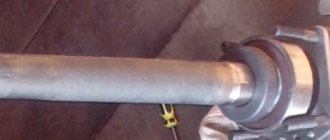
- remove the driveshaft by unscrewing the four bolts and nuts. If the same REM is installed, the cardan with the shank must be marked; this is done in order to put the shaft back in the same position. If you install the cardan incorrectly according to the marks, the shaft may begin to vibrate;
- unscrew the eight bolts securing the rear gearbox (key 13), remove the assembly.
At this point, the removal of the gearbox can be considered complete; now all that remains is to either repair the mechanism or install a new one instead.
Repair of the rear axle gearbox on VAZ 2101-VAZ 2107
Rear axle gearbox - it transmits torque from the gearbox and to the rear wheels, if you remove it, then the car will no longer move, over time, depending on the driving style, the teeth of the gears that are in it wear out and the gearbox requires replacement, but a new one costs quite a lot of money and therefore it makes sense to disassemble and repair the old gearbox, but you just need to understand the fact that if you make a mistake, the car may not move at all when you start it, this will all happen if the gears are not installed correctly, so finesse is needed in assembling the rear axle gearbox and the clarity of installation of all parts.
To disassemble the axle gearbox assembly, you will need quite a few tools, namely: A pencil, a set of wrenches and socket wrenches, a hammer, a chisel, a drift, a punch, you will need all this, in addition, you will need a special puller to remove the bearing ring (You can do it without it) , it’s more convenient with it), various screwdrivers as well, a ruler, a caliper and, of course, a torque wrench!
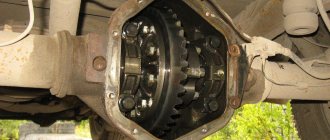
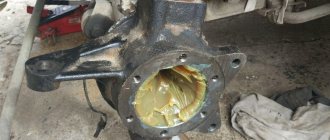
Where is the rear axle gearbox located?
The bridge itself, as is clear from the name, is located at the rear, the gearbox is accordingly located inside it and is attached to the bridge itself with eight bolts (Some of them are indicated by red arrows), the driveshaft is connected to the other side of the bridge gearbox, which is already disconnected from it in the photo, the place where The cardan is attached to the gearbox, indicated in the same photo with a blue arrow.
When is it necessary to repair the rear axle gearbox?
It changes when the noise in it increases, this is especially noticeable when you accelerate the car and at this time there is a strong hum in the rear (If the gearbox is in good working order, there should be no hum), but keep in mind the fact that you are unlikely to understand which part of the car this sound is coming from comes from the fact that it can radiate to the front part, and in the central part there may be, in addition to this sign, vibrations from the axle gearbox increase and all this is due to its improper operation (the car often slips and drives at too high speeds) or from poorly poured oil into it, by the way, exactly the same signs will appear if the oil is not poured into the gearbox, check it, maybe you don’t have it there at all, but how to check the oil level in the axle gearbox and, if necessary, top up or even replace it, read in article: “Changing gearbox oil on a VAZ.”
Adjusting the VAZ rear axle gearbox
If the main pair in the gearbox is worn out, it must be replaced. But you can’t just put the gears back in place; the gaps in them must be adjusted. In total, two types of basic adjustments are made:
- The thickness of the adjusting sleeve (washer) is selected for the shank (drive gear). The washer can have a thickness from 2.6 mm to 3.5 mm;
- The gap between the gears of the main pair is adjusted using two adjusting nuts of the differential housing.
The washer for the shank is selected in such a way that the shaft with the drive bevel gear rotates in the gearbox housing without backlash with a force by hand (0.3-0.4 kg). In this case, the shank nut should be tightened with a force of 12 to 26 kg, usually 18-19 kg are tightened.
After installing the shank, the differential housing with the planetary gear attached to it is put in place. The housing is secured with two covers (4 bolts, a knob with a 17mm head). The adjusting nuts are tightened from the sides of the bearings, the differential is installed so that there is play between the gears of the main pair, and the planetary gear should not be clamped. By moving the adjusting nuts to the right and left, the shank gear is brought to the planetary gear. By adjusting, you select the moment when the gap between the gears practically disappears.
The last stage is to adjust the preload of the differential bearings; the adjusting nuts are tightened from the sides. This work must be done with an indicator; the device should show from 0.14 to 0.18 mm, the gap between the gears should be within 0.08-0.13 mm. After the operation, the adjusting nuts are fixed with plates so that they do not turn.
It should be noted that adjusting the VAZ rear axle gearbox is a very difficult matter, and it is better to trust it to professionals.
Design and diagram of the rear axle gearbox
A gearbox is a complex technical device consisting of moving parts that interact with each other.
The gearbox is located in the rear axle. Therefore, first let’s look at the cross-sectional diagram of the rear axle.
- 1-differential bearing;
- 2-breather;
- 3-differential housing;
- 4-driven final drive gear;
- 5-satellite;
- 6-shaft gear;
- 7-bolts securing the gearbox to the rear axle housing;
- 8-drive gear bearings;
- 9-cuff of the drive gear flange;
- 10-flange;
- 11-nut of the drive gear;
- 12-ring dirt-repellent;
- 13-spacer sleeve;
- 14-adjusting shim (ring);
- 15-drive gear;
- 16-axis satellites;
- 17-gearbox housing;
- 18-beam rear axle.
The design of the rear axle gearbox includes the following main parts:
- drive gear;
- driven gear;
- direction pin;
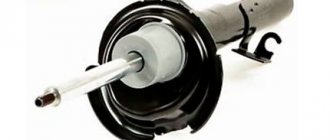
- oil seals;
- drum;
- bearings and their fastenings;
- locking plate;
- breather;
- shank.
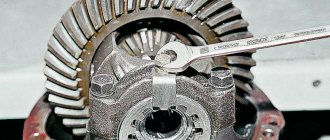
The main gear consists of 2 gears: drive and driven. Their gearing is hypoid, which is why the gear teeth have good sliding.
To make it clear what a hypoid, or hyperboloid, or spiroid engagement is, I will give the types of gear engagements. Hypoid gearing requires high precision in manufacturing, but during operation it provides quiet operation compared to cylindrical gearing.
The drive gear first receives power from the engine, then the driven gear. Gear sizes affect the gear ratio and rotation speed.
In simple words, any gearbox is a device that reduces the speed received from the engine.
The main gear of the rear axle gearbox can be of two types:
- single;
- double.
Double GP, in turn, happens:
- double;
- spaced out.
The dual GP has a simple design. The main parts of the double type GP take the main load and have a larger gear ratio.
As for the spaced type GP, it has a complex design, is smaller in overall dimensions and is more efficient in operation. Installing a spaced GP allows you to increase ground clearance (clearance). There are also special spacers for ground clearance, which can be placed under the springs and shock absorbers to make the car rise higher.
Types of single gears:
- Cylindrical. This is the simplest torque transmission scheme. The gears are in the same plane. This gearing ensures maximum efficiency.
- Hypoid. Manufacturing is more complicated, the design is lighter and lighter in size, and the efficiency is average.
- Conical. The gears in a bevel gear are located perpendicular to each other, which is why the dimensions are so
- Worm. This transmission is silent, operates softly, but produces the lowest efficiency value.
In complex structures, the most common type of transmission is hypoid. The gears in it are located at a certain angle to each other. Due to this arrangement of contacting gear teeth, such a unit operates smoothly and has less wear.
Repair or replacement, which is better?
Car owners of VAZ classics often cannot decide what is best to do - buy a complete ready-made REM assembled or purchase individual parts and repair the gearbox. It’s really difficult to decide here - the price of a new gearbox, of course, is higher, but the owner of the car is freed from the headache of adjustment. The thing is that it’s not so easy to find a good specialist in VAZ gearboxes, and there is no guarantee that the new main pair will not hum.
If a car owner buys a new gearbox, but it hums, the part can be exchanged under warranty, but the car owner loses money on removing and installing the gearbox. If you purchase a defective main pair, the repair itself will be more expensive - you will have to pay a technician for a secondary overhaul of the gearbox.
VAZ rear axle gearbox locking
On VAZ 2101-07 vehicles, the factory does not provide locking of the center differential, but the industry already produces both differentials with locks and fully assembled 3M gearboxes. The most common today are REMs with screw locking; in them, the differential gears are locked depending on the load. In such rear axle gearboxes, a preload clutch is installed, it connects the wheel axle shafts with a certain force, and acts as a blocker.
Locking the VAZ rear axle gearbox provides the following advantages:
- increases cross-country ability, allows the vehicle to avoid slipping on difficult road sections;
- allows the car to accelerate faster at the start;
- The car corners more confidently.
But ZM gearboxes with screw locking also have their disadvantages:
- Fuel consumption increases slightly;
- when accelerating, the car handles worse;
- The differential and assembled gearbox with locking are much more expensive than standard parts (the price is approximately 2-2.5 times higher).
VAZ 2101-07 car owners should know that after installing the RZM with blocking, the car will not become an SUV, and it will not be able to move on severe off-road conditions.
Gearbox diagnostics
In order to finally make sure that there is no problem with the rear axle gearbox of the VAZ-2107, you must perform the following steps:
- Stop the wheel chocks under the front wheels.
- The entire rear of the vehicle must be raised using jacks so that the axle is suspended. Be sure to place the machine on supports.
- Start the engine, then shift into gear and add gas. The main thing is to ensure that the speedometer shows the same speed that you reached while driving.
In the case when, during acceleration without load, extraneous noise still remains, you should understand that there are no problems in the gearbox itself. It is necessary to carefully review all other mechanisms included in the drive design. But if, when there is no load, noise does not come from the gearbox, you will have to repair it. The fact is that when gears wear out, they only make noise under load.
Malfunctions of the rear axle of VAZ 2101, 2102, 2103, 2104, 2105, 2106, 2107 cars
Increased noise from the rear wheels
— The wheel mounting bolts are loose
The bolts need to be tightened.
— Wear or destruction of the axle bearing
The axle bearing needs to be replaced.
Constant increased noise from the rear axle
— The rear axle beam is deformed
Replace the rear axle stockings or the entire axle.
We replace bent axle shafts with new ones.
— Wear of splines on axle shafts
— The rear axle gearbox is incorrectly adjusted, its gears or bearings are damaged or worn
The gearbox needs to be repaired or replaced.
— Not enough oil in the rear axle
Bring the level to normal, eliminate leakage.
Noise when accelerating a car
— Shock absorbers are faulty
Check and replace shock absorbers.
— Incorrectly adjusted gearing of the main gears after gearbox repair
Adjust the engagement by selecting the drive gear adjusting ring.
— Damaged axle bearing
— Not enough oil in the rear axle
Bring the level up to normal.
Noise when the car engine brakes
— Incorrect lateral clearance in the mesh between the final drive gears
Disassemble the gearbox and set the gap to 0.08 - 0.13 mm.
— Increased clearance in the drive gear bearings due to loosening of the flange nut or wear of the bearings
It is necessary to check the technical condition and moment of resistance to rotation of the drive gear.
Noise when accelerating and braking the car engine
— Wear or destruction of drive gear bearings
They need to be replaced.
— There is no lateral clearance between the teeth of the main gear gears
Disassemble the gearbox and set the gap between the teeth to 0.08 - 0.13 mm.
Noise when cornering
— Tight rotation of the satellites on the axis
Disassemble the differential, replace damaged and deformed parts.
Several signs of broken rear axle parts and their elimination
- One of the most common troubles can be safely called bearing failure
. - Another reason may be blunting of gear teeth
, of which there are a huge number in the rear axle. - Whistling instead of knocking means insufficient lubrication
, since over time the lubricant tends to harden, mixing with dirt, swamp and road dust, so it is very important to periodically remove the old one and apply new lubricant. - Particularly loud noise, as well as overheating of the rear axle, may indicate a lack of oil in the crater
, or its low quality. Therefore, with such signs, it is first necessary to check the quality and quantity of the oil. - The problem with gear wear can be the main reason for contacting a car service center or service station specialists, since the rear axle is a part that requires servicing by professionals.
- In addition, one can identify a problem such as a hum in the elements of the rear axle, which is a sign of poorly tightened nuts or gear flanges
. In addition, a hum may indicate that the pinion or differential bearing clearances are not adjusted correctly. In this case, you must first determine which bolt is poorly tightened and use a regular wrench to fix the problem yourself.
To extend the service life, proper maintenance of the rear axle components, namely the differential, final drive and axle shafts, is required.
Rear axle maintenance:
- Check for oil stains before leaving the vehicle.
Bearings
and
teeth
are the most susceptible to damage and
require proper monitoring
.
The main malfunctions of the rear axle and its differential are serious mechanical defects of the parts. Not everyone can completely disassemble the rear axle, remove the driveshaft, axle shafts, repair it, and put everything back in place in the reverse order. Therefore, if this is not an oil change in the rear axle of the car, then it is better to contact a car service center or specialists who have the proper experience in car repairs.
Subscribe
to our channel in
Index.Zen
Even more useful tips in a convenient format
What is an axle reducer?
The rear axle gearbox is a set of mechanisms designed to transmit the torque of the propeller shaft to the axles of the rear wheels. To understand that it requires a gearbox, you need to know how the engine energy is transferred to the wheels of the car.
During operation, the rotation of the engine crankshaft is transmitted to the vehicle's clutch disc, and then to the input shaft of the gearbox. The gear selected by the driver transmits rotation to the output shaft of the gearbox, and then to the crosspiece of the driveshaft, which extends under the car to the rear axle gearbox. The rear axle gearbox distributes torque from the driveshaft to the axle shafts, which, in turn, drive the wheels. Thus, the rear axle gearbox is designed to convert the torque of the propeller shaft to the two axle shafts of the rear wheels of the car.
Diagnostics and causes of malfunctions
The fact that the gearbox is in a faulty condition is indicated by the appearance of a characteristic noise (hum) when the vehicle is moving. To accurately determine the gearbox malfunction, there is the following experiment.
You need to accelerate the car to 25 kilometers per hour and gradually pick up speed, starting from this mark. If suspicious hums appear, be sure to record the speed at which you hear them.
Once you reach the desired speed, slowly release the gas pedal and apply engine braking. Again, listen for extraneous noises and pay attention to the speed at which they appear or disappear.
Certain noises should appear and disappear at the same speed. If this happens, it means that the rear axle gearbox is in a faulty condition. However, to be 100 percent sure, be sure to put the car on the parking brake, put the gear in neutral and try to gain speed, if the noise appears again, then the problem is not in the rear axle gearbox, and if there is no noise, then you can be sure that it is rear axle gearbox.
The cause of malfunctions, most often, lies in the use of low-quality oil, loss of its viscosity, as well as its complete absence. In addition, the gearbox may fail due to failure of oil seals, bearings and special gears. Sometimes, the cause of a rear axle gearbox failure is a broken axle shaft.
How to repair a gearbox on a VAZ 2107
If you decide to carry out repair work, you must remove the gearbox from the car. To do this, first of all, drain the oil from the gearbox: unscrew the drain plug at the bottom of the gearbox and place an empty container. At the end, the oil will need to be replaced with new one.
Now you need to unscrew all the screws that secure the gearbox shank to the driveshaft flange. Then lift the rear of the car and remove both wheels. Remove the brake drums and unscrew the bolts that secure the axle shafts. Pull out the axle shafts, thus completely freeing the gearbox. There will be 4 gearbox mounting bolts left, which also need to be unscrewed. After this, you can safely remove the gearbox.
To repair the gearbox, it must be disassembled. To do this, unscrew all the nuts that secure the shank, pull out the flange, gear with special adjusting rings, rubber seal and inner ring of the bearing. Then press out the outer bearing races and then disassemble the differential and drive gear. Once you have completely disassembled the gearbox, discard the locking spacer.
As you understand, the spacer sleeve needs to be changed in any case. This part is disposable and cannot be reused. Also, if the condition is unsatisfactory, it is recommended to change the bearings and the main pair. The pair allocates a gear ratio, and the larger it is, the higher the power of the gearbox. A small gear ratio increases the speed characteristics of the gearbox. What to choose is up to you. The selection of the gear ratio is precisely the adjustment of the gearbox.
After selecting the gear ratio, change all the oil seals and seals and reassemble in the reverse order.
If the gearbox is in very unsatisfactory condition, it is recommended to completely replace it with a new one. This is a good saving on the work of car service specialists.
Installation of a new or repaired gearbox is carried out in the reverse order. First, install the gearbox itself, tighten the fastening bolts and insert the axle shafts and secure them. After this, install the cardan to the shank and fill the gearbox with new oil.
Removing and installing the rear axle
• Loosen the wheel nuts and raise the rear side of the car, placing it on stands. The car must be raised high enough so that the rear axle can be rolled under the car with the wheels installed.
• Follow the routing of the brake hose and unscrew the brake hose from the brake pipe. For
To do this, unscrew the union nut and disconnect the tube. Knock out the leaf spring and remove the hose along with the metal fastener. Figure 154 shows the connection between the brake hose and the pipe. To prevent dirt from entering, close the hose and tube with appropriate plugs.
• Also, using Figure 154, disconnect the brake force regulator valve rod (4) from the rod (5).
Rice. 154 When removing the rear axle, the following parts are removed.
1 Brake hose
2 Brake pipe
3 Flat spring
4 Control rod of the brake force regulator
5 Actuator rod of the brake force regulator
• Unscrew the nut from the end of the handbrake cable on the cable equalizer lever and release the cable.
• Place a roller jack under the center of the axle and raise the rear axle until the shock absorbers are compressed. Unscrew the upper and lower shock absorber mountings and remove the shock absorbers.
• Check that the rear axle is securely mounted on the jack and unscrew the bolts of the front consoles
springs and bolts securing the springs to the earrings from the frame. There is no need to unscrew the nuts of the spring pins and spring shanks.
• Loosen the exhaust system so that it does not interfere with the removal of the rear axle.
• Lower the rear axle on a jack and roll it out from under the car on a roller jack. Have an assistant hold the rear axle so that it does not tip over from the jack.
Installation of the rear axle is made easier if you first unscrew the pin nuts and shackle nuts
springs
• Roll the rear axle on a roller jack under the car and lift it until the rear consoles (1) in Figure 155 touch the contact surface on the body. Screw in the console mounting bolts, but do not tighten them.
Rice. 155 Rear spring console (1) with spring suspension on earrings (2).
• When doing this, center the console. Figure 152 shows two holes “a” and “b”; two rods of a certain diameter are required for centering. Insert a rod with a diameter of 16 mm into hole “a”, and into hole “b” a rod with a diameter of
12 mm. After the console is seated correctly, tighten
bolts (1) with a torque of 50 Nm.
• Raise the axle until the front spring console touches the body and tighten the bolts (1) in Figure 156 without tightening them. Check that all bolts are located in the middle of the slots and then tighten the bolts to a torque of 50 Nm.
Rice. 156 The front spring console is attached to the body with bolts (1).
• Install shock absorbers. Do not tighten the bolts and nuts yet.
• Thread the brake hose into the hole in the angle and secure it with a bracket. Screw the brake pipe union nut into the hose and tighten it. Avoid kinking the hose. Connect the brake force regulator rods and the handbrake cable.
To tighten the front and rear spring mounts, the rear suspension must be loaded. To do this, place a load in the car so that the dimension “h” in Figure 157 between the adjacent surface of the rubber bumper (1) and the contact surface “b” on the bridge is 107 mm. Measure with a tape measure.
Rice. 157 Before tightening the spring suspension, the height “h” between points “a” and “b” must be set to a certain size.
• Tighten the rear spring suspension nuts to a torque of 120 Nm and the spring pin nuts on the front side to a torque of 150 Nm.
• Unload the car. Once installation is complete, the brake system should be bled of air. Adjust the handbrake. These operating steps are described in the "Brake system" section.
VAZ 2107: replacing the rear axle gearbox
VAZ 2107, the last representative of the classics, which was equipped with rear-wheel drive. It had the same structure as its predecessors: gearbox, cardan drive, rear axle, etc. On newer models, VAZ 2108, 2109, 2110, instead of a gearbox, so-called CV joints were installed, which, over a long period of operation, proved to be less durable.
In general, the gearbox is considered one of the strongest mechanisms in a car. But, as they say, nothing lasts forever, and sooner or later, this mechanism will need to be repaired or replaced. So, let's look at the procedure for replacing a VAZ 2107 gearbox with your own hands.
Device
The gearbox is one of the main mechanisms included in the design of the rear axle. It is responsible for transmitting torque from the gearbox to the drive wheels. His device includes:
- Two main gears: drive and driven;
- An axis with satellites located on it;
- Axle gear;
- Locking plate;
- Differential box;
- Adjustment screw;
- Carter;
- Gearbox housing.
It is worth noting that all the parts of this mechanism are basically in constant motion and are subject to heating. It is for this reason that they require special equipment and operating conditions, otherwise you will need to replace this unit very immediately.