The engine is not running smoothly
Another possible option is when the engine works, but is very unstable and does not develop power.
This happened to me on a steep climb. The engine is running at high speeds in first gear, and suddenly the speed drops sharply. You tighten the choke to increase the flow of fuel into the cylinders and finish climbing the climb. The reason for this, as I think, is the smallest particles accumulated at the bottom of the float chamber, which fall into the inclined inlet with the nozzle of the primary or secondary chamber.
In this case, it is necessary to blow out the air and fuel jets with a hand pump or tire compressor. To do this, you need to remove the top of the carburetor, as is the case with a needle valve. To avoid mixing up the jets, first unscrew the air jet of the primary chamber. Blow out the nozzle itself, and then the hole with the fuel nozzle located there. Screw it into place, then do the same with the second jet. Blow everything out of the float chamber. Blow out the connecting channel of the float chambers, the holes of which are located at the bottom of the float chambers. Blow out all the holes located on the planes of the lower and upper parts of the carburetor.
Setting the fuel mixture supply
The carburetor control screws will help you figure out this setting. Before performing this procedure, you should know that the screws have a plastic factory press-on that limits the rotation of the screws (from 50 to 70 degrees). If turning in this range does not bring results, you need to break the press-on and turn the screws as much as necessary. Before setting the position of the screws, you should warm up the car engine to operating temperature.
To adjust the idle speed of the carburetor, you need to turn out the quantity screw and the mixture quality screw a few turns and, turning them, listen to the operation of the engine. When the engine starts to run smoothly, the carburetor idle adjustment is complete.
Basic malfunctions of the carburetor engine power system
| Malfunction (symptom) | Causes | Remedy |
| Engine won't start | Lack of fuel in the tank. Clogged fuel lines. Clogged fuel filters. Fuel pump malfunction: · damaged diaphragm · clogged valves · clogged strainer. Carburetor malfunction: · mismatch of fuel level in the float chamber · needle valve stuck in the closed position · clogged jets | Fill with fuel. Blow out the fuel lines. Wash the filters. Replace the diaphragm. Clean the valves. Rinse the filter. Check and adjust the position of the float. Clean the valve and remove any jamming. Blow out the jets |
| The engine does not develop full power | Air cleaner clogged. Incomplete opening of the carburetor throttle valves. Fuel pump malfunction. Carburetor malfunction | Clean or replace the filter element. Adjust the throttle valve drive. Check the operation of the pump and replace worn parts. Check and adjust the position of the float, blow out the jets, adjust the damper actuators |
| Smoky exhaust | Insufficient air supply. Incomplete opening of the carburetor air damper. Carburetor adjustment incorrect (very rich mixture) | Clean or replace the filter element. Adjust the air damper drive. Adjust the carburetor |
Diagnosing the power system of a carburetor engine. When diagnosing the power system of a carburetor engine, the following indicators are determined and checked.
1. System tightness (visual inspection).
2. Quality of the fuel pump. The fuel pump is checked directly on the engine or by removing it from the engine. To check the pump on the engine, the fuel line is disconnected from the carburetor and its end is lowered into a transparent container filled with gasoline. If, when you press the manual pumping lever, a strong stream of fuel is knocked out of the fuel line, the pump is working. The release of air bubbles from the fuel line indicates air leaks (leaks) in the fuel line connections or the pump. Damage to the diaphragm is indicated by the cessation of fuel supply and its leakage from the hole in the pump housing. If, when the fuel supply decreases or completely stops, the manual pumping lever moves freely, this indicates a loss of elasticity of the diaphragm spring.
To detect pump malfunctions, special devices are also used, consisting of a hose with tips and a pressure gauge. The device is connected to the system between the pump and the carburetor, the engine is started and the pressure created by the pump is measured. Based on the pressure value and pressure drop, malfunctions of the pump and other system devices are determined (weakening of the diaphragm spring, loose pump valves, clogged fuel lines and filters). To check the vacuum created by the pump, a vacuum gauge is used, which is connected to the inlet fitting of the pump. If the vacuum value is below the nominal value, this indicates a leak in the exhaust valve, damage to the diaphragm or gasket.
3. The fuel level in the carburetor float chamber is checked in various ways (depending on the design features of the carburetor): using the inspection window; along the edge of the control hole with a plug; a special device that works on the principle of communicating vessels.
4. Tightness of the float and needle valve. The tightness of the float is checked by immersing it in water heated to 80 °C and observing it for at least 30 s. Air bubbles will appear from a leaking float. Checking the tightness of the needle valve can be performed with sufficient accuracy on the carburetor removed from the engine or separately on its cover using a rubber bulb. If, after creating a vacuum in the fitting using a bulb for 15 s, the shape of the crumpled bulb has not changed, then the tightness of the valve can be considered sufficient. In this case, it is necessary to ensure that the float presses on the valve, moving it all the way to the seat. A more accurate check is carried out using a special vacuum device.
5. The throughput of the jets is checked with special instruments (Fig. 73a). The amount of water flowing through the dosing hole of the nozzle in 1 minute under a certain pressure (1000 mm of water column) at a water temperature of 19...21 ° C will be the throughput of the nozzle, which must correspond to the nominal value.
For a comprehensive check of carburetors, special stands are used that make it possible to measure almost all the main parameters of the carburetor: the tightness of the needle valve, the fuel level in the float chamber, the performance and operability of the accelerator pump; throughput of the jets (Fig. 73b). These stands also allow you to check carburetors and fuel pumps, either separately or simultaneously.
6. Performance of the accelerator pump. To check the accelerator pump, remove the carburetor from the engine, fill the float chamber with gasoline and place a container under the hole in the carburetor mixing chamber. By pressing the accelerator pump rod, make 10 full strokes of the piston. The amount of gasoline leaked into the container is measured with a beaker and compared with the nominal value.
Rice. 73. A device for checking the throughput of jets (a) and a stand for checking carburetors and gasoline pumps (b): 1 – reservoir; 2 – supply tap; 3 – drain tube; 4 – pressure tube; 5 – jet being tested; 6 – beaker
7. The toxicity of exhaust gases is checked at idle speed using a gas analyzer (Fig. 74).
Rice. 74. Automotive gas analyzers
Before taking measurements, the engine must run for less than 1 minute in test mode. The sampler is inserted into the outlet pipe to a depth of 300 mm from its cut. The gas is sucked in using a pump located in the device body, passes through the filter and enters the measurement unit. Gas analysis is carried out at the minimum stable crankshaft speed at idle and at a speed equal to 60% of the nominal speed. The CO content during such measurements should not exceed the established values.
Repair and adjustment of the carburetor engine power system. The fuel level in the float chamber is adjusted by changing the number of gaskets between the needle valve body and the carburetor body or by carefully bending tongue 8 or the float bracket (Fig. 75). In this case, the supporting surface of the tongue must be perpendicular to the axis of the needle valve and must not have nicks or dents.
The distance between the float and gasket 10 adjacent to the carburetor cover (size A) must correspond to the standard established for this carburetor. This distance is controlled using a gauge. In this case, the carburetor cover should be held vertically so that the float tongue 8 lightly touches the ball 5 of the needle valve 4 without recessing it.
Flushing the carburetor using specialized compounds
Washing process:
- After unscrewing the jets, taking out the nozzles and accelerator pump, place the carburetor halves with the nozzles and jets in a bath filled with gasoline. After filling the channels with a special product, leave the parts for 6-7 hours;
- After the required time has passed, remove the parts from the bath and clean the body with a toothbrush;
- Blow all parts with compressed air;
- Using a cleaner, rinse the channels, jets, tubes and nozzles several times;
- Sprayers can be cleaned with a thin wire;
- Don't forget to dry the passages and throttle valve with compressed air.
When assembling the carburetor, be sure to inspect all gaskets and replace them if they are cracked. When tightening the jets, try not to mix them up. Assemble the carburetor and install it on the car, connecting all the pipes, rods and wires.
Foreshadowing adjustment
Before proceeding with the operation, you need to make sure that the unstable operation of the engine is caused by an incorrectly set idle speed. You need to check the following points:
- Jets for clogging;
- Correctly set ignition angle;
- Gasoline quality;
- Fuel level in the float chamber;
- The tightness of the start sensor;
- Performance of glow plugs.
If all of the above points are normal, and nothing has changed with the car, then you were right, the reason is idling. However, it is necessary to begin its adjustment only in the operating condition of the described mechanisms. Having warmed up the engine to operating temperatures (pay attention to the air damper, it must be in the open position), you can begin the procedure.
Adjusting the idle speed yourself
The idle speed setting is performed as follows:
- The minimum speed is set with the carburetor mixture quality screw, at which the engine begins to operate unstably, but so as not to stall (indicated by number 2 in the figure).
- Increase the rotation speed by adding a mixture (indicated by number 1 in the figure).
Repeat this procedure, with the mixture quality screw, until the engine runs stably and when you press the gas pedal sharply, the car should not stall and there are no failures in its operation.
This adjustment method is used very often and with normal driver experience, a positive result is guaranteed.
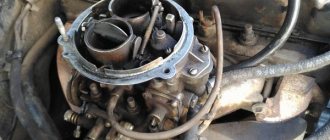
DIY carburetor repair
Carburetor repair begins with removing the unit from the car. To remove the carburetor, remove the air filter housing and disconnect all pipes, hoses and wires. The carburetor should be disassembled using tools such as:
- Spanners;
- Screwdrivers;
- Set of screwdrivers for jets.
Special screwdrivers for jets are needed in order not to damage the threads and channels.
Work algorithm:
- Disassembling the carburetor begins with removing the strainer. To do this, you need to unscrew the plug and take it out;
- The rod of the levers on the throttle and air damper axes is disconnected;
- The top carburetor cover and gasket are removed;
- The floats are taken out;
- You get the needle valve and damping spring;
- The jets are unscrewed;
- The emulsion tubes are taken out;
- The nozzles and discharge valve are unscrewed;
- The remaining valves are taken out.
When disassembling the carburetor is completed, all parts must be washed with a special liquid or gasoline. If gasoline cannot remove tar deposits, you can use a solvent. Under no circumstances should the jets be cleaned using abrasives. It will not be possible to visually check for a violation of the nozzle calibration, and this will lead to increased fuel consumption and a decrease in vehicle power. After washing, all parts must be blown off with compressed air.
Reassembling the carburetor proceeds in the reverse order. You will need:
- Check all carburetor gaskets and, if necessary, replace them with new ones;
- Make sure that the additional system valve is tight. The unit being tested should not jam in its guide;
- Inspect the gap between the drive bar and the rod adjusting nuts;
- When installing new jets, you should select them strictly according to the technical parameters of this carburetor;
- All carburetor channel plugs must be equipped with gaskets;
- Check the tightness of the carburetor floats. If the tightness is broken, you can try to solder them;
- By pressing the float you need to achieve its correct position.