Carrying out a simple computer repair procedure for a car often requires quite a significant investment, because not everyone has the necessary equipment to perform such tasks. Throttle valve adaptation is necessary in modern cars whose engine operation is controlled by an on-board computer. There are several main reasons that necessitate this procedure. Often, car owners are not aware that this quick and not too expensive procedure needs to be performed on their car.
Symptoms of the necessary damper adaptation may resemble other breakdowns, which is why car owners at unscrupulous stations often leave huge sums of money without any positive results. Specialists clean the injector, adjust the valves, set the timing belt correctly, and so on. But this only partially solves the problems with engine operation. Let's look at the symptoms of throttle control problems and the adaptation process.
Signs of throttle adaptation
The damper in its modern form is one of the newest devices that has undergone electronic modernization. Instead of mechanical connections, it has a compact electric motor that acts as an actuator.
The signal to this engine comes directly from the throttle position sensor. This entire system allows you to properly control the engine, delivering the required amount of fuel mixture to the combustion chambers in a timely manner. Here are some tips to get started adjusting your throttle position.
For example, if you suddenly release the accelerator pedal, the engine will not idle and will choke, and the following may occur:
- Unstable engine operation at idle;
- a significant “freezing” of turnover of about 1.5 thousand rev;
- The revolutions slip when the handle is turned on;
- CHECK ENGINE message on the instrument panel
- Difficulty starting during cold start
- no reaction when pressing the accelerator pedal.
Depending on the engine type, a slight loss of power may occur, for example with engines in V8 configuration. Fuel consumption also almost always increases. These symptoms are especially typical for cars with a mileage of 30,000 km or more, equipped with a turbocharger.
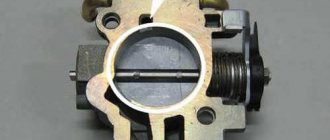
Throttle valve Ford Focus 2: how to clean the electronic unit?
The throttle valve of the Ford Focus 2 is controlled by an electronic unit, which allows for the same precise dosing of air for the fuel mixture as for gasoline. Contamination of this part can lead to various engine malfunctions. In this case, it needs to be cleaned.
Features of the throttle valve
To ensure complete control of engine operation in all modes, car manufacturers have recently begun to switch to electronic throttles and accelerator pedals, which have no mechanical connection with each other. The Ford company has equipped many of its models with such units, including the Ford Focus 2, since 2005. Advantages of electronic air control:
- eliminates mechanical adjustments;
- the design of those systems that, when activated, can or should “strangle” the engine (anti-skid, anti-skid, ABS, exchange rate stability and others) is simplified, since the implementation of the necessary commands is carried out at the level of software-electronic interaction of blocks;
- simplifies repair and maintenance.
A “side effect” of pedal-throttle evolution: the central computer of the car constantly compares the actual current parameters of the engine with the expected ones stored in its memory. If he “doesn’t like” something (the throttle valve is stuck due to contamination or it was replaced with another), then he can record an error with a message displayed on the control panel (CHECK ENGINE), and also turn on the partial speed limit mode.
If you replace the damper or the sensor located on it, you can try to carry out its adaptation procedure, performed by a dealer IDS scanner.
Signs of part contamination
Most often, contamination of a part is accompanied by: jerking (jerking) during starting; unstable idle speed, until the engine stops; decreased throttle response and traction at low speeds; difficulty starting the engine; excessive fuel consumption. Similar symptoms may appear when there is a malfunction of the spark plugs, fuel system or Ford Focus 2 injectors.
To reduce doubts about the reason for unsatisfactory engine performance, it is recommended to clean the throttle valve at least every 50–60 thousand kilometers. This value is relative and depends on the operating conditions of the vehicle. For domestic realities, it is better to reduce it to 20–25 thousand km.
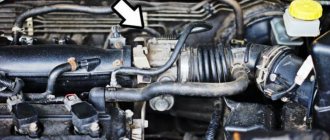
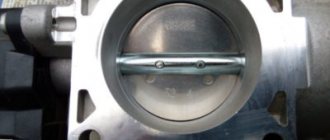
Cleaning the damper of a Ford Focus 2 car
Allow the engine to cool before carrying out work. Then disconnect the ground from the battery. This is done not only for security purposes, but also to reset the current settings of the central computer. We remove dust and dirt from the work site. We loosen the clamps of the air pipe by prying their latches with a slotted screwdriver.
Causes
The most common reason for adaptation is the consequences of damper maintenance. As a result of operation, this unit contains a large amount of sediment, therefore, after flushing, the position of the throttle valve changes, and the ECU continues to signal its condition until maintenance is carried out.
Over time, the resistive layer of the potentiometer sensor and the moving parts of the throttle valve naturally wear out, in which case they will most often need to be replaced after adaptation. It is necessary to conduct training if the ECU settings are changed (chip tuning), especially if operations are performed to increase engine power.
The procedure is carried out with or without the use of special programs on computer equipment (a strictly defined sequence, which will be discussed below), depending on the make of the car. Auto electricians must take into account the specifics of the model, year of manufacture, and type of ECU installed in the vehicle.
Typical breakdowns and causes of their occurrence
There is only one symptom, but the reasons for its appearance may be different. The culprits of the disaster may be:
- dirt trapped in the gap between the heel and the diffuser, or inside the channels through which air flows;
- backlash and jamming resulting from mechanical wear of moving parts.
- failed electronic components - throttle position sensor (TPS) and idle air control (IAC).
There are not so many problems that cause XX floating. But the most difficult to detect and eliminate are faults that arise at the interface of mechanical and electronic components.
Dirt
Solid particles of different compositions, which not only block the normal operation of the unit, but also significantly reduce its resource, have two sources of origin. It could be:
- ordinary atmospheric dust that has penetrated through the atmospheric air filtration system from the intake manifold;
- soot formed during incomplete combustion of fuel or lubricants and entering the diffuser through the crankcase ventilation or exhaust gas recirculation valve.
These faults are not directly related to the operation of the throttle itself. However, if you want your car to function properly, they must be eliminated.
Backlash and jamming
The throttle body cast from aluminum alloy gradually collapses under the influence of loads that are insignificant at first glance. Well, dirt getting on parts only accelerates wear. As a result, the adjustment gaps set by the equipment manufacturer are:
- increase, and then an excess amount of air enters the intake manifold;
- decrease, which leads to the nickel sticking in the closed position.
In both cases, the TPS transmits incorrect data to the electronic control unit (ECU), and the IAC is not able to respond correctly to changes in idle speed.
Electronic component failure
Even the most reliable electronics fail from time to time. And then all that remains is to replace the used parts. Despite the significant cost of original spare parts, saving on their purchase is strictly not recommended. Externally similar to real ones, Chinese analogues, in most cases, have a very small resource, and are even capable of performing only decorative functions.
Vehicle operation specialists unanimously claim that if the Lancer 9 throttle is properly maintained, repairs may not be required for a very long time.
Need for maintenance
Prophylactic treatment should not be given unless there is an obvious cause. Before commissioning, the condition of the damper must be carefully assessed. If there are no visible traces of tar deposits and areas of coking, then unstable operation may be due to something else.
You should also consider the mileage of the car. Experts advise resorting to rinsing no earlier than 100 thousand. km. However, some cars, such as the Ford Focus, may require a flush after 30,000 km.
It is important to know how to clean the damper to achieve the desired effect. This requires the use of a special carburetor cleaner such as Abro Carb & Choke Cleaner or similar products. The assembly must be disassembled; only in this case can the maximum effect be achieved, otherwise soot will remain inside the pipes. Disconnect all connections from the throttle body to allow good access to the intake side of the assembly.
Gently remove soot with a clean cloth or soft brush. Do not use excessive force; this can damage the gland. The internal elements are coated with a thin layer of molybdenum, which the novice driver does not have harmful deposits.
Repair
And yet, no matter how carefully you care for your car, sooner or later there may come a time when you have to think about repairing the Lancer 9 throttle body yourself. Such maintenance involves performing a number of procedures, only some of which can be handled by the average car enthusiast on his own, without any special professional skills or special equipment.
Replacing electronic components
Installing new TPS or IAC is quite possible for anyone who knows how to use plumbing tools. For this all you need is:
- disconnect the negative terminal from the battery;
- disconnect the electrical wiring connector from the sensor;
- using a screwdriver, unscrew the screws securing the part to the remote control body;
- remove the faulty component;
- install a new spare part in the vacant space;
- reassemble in reverse order.
You should remember the nuances so as not to get into trouble:
- The Lancer 9 throttle position sensor should be installed in a strictly defined position, having previously remembered how the part to be removed was positioned;
- no matter what the diagnostics show, the real culprit of the problems may not be the idle air regulator itself, but the o-ring seal placed on it or dirt accumulated on the valve stem - in these cases, it is enough to install a new gasket or remove dirt so that engine operation returns to normal .
Remember that installing/dismantling parts without first disconnecting the battery will cause the computer to malfunction.
Throttle position adjustment
Despite the fact that preliminary adjustments were made by the manufacturer of the equipment, the design of the unit provides for the possibility of changing the gap between the walls of the diffuser and the heel. This can be done using the same 0.05 mm thick probe, an 8 key and a hexagon (see photo below).
However, if there are wearouts in the throttle body or the Lancer 9 damper has mechanical damage, such actions will not give the desired effect.
You should not try to stabilize the idle speed by decreasing or increasing the gap. In the first case, this will cause the damper to jam, and in the second - malfunctions in the operation of the IAC and TPS. Simply put, you will not eliminate the problem, but will only make it worse.
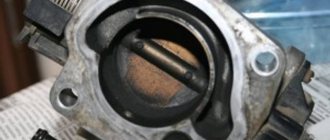
Throttle body cleaning process
To do this job you need a carburetor cleaning agent in an aerosol. Many experienced choke cleaners recommend using Abro Brand Carb & Choke Cleaner. It is inexpensive - around 250-300 rubles. The spray can meets your spray task very well, not only suitable for operation, but also durable. Since the spray is quite poisonous and can cause chemical burns, wear rubber gloves during the procedure. It is also necessary to supply dry, clean clothes and weapons. Using the tools, you will need a cross head screwdriver and a Torx angle screwdriver.
Sequence of actions when cleaning the throttle valve:
- Remove the negative from the battery terminal.
- Using a cross-link screwdriver, remove the five screws and disconnect the crankcase vent cable.
- Remove the cover and remove the air filter (by the way, you can assess the condition of the “consumables”).
- After inserting a lot of force, draw the tray on which the filter was located.
- Inspect the throttle surface and assess the degree of contamination.
- To remove the assembly, the tube clamp can be left intact. First, unscrew the wide air inlet, which is located near the radiator cap.
- Press the latches and release the two electrical connectors.
- Remove the four TORX screws and remove the device.
- Cover the hole with a rag to prevent dirt from getting into the “engine”.
- The cleaner then comes in: apply it to the surface and clean the cloth. We will open the flap and reach barely accessible areas with the cleaning agent. You can use cosmetic cotton for this. Don't forget to wash the gaskets and replace it with a new one.
- As soon as the surface begins to shine clean, we reassemble the assembly in reverse order. A valid condition is a valid condition without distortion. All parts must strictly adhere to the body's body. Tighten the screws to a torque of 8 Nm.
Cleaning takes no more than an hour. After reassembly, you can check the operation of the car: for many owners of a floor sedan, the root of all troubles is excessive negligence of the mechanism. It is possible that no adjustment will be necessary.
Throttle valve Ford Focus 2: how to clean the electronic unit?
The throttle valve of the Ford Focus 2 is controlled by an electronic unit, which allows for the same precise dosing of air for the fuel mixture as for gasoline. Contamination of this part can lead to various engine malfunctions. In this case, it needs to be cleaned.
Features of the throttle valve
To ensure complete control of engine operation in all modes, car manufacturers have recently begun to switch to electronic throttles and accelerator pedals, which have no mechanical connection with each other. The Ford company has equipped many of its models with such units, including the Ford Focus 2, since 2005. Advantages of electronic air control:
- eliminates mechanical adjustments;
- the design of those systems that, when activated, can or should “strangle” the engine (anti-skid, anti-skid, ABS, exchange rate stability and others) is simplified, since the implementation of the necessary commands is carried out at the level of software-electronic interaction of blocks;
- simplifies repair and maintenance.
A “side effect” of pedal-throttle evolution: the central computer of the car constantly compares the actual current parameters of the engine with the expected ones stored in its memory. If he “doesn’t like” something (the throttle valve is stuck due to contamination or it was replaced with another), then he can record an error with a message displayed on the control panel (CHECK ENGINE), and also turn on the partial speed limit mode.
If you replace the damper or the sensor located on it, you can try to carry out its adaptation procedure, performed by a dealer IDS scanner.
Signs of part contamination
Most often, contamination of a part is accompanied by: jerking (jerking) during starting; unstable idle speed, until the engine stops; decreased throttle response and traction at low speeds; difficulty starting the engine; excessive fuel consumption. Similar symptoms may appear when there is a malfunction of the spark plugs, fuel system or Ford Focus 2 injectors.
To reduce doubts about the reason for unsatisfactory engine performance, it is recommended to clean the throttle valve at least every 50–60 thousand kilometers. This value is relative and depends on the operating conditions of the vehicle. For domestic realities, it is better to reduce it to 20–25 thousand km.
Cleaning the damper of a Ford Focus 2 car
Allow the engine to cool before carrying out work. Then disconnect the ground from the battery. This is done not only for security purposes, but also to reset the current settings of the central computer. We remove dust and dirt from the work site. We loosen the clamps of the air pipe by prying their latches with a slotted screwdriver.
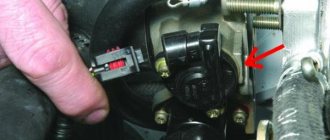
We remove the pipe and inspect the damper. If it is dirty, dismantle it:
- Using a screwdriver, pull the red locking tab of their terminal toward the damper drive control wires (it has a stroke of approximately 5–7 mm and you must try not to break it). In this case, you need to slightly lift the black latch;
- by pulling back the black latch, carefully disconnect the connector from the damper drive;
- Using a socket wrench No. 8, unscrew the 4 fastening bolts;
- remove the damper and the sealing gasket from it.
We clean the valve with a soft rag and a brush (a toothbrush can be useful), using white spirit or a special carburetor cleaner (many people praise HI-Gear). Then we dry the damper and apply silicone grease to its axis, where the latter enters the body. We put everything back together in reverse order. To tighten the clamps, we use pliers.
Examples of throttle valve adaptation on VAG and Lancer IX vehicles
This film will tell you and show you how to adjust the valve on a VAG car.
Throttle adaptation in Volkswagen Golf 4:
- Heat the engine to a temperature of T = 800C and turn off the car. Then connect the USB-KKL cable to the diagnostic connector and after ignition, launch the diagnostic program (Vag-Com 3.11).
- Go to engine section 01.
- Fault memory (02) is charged.
- Detected faults are deleted (05).
- After returning to the previous menu, enter “adaptation-10”.
- On channel 00, press the Read button.
- Save the result and return to factory settings.
- Enter basic settings (04) and enter measurement mode.
- In group 001, click Start.
- Wait 2-3 minutes and then close the program and disconnect the cable. The adaptation has already been completed.
Adaptation of the ignition horn on Nissan vehicles with an electronic gas pedal:
- Release the accelerator pedal completely.
- Turn the ignition on for at least 2 seconds.
- Turn off the ignition and wait at least 10 seconds.
- Turn the ignition on for at least 2 seconds.
- Turn off the ignition. The acceleration pedal adaptation procedure has been completed.
- Create throttle adaptation. The acceleration pedal is released.
- Turn the ignition on and off for a moment. Wait at least 10 seconds. This is the time when the throttle moves.
- Learn the air flow at idle (intermediate time).
- Warm the engine and gear to operating temperature.
- Disconnect all electrical devices in the vehicle. Start the engine and bring it to operating temperature.
- Turn off the ignition and wait at least 10 seconds.
- Release the accelerator pedal completely.
- Turn on the ignition and wait at least 3 seconds.
- Within 5 seconds, press the accelerator pedal five times and wait 7 seconds.
- Press and hold the accelerator pedal until the CHECK indicator stops flashing and comes on (this will take about 20 seconds).
- After the CHECK indicator lights up continuously, release the brake pedal within 3 seconds.
- Let the engine idle.
- Press the brake pedal several times to check idle speed.
- Adaptation of the ignition throttle valve on the VW Passat B5:
Signs of a clogged damper
When the throttle valve becomes clogged, the engine begins to operate in an unstable mode. Typical signs of a malfunction in this case are:
- increased idle speed;
- delayed engine response to pressing the accelerator pedal;
- while the car is moving, jerks are observed, and sometimes the vehicle changes speed independently, without the driver’s participation;
- abrupt release causes the power plant to stop.
In some cases, the CHECK indicator on the instrument panel will light up. Sometimes tar deposits settle on the throttle shaft, causing it to seize. Then the gas pedal is pressed with noticeable force.
Before moving on to solving the problem of how to adapt the throttle valve on a Skoda or any other car, you need to make sure that the diagnosis is accurate by conducting a visual inspection of the mechanism. To do this, you need to remove everything that is possible in order to open access to the module. Be careful not to accidentally disconnect
When should you not perform remote sensing adaptation?
If the throttle valve is not functioning properly due to wear, repair or replacement of parts should be considered. If suddenly, after performing the above steps, adaptation does not take place, it is worth checking the engine responsible for opening / closing the throttle valve. There is probably not enough power to run the node properly.
Using the example of throttle valve adaptation in the above-mentioned cars, we can conclude that absolutely all cars are characterized by certain common processes.
For example, it is necessary to clean the throttle body inside and out before adapting it to each brand of car.
The only difference is that some cars use a cable to adjust the tailgate, while others use electronics. This difference will manifest itself in the choice of adaptive parameters.
In more or less modern cars - 08];
Loss of damper adaptation data.
As practice shows, any time the battery is disconnected, the damper is cleaned, or the damper disc is simply moved by hand, or when a third-party alarm system fails (for example, incorrectly disarming a non-standard immobilizer or tag), the damper adaptation data is lost.
The control unit loses the accumulated correction data on the damper opening angles. This problem can be solved by cleaning and the subsequent adaptation procedure and eliminating the causes of the failure. It is important to note that if a third-party alarm cuts off the power from the engine control unit immediately after turning off the ignition, then it will not be possible to “register” the damper angles in this position. The damper control unit tests it every time the ignition is turned off.
By completely opening and closing the damper - and only after that turns off the power.
Resetting and setting service intervals
Group 098 (NOTE: some SIMOS and Marelli ECU drivers use group 001, for example in ADY and AEE engines);
Resetting the service interval
- [Switch to Basic Settings].
- On the upper display on the right side appears when ADP starts. Adjusting the Throttle program will only be possible after switching to the main settings mode. You will see the parameters change and even hear the throttle stroke; for the first few seconds it operates in a full cycle, after exceeding the programmed cycle it will stop.
- You should remain in the basic setup mode for about 30 seconds.
- 7. Now click [Switch to measurement blocks] and you are done.
The simplest way to carry out adaptation
Now the question of whether it is necessary to adapt the throttle valve after cleaning should definitely not arise if there were still doubts. The easiest way to carry out the operation is with a simple reset. To begin with, it is worth warming up the engine well to operating temperature, for which you need to take a short trip. Then, turning off the engine, disconnect the negative terminal of the battery and wait. Depending on the brand of car, the waiting time can be 10-30 seconds or 15-20 minutes.
During this period, all ECU parameters should return to the original (factory) settings. Next, all that remains is to connect the terminal and start the engine - the speed should return to normal.
Preparing for throttle adaptation
The procedure for preparing the throttle body using computers and automotive programs has its own specifics depending on the make of the car, etc., which is why it makes no sense to describe the entire process. First, however, you must install special software on your computer, such as Vag-Com for VAG (or other) group and drivers. Then follows the sequence of standard orders:
Turn on the ignition;
- Computer connection to vehicle diagnostic socket using data wire;
- Starter software on your computer;
- test;
- Receiving information about readiness for further work - communication: “The adapter is ready for work.”
- Also interesting: tuning Audi A6 C5: changing the car is not in Poznań
- According to a special algorithm, the throttle and ECU adaptation can be done in "full open/full closed throttle" for cars with electronic and manual accelerator pedal. In this case, the throttle is carried out with a warm car and meets the above requirements.
- The question often arises of how to adjust the throttles in VAG cars.
It's pretty simple:
Self-cleansing procedure
If the damper is electronically actuated, then it is better to remove the negative terminal of the battery. Next, you can do everything according to simple instructions:
- dismantle the air filter by unscrewing the pipe clamp;
- disconnect all connectors of the throttle module and other pipes;
- move the air filter receiver to the side so that it does not interfere, and begin cleaning the damper;
- upon completion, reassemble the damper module in reverse order, checking that everything is in place;
- After assembly, start the engine and check the idle speed.
In some cases, before you begin to adapt the throttle valve on a Toyota, Nissan or Skoda, it is necessary to remove the throttle itself, which allows you to completely clean the valve. To do this, you will need a 5 mm hexagon to unscrew the 4 fasteners. Removing the throttle should be done with great care, as there is a risk of damaging the gasket.
If, after cleaning the throttle body, increased idle speed is observed, it means that the damper needs to be adapted. What this is is further in the topic of the article.
When might it be necessary to adapt the throttle valve in a car?
- Go to climate unit (0,
- Select "Basic Settings" mode
- Open channel 001,
- Expect all numbers to be “000”.
The air conditioner can be turned on or off without any difference.
01 idle speed
02 Adjustment of mixture composition with load burden. Enriching the mixture under load with a quick push of a button
The procedure for software adaptation of the throttle valve
03 Precise mixture adjustment with load reduction. Enriching the mixture smoothly pressed or released.
- 04 Enrichment in start mode.
- 05 Enrichment in warming mode.
06 lambda control. Sets the speed of the controller's response to changes in signal lambdas, high values - faster response, low values - slower response
07 additional speed limiter compensation. Sets the limiter by adding 1 km/h
08 is responsible for enrichment in the “starting” phase
How to adapt the throttle on passenger cars with a cable-operated damper (vehicles without an electronic gas pedal):
- 09 Ignition timing compensation. Adjustment of ignition timing every 0.75 degrees throughout the entire speed range.
- 10 basic gears, fuel adjustment (works in all modes)
- 11 Exhaust gas recirculation (EGR / AGR)
- 12 boost pressure adjustment, only for turbocharged vehicles, higher values increase the boost pressure, lower values reduce the boost pressure
- 13 unused
- 14 Additional idle torque compensation adjusts engine idle load, higher values increase idle load capacity, lower values reduce idle load capacity
Ford Focus Sedan › Logbook › Installing the throttle body from Focus3 125 hp
Greetings, brothers in cars!
After removing the catalyst and updating the firmware for Euro 2, the car began to drive a little more interesting, but up to three thousand revolutions the engine was still dull. Thinking about how to increase the power of the Ford, the moments of installing a larger throttle on VAZs popped up in my head and what a good increase this gave the car, I started looking for information about this and came across an article on the forum about installing a throttle from a Focus 3,125 hp. It turns out that its cross-section is larger than that of Focus 2 and the engines are identical... the next day, during disassembly, a throttle was purchased from a car with a mileage of 30 thousand km. and then implementing it into my car.
In terms of fastenings and seating, it fits perfectly without any modifications, but various wiring connectors had to be completed.
I found information that adapters for these plugs are sold, but they cost some astronomical money and even more astronomical delivery times. There was no desire to cut the original wiring and redo it, so I recreated the adapter myself))
To install the throttle, just unscrew the old one and screw the new one on
I measured the dimensions with a caliper, but since it’s Chinese, I doubt they’re accurate.
Next we connect the new original connector)))
After all the manipulations with installing and connecting the throttle, we put everything back together, but there is a small problem: the rubber pipe from the air filter housing does not fit completely onto the throttle, but you can install it and it holds up perfectly, maybe then I’ll buy it from FF3 and install it, but that’s not for sure. ) Having finished under the hood, I tried to start it, I just turned the key and immediately an error appeared on the display that the engine was faulty, but I started it anyway, it was not working stably, I turned off the engine, waited and started it again and voila everything works fine, no errors, the engine runs smoothly, check does not light up, but I still went through the OBD and deleted this error from the memory. Having gone for a test drive, I immediately noticed the response of the gas pedal when pressed, the pickup and jerk is immediate, it develops speed from the very bottom to the cutoff without hesitation or stupidity, the pickup occurs at any speed and at any speed, the acceleration dynamics have really improved, the only thing you need to get used to is pressing the gas pedal, otherwise the reaction became too sharp compared to what it was. Now I'm waiting for normal weather to take measurements so I can compare the acceleration times before and after. That's all for now, good luck to everyone!
Training procedure
1. First we must teach the accelerator pedal to release its position.
2. Make sure the accelerator pedal is fully released.
3. Turn the ignition to ON and wait at least 2 seconds
4. Turn the ignition key to OFF and wait at least 10 seconds
5. Turn the ignition to ON and wait at least 2 seconds
6. Turn the ignition key to OFF and wait at least 10 seconds
7. End
Teaching the damper to open
The purpose of this procedure is to teach the gas pedal to fully open the throttle. It must be performed every time the connector is disconnected from the gas pedal or from the ECM (ENGINE CONTROL SYSTEM i.e. engine control unit)
Procedure operations
- Make sure the accelerator pedal is completely released.
- Turn the ignition switch “ON” and wait at least 2 seconds.
- Turn the ignition switch “OFF” and wait at least 10 seconds.
- Turn the ignition switch “ON” and wait at least 2 seconds.
- Turn the ignition switch “OFF” and wait at least 10 seconds.
Teaching valve to closed position
The purpose of this operation is to learn the fully closed position of the valve lever, observe the output position sensor. This must be done every time the connector from the electrical linkage or ECM has been disconnected.
Procedure operations
- Make sure the accelerator pedal is fully released.
- Turn the ignition switch "ON".
- Turn the ignition switch “OFF” and wait at least 10 seconds.
- Make sure that the valve lever moves for more than 10 seconds, this should be confirmed by sound.
Training in air supply at XX speed
On engines 1.6 and 2.0 this process goes as follows:
- The battery charge must be at least 12.9 V.
- Warm transmission.
- Antifreeze temperature – at least 700.
- The gear selector lever is in position “P”.
- All electricity consumers are turned off.
We teach the gas pedal to the “released” position - this test is necessary to determine the output signal of the throttle position sensor, and is performed after each ECM cable disconnection. To do this you need the following:
- Turn the ignition key to the “ON” position and pause for at least two seconds.
- Turn off the ignition and wait for ten seconds.
- We repeat these two operations again.
We teach the throttle valve to the “closed” position - this is done for the same purpose as teaching the gas pedal to the released position. To do this, you need to use the key to turn the lock to the “ON” position and back to the “off” position and do not touch anything for ten seconds - you will hear the characteristic chirping of the motor returning the damper to the closed position.
Now the training article itself, for this you need a stopwatch to maintain the specified intervals accurate to the second:
- After warming up the engine, turn it off and pause for a few more than ten seconds.
- With the gas pedal fully released, without starting the engine, turn on the ignition and wait three seconds.
- Fully press and release the accelerator pedal 5 times within five seconds.
- After a seven-second pause, press and hold the accelerator pedal until the CHECK ENGINE light flashes amber and stays on continuously.
- Release the pedal after the CHECK ENGINE light comes on continuously after three seconds.
- Start the engine and wait twenty seconds, then sharply increase and decrease the speed 2-3 times to understand how the engine maintains idle speed (700 +50 rpm).
This is interesting: Kia Rio 3 fuse diagram - where the blocks are located
A flashing yellow light means self-diagnosis mode - lower the accelerator pedal and read the code number; when there is no error, the light will blink forty times with an interval of 0000.
Adaptation using the example of some cars
Another method, which we will consider using the example of one well-known German brand, also involves adaptation without a computer. Here you should warm up the engine to a temperature of approximately 70-99°C. The battery voltage must be at least 12.9 Volts when the engine is not running. The action plan for how to adapt the throttle valve on a Volkswagen will be something like this:
- After warming up and turning off the engine, you should wait a short period (5-10 seconds).
- With the gas pedal released, turn on the ignition and wait 3 seconds.
- After 3 seconds, you need to press the accelerator pedal all the way 5 times and release it back. Act quickly, as you only have 5 seconds to do this.
- After the 5th exercise, you should wait a pause.
- After 7 seconds, press the pedal all the way again and hold it in this position until the “CHEK” indicator starts flashing (≈ 10 sec.), then it should remain on continuously (≈ 20 sec.).
- When the indicator lights up constantly, count to three and only then release the pedal.
- Start the engine (repeat if necessary), wait 20 seconds, then lightly accelerate (2000-3500). If the tachometer shows 700 rpm at XX (+- 50), it means that the adaptation was successful.
In this case, it is necessary to strictly adhere to the time intervals of each setting step. This is the only way the ECU training will go smoothly. But before that, it’s worth studying the adaptation features and the possibility of a manual procedure for your car. Perhaps only service station specialists can help.
Our service center is often visited by GAZelle cars, because this is a commercial vehicle that plows like a workhorse day and night. Every day, many GAZelles hit the roads of our country and sooner or later certain breakdowns arise, which we try to eliminate! Today is no exception. A GAZelle Business with a UMZ engine came to our repair zone! Well, let's help business!
After listening to the client: the car does not pull, the check light is on. After you turn the ignition off and on again, the car sometimes starts to work as it should, but then the problem repeats. The rpms don't rise above 2000...
Here it is, a workhorse!
Fig.1
Where to start repairs? Of course, with computer diagnostics. We connect the diagnostic equipment and read the errors that are registered in the engine control unit.
Fig.2
We are interested in the current error P2138 Throttle/Pedal Position Sensor/Switch “D”/”E” Voltage Correlation. What does it mean? This error literally stands for: P2138 incorrect voltage ratio “D” / “E” of the throttle position sensor or accelerator pedal
. Our throttle valve is electronic, as is the gas pedal. That is, both the damper itself and the pedal may be faulty. In order to defect a pedal or throttle valve, you need to understand how they are designed, so first let’s look at their design features, structure and figure out what is the difference between a mechanical throttle valve and an electronic one.
The operating principle of the system with an electronic throttle valve and an electronic gas pedal.
And so, first of all, let’s look at the device of a mechanical throttle valve and figure out how the idle speed is adjusted.
Fig.3
Mechanical throttle (rpm 840..900)
In a mechanical throttle valve (Fig. 3), the idle speed control (4) is responsible for idle speed (engine speed). The throttle valve itself (penny 1) does not participate in idle speed control in any way. The idle speed control sets 55...65 steps (mikas 7.1) to maintain speed in the region of 800...900 rpm. The more steps the idle speed control has, the higher the engine speed will be, because... more air will flow through the bypass channel (3).
Fig.4
Mechanical throttle (rpm 1300..1400)
To maintain idle speed at 1300...1400, the idle speed regulator (2) sets approximately 115...120 steps (Mikas 7.1). In this position, the regulator rod (4) increases the flow of air through the bypass channel (3), thereby increasing the speed.
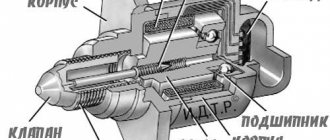
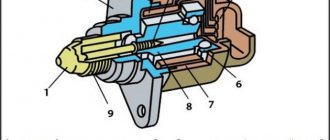
But how does idle speed control work with an electronic throttle valve, and what parts does it consist of? The GAZ electronic throttle valve consists of the following parts (Fig. 5): the valve itself (penny 1), a gear motor (2) that controls the valve (penny 1), and two resistive position sensors (3)
Fig.5
Electronic throttle (rpm 850..900)
Let us clarify that in cars with an electronic throttle valve there is no idle speed regulator as a separate part. The throttle valve itself is responsible for adjusting the idle speed (penny, 1). To maintain idle speed, the throttle valve is opened slightly by 5...6% and the air that is needed to maintain idle speed passes through the valve itself (1). The damper is controlled by a gear motor (2). Sensors (3) read the current position of the damper.
Fig.6
Electronic throttle (rpm 1400..1500)
In order for the engine speed to increase to 1400...1500, the motor (2) slightly opens the throttle valve by 10...12%. Thus, the electronic damper itself participates in the process of adjusting the idle speed. The electronic throttle valve must be kept clean, therefore, in order to prevent engine speed from floating, it must be cleaned much more often than a mechanical throttle valve.
If the mechanical throttle is controlled by a throttle cable, then who is responsible for controlling the electronic throttle? In order for the control unit to understand at what angle to open the throttle, it must first read the current position of the gas pedal. Our gas pedal is also electronic and consists of the pedal itself and two resistive sensors (R3, R4) Fig. 7
.
Let's consider Option 1
. The gas pedal is not pressed. The ignition is on, the gas pedal is not pressed, the throttle is turned to 7.8%, why not 0% you ask? We explain: because Since our throttle valve is electronic, the idle speed regulator, as you already understood, is missing, but we need air to ignite the mixture. It is precisely through the gap of 7.8% that this air enters during engine starting.
Fig.7
The ignition is on, the pedal is not pressed, the throttle is closed (ajar) by 7.8%.
What parameters can we observe with a working throttle valve and a working gas pedal?
Fig.8
Typical parameters for the values of a working gas pedal and throttle valve (the pedal is not pressed)
Table 1. Indications of a working gas pedal and throttle valve (pedal not pressed)
| R3 ADC_DPS1 (V) | |
| 0.78 , R2 ADC_ETS2(B) |
Let's consider Option 2
. The gas pedal is pressed all the way. The ignition is on, the gas pedal is pressed all the way, the throttle is turned to 24%. Why not 100% you ask? Well, that’s how the manufacturer built it into the program.
Fig.9
The ignition is on, the gas pedal is pressed all the way, the throttle is open 24%.
On the computer screen when the gas pedal is pressed, we observe the following parameters.
Fig.10
Typical parameters for the values of a working gas pedal and throttle valve (pedal pressed all the way).
Table 2. Indications of a working gas pedal and throttle valve (pedal pressed all the way).
| Gas pedal readings (highlighted in yellow) are parameters: ADC_DPS1 (V) | |
| Throttle readings (highlighted in red) are parameters: ADC_ETS1(B) 1.42 , ADC_ETS2(V) |
And so, we examined options for the operation of the throttle valve and gas pedal, provided that they are fully operational, but let’s return to our GAZELLE and error P2138
, which is written to the ECU memory when one of the values does not match, we remind these values.
Working gas pedal:
the gas pedal voltage R3 divided by 2 is equal to R4, i.e.
R3/2 =
R4.
A working throttle valve:
the sum of the voltage R1 and R2 of the throttle valve is equal to 5V, i.e.
R1+R2= 5v
.
If one of these conditions is not met, then error P2138 appears - incorrect voltage ratio “D” / “E” of the throttle position sensor or accelerator pedal
. D and E in our case are R1, R2 and R3, R4, respectively. Therefore, in order to reject the gas pedal or electronic damper, you need to carry out the checks described above. Without wasting time, we begin to check our readings on the faulty car.
Checking the throttle and gas pedal readings of a faulty GAZelle car.
First, look at the voltage readings of the throttle valve and gas pedal with the car turned off and the ignition on. And what do we see?
Fig.11
The ignition is on, the pedal is not pressed.
Table 3. Indications of a defective gas pedal (pedal not pressed)
| R3 ADC_DPS1 (V) | |
| Throttle readings (highlighted in red) are the parameters: R1 ADC_ETS1(B) 0.78 , R2 ADC_ETS2(B) |
Fig.12
The ignition is on, the pedal is not pressed (the pedal is pressed all the way).
Table 4. Indications of a defective gas pedal (pedal pressed all the way).
| Indications of a defective gas pedal (highlighted in yellow) are the parameters: R3 ADC_DPS1 (V) | |
| Throttle readings (highlighted in red) are the parameters: R1 ADC_ETS1(B) 0.80 , R2 ADC_ETS2(B) |
Pay attention to the throttle opening percentage in Fig. 12
.
provided that the gas pedal is pressed all the way. Due to a faulty gas pedal, the ECU cannot detect that the gas pedal is pressed and therefore the throttle opening percentage will remain around 7.1%. If the gas pedal was working properly, then the readings should correspond to Fig. 10
.
Well, we have defected the electronic gas pedal. Let's start dismantling it, take it apart and find out what happened to it.
To disassemble the electronic gas pedal, you need to unscrew four screws.
Rice. 15.
Unscrew the 4 screws.
Fig. 16.
Remove the top cover with the board and resistors.
Here is a wiring diagram for our pedal.
Rice. 17.
Connection diagram between the accelerator pedal and the ECU.
How is the connector on our gas pedal numbered?
1. red
power supply +5 volts of sensor 2 pedals 2.
brown-orange
power supply +5 volts of sensor 1 pedal 3.
brown-pink
signal of sensor 1 pedal 4.
brown
common sensor 1 pedal 5.
red-pink
common sensor 2 pedals 6.
brown-green
signal sensor 2 pedals
Rice. 18.
Pinout of gas pedal contacts.
Fig. 19.
Gas pedal sensor board
In Figure 19
you can see a shiny (brushed) area (highlighted in green) on the resistive layer, due to the fact that the gas pedal slider is constantly moving forward and backward. Over time, this layer wears out a lot and the resistance of the coating becomes different, and that’s when miracles begin.
The importance of the throttle valve adaptation procedure can hardly be underestimated, and not every car enthusiast knows how to perform this operation on their own.