Why do you need a brake force regulator?
The function of the regulator is to temporarily reduce the braking force during heavy braking. The fact is that force evenly distributed on the rear and front axles can lead to a skid of the car. If the rear brakes start working a little later and weaker than the front ones, this does not happen.
Based on the above, we can conclude that the sorcerer is an element of the car’s safety system, partly preserving its stability on the road when the brake pedal is pressed in an emergency. On modern models, this function is performed by ABS. That is why there is no need today to use a technically outdated device in production.
Signs of a malfunctioning brake force regulator
“Sorcerer”, as an element of the braking system, has a number of signs of malfunction that manifest themselves during emergency braking. Let's look at the first symptoms that call for checking the regulator:
- When braking hard, the car pulls to the side.
- Reduced braking efficiency (feels).
- “Bouncing” and jerking of the car when braking.
In such cases, it is necessary to check not only the “sorcerer”, but also other components of the brake system and chassis. But, since we are talking about the brake force regulator on the VAZ, we will consider this particular mechanism. After placing the car on a lift, pay attention to the regulator. The most common sign of its malfunction is the presence of brake fluid leaks. In case of any malfunction, the best solution is to replace the sorcerer. But, if you still decide to repair the brake force regulator, then below we have prepared brief instructions for this action.
How does a sorcerer work?
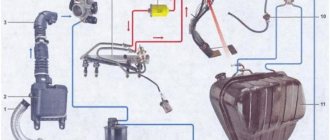
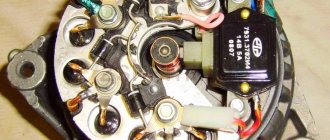
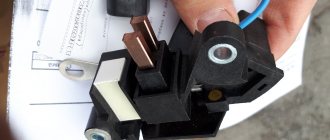
The regulator itself consists of a cylinder, valve, spring and rod. The latter is connected to the rear beam, which ensures the operation of the VAZ-2109 sorcerer. Also, brake fluid circuits pass through the rear brake pressure regulator. For their mounting on the device there are 4 threaded entries. » alt=»»> How does the sorcerer regulator work on a VAZ? During emergency braking, the front of the car is pressed to the ground, and the rear is raised. This causes the regulator rod to move, which blocks the flow of fluid to the rear cylinders. A spring located under the valve prevents it from closing completely. Therefore, the rear mechanisms still work, but later and weaker than the front ones.
Device Description
The design and principle of operation of this element are quite simple. At the moment when the rear part of the car body rises and the distance between the axle and the body increases, a special lever is activated, which is connected in a “sorcerer”. This lever lowers the piston, which closes the brake fluid channel, and accordingly the pressure on the rear pads decreases. The wheels do not stop rotating and, accordingly, do not skid.
The idea itself is quite clever, but, as often happens, in practice it raises doubts. After all, if when braking the brake pedal is pressed with great force, then the front wheels go into skid and the car still begins to skid. Quite often, when observing a traffic accident, you will notice that the cars with the “sorcerer” are turned backwards. Is this related to this miracle detail, which in its essence should prevent this skidding?
Setting the brake force regulator
Adjustment of the sorcerer should be done on an overpass or inspection hole. At the same time, the car is unloaded and driven to the work site. To perform the manipulation you will need:
- Socket wrench 13 or corresponding socket;
- Drill diameter 2 mm.
To adjust the sorcerer, use a wrench to loosen the bolt securing it to the lever bracket. Next, use a screwdriver to move the bracket until the resulting gap allows you to insert a prepared two-millimeter drill into it. After this, the bolt is tightened.
Note: the brake pressure regulator of the VAZ-2110 and previous VAZ models turns sour during operation so that it is not possible to move its bracket. In such a situation, you should pour WD-40 liquid over the rusted area, wait 15-30 minutes, and then use a hammer to move the part to the side using a soft drift.
Removing and installing the brake pressure regulator Lada Priora
One of the reasons for the car skidding or pulling to the side when braking may be a malfunction of the pressure regulator.
It is recommended to replace a faulty pressure regulator as an assembly.
You will need: a flat-blade screwdriver, a 8- or 13-size wrench, a 13-size socket wrench (head), a special 10-size wrench for loosening the brake pipe nuts.
Using a screwdriver, remove the lock washer of the elastic arm of the regulator drive and the flat washer installed under it.
Disconnect the elastic arm with the shackle from the rear suspension beam.
To avoid having to adjust the pressure regulator drive during installation, mark the position of the drive lever relative to the bracket.
Place a container under the junction of the pipes with the regulator, since liquid will flow out from there, and use a special “10” wrench to unscrew the four nuts securing the brake pipes.
Disconnect the tubes from the regulator.
Plug the pipe openings, for example, with protective caps for the wheel cylinder bleeder valves.
Label the tubes so as not to mix them up when installing the regulator later.
Using a 13mm wrench, remove the front bolt securing the regulator to the bracket
Using a 13mm wrench, remove the rear regulator mounting bolt.
Remove the regulator with drive from the car
If it is necessary to replace drive parts, use a screwdriver to pry the earring bracket away from the elastic lever
Remove the bracket along with the earring from the lever.
Using a 8" wrench, unscrew the bolt securing the lever clamp.
Remove the lever retainer and disconnect the drive lever from the elastic lever
Replacing the brake pressure regulator
The replacement of the sorcerer on VAZ-2110 cars and other vehicles equipped with an RTD is carried out on an overpass. You need a 13 mm spanner, a powerful screwdriver and a special 10 mm wrench designed for unscrewing brake pipes. Before starting work, the assembly must be cleaned of dirt and rust, doused with WD-40 or another penetrating compound, and then wait half an hour.
Work begins by unscrewing the bolt securing the bracket to the spring. Afterwards, the brake pipes are dismantled, the position of which is recommended to be pre-marked.
You can also unscrew the tube fittings with a regular wrench. However, using a special tool makes the job easier and reduces the likelihood of “licking” the edges. After the fittings, unscrew the two bolts securing the sorcerer to the body and remove the part. » alt=»»> It is necessary to install the new VAZ-2110 sorcerer in strict reverse order. After installing it and before adjusting the RTD, you should bleed the rear brake circuits. Next, the above-described procedure for setting up the sorcerer is performed.
Brake pressure regulator
Attention. If there are problems with the brake system, then the problem may be hidden in the pressure regulator itself.
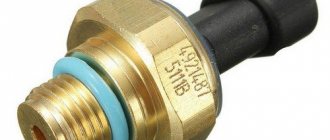
VAZ 2109 rear brake pressure regulator
In order to regulate it, you need to know the basic principles of operation of this mechanism, popularly called a sorcerer. As a rule, the sorcerer is attached with two bolts from the bottom of the car. As for one of the bolts, it also simultaneously secures the fork element of the drive lever, which is responsible for pressure. This very element or bracket is the very object with which the movement is carried out and thus the pressure can be adjusted.
Examination
The operation of the VAZ-2109, 2110 and other AvtoVAZ models is checked on the move, in closed areas. To do this, accelerate the car to a speed of 40 km/h and sharply press the brake. The rear wheels should lock 1/2 second later than the front wheels.
The wheels are monitored by an assistant located outside the car. If wheel locking occurs noticeably later or does not occur at all, and also if the rear axle is locked simultaneously with the front, the sorcerer adjustment procedure is repeated.
To increase the response time of the rear brakes, the gap between the adjuster and the bracket is increased; to shorten it, it is reduced accordingly.
All the best! I was tormented by the wobbly brakes on the car, although everything is new in a circle, pads, drums, cylinders, springs... I decided to check what it was, the result is that the ass brakes sluggishly, and the rear left one is not at all clear how it is. no way. I thought the problem was in the tubes, but experimentally they determined that the problem was in the sorcerer. We begin to pump the second circuit (rear left, front right) and on the rear left the pedal goes a centimeter and stands as if dug out, although it should be pressed to the floor. My father and I scratched our heads for a long time, and in the end, after looking at the sorcerer’s device, it was decided to bleed the rear left with the valve not fully pressed (actually that
"CHEVROLE-NIVA"
By the way, before testing tires on cars without ABS, each time we slightly adjust the regulator taking into account the road condition (snow, ice, asphalt), ensuring that the rear wheels lock a little later than the front ones. Let's not break tradition. Our Shniva found the gap between the cheeks of the regulator to be 16 mm, which was adjusted using a stop screw.
Several brakings, and the braking distance from 80 km/h for a car with a partial load is determined: 34.4 m. With a full load... 33.6! Almost a meter shorter! At the same time, the driver noted a heavier pedal and rapid heating of the brakes, which required cooling before each measurement. Let’s remember these parameters and make adjustments to the “sorcerer” adjustment. First, let's reduce the gap to 8 mm. Now the regulator significantly limits the pressure in the rear brakes, transferring almost all the hard work to the front ones.
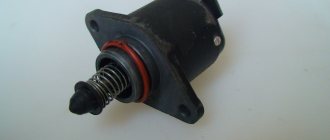
Checking the brake pressure regulator for souring:
Have a helper press the brake pedal while you watch the pressure regulator rod (1), which should extend from the regulator body and act on the spring plate (2), pressing it against the drive lever (3). If the following sequence of operation occurs when you press the pedal, then all that remains is to adjust the “sorcerer”. It is advisable to check the adjustment of the sorcerer during each technical inspection, as well as during the replacement of springs and struts, and repair work on the rear beam.
"Wizard" OR ABS?
And yet, such a regulator on a modern car is a legend of deep antiquity. It cannot compete with ABS, especially if the driver is an average driver who does not know extreme driving techniques. The curb weights of Kalina and Priora are almost the same - the difference is less than a percent. Using the same tires that were on the Kalina, the Priora with ABS showed the best results under any load. Moreover, no dosing of force on the brake pedal was required, you just press with all your heart, and the electronics do the rest.
Test results:
Signs of a working brake pressure regulator
A working regulator (3) should show no signs of brake fluid leakage, the rod should be movable, and the gap between the drive lever and the plate should be 2 mm.
Malfunctioning Sorcerer
If you find that the gap between the lever and the plate (3) does not match or the sorcerer is immobile, you should replace or adjust it.
Rear brake pressure regulator
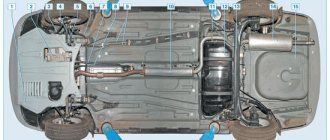
Place the car on a two-post lift, apply the parking brake and turn off the ignition (electro-hydraulic lift, type PV-3-T-SP, with a lifting capacity of 3 tons).
Disconnect brake pipes 1, Figure 1, from brake pressure regulator 2 and install plugs on them (wrench 67.7812-9525 for brake pipe fittings, technological plugs).
Figure 1 — Removing the rear brake pressure regulator:
1 — brake pipes
2 — rear brake pressure regulator
3 - pressure regulator drive lever
4 — nuts securing the pressure regulator bracket
Remove the retaining ring and washer from the pin securing lever 3 to the rear suspension arm and disconnect the lever.
Unscrew the nuts 4 securing the bracket to the body and remove the regulator 2 as an assembly with the bracket and lever 3 of the pressure regulator drive (wrench 13).
Tighten nuts 4 securing the bracket to the body and install regulator 2 assembled with the bracket and lever 3 of the pressure regulator drive (wrench 13).
Install a retaining ring and a washer on the pin securing lever 3 to the rear suspension lever and attach lever 3.
Setting the Priora brake pressure regulator
We replace the pressure regulator when the braking efficiency of the rear wheels cannot be adjusted (early or late blocking in relation to the front wheels), due to jamming of the piston in the cylinder or leakage of brake fluid through the cylinder seals. We clean all threaded connections of the pressure regulator in the brake mechanisms of the rear wheels with a wire brush and treat them with a penetrating liquid such as WD-40. Using a screwdriver, we pry up the tendril of the bracket, covering the elastic lever of the regulator and, removing the lever from the hole of the earring...
...remove the bracket. Mark the position of the brake pipes relative to the regulator.
Using a special “10” wrench for brake pipes, unscrew the fittings of the four brake pipes.
Using a 13mm wrench, unscrew the two nuts securing the regulator bracket to the body bracket...
...and remove the regulator along with the bracket and elastic lever.
Using a 13mm wrench, unscrew the bolt securing the regulator to the drive...
...bolt securing the regulator to the bracket...
...and separate them.
Using an “8” wrench, unscrew the bolt securing the elastic lever clamp...
...and remove the lock.
We remove the elastic lever from the regulator drive. Install the pressure regulator in reverse order. After installing the pressure regulator, use pliers to compress the elastic lever bracket and bleed the brake system (see “Bleeding the brake system hydraulic drive”). After pumping, we adjust the pressure regulator drive. To do this, we place the car without a load on a flat surface and press the rear part of the car from top to bottom with a force of 40–50 kg 2–3 times so that the rear suspension takes its middle position.
Using a 13mm wrench, loosen the bolt securing the pressure regulator to the drive...
...and move the drive with a screwdriver so that the gap between drive lever 1 and lever spring 2 is within 2.0–2.1 mm. We check the gap with a piece of wire or the shank of a drill of the appropriate diameter. After the adjustment, we carry out a kind of road test, in which an observer outside the car must detect the locking of the rear wheels, which should occur somewhat later than the front ones, during sharp braking from a speed of 30–40 km/h. If the locking is too late, we reduce the gap, if it is early (advancing the locking of the front wheels), we increase it, with a mandatory subsequent check in the same way.
Source