Steering Gear Adjustment | AUTOFIZIK.RU / auto repair
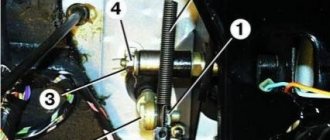
The need for adjustment arises if the free play of the steering wheel increases over 20° for buses and 25° for other modifications of the car (see Checking the technical condition of the steering). By turning the steering wheel 2.5 turns from the straight-line position in any direction,...
... and by swinging the steering gear screw by the fork attached to it, we check the axial or radial clearance in the steering gear bearings. The play should not be felt.
You can adjust the clearance in the propeller bearings on a car, but for subsequent adjustment of the nut-shaft-sector engagement, it is more convenient to immediately remove the steering mechanism. Remove the steering mechanism (see Removing the steering mechanism). To avoid damage...
. remove the plastic cover...
...and a foam seal.
Using a 13mm head, unscrew the four bolts securing the upper cover of the mechanism housing.
Using a screwdriver, remove the cover...
...and remove one of the shims.
We install the cover, tighten the bolts and check the play. If there is play, remove another gasket. Having achieved the absence of play, we adjust the gap in the engagement of the nut-shaft-sector pair. To do this, install the bipod on the shaft and, slightly tightening its nut, turn the screw to move the bipod to the middle position, after which we swing the sector shaft by the bipod. The stroke of the end of the bipod should not be felt (exceed 0.3 mm). If it is larger, then pry it off with an awl or a thin screwdriver,…
remove the plastic cover...
...and remove the two plugs.
Using pliers, remove the spring rings from both sides of the mechanism body.
Using a thin beard with a blunt end, we straighten the holes on the edge of the outer ring of the sector shaft bearings.
Using a special wrench, we turn the eccentric outer rings of the bearings in the crankcase holes clockwise from the side of the splined end of the sector shaft.
ATTENTION When adjusting, you should exclude the possibility of skew of the sector shaft, for which we turn both bearings alternately at a small angle until the gaps in the engagement are eliminated.
The turning torque of the screw on the adjusted mechanism should be 10–18 kgf.cm. We secure the eccentric rings from turning by bending their collars into the holes of the crankcase with a bead. We assemble the steering mechanism in the reverse order and install it on the car. When assembling, we moisten the foam rubber seal of the shaft-sector with transmission oil, and the spline joint with CV joint-4 or ShRB-4 lubricant.
How to adjust the power steering mechanism of a Gazelle car
Page 1 of 2
Adjusting the steering mechanism is necessary when the vehicle's directional stability is low at high speeds (you don't seem to feel the steering wheel at high speeds).
This defect is associated with a violation of the adjustment of the propeller thrust bearings, and in the rack-piston-shaft-sector pair of the steering mechanism.
After adjustment, the force required to rotate the input shaft should not increase noticeably. During operation, you should constantly monitor the condition of the hoses, especially high pressure ones. If cracks, swelling or cuts occur, hoses must be replaced. You should also check that there are no leaks of working fluid (oil) from under the hose clamps, steering gear covers or power pump. When the pressure in the system increases due to jamming of the bypass valve, the technological plugs in the pump casing can be squeezed out, so you should monitor the system and the quality of the working fluid being poured, top it up, replace it and change the filter in a timely manner. You should not hold the steering wheel in extreme positions for a long time. This can lead to damage and even seizure of the booster pump. A slight noise when the amplifier operates is not a sign of malfunction.
We remove the steering mechanism without removing the bipod.
1. We clamp the mechanism in a vice with the fittings down and drain the remaining oil into a container, turning the mechanism shaft with a key to 17.
2. Pressing the spool shaft with your hand, rock the bipod. If axial play of the shaft is felt, adjust the thrust bearings.
3. To do this, use a bevel or drift to straighten the collar of the adjusting nut, which is cored into the grooves of the crankcase.
4. Use a special wrench to turn the nut clockwise until the gap is eliminated.
At the same time, we control the torque of the shaft, which should be no more than 0.2 kgcm.
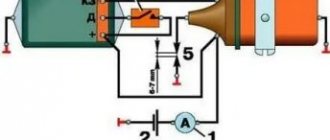
5. To do this, use a dynamometer hooked to a 17 key to measure the turning torque of the spool shaft.
With a lever length of 200 mm, the force should not exceed 1.0 kgf.
6. Bend the collar of the nut into the groove with a beard.
7. Rock the bipod of the steering mechanism with your hand. If a gap is felt, adjust the gearing.
8. To do this, remove the bipod from the sector shaft.
Gas 2705 | 3302 gazelle from 1994, steering without power steering, instructions online
Payment for goods and downloading of the book in electronic form (PDF format) is made on the website.
To do this, you need to find the book you are interested in and click on the “Buy” button. The price of the book is indicated on the button.
For convenience, the price on the website for residents of Russia, Belarus and Kazakhstan is presented in rubles.
For residents of Ukraine in hryvnias, and for all other countries - dollars.
After clicking on the “BUY” button, a payment window will open where you can select a payment system with which you can pay for the selected book using any bank card (Visa, MasterCard, MIR, etc.)
When you click on the “Pay by bank card” button, the Portmone payment system will open, which is the easiest way to make a payment.
In addition, the website offers four payment systems for payment:
- Yandex (payment from any bank cards, Yandex Money account, QIWI Wallet, terminals, etc.);
- Portmone (payment from any bank cards, Portmone account);
- PayPal (payment from any bank cards, PayPal account);
- WebMoney (payment from any bank cards, payment from WebMoney wallets).
Payment via Yandex Cashier
After selecting payment via Yandex, the Yandex Cashier payment system will launch, where you need to select a convenient payment method (bank card, QIWI, Yandex Money account, etc.)
After specifying payment details and confirming payment, payment for the goods will occur.
If you have a bank card in a currency other than the ruble, then the money will be debited from the card at the rate of the Central Bank of Russia at the time of the purchase.
This payment method is optimal for residents of Russia, Kazakhstan and Belarus.
Official website of the Yandex Kassa payment system https://kassa.yandex.ru
Payment via Portmone
After selecting payment through Portmone, the payment system will launch, where you need to select the payment method: bank card or Portmone account.
The price in the Portmone payment system is converted into dollars at the exchange rate of the Central Bank of the country where you are located.
If you have a bank card in a currency other than the dollar, then the money will be debited from the card at the rate of the Central Bank of your country at the time of the purchase.
After specifying payment details and confirming payment, payment for the goods will occur.
Official website of the Portmone payment system https://www.portmone.com
Payment via PayPal
After selecting payment via PayPal, the PayPal payment system will launch, where you need to select the payment method: bank card or PayPal account.
If you already have a PayPal account, then you need to log into it and make a payment.
If you do not have a PayPal account and you want to pay using a bank card via PayPal, you need to click on the “Create an Account” button - shown with an arrow in the picture.
PayPal will then prompt you to select your country and provide your credit card information.
After specifying the information required to make the payment, you must click on the “Pay Now” button.
Official website of the PayPal payment system https://www.paypal.com
Payment via WebMoney
After selecting payment via WebMoney, the payment system will launch, where you need to select the payment method: bank card or WebMoney wallet.
If you already have a WebMoney wallet, then you need to log into it and make a payment.
If you do not have a WebMoney wallet and you want to pay in another way, you need to select any of the methods that WebMoney offers and make the payment
After specifying payment details and confirming payment, payment for the goods will occur.
Official website of the WebMoney payment system https://www.webmoney.ru/
Downloading a book
After successfully completing the payment (by any method) and returning to the KrutilVertel store from the payment system website, you will be taken to the successful payment page:
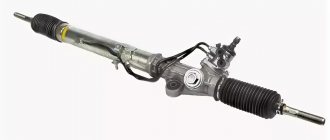
Steering gearbox for Gazelle: diagnostics and repair
Today, the steering gear is installed on almost all modern models of Gazelle vehicles, regardless of the presence of power steering. The main function of the presented mechanism is considered to provide control of the machine, therefore the technical serviceability of the device directly affects the safety of the driver and passengers while driving.
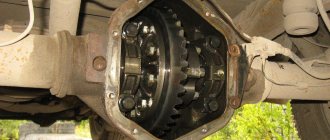
Signs that repairs are needed
Gazelle steering gear repair
In any car, the steering parts are subject to the greatest degree of wear, since they bear heavy loads when driving on uneven roads, cornering, and sudden braking. Therefore, the Gazelle steering gear often fails, as a result of which it is urgently adjusted. The list of signs of malfunction of the unit in question usually includes:
- Vibration or knocking in the device transmitted through the steering wheel;
- Having difficulty turning the steering wheel;
- Presence of play in the gearbox;
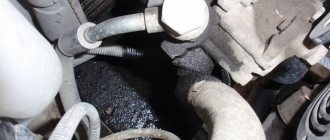
- Oil leaks in the mechanism.
Sale of new SUVs
Main aspects of power steering repair in Gazelle
The purpose of power steering is to provide more convenient steering wheel control. Today, the power steering system is installed on Gazelle and many modern cars. You can learn more about the device, malfunctions and repair of the unit at home from this material.
Device
Both the electric power steering on the Gazelle and the power steering are designed for more comfortable steering. First, let's analyze the power steering device on the Gazelle. We are talking about both the Gazelle Business with the 405 engine and other models in this line.
So, what is the system device:
Typical faults and solutions
Like any component, power steering can fail from time to time.
The main malfunctions and methods for eliminating them are given below:
Repair instructions for power steering pump
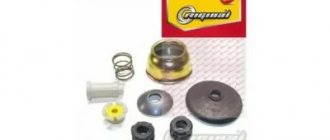
As you might have guessed from the previous paragraph, if the power steering on a Gazelle does not work, then this is due to the pump. To repair this element in a car with your own hands, you will need to purchase a repair kit in advance. You can buy it at any themed store. The main difficulty in repair is that the pump is not dismountable.
The repair procedure is carried out as follows:
Adjusting the power steering mechanism of a Gazelle car
Page 1 of 2
Adjusting the steering mechanism is necessary when the vehicle's directional stability is low at high speeds (you don't seem to feel the steering wheel at high speeds).
This defect is associated with a violation of the adjustment of the propeller thrust bearings, and in the rack-piston-shaft-sector pair of the steering mechanism.
After adjustment, the force required to rotate the input shaft should not increase noticeably. During operation, you should constantly monitor the condition of the hoses, especially high pressure ones. If cracks, swelling or cuts occur, hoses must be replaced. You should also check that there are no leaks of working fluid (oil) from under the hose clamps, steering gear covers or power pump. When the pressure in the system increases due to jamming of the bypass valve, the technological plugs in the pump casing can be squeezed out, so you should monitor the system and the quality of the working fluid being poured, top it up, replace it and change the filter in a timely manner. You should not hold the steering wheel in extreme positions for a long time. This can lead to damage and even seizure of the booster pump. A slight noise when the amplifier operates is not a sign of malfunction.
We remove the steering mechanism without removing the bipod.
1. We clamp the mechanism in a vice with the fittings down and drain the remaining oil into a container, turning the mechanism shaft with a key to 17.
2. Pressing the spool shaft with your hand, rock the bipod. If axial play of the shaft is felt, adjust the thrust bearings.
3. To do this, use a bevel or drift to straighten the collar of the adjusting nut, which is cored into the grooves of the crankcase.
4. Use a special wrench to turn the nut clockwise until the gap is eliminated.
At the same time, we control the torque of the shaft, which should be no more than 0.2 kgcm.
5. To do this, use a dynamometer hooked to a 17 key to measure the turning torque of the spool shaft.
With a lever length of 200 mm, the force should not exceed 1.0 kgf.
6. Bend the collar of the nut into the groove with a beard.
7. Rock the bipod of the steering mechanism with your hand. If a gap is felt, adjust the gearing.
8. To do this, remove the bipod from the sector shaft.
| rice. 9 |
9. To remove the bipod, unscrew the bipod nut
DIY Gazelle steering wheel repair
How to repair a Gazelle steering wheel on your own in a garage? Let's talk about this, illustrating what has been said with pictures and videos.
You need to work systematically and carefully.
As a rule, this operation involves repairing the steering gear. In what cases should it be done?
- The steering wheel suddenly became heavier for no reason.
- A backlash of over 20-25⁰ appeared in the gearbox.
- Specific knocking and vibrations appeared in the crankcase.
- An oil leak is visually observed.
The symptoms are serious, the gearbox will have to be removed from the Gazelle for repairs.
To do this, you will have to loosen the fastening of the front pair of wheels, hang the front axle, and remove the wheels. Turn the steering wheel left and right until it stops, knock out the steering rod, remove the gearbox with the bipod. The algorithm for reducing play in the Gazelle steering wheel is as follows (it can be clearly seen in the lightbox below).
2-3. Remove the plastic protection (cover) and foam seal.
4-5. Unscrew the 4 fastening bolts of the cover and remove it.
6. Remove one of the shims.
7. All that remains is to assemble the assembly in reverse order.
If the play on the bipod cannot be eliminated by removing one gasket, remove another one, etc. (we repeat the operations).
Once the backlash problems are resolved, the eccentric shims should be addressed. To avoid distortion, they must be rotated alternately with a fixed force (10-18 kgf/cm). At the end of the work, you need to lubricate the foam rubber seal with transmission oil, lubricate the splines with grease (ShRB-4 or CV joint-4), and put the part in place.
Of course, this is a general scheme for repairing a Gazelle steering wheel. In practice, there may be special cases with other faults in the Gazelle steering. Some types of repairs are shown in these two videos:
Malfunctions may be of a different nature. For example, any element of the steering mechanism may fail: a screw with a nut, angular contact bearings, a crankcase. Or elements of the steering drive: bipod, transverse and longitudinal steering rods, hinges, steering knuckle arms, etc. All these cases will be gradually sorted out and the topic of repairing the Gazelle steering wheel will be continued. Particularly valuable information comes from experts with experience driving a car. January 17, 2018Teor21
Personal repair of the GAZelle steering gear – Auto Moto Special
Commercial vehicles do not necessarily have a lot of equipment on board to facilitate comfortable and safe driving. Although this was possible even for a deep scoop. Let us recall, for example, the RAF 2203, which was considered almost a model of comfort for a minibus. Despite the fact that it was assembled entirely using Volga components and assemblies. It’s time to erect a monument to this icon of Soviet minibuses and ambulances - the RAF not only somehow did not deteriorate from congenital Volga diseases, it managed to become an absolutely self-sufficient and comfortable vehicle.
The photo shows RAF 2203, which during the USSR was considered a model of comfort
What happened has passed, and the RAFik was replaced by the GAZ 3302 GAZelle, on which high hopes were placed. As a result, over the 20 years of production, it remained a gasoline tractor with a steering wheel and a gearbox poker, having managed to contract incurable diseases with its most primitive design. Since there is no choice at all in this price segment, the car enjoys forced popularity and strained love from drivers.
Features of the GAZ 3302 steering gear
Like the whole car, the GAZelle’s steering mechanism does not suffer from sophistication in design, but many believe that this is for the better. Regardless of whether the car has power steering or without power steering, repairing and adjusting the steering is extremely simple and does not require deep encyclopedic knowledge or special tools from the driver. The very minimum of both – and you can move on.
review of GAZelle 3302
It is still different from the prehistoric GAZ worm-roller gearboxes, and even has its positive aspects. The most pleasant feature from the point of view of car architecture is that the GAZelle gearbox mechanism is quite compact and at the same time has good efficiency.
What is especially noticeable on cars without power steering is that driving even a loaded car does not require the use of brute physical force. The designers achieved this by using rolling instead of sliding. It cannot be said that this introduction brought revolutionary changes to the global auto industry at the end of the 20th century, but the steering wheel became noticeably lighter.
This made it possible to increase the service life of the entire assembly, since it does not wear out as intensively as a worm pair, and rarely requires adjustment.
There were some shortcomings, although the designers had nothing to do with it. The working pair of screw/ball nut is a non-removable element, and during the first 10-15 years of the car's production it was quite difficult to find a replacement pair. Now this stuff is enough, so replacing a working pair can cost 5-6 thousand rubles. Adjusting the steering gear requires its complete dismantling, which also does not delight users. Moreover, to adjust the gap, in addition to a special profile wrench, you also need level and skillful hands, since the bearings can be skewed in no time if you do not use a torque wrench.
In GAZelle, control does not require the use of brute physical force, even if the car is loaded
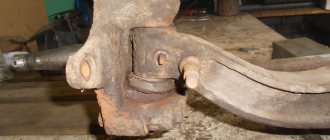
But the main surprise for the driver who decides to adjust or repair the gearbox is the removal of the bipod. This is not hellish work, but in the cold, dismantling the bipod can cause some discomfort.
Repair of GAZelle steering gear
Because of a good life, no one wants to remove the steering gear with their own hands, and the reasons for this must be more than compelling. This is mainly necessary if the steering wheel has become noticeably heavier, characteristic knocking noises have appeared in the gearbox housing, or there is a clear lubricant leak. The gearbox always sweats, but if the leak is too active, then the seals need to be replaced. In this case, it is necessary to check the condition of the shaft and, if necessary, remove traces of corrosion by grinding.
You can make adjustments without completely dismantling the gearbox, but it will be safer if you still remove it and inspect it carefully.
For the curious or for those in a hurry, here is the technology for removing the gearbox from under the hood:
- Loosen the front wheels.
- We hang the front axle on a stand and remove the wheels.
- We turn the steering wheel all the way to the right and from under the hood we knock out the steering rod with fittings of suitable length.
- We do the same on the left.
- From under the hood we remove the gearbox along with the bipod, which is more convenient to remove on a workbench.
Once we have the gearbox in our hands, we can repair it. Replacing parts should not present any difficulties, since the design of the gearbox is extremely simple and clear, and the adjustment requires some attention and reference to the factory adjustment data. They are also extremely simple.
For cargo GAZelles, the permissible play is 25˚, for passenger ones - 20˚. According to factory tolerances, there cannot be any play in the gearbox bearings. Adjustment of the clearance in the screw bearings is carried out in a vice on a workbench. It is more comfortable. We remove the plastic protection and the foam seal, then unscrew the four bolts securing the cover, remove one of the adjusting shims, and then reassemble everything in the reverse order. If there is play, repeat the operation to dismantle the gasket. So until you are completely satisfied and the play on the bipod is eliminated.
GAZ 2705 | Steering adjustment
8.3.1 Steering adjustment
Adjusting the steering column height and angle Adjusting the steering gear screw bearings Adjusting the engagement of the steering gear nut-sector pair Adjusting the steering column locking mechanism.
8.3.2 Adjusting the steering column height and angle
8.3.3 Adjusting the steering screw bearings
8.3.4 Adjusting the engagement of the nut-steering sector pair
8.3.5 Adjusting the steering column locking mechanism
GAZ 2705 | Adjusting the steering gear
1. Remove the steering mechanism (see “Replacing the steering mechanism”).
2. Secure the steering mechanism in a vice so that the discharge and drain holes (holes for fittings) are at the bottom.
| Rice. 8.3. Power steering mechanism (31519-3400011-10): 1 – nut; 2, 5, 6, 17, 21, 23, 24, 37, 40 – sealing rings; 3 – glass; 4, 11 – thrust bearings; 7 – piston-rack; 8 – screw; 9 – crankcase; 10, 18 – pins; 12 – discharge hose fitting; 13 – drain hose fitting; 14 – sleeve; 15 – cuff; 16 – torsion bar; 19 – ball guide; 20 – balls; 22 – channel in the crankcase; 25 – bipod; 26 – bipod nut; 27 – lower protective cover; 28 – retaining rings; 29 – adjusting washers; 30 – bipod shaft supports; 31 – rollers; 32 – bipod shaft; 33 – upper protective cover; 34 – rotor; 35 – protective cap; 36 – distributor housing; 38 – channel in the distributor housing; 39 – bolts securing the distributor housing to the crankcase |
3. Drain the oil from the mechanism by turning rotor 34 (Fig. 8.3) or spool shaft 31 (Fig. 8.4) by hand.
| Rice. 8.4. Steering mechanism with hydraulic booster (3162-3400011) (optional): 1 – adjusting nut; 2, 4, 7, 8, 9, 21, 23, 32, 35 – sealing rings; 3, 10 – thrust bearings; 5 – screw; 6 – rack-piston; 11 – bearing; 12 – distributor housing; 13 – cuff; 14, 18 – retaining rings; 15 – protective ring; 16 – ball guide; 17 – balls; 19 – lower protective cover; 20 – crankcase; 22 – upper protective cover; 24 – rollers; 25 – lock nut; 26 – locking bolt; 27 – bipod shaft supports; 28 – bipod shaft; 29 – bipod; 30 – bipod nut; 31 – spool shaft; 32 – check valve; 33 – drain hose bolt fitting; 34 – check valve |
4. Press the rotor or spool shaft with your hand along the axis and rock the bipod 25 (see Fig. 8.3) or 29 (see Fig. 8.4). If axial movement of the rotor or spool shaft is felt, it is necessary to adjust the tension of thrust bearings 4 and 11 (see Fig. 8.3) or 3 and 10 (see Fig. 8.4). 5. To adjust the thrust bearings, use a punch and a hammer to straighten the collar of cup 3 (see Fig. 8.3) or adjusting nut 1 (see Fig. 8.4), cored into the grooves of the crankcase wall.
Try not to hit too hard.
6. Eliminate the gap by turning the cup or nut clockwise.
7. Check the turning torque of the rotor or spool shaft in the thrust bearings; it should be 2 Nm (0.2 kgf m).
8. If there is a gap in the middle position of the bipod shaft when rocking the bipod, adjust the gearing by unscrewing nut 26 (see Fig. 8.3) or 30 (see Fig. 8.4) and remove the bipod. 9. Remove the upper and lower 27 and 33 (see Fig. 8.3) or 22 and 19 (see Fig. 8.4) protective covers. 10. Remove the locking rings 28 (see Fig. 8.3) and adjusting washers 29. Loosen the locknuts 25 (see Fig. 8.4) and unscrew the locking bolts 26 two or three turns. 11. Straighten the adjusting washers 29 (see Fig. 8.3). 12. By simultaneously turning supports 30 (see Fig. 8.3) or 27 (see Fig. 8.4) of the bipod shaft counterclockwise (as viewed from the splined end of the bipod shaft), eliminate the gap in the engagement. Carry out the adjustment in the position of the bipod shaft, corresponding to the middle position of the gear sector.
13. Check the turning torque of the bipod shaft; it should be within 35–45 N·m (3.5–4.5 kgf·m) when passing through the middle position.
If, after adjusting the bearing tension, the gap in the gearing cannot be eliminated, then the gap is caused by wear of the ball drive. In this case, the steering mechanism must be repaired in a specialized workshop.
14. Install adjusting washers 29 (see Fig. 8.3) and retaining rings 28, bend one of the antennae in both adjusting washers into the groove of the bipod shaft support. 15. Tighten locking bolts 26 (see Fig. 8.4) and locknuts 25 with a torque of 8–10 N·m (0.8–1.0 kgf·m).
16. Install the parts in the reverse order of removal.
17. Remove air from the power steering system (see “Bleeding the power steering system”).
Hi all! In this part I want to finish with the steering gearbox, otherwise a lot has been written in other parts about everything except assembly and adjustment. Go.
After replacing all the o-rings and bearings, we begin to assemble. In my case, the shaft journal on the spline side was necessarily ground, because... there was corrosion and deterioration.
I’ll write two words on how to replace the bearing race, which sits deep in the housing.
We warm the entire body so that it doesn’t lead to heat, and then use a gas burner to heat the place where the clip sits.
When it’s warmed up, we take the case with our bare hands and throw it away. Yes! Damn hot ☺️! We put on protective gloves, take the body and knock on a wooden surface or on a thick rubber conveyor belt, where the lid is screwed on. On the second or third strike the clip falls out.
Parts and spare parts, maintenance, service and repair
GAZ cars
ZIL cars
KAMAZ vehicles
MAZ cars
KRAZ cars
URAL cars
- URAL-4320, 5557
- Engine YaMZ-236
- __________________
- MAP OF SITE
Design and adjustment of the steering control of Gazelle GAZ-2705
The steering of the Gazelle GAZ-2705 car consists of an adjustable steering column with a shaft and wheel, a steering mechanism and a drive.
The design of the steering column (Fig. 19) allows you to change the position of the steering wheel in height and angle.
The steering mechanism of the Gazelle GAZ-2705 (Fig. 19), consisting of a screw with a ball nut 33 and a sector shaft, is mounted in an aluminum crankcase, which is attached to the left side member of the frame using a special bracket. The steering gear ratio is 23.09 (in the middle part).
Fig. 19. Steering Gazelle GAZ-2705
1 — steering wheel; 2, 25 — steering column switch; 3 - retaining ring; 4 — washer; 5 - bearing; 6 — plastic bushing of the bearing; 7 — ignition switch (lock); 8 - lower casing; 9 — steering column shaft; 10 — universal joint; 11 - wedge; 12 — nut: 13 — steering driveshaft; 14 — propeller shaft seal; 15 — cardan joint bearing; 16 — bearing needles; 17 — retaining ring; 18 — steering mechanism; 19 — bipod shaft with gear sector; 20 — universal joint grease fitting; 21 — steering column pipe; 22— bracket; 23 — handle of the steering column fixation mechanism; 24 — upper casing; 26 — steering wheel fastening nut; 27 — steering wheel pad; 28 — ball nut screw; 29 — top cover; 30 — adjusting gasket; 31, 39 — sealing rings; 32 - ball nut ball, 33 - ball nut; 34 - nut; 35 — bipod; 36 - cover; 37 — foam ring; 38 — retaining ring; 40 — bipod shaft bearing; 41 — shaft sector; 42 — ball nut screw bearing; 43 — bracket; 44 - crankcase; 45 — filler plug; 46 — oil seal; 47 — protective cover; 48 - wedge
A screw with a ball nut 33 is installed in the steering gear housing of the Gazelle GAZ-2705 on two angular contact bearings, the outer races of which are pressed into the crankcase and into the upper steering cover, and the inner races are pressed onto the steering gear screw.
The turning torque of the steering gear screw is adjusted using shims 30 installed under the steering gear cover.
When the screw rotates, the balls roll along a special channel, causing the ball nut to move. The balls are manufactured with high precision and differ from each other by no more than 4 microns.
The Gazelle GAZ-2705 steering mechanism assembly, consisting of a screw, a ball nut and a set of balls, cannot be dismantled. High quality processing and precision selected parts ensure easy and smooth operation of the steering mechanism.
With its teeth, the nut engages with the shaft - sector 41. The bipod shaft rotates on two cylindrical roller bearings, the inner race of which is the bipod shaft.
The sealing of the bipod shaft, as well as the steering mechanism cover of the GAZelle GAZ-2705, is carried out using rubber rings.
Fixation of the outer races of the bipod shaft bearings from axial movement is carried out using locking rings 38, and from angular movement - by coring the outer races into the crankcase holes, closed by plug 5.
The screw-ball nut of the Gazelle GAZ-2705 steering mechanism is connected to the steering column shaft using a propeller shaft. The hinge forks are fastened to the shafts using a wedge 48 (see Fig. 19).
The steering column is secured with four bolts to the clutch and brake pedal bracket. The steering column shaft rotates on two ball bearings. Adjustment of the steering column shaft bearings is not required during operation.
Signs that repairs are needed
Gazelle steering gear repair
In any car, the steering parts are subject to the greatest degree of wear, since they bear heavy loads when driving on uneven roads, cornering, and sudden braking. Therefore, the Gazelle steering gear often fails, as a result of which it is urgently adjusted. The list of signs of malfunction of the unit in question usually includes:
- Vibration or knocking in the device transmitted through the steering wheel;
- Having difficulty turning the steering wheel;
- Presence of play in the gearbox;
- Oil leaks in the mechanism.
If one or several signs appear, immediate adjustment of the steering gear is required, which will allow timely elimination of malfunctions in the operation of the device and reduce the risk of failure of other components of the vehicle.
Gazelle steering gear
Design and procedure for dismantling the control unit of a Gazelle car
Composition of the Gazelle control unit:
Repair of the Gazelle steering wheel is carried out as needed, mainly when the first signs of a malfunction appear.
The gearbox mechanism is compact and quite simple. The work does not require high qualifications, but it should not be the first step in setting up.
The fact is that in order to remove the problem node, you will need:
Since these actions are quite difficult, the process of adjusting the steering gear must begin after some preparatory operations:
Work order
Professional steering adjustment on Gazelle models begins with its careful dismantling. Next, remove the top plastic cover from the mechanism along with the foam rubber seal and the head of the 13 key, and unscrew the four fastening bolts of the metal protection. We remove one of the adjusting shims located inside, assemble the device in the reverse order, check the play and, if there is any play, disassemble the unit back, removing another spacer ring.
When it has been possible to ensure that there is no backlash, it is necessary to adjust the gap when engaging the nut pair - shaft-sector. To perform this operation, you should install the bipod on the shaft and successively rotate the screw to move it to the middle position, and then turn the sector shaft directly behind the bipod. The play of the bipod tip should not be felt or exceed 0.3 mm.
When the mentioned indicator is greater, then using a plastic screwdriver we dismantle the plastic cover of the gearbox, after which we remove the two plugs. Using metal pliers, remove the spring rings on both sides of the body and straighten the holes on the edge of the outer ring. The eccentric outer rings are rotated clockwise until the gaps with the sector shaft are removed. To prevent the rings from turning, we fix them by bending the collars in the grooves of the crankcase. We assemble and install the mechanism in the reverse order.
Thus, adjusting the steering gear on a Gazelle car is an important repair measure that allows you to restore the functionality of vehicle control, significantly increasing the safety of passengers while driving.