DIY steering rod replacement
Vehicle steering is one of the most significant systems that ensures trajectory changes and safety while driving.
There is no need to remind drivers of the importance of keeping it in working condition, while one of the common repairs is replacing the steering rod. Many car owners are hesitant to perform this procedure themselves due to the complexity of the process. It is worth describing in detail the essence of the problem in order to fully evaluate the possibility of dismantling and installing the steering rod with your own hands. First, you need to understand the reasons why this element of the car control system fails.
The process of diagnosing longitudinal and transverse steering rods
One of the common causes of tie rod failure is the wear of the ball joint. Some mechanics, if the rods are faulty, recommend restoring them. It is impossible to confidently call this measure correct, since it is not known how long the restored element will last. The only option would be to completely replace them. Moreover, acquiring the necessary spare parts is not a problem today.
Signs of a faulty steering linkage:
- the appearance of third-party noise in the area of the steering rack, which is unusual for the normal operation of the mechanism;
- steering wheel vibration;
- sudden pull of the car to the side when driving in a straight line;
- the occurrence of play in the steering column;
- heavy steering.
If at least one of the symptoms described above is noticed on the car, it is necessary to urgently check the control system, in particular the steering rods. During the diagnostic process, you need to pay attention to the following points:
- The distance by which the steering tips can move relative to the axis of the fingers should not exceed 1.5 mm. It is also necessary to determine the presence of play in these parts, which is evidence of their wear. In this case, you can restore the performance of the rod by replacing the hinge and steering tip. But, it is better to install a new part on the car.
- There are special adjusting couplings on the rods, which are tightened with clamps. Let's examine the condition of these elements. The presence of a hole indicates the need for repair work.
- During the diagnostic process, the protection of the ball joint tip must not be left without inspection. Damage to it significantly increases the wear of the part, since small abrasive particles (dirt, sand, etc.) accumulate on its surface. Damaged protective covers must be replaced.
Replacing the steering rod
To carry it out, you will need a standard set of plumbing tools, which every driver probably has, except that a special puller won’t hurt, but if you don’t have one, you can use a hammer and a small crowbar. The main thing is not to overdo it. Let us describe the sequence of the process of replacing the rod without removing the steering rack:
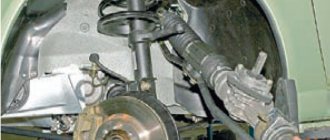
- We lift the car with a jack, fix the rear wheels, and place a support under the bottom.
- From the side of the steering rod being replaced, remove the front wheel, and then unscrew the pin nut.
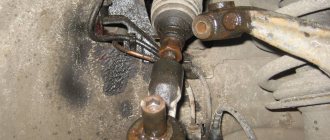
- Now you need to dismantle the steering tip by removing the fixing pin. Ideally, use a puller that is installed on the part. After which its nut is tightened until it stops. Next, hit the rotary lever of the puller with a hammer. If the finger could not be removed, the described procedure should be repeated again. If you do not have a puller, you can try to remove the steering pin using a hammer and a small crowbar.
- The tip is screwed to the steering coupling. It needs to be unscrewed. For this purpose, edges are provided on both elements. If you cannot unscrew the tip, you need to treat the threaded connection with WD-40, wait a couple of minutes and continue the procedure.
- We unscrew the steering linkage from the rack seat, having first removed the protective boot.
- Before installing a new rod, you should compare it with the one removed from the car and make a mark on the body. This will help the rod to take the required position during installation, which, after replacement, will be adjusted during the wheel alignment procedure.
- The new rod is installed in the reverse order, and it is necessary to coat its threads with lithol in advance.
How to remove a tie rod without a puller
Let's first look at the stages of removing the steering tip:
- The first stage is lifting the front of the car on a jack. For the safety of the car and the owner, we place reliable stands under the thresholds.
- We remove the wheel. To do this, unscrew the mounting bolts.
- Next, you need to clean the steering column. We do this with a stiff brush - we remove dirt, rust, dust. We treat the stand with a small amount of diesel fuel, kerosene or WD-40 and wait a few minutes. Thanks to this we will be able to unscrew the nuts more easily.
- After the preparatory procedures, we first loosen the tie rod end nut. Only after this action do we move on to the nut securing the ball pin of the steering tip.
- Unscrew the steering tip nut. In this case, it is advisable to turn the steering wheel in the opposite direction of the rack that you are pulling out - this will make the work process easier.
- Using a caliper, we measure the distance from the center of the steering tip to any mark on the tie rod (we ourselves put a mark on it somewhere). This is necessary in order to correctly align the new steering tip. This event must be approached as responsibly as possible. If you don't have a caliper, use the method from step 8.
- Now we need to knock out the steering tip itself. If you don’t have a special puller, you can get by with a hammer and some kind of strong lever (for example, a crowbar). We insert the lever between the rod and the protrusion of the stand connecting to it. We press the lever and at the same time hit the end of the steering tip.
- After the steering tip is knocked out, we simply unscrew it from the steering rod. At the same time, if we want to maintain an approximate camber, but, for example, we don’t have a caliper, or we just want to play it safe, we need to accurately count the number of revolutions when unscrewing and write down this number.
- We have removed the steering end, what should we do now? We put the new one, very important, on the right side, since they come in right and left ones. It is installed in the reverse order as we removed the old one. We screw it into the steering rod, and be sure to check the data from the caliper or the number of turns that was originally.
- When everything is screwed on, we install the entire structure in its original position and tighten all the nuts and bolts. After all the purging manipulations, we be sure to check whether the elements converge everywhere - this is very important for the safety of the car.
the video for more details on how to remove the steering tip without a puller :
How to remove the steering tip using a puller , see here:
There are times when everything does not go according to a good scenario, but, so to speak, with difficulties. This can be for many reasons, such as: broken threads on the nut, various types of rust, bends of an element due to external influences and other not very pleasant things. What to do in such cases?
Some installation details
If both rods are changed, they must be tightened at the same time, making sure to fix the rack shaft. This will help prevent damage to the nut that holds the shaft inside the rack. During factory assembly, both rods are simultaneously screwed to the rack and tightened equally, without destroying the block or its stop.
If it is possible to use a vice when replacing, you must carefully clamp one of the rods in it and tighten the second. To do this, it is advisable to use a torque wrench. During tightening, the rack body will rotate slightly. It's not scary. After tightening the rod, you should process its hinge, since burrs may remain on its plane after clamping in a vice.
Important! When installing parts without dismantling the steering rack, they should be tightened extremely carefully and correctly in order to obtain the required tightening torque, while avoiding the occurrence of increased torque on the rack shaft. The shaft has special flats for which it is secured with a key. But this is not always possible, since not all shafts have them; in addition, due to the peculiarity of their location, a special key is needed. Please note that it is strictly forbidden to use pliers to fix the shaft, as their jaws will damage the polished surface.
As you can see, the procedure for replacing rods is not complicated. Difficulties can only arise with tightening them, which is why motorists prefer to carry out this procedure in a car service center.
How to unscrew the steering wheel nut
If there is a broken thread that cannot be unscrewed, there are three ways:
- You shouldn’t immediately take a radical approach to this matter; perhaps not everything is as bad as you think and just simple manipulations are enough. First, let's clean the entire surface on which we will work with a wire brush and drop a little penetrating lubricant. If you do everything described above, then there is a chance that a regular spanner will help you to unscrew a bolt or nut with torn edges. If not, there are other ways. You can try to simply tap the ill-fated object (but not too hard!).
Lubricating a soured nut with WD-40
- How to unscrew a bolt or nut with broken edges? Of course, a gas wrench will help you a lot in this case. This is truly a magical tool. This tool, of course, requires a lot of space since it is very large, but at the same time it is able to hold even the most even objects, which helps a lot in this problem.
Gas key
- In those equally frequent cases when a gas wrench will not help, but the nut (or bolt) is large enough, an angle grinder will come to the rescue. You can simply take and carefully cut the edges, which will be smaller than those that have been erased. Four of these newly cut edges will be enough; there is no need to try to cut out all six. After this, the nut (or bolt) can be easily unscrewed with a socket or socket wrench, or using a gas wrench for greater confidence in a positive outcome (it is not recommended to touch the open-end wrench). You can also restore the edges using a file, although this, of course, takes more time.
Cutting the nut thread with a grinder
Replacing steering rods and ends with your own hands is within the power of every driver if desired.
Hello, dear car enthusiasts! There is probably no point in explaining to the driver what the car’s steering is intended for. We are sure that you drive modern cars that have a steering wheel, and not levers like in a tank.
If we build a logical-mechanical chain, we will see: a steering wheel - a worm gear or steering rack - and, finally, a steering gear (trapezoid). The steering drive consists of steering rods, and it is the replacement of the steering rod that is the main issue of today’s material.
It is not a fact that you will use the knowledge you have acquired and will, without exception, begin to replace the tie rods and tie rod ends with your own hands. Not everyone wants or can. However, knowing how to replace a tie rod and when to replace tie rods or ends is essential.
Steering rod - its functions and vulnerabilities
All tie rods perform the following two functions. They transmit forces from the steering mechanism to the rotating arms of the hubs, thanks to which the wheels turn, this happens due to the hinges installed at the ends of the rods. Also, these elements of the car provide the necessary angle of rotation of the wheels, because during turns the radii along which the wheels move are not the same. And by adjusting the required rod length using a special thread, you can adjust the angle of the wheels (toe angle).
Most often, the hinges become unusable, or more precisely, the rubber liner; this, by the way, renders the entire control unusable. This happens as a result of long-term use. Due to the ingress of dust and dirt, the tie rod boot may also deteriorate. The rods themselves become faulty, mainly only after mechanical impact. This could be a collision of wheels with the edges of deep holes or a direct impact with a stone, etc.
REPLACING THE STEERING END BOOT
It often happens that the steering tips themselves are in good condition, but a visual inspection reveals a rupture of the boot. If you leave it in this condition, it will soon become unusable and will have to be replaced.
The sequence of work when replacing the steering tip boot is the same as when replacing it completely, with the only difference being that after pressing it out of the steering knuckle of the strut, you need to remove the ring securing the boot and replace the damaged one with a new one.
When is it necessary to replace the steering rod?
You can understand that the steering rod needs to be replaced by the following signs:
- extraneous sounds and knocking appear in the controls;
- steering wheel wobble occurs;
- increased steering play. If it occurs during vertical rocking, then it is necessary to replace the ball joint or the hub bearing. In the case of horizontal swaying, there is a malfunction of the steering tip;
- the drive wheel rotates quite tightly;
- While driving, the car tilts to the side (either to the right or to the left).
Of course, it is possible to replace this mechanism yourself, but before taking action, it is worthwhile to diagnose the car. You can determine whether there is backlash as follows. It is necessary for someone to turn the steering wheel of your car, and in the meantime you would determine the presence of play by eye, or slowly rotate the steering wheel yourself and evaluate its trajectory by touch. If there is runout, then it is worth changing the tie rod end with the hinge.
Steering rod puller and other features of the replacement process
After a thorough diagnosis, if necessary, you should proceed directly to dismantling the old rod and installing a new one. Be sure to put your car on the handbrake before starting work, and install thrust bars under the rear wheels . If you need to dismantle the right link, then the front wheels are turned to the left; when dismantling the left, respectively, to the right.
Next, the front part of the car must be installed on supports. The ball joint is attached to the swing arm using a nut; it should be unscrewed after first removing the lock. For the next step, you will need a steering rod puller; use it to press the ball joint pin out of the strut swing arm.
Use a screwdriver to unscrew the ends of the locking plate, this way you will loosen the bolts that secure the tie rods, then unscrew them altogether. It is necessary to rotate the connecting plate so that you can disconnect the rod from the steering mechanism. Now you can remove it. If it is necessary to replace the tie rod end, then it must be clamped by the hexagon of the coupling in a vice and loosen the lock nut of the tip.
When unscrewing the tip itself, do not forget to count the number of revolutions completed. It is best to record this number on paper so as not to forget. When installing a new tip, screw it in exactly the same number of turns. If it is necessary to replace the cover, you need to remove the old one, then lubricate the surface with sealant, and only then install a new one. You need to reassemble the steering linkage in exactly the reverse order, so don’t get distracted when you disassemble your car.
Symptoms of faulty steering rods VAZ - 2107
- A knock from the front suspension is a rather unpleasant symptom, especially noticeable when driving over small bumps at moderate speeds. Although the appearance of a knock from the front suspension may indicate a malfunction of other suspension elements - ball joints, stabilizer struts, silent blocks, etc.
- Increased free play of the steering wheel. Here I think it’s clear that this is visible when the wheels remain motionless when turning the steering wheel. This also makes it difficult to control at high speed; you often have to steer while maintaining the course.
So how can you determine if the steering rods are faulty? I will not consider the special devices that professionals use when diagnosing a malfunction; we will consider the old but true methods. The first of them is to place the car on a flat area, preferably in a hole, just take the rod with your hand and turn it along the axis - if you can turn the rod with your hand, then quickly replace the rod. Another method is to turn the steering wheel back and forth and at the same time rest your foot on the wheel - if the tips are faulty, you will feel clicks and gaps, this is difficult to explain, you have to try. The last method I know of is with an assistant, the assistant rocks the steering wheel in both directions, and meanwhile you take the joint being tested with your hand and feel the presence of a gap - adjacent rods do not move synchronously. If there is a gap, then the tips need to be replaced.
Replacing tie rod ends for VAZ 2101 - 2106
Replacement is not a very difficult operation, but requires certain skills. You can go two ways: use a factory puller; knock out cravings using improvised means. The puller is designed to make it easier to remove the steering tip pin from the swivel wheel bipod, which sticks and is clamped very tightly in the cone during prolonged driving.
Tie Rod End Puller
Using the puller is quite simple - it is put on the head of the tip and by screwing in the bolt, the pin of the steering tip is squeezed out. This process can be facilitated by pre-treating the joint with a liquid like VD-40 or by tapping the bipod through a powerful attachment at the point where the finger enters with a hammer.
The second option is to load the steering rod with force using a crowbar and sharply hit it with a hammer (possibly with an attachment, as it suits you) on the bipod of the steering knuckle. Do not overdo it, there is a possibility of damage to the bipod.
Hit here with a hammer
This is how both the inner and outer tie rod ends . After the rod is removed from the car, the necessary measurements must be made to avoid the need to adjust the wheel alignment.
Necessarily! It is necessary to measure accurately!!! the distance from the coupling to a certain point on the tip chosen by you, also, as an option, you can count the number of threads to the coupling. The main criterion is to ensure the same measured lengths on both the old tip and the new one.
Measuring tips
After measuring the tips, you can disassemble the rod, release the coupling clamps, and unscrew the tip from the coupling. To facilitate this process, you can pre-treat these connections with lubricant. After removing the tip from the coupling, a new one is screwed in its place, do not forget that it must be screwed in until the previously measured size is obtained. The second one is replaced in the same way.
After completing the replacement of the tips, you must carefully and tightly tighten the clamps, install the rod in place, tighten the nuts with the required torque and tighten them.
Replacing steering rods and ends with your own hands is within the power of every driver if desired.
Hello, dear car enthusiasts! There is probably no point in explaining to the driver what the car’s steering is intended for. We are sure that you drive modern cars that have a steering wheel, and not levers like in a tank.
If we build a logical-mechanical chain, we will see: a steering wheel - a worm gear or steering rack - and, finally, a steering gear (trapezoid). The steering drive consists of steering rods, and it is the replacement of the steering rod that is the main issue of today’s material.
It is not a fact that you will use the knowledge you have acquired and will, without exception, begin to replace the tie rods and tie rod ends with your own hands. Not everyone wants or can. However, knowing how to replace a tie rod and when to replace tie rods or ends is essential.
At least so that the very “scrupulous craftsmen” of car services who are sorely short of money do not “hang electrical wiring on your ears.” And they take advantage of the naivety of car enthusiasts. Let the real pro masters not be offended by us.
Diagnostics before changing steering rods
Food for thought: you should know that the most common and typical malfunction of the steering drive is failure (wear) of the ball joint of the tie rod ends.
And yet, some “Kulibins”, from old memory, use a repair method such as restoration of steering rods. This is, of course, a personal matter for each driver, but it’s worth counting your money: how long will it take for the restored steering linkage to last, will all factory parameters be met during restoration, and how much money will the restoration cost?
Wouldn't it be easier to buy a factory steering rod, since the time of shortages for spare parts is long over? And replace the steering rod yourself.
How do we know if there is a steering problem? Elementary. Our hands on the steering wheel and our ears will tell us that it’s time to diagnose the steering.
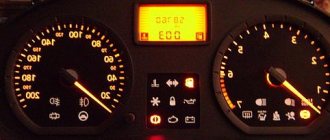
Typical signs of a faulty steering system in general:
- various abnormal knocking noises - glitches in the steering;
- characteristic beating of the steering wheel;
- increased play in the steering wheel: play when the steering wheel is swayed vertically indicates a faulty wheel bearing or ball joint, play when swayed horizontally indicates a faulty steering tip;
- the steering wheel became difficult to rotate;
- The car begins to change its forward direction while driving.
One of these signs is present, which means it’s time to diagnose the steering.
When diagnosing on your own, or making an initial diagnosis, pay attention to the following characteristic points:
- the movement of the steering tips along the axis of the fingers should be no more than 1.5 mm. The assistant turns the steering wheel, and you use your fingers (by touch) to determine the presence of play on the ball joints. There is play or knocking - the tip with the hinge needs to be changed.
- Check the tightness of the adjusting clutch clamp on the side link.
- Check the serviceability (absence of mechanical damage) of the protective covers of the ball joint of the tip. There are cracks and tears, the cover needs to be replaced.
How to remove and replace steering linkage
Let's start with the fact that you must purchase rods complete with tips. It's up to you, but it is advisable to change both tips so that after a while you do not have to return to replacing the old tip that was left behind. Dubious savings.
In order to remove and replace the steering rod, you will need a set of tools and accessories: a jack, “goats” for safety, a steering rod puller (if the puller is a problem, then the craftsmen use a hammer and a small “pry bar”), pliers, wrenches, screwdriver and universal technical fluid WD-40.
So, let's start replacing the steering rod:
- Jack up the car and put the jack up. Remove the front wheel.
- Unscrew the pin nut and unscrew it.
- Install the puller and, having tightened its nut all the way, sharply hit the eye of the swing arm with a hammer. If the finger does not come off, repeat the procedure: tighten the puller nut and hit it with a hammer.
- Completely unscrew the steering linkage from the coupling. WD-40 will come in handy if the threads are rusty.
- Remove the boot and unscrew the rod from the steering rack.
- Before installing a new rod, attach it to the removed old one and make a mark along the old mark on the new rod. This is necessary for this. To tighten it to the mark and get to the breaker normally.
- We install the new rod in the reverse order, preferably without a hammer.
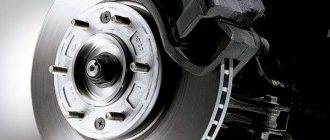
Features of the design of the steering tip
The rod is attached to the steering rack rod using an internal tip, and to the middle link of the trapezoid - using a swivel joint. The rods are connected to the steering knuckle lever through the outer steering tip. Internal tips and ball joints ensure the mobility of the rods in the vertical plane - otherwise the rods would break off when the car drives on uneven surfaces. The external tip ensures the mobility of the rod and the wheel in any plane - so the drive can operate normally on turns and potholes without damage.
Steering rods and ends
The design of the tip resembles the structure of a human joint: the sphere of the finger rotates inside a hemispherical body with a Teflon, caprolon sleeve or lubricant, which eliminates the friction of metal elements and allows the finger to deviate at a certain angle. The entire hinge is protected by a rubber boot. This design allows you to accurately connect the fixed and moving elements of the steering drive.
In general, the steering tip is a reliable, wear-resistant element: the fingers are made by casting or stamping from special steels, the ball parts are carefully ground, wear-resistant anti-friction materials are used as liners, the body is injection molded and anodized to further protect against corrosion. There is nothing to say about traction.
So why do these reliable elements force drivers to go to the service station from time to time?
Scheme of operation of the tie rod end
How and why steering rods break
The tie rods themselves never wear out, unless the car sits on the street for an eternity and simply rots. Usually the driver “helps” the rods: he suddenly flew onto the curb at speed, hit a stone - the rod was bent. Actually, corrosion and deformation are all possible malfunctions of steering rods.
However, bent rods cause other troubles - wheel alignment, wheel steering angle are disrupted, tip boots are torn, or the entire tip is torn out. Therefore, if you come across something impressive, just in case, go to a service station and check the geometry of the rods. If one rod is bent, both will have to be replaced.
Why do tie rod ends break?
The condition of the steering tips depends on one factor - the driver: how he drives, at what speed, and how carefully he monitors the steering system. Well, and also from the condition of the roads, because no one is safe from “suddenly flying into a hole in the dark.”
Therefore, the first enemy of steering tips is “beautiful” roads and the driver who drives on them. Due to strong impacts, not only do the rods bend, but the fixing nut simply loosens—the consequences of this are clear. In addition, a strong blow breaks the anthers, displaces the sphere, and it, in turn, breaks the bushing.
A torn boot is enemy number two. Yes, yes, the boot again (sometimes you get the impression that this is generally the most important element in the system). Through a torn boot, water and dirt will enter the ball, the metal elements rust, the dirt acts as an abrasive, and the water gradually washes away the lubricant.
How do handpiece malfunctions manifest?
We have already mentioned more than once that malfunctions of different elements and components of the steering can manifest themselves in the same way: backlash, knocking, vibrations, tight or loose steering wheel, beating in the steering wheel.
You can assume that something is wrong with the tie rod ends if:
- when driving, it “gives” the gas pedal;
- a quiet and frequent knock in the wheel area when turning the steering wheel and when the car is driving on an uneven road;
- the steering wheel turns too easily;
- There is no way to adjust the wheel alignment.
To be 100% sure that the tips are worn out, you need to lift the car or put it on a pit and swing the rods up and down - the gap should not be more than 1.5 mm. You can ask a friend to turn the steering wheel and watch the movement of the tip - it should not dangle in the seat.
IMPORTANT! Some drivers still take the risk of restoring them rather than changing their steering ends. Undoubtedly, now this is a very technological process. However, we do not recommend restoring such an important part. The fact is that workshops change the bushing - i.e. “fill” with new anti-friction material (the bushing is designed for the new sphere). Meanwhile, the working surface of the finger sphere has already worn out. To fit the hemisphere and sphere, the new bushing is pressed. It turns out that on a cold car the steering wheel is a little tight, but on a warm car the tip still knocks. In a word, the game is not worth the candle.
Replacement of tie rods and ends
So, we made sure that the tips were loose. Or the rods are bent. Or both. In general, you will have to change.
How to do it:
- First, jack up the car, remove the front wheels, and lock the steering wheel.
- We loosen the fixing nut with which the tip is screwed to the rod.
- If there is a cotter pin, remove it from the tip pin nut (a cotter pin is a fixing element, similar to a woman's invisible hairpin).
- Unscrew the nut that secures the tip to the steering knuckle (on the pin).
How to independently adjust wheel alignment on a car
Correct wheel alignment plays an important role in every passenger car. At the slightest deviations in camber or toe, increased fuel consumption and accelerated tire wear occur. For residents of large settlements, numerous car services will offer wheel alignment. But what about those motorists who live far from civilization? They should learn how to do their own wheel alignment.
Any experienced motorist who started driving in Soviet times did most of the maintenance work on his iron horse himself or with the help of neighbors and acquaintances. In domestic cars, wheel alignment was established using simple measuring devices. Modern cars are characterized by greater accuracy during adjustment and some difficulties in operation.
Basic parameters for installing wheels
If a motorist needs to do a wheel alignment with his own hands, he first needs to determine those connections in the suspension that affect the change in tire orientation. Many work on replacing suspension parts involves subsequent adjustment of the wheel alignment. For example, replacing a ball joint, steering rods and ends, and a shock absorber cannot be done without at least a simple check of the main dimensions. Then you will be able to save the tires until your next visit to the service station.
You should not install wheel angles if there are faults in the car’s suspension. Only after replacing all damaged parts and assemblies can you begin to adjust the wheel alignment.
Wheel alignment indicators
Camber and toe are two different parameters.
- Camber is usually called the angle connecting the plane of rotation of the wheel and its vertical. Positive camber occurs when the top of the wheel protrudes outward relative to the bottom. With negative camber, the top points towards the inside of the car.
- Wheel toe is the angle that connects the plane of rotation of the wheel and the direction of its movement. With correct toe-in, the wheels are parallel or the front of the wheel is slightly turned inward of the car.
Important parameters for steered wheels
The front suspension has a number of differences due to the need to turn the wheels. There are several additional options here.
- An important indicator is the longitudinal angle of inclination of the rotating axis of the wheel (caster). This angle connects the projection onto the longitudinal plane of the wheel's turning axis and the vertical. A properly adjusted caster is responsible for the spontaneous alignment of the wheels at speed. The optimal longitudinal tilt angle is 6 degrees.
- The transverse angle of inclination connects the vertical projection of the wheel's turning axis and the transverse plane.
These parameters are usually not adjustable; they depend only on the serviceability of the chassis parts.
Wheel alignment technology
The adjustment occurs in two stages. First you need to set the camber angle, and then adjust the toe.
Setting the Camber Angle
To set the camber angle with your own hands, you need to install the car on a flat platform (preferably with an inspection hole), prepare accessories such as a ruler, a plumb line and chalk.
The technology for adjusting wheel camber is as follows.
- First, the wheels are aligned in a strictly straight direction.
- Make two marks with chalk on the top and bottom of the tire.
- A plumb cord is applied to the car fender, which should hang motionless parallel to the plane of the wheel.
- Now you need to measure the distance from the cord to the rim of the disc. The difference in measurement should not exceed 3mm.
- The next step is to move the car forward to rotate the marks at an angle of 90 degrees. After this, the measurement procedure is repeated. This will allow you to obtain more accurate arithmetic averages.
- To adjust the camber, you need to remove the wheel, loosen the bolts securing the steering knuckle and shock absorber strut.
- Now, depending on the measurement data, it is necessary to move the steering knuckle inward or outward.
- After this, the bolts are tightened, the wheel is installed in place and a control measurement is carried out.
Thanks to these actions, it will be possible to achieve the correct camber of the wheel. For rear-wheel drive cars, errors are allowed within the range of +1...+3 mm, and for front-wheel drive cars this figure is limited to the range of -1...+1 mm.
Wheel alignment installation
To adjust the toe angle, a telescopic ruler is required. A prerequisite is the presence of a flat surface and the straight position of the wheels.
- Work begins by placing chalk marks in the form of dots on the inside of both tires (front), close to the rim.
- The telescopic ruler is installed so that its ends touch the points on the tires, but the measuring tool does not touch the machine parts. In this position, the ruler is fixed and a measurement is taken.
- After this, the car rolls forward so that the telescopic device moves back without touching any suspension elements.
- Now all that remains is to check the readings obtained and compare them with the measurement in the front part.
- If the distance between the tires has decreased, the tie rods should be shortened. As the distance increases, it is necessary to lengthen the rods. To make adjustments, you must first loosen the locknuts located near the steering tips. After setting the toe angle, do not forget to tighten the nuts.
Carrying out simple adjustments with your own hands will allow you to approximately set the wheel alignment at home. If, after installing the wheels, the car pulls to one side while driving, bad “rolling” is observed, and the outer or inner side of the rubber wears out before your eyes, you should contact a service station for more precise adjustments.
There are three options for getting out of this situation
The first option is to cut off the nut with a grinder.
The second is to place a second jack under the tip itself and press the steering tip pin to the steering knuckle.
Since it is conical, it will clamp and you can further unscrew the nut.
If you don’t have a grinder or a second jack, you can place a stump or some kind of stand under the steering tip and slightly lower the jack on which the car is currently standing.
Since I have a second jack, I will use it, try to press the steering pin a little against the steering knuckle and unscrew the nut.
There is no need to lift the car too much. The spring is pressed in a little and this will be enough for the nut to unscrew.
If the nut still won't come off, you can try heating it with a portable gas torch.
In my case, the nut does not budge; the bolt rotates inside the tip itself. You'll have to use a grinder.
In general, when repairing the suspension, you should always have an angle grinder on hand, because very often many bolts either turn or fail to turn.
The nut and bolt should be cut lengthwise, since if we also have to use a puller to press out the tip itself, we will need the rest of the bolt.
If we cut under the nut, then there will be nowhere to press with the puller itself.
Next you need to unscrew the locknut that holds the steering rod itself. The nut is located at the end of the tie rod. It can be unscrewed with an open-end wrench.
It unscrews clockwise; just loosen it a little.
The locknut has been unscrewed, now we knock out the steering tip bolt, you can knock it out with a hammer by hitting it a little.
If it doesn’t work, then you can’t knock anymore, since his hat will become flat and in the future simply won’t fit into the hole, you’ll also have to cut it off with a grinder.
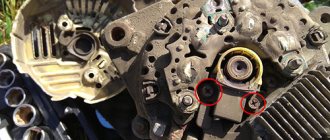
In order to easily dismantle the steering tip, there is a puller that fits onto the steering knuckle.
There is a bolt in it, it presses on the bolt of the steering tip itself. We tighten the bolt on the puller and thus squeeze out the steering tip.
As you can see, the steering end came out very easily, all that was left was to unscrew it. It unscrews by hand from the tie rod without any problems.
Now we can determine which tie rod we need.
We go to the store and buy two tie rod ends. Why two?
Because they are the same, they drove along the same road, worked in the same conditions and they have the same resources.
If one tip knocks, then the second one will either knock soon, or is already knocking, which is why we buy two at once - left and right.
They are different from each other. The steering tip is sold from the factory already filled with some kind of grease.
But, as a rule, very little is put there, so I always add my own lubricant. It's better to have a lot of lube than for him to die very quickly.
In the steering tip boot I will add the paint that is used for the steering racks. It can also lubricate bearings.
I think it won’t be a big deal if I add it to the steering tip boot.
To press it into the steering tip boot, I squeeze a little of this lubricant into a syringe; it has a poisonous green color.
Since the boot on these steering tips cannot be removed, I simply lift it up a little so that some space appears, and use a syringe to press the lubricant inside.
For convenience, you can use pliers to slightly flatten the nose of the syringe, so it will easily fit under the rubber band.
I added about 5 ml of this lubricant inside the boot. That's it, the tip can be installed in its place.
First, slightly lubricate the threads and the cone where the tip bolt itself is inserted, so that later there will be no problems with dismantling.
We extend the tip onto the tie rod. We assemble in the reverse order and be sure to check the length by which the steering tip protrudes.
I check how well he performs. I measured it by bolt, I had 25 cm and 8 mm, but now the steering tip is twisted 3 or 4 mm inward.
That is, I only tightened it to the stop nut, just like it was, but I twisted it. I turn it back one turn and measure it again.
But, as you can see, this is not enough, that is, you need to unscrew probably two or three more turns. Now 25 and 8 mm along the edge of this thread from the clamp. You can clamp it.
So, guys, count how many turns, how many revolutions you have turned, it is best to measure it with a tape measure from the boot. This will be for sure.
When you put everything back together, you measure exactly how long the tip should extend and thus.
You most likely won’t have to do a wheel alignment; you can still drive like this.
To tighten the steering tip nut, you need to push it up a little. Thus, the cone will jam and will not turn.
That's all, all that remains is to tighten the nut and locknut.
When tightening the locknut, the steering end must be held by the special edges with a second wrench.
This is done to prevent it from turning and to prevent the boot from being crushed. The wrench is placed on the edge of the tip and the nut itself is tightened.
All is ready. This is how the steering tip is changed.
That's all, see you soon!