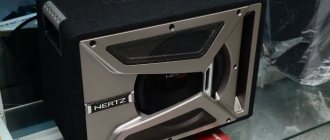
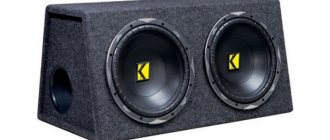
A subwoofer is a good addition to a car's sound system. But it’s worth considering that buying an expensive subwoofer does not guarantee high-quality sound, since this device needs to be properly configured. To connect and configure a subwoofer properly, you must not only have good hearing, but also a deep knowledge of car audio theory.
Of course, before setting up a subwoofer in a car, it is best to seek help from specialists, and for those car enthusiasts who want to do it themselves, this article will be useful.
Where to start setting up a subwoofer?
Setting up a subwoofer begins from the moment the box is manufactured. By changing the characteristics of the box (volume, port length) you can achieve different sounds. In this case, you need to know in advance which audio files will be primarily played in the car, as well as which amplifier will be connected to the audio system. When the subwoofer is already supplied in a manufacturer's housing, the flexibility of configuration is, of course, limited, although if you have the necessary knowledge, it is quite possible to achieve the desired sound quality.
One of the important factors affecting sound quality is the amplifier; we recommend that you read the article “How to choose an amplifier.”
Setting up the LPF (lowpass filter) filter
First, you need to set up a low-pass filter (LPF). Every subwoofer today has a built-in LPF filter. The filter allows you to select the threshold at which it begins to block high frequencies, which allows you to naturally mix the subwoofer signal with the signal from other speakers.
Installing a filter, like setting up an active subwoofer, consists of many experiments - there is simply no specific correct “formula”.
The subwoofer is designed to reproduce low frequencies; it cannot sing; this is the task of the speakers. Thanks to the LPF low frequency filter, we can make the subwoofer play bass. You need to make sure that the filter value is not set too high and that the subwoofer does not overlap the woofers of your full range speakers. This can result in over-emphasis on one frequency range (say around 120 Hz) and the speaker sounding unclear. On the other hand, if you set the filter too low, there may be too much difference between the subwoofer signal and the speaker signal.
The playback range of a subwoofer is usually from 60 to 120. Try setting the LPF filter at 80 Hz first, and then test the sound. If you don't like it, adjust the switch until the speakers sound the way you want. On the radio itself, the filter must be turned off.
Setting up a subsonic
Next, you need to activate the infrasonic filter, which is called “sabsonic”. Subsonic blocks the ultra-low frequencies that occur naturally in some songs. You cannot hear these frequencies because they exist below the threshold of human hearing. But if they are not cut, the subwoofer will waste additional energy to reproduce them. By blocking infra-low frequencies, the device will be able to more effectively reproduce exactly those frequencies that are within the audible range. Moreover, in this case, failure of the subwoofer coil due to the accelerated movement of the diffuser is eliminated.
What is Bassboost for?
Many amplifiers also include a Bassboost switch, which can increase the power of the subwoofer by setting a specific frequency. Some motorists use the switch to make the sound more "saturated", although, as a rule, it is used to distribute bass evenly. If you set the switch to the maximum value, the subwoofer may burn out; however, you should not turn off Bassboost completely, because in this case the bass may be completely inaudible.
Setting the input sensitivity (GAIN)
Some motorists do not understand how to properly adjust the input sensitivity. Input sensitivity indicates how much signal can be applied to the input to produce the rated output power. It must be adjusted to normalize the input signal voltage.
It is very important to set the input sensitivity correctly to avoid signal distortion, poor sound quality, or damage to the speakers.
To set "GAIN" you need
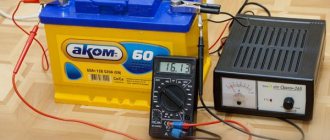
- digital voltmeter, which can measure AC voltage values;
- a test CD or file on which a sine wave is recorded with an initial level of 0 decibels (it is very important not to use a weakened test signal);
- instructions for the subwoofer, which indicate the permissible output voltage.
First you need to disconnect the speaker wires from the subwoofer. Next, you need to make sure that the bass, equalizers and other settings on the head unit are turned off to get clear sound. The level of input sensitivity should be minimal.
Make sure the digital voltmeter can read AC voltage and connect it to the speaker terminals on your speakers (you can secure it with a screwdriver). After this, you will have to turn the sensitivity “twist” until the voltmeter shows the required voltage value, which was indicated in the specifications.
Next, you need to feed the recorded audio file with a sine wave to the subwoofer, changing the volume of the audio system from time to time until interference appears. If interference occurs, the volume must be restored to its previous value. The sensitivity is adjusted in exactly the same way. To obtain the most accurate data, you can use an oscilloscope.
Acoustic phase
Most subwoofers have a switch on the back called "Phase" that can be set to 0 or 180 degrees. From an electrical point of view, this is the second simplest thing after the on/off switch. If you set the power switch to one side, then two conductors will carry the signal from the output to the rest of the electronics in one direction. Just flip the switch and the two conductors change position. This means that the shape of the sound will be reversed (which is what engineers mean when they talk about reversing the phase, or switching it 180 degrees).
But what does the average listener get from adjusting the phase?
The fact is that by manipulating the phase switch, you can achieve the highest perception of mid and upper bass while listening. It is thanks to the phase shifter that you can get all the bass you paid for.
In addition, the phase tuning of the monoblock helps to achieve front-facing sound. It often happens that the sound is distributed unevenly throughout the cabin (music can only be heard from the trunk).
Delays
Subwoofers tend to have small delays, and they are directly proportional to the size of the distance. For example, speakers from the American manufacturer Audissey deliberately set a greater distance to prevent this delay. It is worth noting that tuning the amplifier for a subwoofer manually is only possible if there is an external processor or a built-in processor. A sign that the subwoofer is causing delays can be considered delayed bass, which sometimes spoils the sound. The purpose of the delay setting is to achieve simultaneous playback of the subwoofer and the front speakers (the sound should not be delayed by even a couple of seconds).
HPF / LPF (HPF / LPF)
Hight pass filter (HPF), also known as a high-pass filter (HPF), filters out (cuts off) low frequencies, leaving high ones.
When setting up a subwoofer amplifier, set the control to about 20 Hz to cut out infrasound and not waste energy, since you won't hear it anyway. For mid-range speakers, the HPF is set around 80 Hz to remove the low frequency range for which the speaker is not designed and will not be able to play it. If you have separate channels or even a separate amplifier for tweeters (tweeters), the HPF is set in the region of 3000 - 5000 Hz, depending on the model, so as not to burn them.
All figures given are approximate, to obtain more accurate and safe values, study the characteristics of your speakers!
Low pass filter (LPF), also known as a low pass filter (LPF), is the opposite of HPF and cuts off the upper frequencies, leaving the lower ones.
For subwoofers, it is set in the region of 50-80 Hz, depending on the type of design (ZYA, FI, etc.) in order to cut off frequencies for which the subwoofer is not intended. The same goes for midrange drivers, cut them around 1400-1600 Hz.
If possible, you can limit tweeters to 20,000 Hz, but this is not necessary.
Why is it important to pair subwoofers and midbass correctly?
If the subwoofer is poorly connected to the midbass, the sound will be of poor quality and incomplete. This is especially noticeable at low frequencies, when instead of pure bass you get some kind of nonsense. Sometimes such disastrous scenarios are possible, when the sound from the subwoofer will play independently. In fact, this applies to all types of music, and not just, say, classical or rock music, where “live” musical instruments are played.
For example, in tracks that belong to the EDM genre, which is so popular among young people, the brightest bass is located precisely at the junction with midbass. If they are connected incorrectly, then the low-frequency loud bass will, at best, be less impressive, and at worst, it will be barely audible. Since the amplifier must be tuned to the same frequency, it is recommended to use an audio spectrum analyzer to obtain the most accurate data.
Setting up an amplifier for a Fusion subwoofer
The Subsonic filter is responsible for the reproduction frequency of the low-frequency speaker system. Its installation is carried out by turning the corresponding regulator. Adjusting this unit allows you to remove the so-called spurious frequencies. They are located in an area of the sound range that is no longer audible to the human ear. These infra-low overtones can cause damage to the woofer cone. If the housing has a graduated scale in Hertz, then the optimal adjustment will be a frequency level five positions lower than the resonant frequency of the speaker system.
Sensitivity adjustment is also made for the slot and is marked “GAIN” or “LEVEL”. Some people incorrectly think of this as the volume level of the speaker system, but this is not the case. This tunable unit is a matching device between the car radio and the low-frequency system. In order to set it correctly, there is a simple technique:
- The controls on the radio and amplifiers are set to minimum.
- A piece of music is played.
- The volume level of the radio increases until distortion occurs.
- The volume is reduced to the threshold of clear sound.
- The amplifier volume is increased until distortion occurs.
- The volume is reduced until clear sound appears.
How do you know if you have configured your subwoofer correctly?
If the subwoofer is connected correctly, then people in the car simply cannot hear it, since it should not interfere with the main signal. If you listen to music at low volumes, it may seem that there are not enough bass frequencies. The absence of bass at low volumes is a sure sign that the subwoofer was connected correctly. Of course, there should be no noise, distortion or delay in the audio signal, and it makes no difference what type of design is used. The percentage of bass in each track must be different, that is, the playback must completely match the original track recorded by the producer.
The next article we recommend reading is called “How does a subwoofer box affect the sound?”
How to avoid common mistakes
Many car owners believe that if the diffuser is actively moving and almost “jumps” out of the speaker, then this indicates that the bass is correctly adjusted. In fact, everything is completely different. This means that you are having problems setting up the low pass filter. If you adjust it, the sound will become much clearer and more elastic, and the buzz will disappear.
Another mistake is the location of the oval speakers and subwoofer at the rear of the car. It is important not to overdo it in this matter. Oval speakers themselves produce rather low sounds, so if you place them next to a subwoofer, you will greatly lose the richness of the bass.
Do not configure the subwoofer in such a way that listening to music in the car will be harmful to your health.
It is difficult to give universal instructions for adjusting a car's sound system - everything depends too much on personal preferences. However, by following the above rules, you will achieve good sound and only then you will be able to adjust the acoustics with your own hands to individual requirements.
Setting up the subwoofer
1) Set the volume knob on the subwoofer to minimum.
2) Set the cutoff frequency knob on the subwoofer to 50 Hz (or 10-20 Hz lower than the lower limit of the frequency range of your front speakers).
3) Turn on a soundtrack with a good low-end level (for example, a test disc - “music for the subwoofer” - Deep Bass (2004) or rap, hip-hop, etc.). Raise the subwoofer's volume using its volume knob to a level approximately equal to the volume of the front speakers. Turn off the soundtrack.
4) Next we need a test disc with a list of frequencies of the AudioDoctor FSQ type. On it, the frequency value is sequentially pronounced by voice and the tone is heard. The sound volume should be neither low nor too loud. At the volume level of a normal conversation.
First, we go through the entire range of frequencies from 20 to 200 Hz to identify frequencies at which the level is either too loud or too quiet, we determine the frequencies at which resonant phenomena occur (rattling of glass, humming of furniture walls, etc.).
If the volume level, starting from 20 Hz, goes more or less evenly, then decreases around 40-90 Hz, and after a few more frequencies (for example, 110 Hz) the volume rises again to a normal level, then you need to increase the cutoff frequency of the subwoofer to value after which the level begins to go normally again (in this case it is 100-120 Hz).
Go through the range of frequencies from 20 to 200 Hz again. Adjust the volume level, and maybe the cutoff frequency of the subwoofer filter. And so on several times until the volume levels become fairly uniform.
What phenomena can you observe when passing through the range?
a) Frequencies of 20-40 Hz are not audible at all, but other frequencies are audible normally. This is the subwoofer's bandwidth limitation (look at its instructions in the "Specifications" section).
b) Objects in the room resonate at certain frequencies. Identify these items and, if possible, remove or neutralize them. You can hang heavy curtains on rattling windows. And, if the frames are old wooden, “plant” the glass with sealant.
Try experimenting with the placement of the subwoofer, testing each movement by listening to the frequency range 20 - 200 Hz.
5) After all the settings have been made, you need to turn on music playback with deep bass. If the bass is too loud, distorted and/or unclear, you may need to reduce the subwoofer volume until the distortion stops. You can try reducing the dynamic range of the bass (if your subwoofer has a bass dynamics switch). You can cover the walls, floor, and ceiling with sound-absorbing surfaces. If the subwoofer has a bass reflex at the back, then you need to move the subwoofer away from the wall to reduce the amount of bass; to increase it, on the contrary, move it closer.
6) Next comes regular jazz orchestral music, then symphonic music, electronic, rock, movies with explosions, etc. and checks to see if there is too little or too much bass. If it’s low, the subwoofer volume level increases slightly; if it’s high, it’s the opposite. You can try increasing or decreasing the dynamic range of the subwoofer.
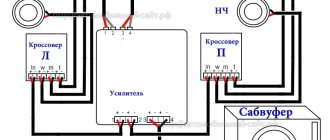
When connecting a subwoofer through the “speaker” inputs (bypassing the built-in amplifier):
— when connecting a subwoofer parallel to the front speakers, you should adjust the low-pass filter of the front channels or in the subwoofer itself (if it has a customizable low-pass filter at the “speaker” input);
- when connected to a separate external subwoofer amplifier, a low-pass filter is used either in this amplifier (amplifier channel), or in the subwoofer itself, a low-pass filter is used at the “speaker” input.
Gain\Level
Gain (sensitivity) is often confused with volume, but this is not entirely correct.
Gain is an adjustment of the amplifier's input sensitivity to match the radio. But let’s not get into the weeds and consider this setting from the point of view of what is useful for the user.
Sometimes the Volts (V) value indicated on the regulator can be misleading. The fact is that sensitivity is measured in Volts. The smaller V, the higher the sensitivity, the louder the speaker will play and vice versa.
To begin with, it will be useful to watch a clear video about how gain works on an amplifier:
Adjusting gain by ear (method 1)
Having a good sub link, do not use an equalizer and various bass enhancers, forget about bassboost on the amplifier - so before adjusting the gain, make sure that all this is turned off!
Set the control to minimum and play music that you usually listen to. Turn up the volume of the radio by 3/4 of the maximum; if you hear distortions in the sound of the subwoofer earlier, stop and turn down the volume a couple of notches. Go to the amplifier. Have an assistant slowly turn up the gain control until new distortion appears, and when you hear it, stop the rotation and turn it down by 10%.
Adjusting gain by ear (method 2)
If you don’t trust your hearing and are afraid not to hear changes during time, then use a more accurate method - using sinuses.
If you are tuning a subwoofer, then use 40 Hz, if your case is tuned above 40 Hz or you have a closed box, then take 50 Hz (download sines in the Downloads section). To set the gain for the midbass amp, use 315 Hz.
Sine or tone (in our case) is a tone signal of a certain frequency, changes in the sound of which you can easily hear
Set the gain to minimum, turn on your sine and turn up the volume of the radio. When changing the sound of the tone signal, stop and turn it down a couple of notches (set the maximum volume limit to this value if your radio has such a function). Go to the amplifier. Similarly to the first method, add gain. When the sound changes, stop and turn it down 10%.
Adjusting Gain Using a Multimeter or Oscilloscope
Adjusting the gain level using instruments is a smart and precise adjustment. At the same time, neither the speaker nor your ears are strained. This setup is shown in detail in the video on our YouTube channel:
Please note that when setting with a multimeter, you must be sure of the power declared by the amplifier manufacturer.