04/30/2021 3,457 Light and sound devices
Author: Ivan Baranov
The purpose of the brake light is to warn drivers behind you about braking. It should turn on as soon as the brake pedal is pressed. If the stop is faulty, it can cause an accident. The article discusses the brake light, the principle of operation, typical malfunctions, methods for eliminating them, and provides instructions for replacing them yourself.
[Hide]
where is the switch, frog and repeater located
The purpose of the brake light is to warn drivers behind you about braking. It should turn on as soon as the brake pedal is pressed. If the stop is faulty, it can cause an accident. The article discusses the brake light, the principle of operation, typical malfunctions, methods for eliminating them, and provides instructions for replacing them yourself.
Content
[ To uncover]
[Hide]
The principle of operation of the brake light
The brake lights are located at the rear of the car. Red lanterns. They light up automatically if the driver brakes. When the driver takes his foot off the brake pedal, they are also automatically turned off. The presence of stops is mandatory for vehicles.
What to do if the brake lights on a VAZ 2110 do not light up and repairs
Let's consider the causes and possible ways to eliminate problems with brake lights in a VAZ-2110 car. It is worth noting that solving this problem will only require knowledge, time and a little experience, so before contacting a service station, you can try to solve everything on your own.
Advantages of brake lights VAZ-2110
Unlike old VAZ models, where the sensor that turned on the brakes was closed from pressure, liquid or gas directly when the brake pads were activated, on the 2110 model the sensor is located on the brake pedal, and thus the lights come on at the slightest press on the pedal even before braking, giving road users a little advance warning.
Common problems with brake lights
Stop lights are constantly on
Another common problem is that the lights refuse to turn off. Some vehicle models use a brake light switch configuration that allows the switch to return to its normal position when the brake pedal is depressed. Pressing the brake pedal releases the switch to turn on the brake lights. When a switch wears out or becomes out of position, it can cause the light to stay on.
Troubleshooting brake lights that won't go off:
- Press the brake pedal with your hand and observe how the pedal movement relates to the operation of the brake light switch. You may only need to reconfigure the switch to resolve the issue.
- To make adjustments, disconnect the connector and turn the switch to move the sensor contact, depending on your specific situation. Place the contact so that you don't have to press the pedal too hard before the brake lights come on.
- You want the light to turn on with a light pedal motion.
- Also, see if the position of the switch can be adjusted. You may only need to move the switch back to the correct position relative to the pedal.
- Another possibility is that the internal switch mechanism is worn out and the switch needs to be replaced. If necessary, consult your vehicle's repair manual or replace the worn contact block.
Good luck with the diagnosis
If you notice that your brake lights aren't working, start diagnosing them with the most common problems. Troubleshoot blown fuses, worn brake light switches, and burned out light bulbs. This can lead to short circuits, poor connections and damaged wires. This guide will help you quickly identify the cause of the problem so you can get back on the road safely.
conclusions
As you can see for yourself, there is nothing complicated in independently checking and diagnosing brake lights on a Renault Logan, but remember one thing: the solution to all incoming problems should be solved from the specific to the general. Therefore, you should not “disrupt” the entire wiring system if only one light bulb does not work, because 98% of the reason is hidden either in the light bulb itself or in what surrounds it. And by using our instructions, the time needed to find the global cause of the malfunction will be significantly reduced.
Why don't the reverse lights come on?
There are several reasons why the lamps in the reversing lights may not light:
- The fuse protecting the power supply circuit for the reversing lamps has blown. The breakdown is visible visually; you just need to pull the fuse out of the block.
- The lamps have burned out . To check the functionality of the lamps, they should be removed one by one from the lantern and make sure that there is no break in the spiral using an ohmmeter (multimeter) or a continuity tester.
- Wiring is damaged . You can also check it using a multimeter and a continuity test, but finding a break will be much more difficult.
- Poor contact of wires with the terminals of the reverse sensor . The check should begin with a visual inspection and cleaning of dirt and oxides. Then you can use a multimeter to measure the resistance of the circuit.
- There is a short circuit in the power wires . You can check the absence or presence of a short to ground wire with a continuity tester or a multimeter.
- The reverse sensor of VAZ 2107 is broken . You can check it with a continuity tester or a multimeter. Visually, the malfunction is expressed in the fact that the reversing lights either do not turn on at all or are constantly on.
The brake light on the VAZ 2110 does not work
Driving out onto the road with such a problem is prohibited by traffic rules. This will create problems not only for you and your car, but also for other road users. This model provides monitoring of the status of the brake light lamps; when a malfunction occurs, the signal lamp flashes. However, work stoppage can be caused by other reasons. That's what we'll talk about in this article.
A failure can occur on the way, the service is far away, but you need to continue moving. Therefore, any driver should know the approximate causes of failures and what to do in this case. For in-depth testing, it is advisable to have an autotester or multimeter. In extreme cases, a control light can help out. It is advisable to print and carry with you a list of fuses and the circuits they protect.
Where to start checking
The power supply circuit for the brake light lamps is protected by 7.5 Ampere fuse F17, but in addition to them, it also powers interior lighting lamps, ignition switch illumination, a clock or a computer. In the event that all this does not work, you should check this protective device. If a fuse is blown, try to determine the cause of the failure before installing a new one. If there is a short circuit in the circuit, then burnout will occur indefinitely until the cause of the short circuit is found and eliminated.
Next, you should check the serviceability of the brake light switch, which is installed on the brake pedal bracket. One of the two suitable wires must have on-board voltage. It can be checked with a device or a test lamp. If there is power, check the operation of the switch. To do this, disconnect the wires from it and connect them together with a piece of wire, after which you can see whether the lamps are on or not. The appearance of light will confirm the failure of the switch; its absence suggests continuing the search.
What else to pay attention to
Very often, the appearance of such malfunctions occurs due to the fault of the rear lights, or more precisely, in the places where the connectors with wires and lamp sockets are connected. Using a measuring device or a test lamp, check the presence of power at the rear light connectors with the brake pedal pressed or the wires on the switch connected to each other. If it is missing, you should carefully check the condition of the wiring harness.
Oxidation of contacts in connectors or sockets of electric lamps can be removed using available means. It is not advisable to use sandpaper for this, even very fine sandpaper. Alcohol-containing liquids are best suited for this, as they remove the resulting oxidation.
Share this article with your friends:
helping-auto.ru
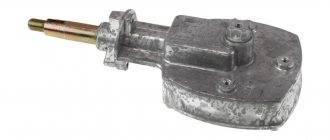
How to change the reverse sensor on a VAZ 2107
Before replacing the sensor, it is advisable to clean the gearbox of dirt. If this is not done, it may get into the oil, which is located in the crankcase. Replacement of the VAZ 2107 reverse sensor is carried out in the following sequence:
- disconnect the wire tips from the sensor contacts;
- Using a 22mm wrench, unscrew the old sensor from the gearbox, removing it along with the metal washer;
Note: if the sensor is “stuck” and cannot be unscrewed with a wrench, you can try to unscrew it using a chisel and hammer. However, this must be done with extreme caution so as not to damage the gearbox housing, which is made of a fragile aluminum alloy.
- clean the sensor seat;
- put a new washer on the new sensor and screw it into the gearbox using a 22mm wrench;
- Place the wire ends on the sensor contacts.
Now you know how to change the reverse sensor on a VAZ 2107. After installing the new sensor, pay attention to how tightly the wire tips fit on the sensor contacts. They should not dangle or fall off. If necessary, tighten the tips using pliers.
It is a good idea to clean the tips before placing them on the sensor contacts. This way you can be sure of reliable contact on this connection.
Pro Tips
To quickly eliminate a malfunction that is discovered during a trip, you can proceed as follows: if the breakdown concerns a device that consumes electricity and does not have a particular impact on traffic safety, then you can temporarily turn off the problematic device.
The circumstances should be taken into account - the distance of the upcoming trip and the importance of the device.
Experienced motorists recommend always having an on-board electrical circuit diagram with you. It will be required even if you turn to professionals for help, because as a result of constant improvement in car design, there may be differences in the designs of different series of the same model range.
The diagram is an excellent information source that will help you decide on the algorithm of actions, give you a hint about which circuits need ringing, and which fuses you should pay attention to first.
Another useful tip: when going on a trip, take technical documentation with you; experience shows that it may be necessary at any time during the trip.
In addition to basic tools, it wouldn’t hurt to have a test light and a multimeter in your car.
The brake lights on the VAZ-2112 do not light up or work, why?
On all cars of the Tenth Family, the power lines for the lights contain many elements. There are lamp health relays, switches and fuses. Therefore, if the brake lights on a VAZ-2112 do not light up, you need to check the entire chain. But the reason may look simple: sometimes the lamps do not turn on because the socket does not contact ground. Circuits are easy to analyze, but finding the cause of a breakdown is difficult. Let's look into the details.
If one of the lamps does not light, it is simply replaced. See the example in the video - you need a P21 W
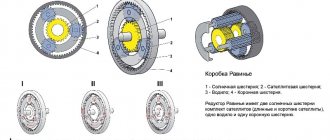
Standard version of the brake light operating diagram
Power is supplied to fuse F17 from the battery, then the current goes to limit switch contact 11, and then, if the limit switch is closed, a circuit is formed with the filament of lamps 7. But note: part of the circuit is relay K1, more precisely, its contacts 5 and 4.
Basic network diagram
Video “Features of installing an additional stop”
What you need to consider when installing an additional brake light and what the result will look like - see the video below (author - channel -AvAlex-).
Often, car owners have a situation where the rear brake lights do not light up. An experienced motorist can guess what the reason might be. Therefore, it will not be difficult for him to determine the source of the malfunction and eliminate the problem. For beginners and inexperienced owners, it is advisable to contact specialists or study reliable information on car repairs.
This article outlines the main causes of this malfunction and provides recommendations for eliminating it. The owner of the car can make the repairs himself or contact a car service center.
Replacement Guide
The replacement procedure is simple, so any car enthusiast can handle it. True, you should know the basics of electronics. To be sure, you can look at the car’s operating manual and find the wiring diagram for connecting the rear brake. Next you need to prepare materials and tools.
Tools and materials
First you need to decide on the choice of lamp for the rear brake light.
Lamps can be of different types:
- With and without base. The base system is gradually becoming a thing of the past, as it has such disadvantages as loose fit to other contacts and poor fastening. Therefore, it is recommended to use the baseless version.
Brake light bulbs
- With two filaments (to perform the function of side lights, one filament lights up, and when braking, the second one lights up).
- With dull or colored glass. For incandescent lamps, the color of the glass does not matter. If a two-pin LED bulb is installed, it is better to use it in red. Due to the increased luminous efficiency, the light from it jumps through the lamp and sometimes looks little like red, which can confuse road users.
Red products
- Lamp power can vary from 5 to 21 W. Power only affects light output: the higher the power, the stronger the light bulb shines. But a lamp that is too powerful can blind the driver from behind and cause an accident. In addition, more powerful options consume more electricity.
Having purchased the necessary brake light bulbs, you need to prepare the appropriate tool:
- a set of wrenches for unscrewing nuts;
- Phillips screwdriver to remove the screws holding the lamp.
To avoid unpleasant sensations from electric shock, turn off the ignition before work.
Algorithm of actions
Having prepared the light bulbs and the necessary tools, you can begin replacement, which consists of the following steps:
- First of all, you need a car trunk lid.
- Then you need to remove the decorative panel of the rack. There are usually no problems with its removal, since it is held in place by four clips. Now you have access to the wing nut.
- To access the lower wing nut, you need to remove the lid from the secret drawer, which is located in the same place as the decorative panel.
- The next step is to unscrew the upper and lower wing nuts. The first nut is in a convenient place and there will be no difficulty in unscrewing it.
Unscrewing wing nuts
- You will have to tinker with the second one, since it is located in an inconvenient place and is difficult to tear off with your hands. In order to easily unscrew the nut, you need to put the head on it at “22”. After this, unscrewing the nut will not be difficult. In this case, you should be careful not to lose sight of the nut and head, as it will be difficult to get them out.
- Having unscrewed the wing nuts, you can begin to dismantle the taillight. In this case, it is important that the top and bottom come out at the same time, otherwise the headlight may become flat. An assistant will be needed for this operation.
- On the pulled out headlight, unscrew three screws. Now we have access directly to the light bulb. We unscrew the old lamp and screw the new one in its place.
- After changing the light bulb, we reassemble the rear part of the car in the reverse order according to removal.
- Press the brake pedal and check the operation of the brake light.
Thus, replacing the brake light bulb is not difficult. If you perform the replacement with your own sludge, you can save time and money at the service station.
Sorry, there are no surveys available at this time.