- Clutch device
- Clutch basket
- Replacing the clutch of a VAZ 2110
- Replacing the VAZ 2110 clutch: adjustment
- Video instructions for replacement
Owners of domestic cars often have to contact a car workshop with a request to adjust or repair the clutch. In foreign cars, the unit has a simpler structure, and accordingly, it requires repairs less often. But you can contact the service only if the mechanism is seriously damaged, for example, if you need to replace the clutch of a VAZ 2110. In other cases, you can handle it yourself: this includes replacing, repairing some elements, and adjusting the cable. You will learn about all of the above after reading this material.
Clutch device
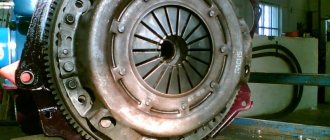
To begin with, the VAZ 2110 has a dry type of clutch. The clutch itself includes only 2 discs, which are treated with friction material to withstand prolonged friction. Each disk is made of organic material mixed with wire, which performs a heat-dissipating function during operation. Each disc interacts with other car mechanisms, for example, with the gearbox. There are other parts between the disks that are held together by a casing. It's called the "clutch basket". You need to stop there.
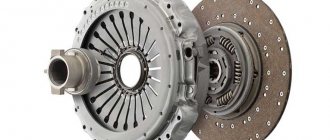
Two clutch discs from a modern clutch kit.
Clutch basket
The cart includes the following items:
- Flywheel. This element receives torque from the engine, and the basket is attached to it.
- Pressure and driven disk. They work as follows: when the driver depresses the clutch pedal, the pressure plate contacts the driven one; when the pedal is pressed, the parts are released.
- Gearbox input shaft. It transfers torque from the engine to the gearbox.
- Shutdown forks. Forks are needed to compress and unclench the discs. The pedal is pressed - the forks separate the parts, the forks are released - they move together.
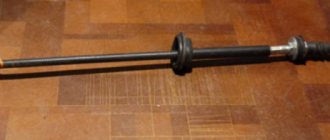
- Cable. It is the connecting link between the mechanism and the clutch pedal. When changing the length of the cable, the stroke length changes.
As for the wet clutch, it is always immersed in oil. Due to this, less wear occurs - the discs rub less, and their surface always remains cool and clean.
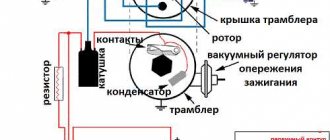
A visual diagram of the clutch basket design.
Features of the “tens” clutch
The characteristic features of the structure of this unit in model 2110 include the following:
- The specific structure of the diaphragm spring, which guarantees a reduction in the force to disengage the clutch. This quality creates favorable conditions for driving a car at medium and high speeds, and also affects the conversion of force on the clutch pedal in the area of partial/full starting. This design feature allows an inexperienced motorist to start moving smoothly, reducing the level of fatigue when driving in the city, where frequent engagement of the clutch is the norm.
- Rational choice of the shape of the diaphragm spring, the number of blades, the proper structure of the spring supports, which is subject to mandatory control during production.
- The nonlinear properties of the spring are carefully calculated taking into account the preservation of car parts: if the clutch begins to slip, it happens shortly before the critically acceptable degree of wear of the friction linings. Thus, the flywheel and clutch disc of the VAZ 2110 are protected from damage from the rivets of the linings and is a distinctive indicator for repairing the VAZ 2110 clutch.
- Mechanized finishing of main disk blanks made of cast iron, which is carried out in order to optimize wear-resistant and friction properties. Their processing takes place on semi-automatic lathes with high precision, followed by monitoring the surface quality of the working surface.
- Thanks to the special design of the shock-absorbing plate and the use of springs of different stiffness, the absorption of rotational changes takes place in several stages. This makes it possible to increase softness and reduce the level of jerking when engaging the clutch, protecting transmission parts from stress at the start of movement and abrupt gear changes.
- For the production of friction linings, raw materials with reinforced additives and carbon threads began to be used. This composition increased resistance to wear, centrifugal loads and constant friction.
- Clutch housing parts are phosphate coated to increase corrosion resistance.
- Carrying out control static and dynamic balancing of the VAZ 2110 clutch discs determined the formation of the final price of the unit for this vehicle.
Failure of this unit is not uncommon. To prevent it, it is necessary to carry out timely repairs or replacement of the entire set. Operation of the vehicle requires periodic removal of the VAZ 2110 clutch in order to monitor its condition and ensure trouble-free operation.
Replacing the VAZ 2110 clutch: adjustment
Adjusting the length of the clutch cable. To work, you need to take a ruler or tape measure.
The adjustment consists of changing the length of the cable:
- You need to place a ruler or tape measure next to the clutch pedal area. It is better to take a ruler, since now you need to rest it on the car floor mat. Next, we need to measure the distance from the surface of the rubber pedal pad to the mat. If the ruler shows that the distance is more than 130 millimeters, then adjustment is needed. If the distance is less than 130 mm, then setting the cable length is also required.
- The next step is to loosen the locknut that secures the cable. By rotating the nut, we change the length of the cable. We need to ensure that it is in the range of 125-130 millimeters.
- We measure again. If the result is successful, you can slide the restrictor sleeve into the fork. Ready.
CLUTCH
Device Features
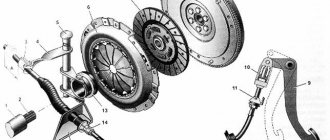
| Rice. 3–1. Clutch assembly: 1 – cable guide; 2 – clutch release fork; 3 – clutch casing; 4 – bolt securing the clutch to the flywheel; 5 – pressure disk; 6 – flywheel; 7 – driven disk; 8 – gearbox input shaft; 9 – lower cover of the clutch housing; 10 – clutch housing; 11 – pressure spring; 12 – clutch release bearing; 13 – bearing coupling flange; 14 – bearing coupling sleeve; 15 – restrictive sleeve |
The clutch is single-disk, with a central pressure spring 11 (). The clutch housing 3 is attached to the flywheel 6 with six bolts 4, and is connected to the pressure plate 5 by three pairs of elastic plates.
The driven disk 7, assembled with a damper, is located on the splines of the input shaft 8 of the gearbox.
On cars with a VAZ-2112 engine, a clutch with different characteristics of the pressure spring of the leading part of the clutch and the damper springs of the driven disc is used. To distinguish the leading parts of the clutch, clutch 2112 has a mark in the form of a hole in one of the slots in the pressure spring petals. The two drive disc damper springs 2112 have white paint stripes on them.
The clutch drive is cable-type, backlash-free (there are no gaps in the drive).
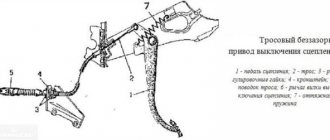
| Rice. 3–2. Clutch drive: 1 – cable sheath; 2 – lower tip of the cable sheath; 3 – cable fastening bracket; 4 – cable protective cover; 5 – lower cable tip; 6 – adjusting nut; 7 – lock nut; 8 – cable lead; 9 – clutch release fork; 10 – upper cable tip; 11 – thrust plate; 12 – upper tip of the cable sheath; 13 – seal; 14 – clutch pedal; 15 – clutch pedal spring; 16 – clutch pedal bracket |
Clutch pedal 14 () is installed in bracket 16 on the axle. The upper part of the pedal is connected to the tip of the cable 10. The upper tip of the shell 12 is fixed to the clutch pedal bracket using a thrust plate 11. The lower tip 2 is fixed to the bracket 3 on the power unit. The cable guide 8 is connected to the clutch release fork 9.
Removing and installing the clutch and its drive
Withdrawal.
First remove the gearbox (see subsection “Gearbox”).
Unscrew the bolts securing the clutch housing to the flywheel and remove the housing assembly with the pressure plate. This releases the clutch driven disc.
To remove the clutch drive, loosen the nut securing the shell tip 2 (see) and remove the lower part of the cable from the bracket socket 3. Then disconnect the guide 8 from the clutch release fork 9, having previously loosened the nuts 6 and 7.
Having removed the locking bracket from the pedal pin 14, disconnect the cable end 10 from the pedal. Having unscrewed the bolt securing the thrust plate 11, remove the cable assembly from the front panel of the body.
To remove the clutch pedal 14, remove the spring 15, remove the locking bracket from the groove of the pedal axis and, removing the pedal axis from the hole in the bracket 16, remove the clutch pedal.
Installation of the clutch and its drive -
carried out in reverse order, taking into account the following:
– check the condition of the splines in the hub of the driven disk and on the input shaft of the gearbox, clean the splines and rinse with white spirit;
| Rice. 3–3. Centering the driven disk: 1 – flywheel; 2 – clutch assembly; 3 – mandrel A.70081 |
– install the clutch, placing the driven disk with its protruding part towards the pressure plate and center the disk relative to the flywheel using mandrel A.70081, simulating the splined end of the gearbox input shaft ();
– lubricate the cable guide, pedal bushings, clutch pedal pin and cable tip pin 10 (see ) on all adjacent surfaces with LSC-15 or Litol-24 grease.
Checking the technical condition and checking the clutch
Checking the condition of the slave disk.
| Rice. 3–4. Replacing the friction linings of the driven disk: 1 – conductor; 2 – driven disk; 3 – mandrel |
Replace friction linings with new ones when cracking appears, the distance between the rivet head and the working surface of the lining decreases to 0.2 mm, as well as when there is uneven wear and one-sided scuffing. When repairing the driven disk, use device 67.7822.9536 (), consisting of mandrel 3 and conductor 1.
| Rice. 3–5. Checking runout and adjusting the clutch driven disc |
The runout of the working surface of the friction linings should not exceed 0.5 mm. If it is larger, then straighten the disk using the key 67.7813.9503 () or replace it with a new one.
Checking the condition of the clutch drive part.
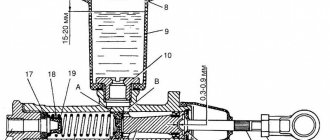
| Rice. 3–6. Clutch control: 1 – pressure spring; 2 – clutch casing; 3 – pressure disk; 4 – intermediate ring; A, B, C – dimensions |
Attach the pressure disk 3 () assembled with the pressure spring 1 and casing 2 to a device with an intermediate ring 4 of thickness B = (8.3 ± 0.04) mm. This device replaces the flywheel with a driven disk.
Carry out a check by disengaging the clutch three times with a release stroke of 8–9 mm, applying a load to the petals of pressure spring 1 at a diameter of C = 34 mm. Wherein:
– check that the shutdown stroke (8.0±0.1) mm corresponds to the pressure plate stroke of at least 1.4 mm;
– the difference in the withdrawal values of the pressure plate 3 is no more than 0.25 mm;
– size A should be within (29–31) mm;
– the load on the petals of pressure spring 1 at diameter C with a stroke of (8.0±0.1) mm should be no more than 1100 N (1350 N for the VAZ-2112 clutch), the peak release load should not be more than 1300 N (1500 N for the clutch VAZ-2112).
Measure the depth of circular wear of the pressure spring petals at the point of contact with the clutch release bearing; if the wear value exceeds 0.8 mm, replace the clutch housing assembly with the pressure plate.
Checking the condition of the cable. First of all, make sure that the cable ends are securely fastened and that the cable moves freely inside the sheath. Check the condition of the cable sheath and protective cover. If the cable sheath and other elements are damaged, or if the ends are loose, replace the cable with a new one.
Checking spring elasticity.
The length of the spring should be: under force (117.6±5.9) N [(12±0.6) kgf] – 160 mm, under force (12.74±1.2) N [(1.3±0 ,2) kgf] – 80 mm.
Clutch drive adjustment
The clutch pedal travel to the floor mat should be 120–130 mm. It is adjusted using the adjusting nut 6 (see), changing the position of the lower tip of the cable 5. During the operation of the vehicle, due to wear of the driven disk linings, the full travel of the clutch pedal increases (the pedal rises). The maximum permissible pedal travel should not exceed 160 mm.
Adjustment procedure:
– by loosening the lock nut 7, by rotating the adjusting nut 6, set the clutch pedal travel to 120–130 mm;
– press the clutch pedal all the way to the floor mat at least three times and check the pedal travel; if necessary, adjust it with nut 6;
– without changing the position of the pedal, tighten the lock nut 7 and slide the limit sleeve 15 into the fork 9 until it stops (see ).
Clutch diagnostics on a VAZ-2110
The VAZ-2110 received the mechanism from the eight and nine virtually unchanged, only the downforce was adjusted, which corresponds to the engine torque.
Clutch diagram.
Nevertheless, every clutch has its time. The resource of the unit greatly depends on the driving style and operating conditions. And besides, from the kit manufacturer. By the way, it is not at all necessary to change the clutch assembly due to a failed driven disk or release bearing; it is expensive.
But replacing any element of the mechanism, as well as the entire clutch, at a service station will cost at least 3-5 thousand rubles , not counting the cost of materials. Therefore, it makes sense to do the repairs yourself. This is not the simplest operation, but it is quite accessible even for a novice driver.
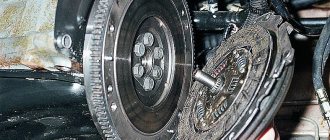
Clutch kit: basket, disc, bearing and mandrel.
Symptoms of a problem
Before removing the clutch on a VAZ-2110, you need to find out its condition based on the following signs:
- The clutch is slipping. This means that when the engine speed changes, part of the torque is lost when the clutch of the driven disk slips - the speed increases, but there is no traction. There may be several options - either the friction linings of the driven disk are worn out, or the adjustment of the free play of the clutch pedal is impaired. In the first case, disk replacement is necessary.
- The clutch drives. When the pedal is fully depressed, the clutch does not disengage. That is, part of the torque is still transmitted to the gearbox; the drive and driven disks do not open. In this case, either adjusting the same pedal free play will help, or replacing the release bearing or clutch basket if the adjustment does not produce results.
- The clutch vibrates. We observe vibrations in the gearbox area at certain speeds or constantly. In this case, the clutch needs to be replaced; most likely, the basket has failed.
- The clutch is noisy. Increased noise when pressing the pedal, extraneous sounds when changing gears. Most likely, either the entire clutch assembly, or the basket or release bearing has failed. The kit needs to be replaced.
If one of these symptoms appears and, having made sure that the adjustment does not produce results, we proceed to disassemble the clutch with our own hands, so as not to disturb the specialists, whose time and labor will cost us a lot of money. We ourselves can replace the clutch assembly in an hour, maximum two.
Clutch repair on a VAZ car
The article describes in detail the process of disassembling, repairing and reassembling the clutch on a VAZ car.
The clutch plays one of the most important roles in the movement of the car and at the first signs of malfunctions in its operation, it is necessary to begin repairs immediately, otherwise inaction can lead to dire consequences, then it will take much more money and time for repairs. Before removing this mechanism, you will need a clutch diagram; study it in detail for further repairs and an understanding of the operating principle.
We removed and repaired the clutch disc on a VAZ 2110, similar equipment is installed on the 2111 and later models of these cars, but on the VAZ 2112 there are some differences and improvements, in particular, modifications were made: the springs of the damper of the driven disc and the drive part of the clutch, but the essence of the repair remains similar.
Noises
Why is the clutch on the VAZ-2110 noisy? This malfunction no longer occurs due to the disk (except in the case of weakened springs), but due to a worn bearing. The main one is the release one.
It is he who makes the characteristic noise and howl when the clutch is disengaged. It's very easy to check. You need to listen to the operation of the box with the engine on in neutral. If the hum disappears when you press the pedal, it means the clutch release bearing on the VAZ-2110 has become unusable. As we can see, most problems are related specifically to the driven disk. If such malfunctions are observed, the clutch should be replaced with a VAZ-2110.