How to check the fuel pump relay yourself
The fuel pump relay is a device that provides and stops power supply to the fuel pump upon command from the ECU. The device is fully responsible for controlling the fuel pump, and also performs certain additional functions, which depend on the specific brand and equipment of the car. For example, on cars with automatic transmission, if it is necessary to activate the kick-down mode (intensive acceleration), the specified relay is activated.
Signs and Symptoms of a Bad Fuel Pump Relay
Let's start with the fact that the fuel pump is controlled through a relay according to the following general scheme:
- the driver inserts the key into the lock and turns on the ignition;
- after turning on the ignition, the relay turns on the fuel pump for 2-3 seconds, which is necessary to create pressure in the fuel rail.
- then you can hear a characteristic sound as the fuel pump relay clicks, which has turned off the fuel pump;
- subsequent operation of the fuel pump will be possible under 2 conditions: rotation of the engine by the starter during startup and further independent operation of the already running engine.
- after turning off the ignition and stopping the engine, the relay turns off the fuel pump immediately or after 1 second.
Also on some cars the device serves as a kind of engine speed limiter. If the engine speed approaches maximum and begins to exceed the permissible threshold, the fuel pump is switched off via a relay. The gasoline supply stops, the speed decreases, after which the element supplies power to the pump again.
If the relay malfunctions, then power may not be supplied to the fuel pump. The second option is that the pump hums or hums constantly, that is, it does not turn off a few seconds after the required pressure is created in the fuel line. In the first case, the engine often cannot be started because the pump does not pump and there is no gasoline in the fuel rail. In the second case, the fuel pump relay gets stuck (the fuel pump relay does not work) and the battery charge is consumed for the constant rotation of the fuel pump motor. Let us add that on some cars, starting the engine is possible even if there are certain malfunctions in the operation of the element, since the pump relay connection diagram allows the device to operate while the starter is cranking.
Checking the fuel pump relay yourself
At the beginning of the test, you need to get to the following elements: the pump fuse and its relay. Having decided which relay is responsible for the fuel pump, you should also inspect the fuse. Additionally, you need to check the fuse because the fuel pump relay heats up and then does not respond in a timely manner or does not operate at all due to a malfunction of the specified fuse.
Now let's look at another available way to check using the example of a VAZ 2110 car. The fuel pump relay itself in this model is located near the fuse.
- To check, you will need a multimeter or a test light of no more than 0.25 A. Next, you should alternately measure the voltage at the control terminals of the device, simultaneously fixing the contact to ground. This method allows you to accurately determine whether the fuel pump relay needs to be replaced.
- If the warning light does not light up, the pump fuse is working or replaced with a known working one, then attention should be paid to the wiring from the relay to the computer. At the same time, the possibility of malfunctions in the engine control unit should not be ruled out.
Finally, we add that the element may also refuse to work or stick after failures or unqualified installation of a car alarm/immobilizer. The fact is that security and anti-theft systems with an engine start blocking function are often based on interrupting the power supply to the fuel pump. In this case, these systems must be diagnosed separately.
How to determine why the fuel pump does not pump or works poorly. Fuel rail pressure, pump diagnostics. Wiring, relays, fuel pump fuses.
Purpose, design features, installation location of the fuel pressure regulator of an injection engine. Signs of RTD malfunctions, checking the device.
Why does the starter turn normally, but the engine does not catch and does not start? Main causes of malfunction, checking fuel supply and ignition systems. Adviсe.
How to remove the engine start lock. Checking for random activation of the immobilizer and how to disable it. Diagnosis of possible alarm malfunctions.
The causes of whistling and increased noise during operation of the fuel pump are overheating of the pump. How to diagnose and fix the problem yourself. Tips and tricks.
Mechanical and electric fuel pump, design and principle of operation of the device, types of pumps and main malfunctions, operating features
Relay test
If the main relay is not working, we will need to test the circuit that turns it on. If it turns on, but there is no pump relay, then you will have to check the presence of power at terminals No. 86 and 85. To determine why the fuel pump of the VAZ 2110, 2109, etc. does not work, we will need one simple device - a control light , which you can make yourself. When using a lamp, you need to remember that the current consumed by it should not be higher than 0.25A. Let’s connect one terminal of the device to the “minus” of the controller, and connect the other one to the connectors in turn. Possible results of our “research”: 1. The light bulb does not light up. This means that electrical power is not being supplied to the fuel relay. The cause of the malfunction may be a break in the electrical circuit or a blown fuse. 2. When testing one of the connectors, the lamp lights up brightly, while the other flickers dimly. Pull the relay out of the well, and connect contacts 85–86 with the terminals of the control lamp. Turn on the ignition. If the light comes on, but after 30 seconds. goes out, this will mean weak contact between the well and the relay. If the lamp does not light up at all, it means there is a break in the controller-fuel relay circuit or the controller is faulty. There is another problem - the VAZ 2110 fuel pump relay turns on, but the pump itself does not work. What to do in this situation? Test terminal No. 87 of the fuel pump relay. If the lamp lights up when you touch the terminal, continue the test by removing contacts No. 30 and 87 from the block and connecting them together using a jumper. This way we will make sure that the unit is working properly, and the cause of the breakdown is the relay. Didn't the light come on? This means that we will need to replace the fuse or restore the integrity of the wiring in the circuit. But what to do if the pump does not start? Without removing the jumper from contacts No. 30 and 87, connect one of the control lamp terminals to the “minus” and the other to the wire that is connected to the unit. If the VAZ 2110 submersible fuel pump (injector) included in the fuel module does not work, disconnect the connector and touch the lamp terminal directly to each thick wire. If the lamp does not light up when touching one of the wires, this will mean that there is a break in the relay circuit - pump or module - that needs to be repaired. We test remote-type devices in this way: we attach the terminal of the test lamp either to thick wires or to the connector itself. If it lights up, remove the second terminal from ground and connect it to the second connector of the pump. The lamp does not light up - there is poor contact between the negative (ground) of the car body and the pump itself or an open circuit. We hope that this article can significantly help in solving your problem, because its information content was tested on one of our friends. The young man did not even know where the VAZ 2107 fuel pump relay (injector) was located, although he owned this car for more than three years. After reading the review, he independently figured out the issue, however, none of the testing methods we proposed helped him identify the cause of the malfunction. This could only mean one thing - the pump does not work because its electric motor has failed, and in this case the part needs to be replaced.
Gasoline pump VAZ 2110 - design and repair
The VAZ 2110 fuel pump has two varieties. The first option is mechanical, built into the engine and mainly used in carburetor engines. The second option is electric, built into the fuel tank for operation on fuel-injected cars. We will consider the electric fuel pump: its design, reasons for failure, the possibility of independent maintenance or replacement.
Location of fuses on the diagram for VAZ 2110, 2111, 2112
Today we will look at the location of fuses in VAZ cars of the tenth family, namely models 2110, 21102, 21103, 2111, 2112. We will also show where the fuses and relays are located on the diagram and talk about the purpose of each of them and how to replace the fuses with your own hands. We will also touch on the most common problems with fuses among owners of these cars, diagnostic methods and replacement.
I would like to say that car electrical systems, in particular fuses and relays in the VAZ 2110, 21102, 21103, 2111, 2112, are quite reliable. The service life depends on operating conditions and timely diagnosis and replacement with high-quality components.
Let's figure out why fuses are needed in a car. First of all, they are responsible for the safety of the wiring and other systems of the machine. It is important to understand that each specific fuse is responsible only for its task and in the event of a short circuit or failure, a fire is practically excluded. A specific fuse blows and this does not cause a chain failure of other systems.
Depending on the problem of failure of any component or part of the car for which the electrician is responsible, you need to understand whether the car can be operated with this malfunction or not. The traffic rules contain a list of faults that you cannot operate a car with. If you discover, for example, that the headlights have failed or the wipers are not working at all, you should immediately correct the problem. Well, you can drive a car with non-working power windows. So…
Why does the VAZ 2110 fuel pump not turn on?
If you want to start the engine with all systems in full working order (the starter rotates the engine, a spark is supplied to the spark plugs, and there is enough gasoline in the tank), you may encounter a problem with the fuel supply. The reason is that the fuel pump on your VAZ 2110 does not work. Either it broke down and no longer maintained the required pressure, or there was no power supply to it. Also, a breakdown can occur while driving, which will lead to the engine stopping.
Fig.1. Fuel supply diagram for an engine with a fuel injection system: 1 - injectors; 2 — fitting plug for monitoring fuel pressure; 3 — injector ramp; 4 — bracket for fastening fuel pipes; 5 — fuel pressure regulator; 6 — adsorber with solenoid valve; 7 — hose for suction of gasoline vapors from the adsorber; 8 — throttle assembly; 9 - two-way valve; 10 - gravity valve; 11 - safety valve; 12 - separator; 13 — separator hose; 14 — fuel tank plug; 15 - filling pipe; 16 — filling pipe hose; 17 — fuel filter; 18 — fuel tank; 19 — electric fuel pump; 20 — fuel drain line; 21 - fuel supply line.
Soulemil › Blog › Diagram and location of fuses VAZ 2110, 2111, 2112
If your windshield wiper blades stop working, or your turn signals stop turning on, do not run to buy a wiper motor or new light bulbs. Most often the problem is burnt fuses. The operation of all electrical appliances in the car is ensured by fuses. It is thanks to them that when a short circuit occurs, all the wiring does not burn out. Let's look at the fuse diagram for the VAZ 2110, 2111, 2112.
First of all, let's mark all the fuses with their numbers:
Explanation of fuse values: Fuse No.: Amps Responsible for: F1 5 Lighting lamps: numbers, instruments, dimensions on the dashboard, left dimensions, trunk light F2 7.5 Low beam in the left headlight F3 10 High beam in the left headlight F4 10 Right front fog lamp F5 30 Door windows F6 15 Portable lamp, cigarette lighter F7 20 Radiator fan, horn F8 20 Heated rear window F9 20 Windshield washer and wiper F10 20 Reserve F11 5 Clearance on the right side F12 7.5 Low beam in the right headlight F13 10 High beam in the right headlight F14 10 Fog lamp, left F15 20 Heated seats F16 10 Hazard signal, turn signals F17 7.5 Brake light, ignition switch illumination, interior lighting F18 25 Cigarette lighter, glove compartment light, interior heater F19 10 Reversing lamp , monitoring the serviceability of the brake light F20 7.5 Rear fog lights Additional fuses and relays are located to the right of the center panel. Unscrew the screws and remove the cover:
Next we see these fuses:
1 - ignition module 2 - speed, air flow, heating sensors 3 - fuel relays, pump, injectors 4 - fan 5 - fuel pump 6 - ignition Now you know how to change fuses on your VAZ 2110, 2111, 2112 yourself. The procedure is quick and simple.
I brought this out for myself so that I could quickly log into the blog and see which fuse is responsible for what for other users. Thank you!
52 likes Subscribe
How to check the fuel pump on a VAZ 2110 injector 8 valves
If the electric fuel pump on a VAZ 2110 simulates operation, but the car does not start, then it is necessary to measure the pressure in the fuel system. To do this, you should purchase (use) a tire pressure gauge, a piece of fuel hose, a 7/16-20 UNF fitting adapter and clamps. The parts must be connected to each other.
Then, relieve the pressure in the system and attach the structure to the fuel rail at the edge. Start the engine. The arrow on the pressure gauge will begin to show values. The following indicators are considered normal: 280-320 kPa (2.8-3.2 kg/cm2) at idle. At high speeds: 280-350 kPa (2.8-3.5 kg/cm2). If the indicator is less, you should remove the fuel pump module from the tank.
This diagnostic method allows you to narrow the range of faults, which include:
- faulty rail pressure regulator;
- insufficient fuel supply from the pump;
- clogging of the fuel system (mesh filter).
Sometimes, replacing or cleaning the strainer on the pump body helps eliminate the problem and the pressure is restored.
No power to the fuel pump VAZ 2110 injector
A harness of three wires is connected to the pump: “plus”, “minus” and fuel level. In order to check the power supply, you need to use an electrical voltage tester. In its absence, a 12 V control light will help. By closing the circuit, it becomes immediately clear whether power is coming to the unit or not.
If, as a result of the check, it turns out that your VAZ 2110 does not have power for the fuel pump relay, then you need to check the “negative” and “positive” wires separately. For example, take the mass from the car body, and “throw” the plus from the battery.
Fuses for VAZ 2110 which are responsible for what
The operation of the car is entirely dependent on the fuse link system. If a failure occurs in any system, the fuse link is destroyed. Thus preventing fire in the wiring.
As a rule, it is quite difficult to understand this organization without much experience. And this article was compiled to help those suffering.
Which fuse is responsible for the cigarette lighter of the VAZ 2110
If the cigarette lighter of a VAZ 2110 car malfunctions, you need to open the main panel, which is located in the lower left part of the dashboard. There is a VAZ 2110 cigarette lighter fuse. It is marked F 18 and can withstand loads of up to 25A.
To replace it, you should use special tweezers. Under no circumstances should you remove the element with your fingers - this may damage the mounting sockets.
Which fuse is responsible for the power windows of the VAZ 2110
In vehicles with electric window system. Their operation may be disrupted. If this system fails, you should pay attention to element F5 in the main unit. It is easy to find since it is practically the only 30A element. The node is responsible for the drives of all windows.
What is the fuse for the cigarette lighter of VAZ 2110
The portable lamp system will also help you find out which fuse is responsible for the VAZ 2110 cigarette lighter. A cigarette lighter mechanism is often connected to its circuit. Therefore, if problems arise for this node, you can check this insertion.
On some models, the VAZ 2110 cigarette lighter fuse may be numbered F6 and have a load-bearing load of 15 A.
Thus, one element is sometimes responsible for a portable lamp and the ability to light a cigarette.
Which fuse is responsible for the VAZ 2110 radio?
Sometimes a confusing wiring diagram is an impossible task for a beginner. This is especially true for the domestic automobile industry, in which there are a large number of differences. You can often find cars from different years of manufacture on the same model. A spectacle that looks like the same element is responsible for different parts.
Therefore, the radio is often connected to the power system either at F10 or at F4.
F10 is a reserve that is used in the event of a breakdown. Our craftsmen often connect a tape recorder to it.
F4 – responsible for the front right fog lamp. And can power the car's music.
As you can see, the question about the radio has the same problem as the question - which fuse is responsible for the cigarette lighter of the VAZ 2110.
What is the fuse for the fuel pump on the VAZ 2110
To find the root of the problem of fuel pump failure, you need to make a lot of effort. The diagram will help you find out where and what fuse is for the fuel pump on the VAZ 2110.
The unit is located in the second auxiliary block at the passenger's feet. Opening it you can see that there are 3 fuse links and 3 relays. So what you need is in the middle of the panel. That is, the second number on either side.
Which fuse is responsible for the cigarette lighter on the VAZ 2110 injector
The connection system of the VAZ 2110 carburetor and injection versions is very similar. In order to understand where the root of all evil is, you can open a book on vehicle electrical manuals on the tab - VAZ 2110 which fuse goes to the cigarette lighter. Or read this article.
Cigarette lighter fuse for VAZ 2110 numbered F 18 on the main panel. He is responsible for supplying power to the injection unit. It is one of the most powerful as it is marked 25 A.
Which fuse is responsible for the dimensions of the VAZ 2110
Depending on what kind of trouble happened, there may be two separate elements in solving this nuance.
If the dimensions of the VAZ 2110 on the right side are missing, then element F11 is responsible for this. The current in the circuit is insignificant, which is why it is marked 5A.
Also, if problems arise with the dimensions in the cabin, it would not be superfluous to check the F1 insert at 5A.
Which fuse is responsible for the starter on a VAZ 2110
If there are problems with the starter, it is important to know that this unit is not included in the design of the VAZ 2110.
This function is performed by a relay installed in the mounting block of the machine. You can find it by number R7. And the unit is located in the panel on the right side of the steering wheel.
It is noteworthy that some models are equipped with two devices at once. The first is responsible for unloading the ignition switch contacts. And the second during the rotation of the starter. Preventing it from starting while the engine is running and not rotating for more than 15 seconds.
The elements are usually located on an additional block.
What fuse goes to the wipers of the VAZ 2110
If the wipers break down, you should first open the long-suffering mounting panel. On its front side is the culprit in 80% of cases of failure of this system. The fuse is numbered F9 and is marked with a current strength of 20A.
Cases of burnout of this insert are very common. Therefore, it is recommended to carry spare parts with you for quick replacement.
Additionally, it is worth knowing that replacing a burnt-out element with a more powerful one is strictly prohibited. Also, do not insert foreign objects (jumpers) into the socket that could damage the units or even cause a wiring fire.
VAZ 2110 which fuse is responsible for the signal
Failures of the signaling device also occur in the VAZ 2110 car. This problem may arise due to prolonged pressing of the horn or another breakdown. The problem is usually accompanied by a malfunction of the cooling system fans. On engines with a 16 valve head system.
To eliminate the malfunction, replace element F7 with 20A. Which is located in the main compartment.
VAZ 2110 cigarette lighter fuse is on
In case of a long-term problem of burnout of the cigarette lighter insert. It’s no longer worth telling which fuse goes to the cigarette lighter of the VAZ 2110.
In this case, it is worth carefully inspecting all the wiring. Usually problems in this part occur due to a short circuit or insulation breakdown.
To clarify the circumstances, you need to connect the wires directly, in other words, remove this element from the network. If the insert burns out again, it means it is not involved in the malfunction.
Which fuse is responsible for the VAZ 2110 stove
The VAZ 2110 stove is also one of the capricious parts of the car. If the unit fails frequently, you need to turn your attention to F18 located on the main panel of the unit. And which is marked 25 A. Additionally, the insert supplies power to the glove compartment lighting.
Which fuse is responsible for the speedometer of the VAZ 2110
The electronic speedometer is a good invention. However, there are incidents here too. This element of the speedometer power supply system is located in the main part of the mounting panel and has the number F19 marked 10 A.
How to remove the fuel pump on a VAZ 2110 injector 8 valves
If the car owner has skills in plumbing, then removing the fuel supply pump will not be difficult. Work can be carried out in the garage or outdoors. The second will be more acceptable, since the inevitability of gasoline evaporation can affect your well-being.
Initially, you will need to prepare several tools, including:
- socket wrench or socket wrench 7 mm;
- open-end wrench with 17 mm opening;
- screwdrivers: Phillips and slotted;
- pliers.
Before plumbing work, especially those related to electricity, you should disconnect the negative terminal from the battery.
Next, removing and replacing the VAZ 2110 fuel pump, 8 valve injector, will be described in the form of step-by-step instructions:
- We remove the rear seat, freeing it from the latches along the lower side edges;
- In the carpet, you need to find a cutout that hides the hatch cover;
- A square hatch, secured with two screws that must be unscrewed;
- Having removed the cover, the upper part of the pump appears before us;
- First of all, disconnect the electrical circuit plug;
- Then, using a 17 mm wrench, unscrew the two fuel fittings;
- After this, you should unscrew the 8 nuts around the perimeter of the ring with a socket wrench or 7 mm socket;
- Next, remove the crimp ring itself;
- Now you can remove the fuel pump housing;
- Carefully remove the electric motor from the housing.
Reassembly after replacement should be done in reverse order. At the same time, it is recommended to change the rubber gasket under the body and 2 o-rings on the fuel fittings.
VAZ 2110: fuel pump relay - operating principle
Location of the fuel pump relay on a VAZ 2110
As you know, energy is the trigger for any dynamic process on the globe. From a practical point of view, a relay is a trigger mechanism, the operation of which occurs due to the closure of internal electrical contacts, as a result of which the car engine moves from a static position to a dynamic one. If you look at the fuel pump relay on the VAZ 2110, it has some specific functioning. Many VAZ 2110 drivers don’t even know where the fuel pump relay is located, let alone the principle of its operation.
Soulemil › Blog › Diagram and location of fuses VAZ 2110, 2111, 2112
If your windshield wiper blades stop working, or your turn signals stop turning on, do not run to buy a wiper motor or new light bulbs. Most often the problem is burnt fuses. The operation of all electrical appliances in the car is ensured by fuses. It is thanks to them that when a short circuit occurs, all the wiring does not burn out. Let's look at the fuse diagram for the VAZ 2110, 2111, 2112.
First of all, let's mark all the fuses with their numbers:
Explanation of fuse values: Fuse No.: Amps Responsible for: F1 5 Lighting lamps: numbers, instruments, dimensions on the dashboard, left dimensions, trunk light F2 7.5 Low beam in the left headlight F3 10 High beam in the left headlight F4 10 Right front fog lamp F5 30 Door windows F6 15 Portable lamp, cigarette lighter F7 20 Radiator fan, horn F8 20 Heated rear window F9 20 Windshield washer and wiper F10 20 Reserve F11 5 Clearance on the right side F12 7.5 Low beam in the right headlight F13 10 High beam in the right headlight F14 10 Fog lamp, left F15 20 Heated seats F16 10 Hazard signal, turn signals F17 7.5 Brake light, ignition switch illumination, interior lighting F18 25 Cigarette lighter, glove compartment light, interior heater F19 10 Reversing lamp , monitoring the serviceability of the brake light F20 7.5 Rear fog lights Additional fuses and relays are located to the right of the center panel. Unscrew the screws and remove the cover:
Next we see these fuses:
1 - ignition module 2 - speed, air flow, heating sensors 3 - fuel relays, pump, injectors 4 - fan 5 - fuel pump 6 - ignition Now you know how to change fuses on your VAZ 2110, 2111, 2112 yourself. The procedure is quick and simple.
I brought this out for myself so that I could quickly log into the blog and see which fuse is responsible for what for other users. Thank you!
52 likes Subscribe
Principle of operation
VAZ 2110 stalls, the fuel pump relay clicks
The operating principle is as follows:
- the relay uses a classic contact closure circuit;
- the relay core is represented by a classic coil;
- manual supply of the closing and opening signal is also involved.
Today, a modern European car is almost completely automated and the concept of “a car won’t start” is practically not found in economically developed countries. This phenomenon is primarily explained by the automation of the relay operation. In particular, the frequency of contact closure controls the built-in on-board control system, plus the material from which the wiring is made has increased electrically conductive properties. This, in turn, allows for more economical and efficient use of material and technical capabilities:
- Firstly, relay wiring from European manufacturers consists of high-tech alloys, this in turn allows you to avoid such phenomena as wiring burnout as a result of electrical short circuits.
- Secondly, the speed of current conduction is quite high, which ensures almost instantaneous transmission of an electrical impulse from point A to the final conditional point B.
Note. Despite the multiple advantages of relays from European manufacturers, from a practical point of view they are inaccessible to the average motorist. Due to the narrow technical range of compatibility and fairly high price.
Design features of relays from national manufacturers
VAZ 2110 how to check the fuel pump relay
Almost all relays of the national automobile industry are identical to each other, since they are produced according to the general principle, which was developed back in the 70-80s. So, the relay usually consists of 4-5 five terminals. The peculiarity of the structure of a 4-pin relay is the absence of a central terminal. The relay is connected to the electrical network using a special plug made of dense plastic. Inside, this plug contains special openings for wires, which are popularly referred to as “decoys”. Inside the relay itself, there is a coil that is attached to the core.
VAZ 2110 fuel pump switch relay
- When voltage is applied, the core of the electric coil is automatically magnetized, thereby attracting the movable contact to itself, thus closing the electrical contacts, as a result of which a spark is actually formed. The moving contact itself is well fixed in a certain position by a spring. The movement of the contacts depends entirely on the electromagnetic activity of the core.
- Inside the relay there are two moving and two fixed contacts. If the relay has 4 contacts, then it works exclusively for closing; if it has 5 contacts, then it operates in two main modes: closing and opening. Modern relays are equipped with 5 contacts, since in this case, the efficiency and reliability of operation increases significantly.
Do-it-yourself relay troubleshooting
VAZ 2110 electric fuel pump relay
The main reasons that can cause a relay to malfunction:
- the service life has been significantly exceeded;
- low-quality material of the relay coil and its contacts;
- Incorrect relay wiring connection, etc.
VAZ 21102 fuel pump relay
As a rule, there are countless reasons for the relay to fail, but there is only one outcome - the car simply does not start. Therefore, there are two possible options: a breakdown of the relay or the fuel pump (see VAZ 2110: problems with the fuel pump and all about it). If you hear any electrical sound when you try to start the car, then the relay is functioning properly, and the problem lies in the fuel pump.
VAZ 21104 fuel pump relay
The main and most common reason for the inability to bring the engine into an active state is a clogged fuel pump mesh. In connection with which it needs to be replaced in order to eliminate this current problem:
Note. You should always have a filtration mesh for the fuel pump on hand, and it is advisable to have several of them, otherwise you will have to wait a long time for the service center staff.
- First of all, you should disconnect the battery, thereby temporarily de-energizing the car in order to comply with safety measures.
- Then you need to relieve the pressure; to do this, you need to unscrew the plastic cap on the side of the aluminum lamp.
- Then, in the center there will be a fitting, which will need to be pressed with some hard, blunt object. After which liquid (gasoline) will flow out of it, thus releasing the pressure inside the gas pump.
- After releasing the pressure, the fitting will need to be tightened with the cap that was previously removed from it.
Electric fuel pump relay marking
Note. The fuel pump itself is located under the rear seat of the car. To open access to it, you need to remove a special quadrangular cover.
Fuel pump repair
- standard open-end automotive screwdriver;
- key to 17;
- Be sure to have a tube for 7.
Note. To work, you need a tube for 7, even 8 or 6 won’t work. If it is absent, it will be impossible from a practical point of view to open access to the fuel pump.
- Once access to the fuel pump is opened, it will be necessary to remove the plastic terminal, which is very easily disconnected when a certain amount of force is applied.
- Then, you will need to unscrew two nuts, each of which is located on the outlet circuit.
- The final stage involves using a 7 tube, with which you need to unscrew the 8 nuts.
- When all 8 small nuts are unscrewed, you will need to remove the rubber coating from the studs.
Note. When removing, you must act extremely carefully so as not to damage the float.
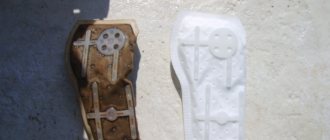
- Then, when the fuel pump is outside, you need to replace the old filter mesh with a new one.
Signs of clogging of the old filtration mesh can be seen with the naked eye, since in one case it is gray, in another black, depending on the degree of its clogging. After replacing the screens, you need to reassemble the fuel pump in the reverse order, which in principle does not present any significant difficulty. Repairing the fuel pump and thereby eliminating the cause of the car’s refusal to start is not difficult, both from a theoretical point of view and directly from a practical one. The main thing is to consolidate all the information received about this technical manipulation visually using video and photo materials. The instructions will allow you to eliminate the most common cause of car malfunction with your own hands. Since replacing the filter in the gas pump does not present any difficulty, the price of this technical procedure is purely arbitrary, since its implementation corresponds to the cost of the filtration mesh. In fact, in a rare case, the cost of repairing a car is almost zero. In the process of independent work, a novice motorist will learn where the fuel pump relay is located and what to do if it does not click.
Where is the VAZ-2110 fuel pump relay located?
On any passenger vehicle that runs on gasoline, the gasoline pump performs the function of supplying fuel from the tank to the metering device.
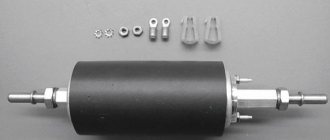
There are two types of fuel system: carburetor and injection. Fuel pumps on cars with carburetor engines are located on the back of the valve cover, not far from the distributor. In a car with an injection engine, the fuel pump (hereinafter referred to as BN) is located in the fuel tank. In the case when the BN fails, it becomes difficult for the engine to develop speed and pull. In frequent cases, the engine does not start at all.
Tips for motorists
VAZ-2109 passenger cars of the last years of production had injection engines, so on these “nines” an electric fuel pump was installed in the fuel tank. And on a small part of the VAZ-2109 with a carburetor engine still in use today, mechanical fuel pumps were installed.
Failure of the fuel pump on VAZ-2109i injection engines is determined quite simply, since when the ignition key is turned to the “ignition on” position, the driver simply will not hear the characteristic noise that the operating electric motor of the fuel pump makes. Typically, drivers of “nines” begin their search for the cause of a fuel pump failure by checking the condition of the fuse that protects this electrical circuit.
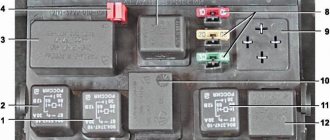
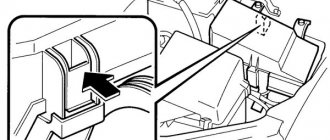
It is located under the front panel shelf, which is located below the glove compartment. When you unscrew the fastening screws, the block of three relays and three fuses on the wires will move lower, so it will be more convenient to work with it. You will need to check the rightmost fuse and the condition of its contacts. If a blown fuse is detected, it will have to be replaced with a new one. And also find the reason why he burned out.
If the fuse is intact and the contacts are not oxidized, then the next step in troubleshooting is to check the functionality of the fuel pump relay. It is located in the same block as the fuse and is located on the far right. Drivers usually check it by replacing it with a known-good relay. If after such a replacement the fuel pump starts working, then you will have to purchase and install a new relay.
BN electrical diagram
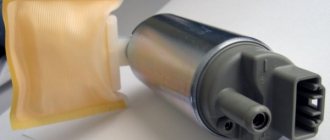
The structure of the electric fuel pump (hereinafter referred to as EBN) on the domestic VAZ-2110 car is very simple in structure. It is an electric motor powered by 12 volts. This device protects the pump body from the entry of dirt and dust particles, which serves to protect it from possible damage and contamination.
The EBN of a VAZ-2110 car contains the following elements:
- egnition lock;
- circuit breakers;
- relay;
- electrical wiring;
- the engine control unit.
When the ignition key is turned, power is supplied to the BN terminals through the vehicle relay, and the pump pumps gasoline. After filling the inlet line of the fuel line with flammable liquid, the electrical control unit gives a command to turn off the voltage. In this way, the fuel system is prepared to start the car engine. You just need to scroll while pressing
motor starter motor.
BN relay for VAZ-2110
The function of a relay in any electrical circuit is to close and open a circuit in order to protect the elements of the entire circuit from high inrush current. When starting the engine, the current required for the starter to turn over reaches 80-300 Amperes. If there is no relay, any element of the electrical circuit may fail.
The BN relay of the domestic “ten” has an electromagnetic coil with a core inside a plastic housing. When voltage is applied, the contacts close immediately. The relay for this car is four-pin.
Pinout BN VAZ 2113, 2114, 2115
— block headlights; — gearmotors for headlight cleaners*; - fog lights*; — ambient temperature sensor; - sound signals; — engine compartment lamp switch; — electric motor of the engine cooling system fan; — generator; — low oil level indicator sensor; — washer fluid level sensor; — front brake pad wear sensor; — wire tips connected to the common windshield washer pump**; — windshield washer pump; — headlight washer pump*; — wire ends for connecting to the rear window washer pump on VAZ-2113 and VAZ-2114 cars; — low oil pressure indicator sensor; — engine compartment lighting lamp; — wire lug for connecting to the wiring harness of the engine control system; — gear motor for windshield wiper; — starter; — a block connected to the wiring harness of the ignition system on carburetor cars; — coolant temperature indicator sensor; — reversing light switch; — low brake fluid level indicator sensor; - accumulator battery; — low coolant level indicator sensor; — relay for turning on fog lights; - mounting block; — brake light switch; — plug socket for a portable lamp; — hydrocorrector scale illumination lamp; — switch for the parking brake indicator lamp; — block for connecting a backlight lamp; — switch for instrument lighting lamps; - Understeering's shifter; - hazard warning switch; — front seat heating element relay; — ignition switch; — rear fog light circuit fuse; - fuse for the front seat heating elements; — door lock circuit fuse; — front ashtray illumination lamp; — ignition relay; - cigarette lighter; — glove box lighting lamp; — switch for the glove compartment lighting lamp; — heater fan electric motor; — additional resistor for the heater electric motor; — heater fan switch; - heater switch illumination lamp; — lamp for illuminating the heater levers; — gear motors for electric windows of the front doors; — power window switch for the right front door (located in the right door); — gear motors for locking front door locks; — wires for connecting to the right front speaker; — gearmotors for locking rear doors; — wires for connecting to the right rear speaker; — door lock control unit; — wires for connection to radio equipment; — headlight cleaner switch*; — rear window heating element switch; — relay for turning on the rear fog lights; — block for connection to the heating element of the right front seat; — rear fog light switch; — switch for the heating element of the right front seat; — fog light switch*; — switch for external lighting lamps; — left front seat heating element switch; — block for connection to the heating element of the left front seat; — wires for connecting to the left front speaker; — power window switch for the left front door (located in the left door); — power window switch for the right front door (located in the left door); — wires for connecting to the left rear speaker; — side direction indicators; — courtesy light switches on the front door pillars; — courtesy light switches on the rear door pillars; - lampshade; — ceiling lamp for individual interior lighting; — block for connecting to the wiring harness of the electric fuel pump; — trunk light switch; — instrument cluster; — trunk lighting lamp; — display unit of the on-board control system; - trip computer*; — block for connecting the wiring harness of the engine control system; — rear exterior lights; — rear interior lights; — pads for connecting to the rear window heating element; — license plate lights; — additional brake signal located on the spoiler.
Common reasons leading to relay failure:
- Significantly exceeding the operational life of the element.
- Poor quality of relay coil materials, as well as the contacts themselves.
- Incorrect relay wiring connection.
There are many reasons why the BN relay may not work, but they all have the same outcome - the car engine will not start. In this case, there are two possible options: a malfunction of either the BN or the relay itself.
You can determine that the relay is in good condition by the electrical sound that will be heard when you try to start the car engine. Given this scenario, it is time to conclude that the BN does not work.
One of the main reasons why a BN may fail is that its mesh is clogged. In this case, it needs to be replaced urgently, which
would eliminate this problem. First, you need to completely disconnect the battery to de-energize the car and protect yourself. Then release the pressure by unscrewing the cap on the aluminum plastic lamp. After this, press on the fitting using a hard and blunt object. The pressure inside the BN will be released when hot liquid flows. After this, the fitting must be screwed back.
Every car owner can notice that the filtration mesh is clogged without much difficulty. After all, the mesh in this case becomes either gray or black, depending on how dirty it was. After this replacement, it is necessary to assemble all the elements of the fuel pump in the order in which they were located.
Fuel pump relay for VAZ 2110
As everyone knows, it is energy that starts any mechanical process in a car. The relay is a trigger mechanism. Its purpose is to start the engine when internal contacts connected under the influence of electric current occur.
If you specifically disassemble the VAZ 2110 fuel pump relay, a certain specificity of its operation is revealed. Of course, a very large number of drivers do not know at all where exactly the fuel pump relay is located and what the basic principles of its operation are. Because of this, difficult situations often arise during breakdowns.
Finding the fuel pump relay and troubleshooting
As you know, in order to start any process, be it mechanical or electrical, you need a source of energy. And the relay thus represents a kind of trigger mechanism, because its work is to connect the contacts located inside, which close when exposed to electric current.
If we personally consider the VAZ-2112 fuel pump relay, then there are certain specifics in its operation. It also happens that many car enthusiasts simply do not know where exactly this relay is located, and how to correct the malfunction when it fails.
Principle of operation
Almost all relays that are mounted on Russian cars are identical. For the most part, they differ in the number of contacts with five versus four, and the latter, as a rule, does not have a central input.
The current strength, measured in Amperes, is also almost the same and is about 30 - 40A.
The relay in the photo is 30 Ampere.
The relay is connected to the network using a plastic block (plug - approx.), and when the electric current reaches the coil inside the relay and the magnetization process begins, it then closes and the circuit is connected.
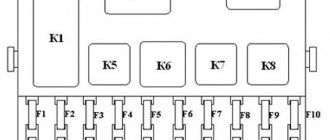
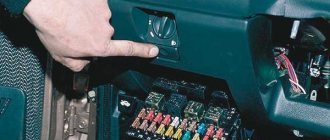
Relay in additional fuse box
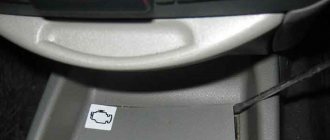
Location of the additional relay unit inside the car
The fuel pump relay is located on the left side of the front passenger's feet, where three relays and three fuses are located next to each other.
After dismantling, we put it aside
The fuel pump relay is located exactly in the middle under the number “ 5 ”. Nearby, there is also a fuse numbered “ 3 ”.
Functionality check
In order to check the fuel pump fuse, you just need to inspect it and, if necessary, replace it with a known working one.
There are several methods to check the fuel pump relay:
- The easiest way is to replace the old relay with a known good one .
- If you don’t have one at hand, you can use a regular multimeter .
Operating principle and checking the device status
Almost all domestic relays are produced identically, since they are made according to the same template, developed when the first models were released. Basically, relays have 4-5 output models. Moreover, the main characteristic of a 4-pin relay is the absence of a central input. The device is connected to electricity using a special plastic plug, in the middle of which there are special slots for wires.
If you look specifically at the relay core, you will see a coil attached to the core. Therefore, it can be concluded that when electricity reaches the core of the electric coil through the wire, it automatically begins the process of magnetization. After the process starts, a motor contact is attracted to the coil. As a result, the electrical contacts close and a spark is formed, bringing the engine into working condition.
If the car not only does not start, but also does not make sounds when you turn the ignition key, perform an independent performance check. First of all, you need to pay attention to how the fuel pump fuse behaves. In 2110 it is located on the left side of the front passenger's feet.
Keep in mind that the relay is located close to the fuse, so it would be a good idea to look at it right away. To do this, you need to check the voltage level in all terminals one by one. As a tool, it is best to use a test lamp, the current consumption of which will be no more than 0.25 A. If it does not light up, the fuse is already faulty.
At the second stage of testing, connect the test lamp not to the relay, but directly to the terminals. When you turn on the ignition, the lamp should light up. If this does not happen, it is the fuel pump relay that is faulty. Also a good way to check would be to replace the relay with a working one. If it works, then everything is in order, and if not, then the cause of the breakdown is hidden elsewhere.
In order to check the operation of the fuel pump, it is necessary to remove it. Also, to identify malfunctions, it may be necessary to completely disassemble the fuel pump.
Then you need to apply approximately 12 W from the battery directly to its contacts. When carrying out the inspection, you must try to carry out all actions with the utmost caution, as remaining gasoline may ignite. If you are convinced that the breakdown was caused by the fuel pump, keep in mind that, most likely, the alarm is to blame, which was triggered by a strong impact and blocked the operation of the fuel pump.
Connection diagram of the VAZ 2110 mounting block
The order of conventional numbering of plugs in the connecting blocks of the mounting block and the wires connected to them