Complete sound insulation of a car is a set of measures aimed at both reducing the noise level in the cabin and changing its frequency response (amplitude-frequency response). Contrary to popular belief, achieving noticeable results in these areas is extremely difficult. It is no less difficult to objectively evaluate the effectiveness of the installed sound insulation and understand whether the money was wasted, or whether the car has actually become quieter and more comfortable.
The purpose of this article is to provide comprehensive answers to the following questions in detail and understandably for a non-specialist:
1. How does complete sound insulation of a car work? 2. How much money is needed to implement it? 3. How not to soundproof a car? 4. How to properly prepare the car? 5. What materials and tools should I buy? 6. How to completely soundproof a car step by step? 7. How to properly check the effectiveness of the installed sound insulation?
Along the way, you will learn about the main nuances of this procedure, as well as about mistakes that, unfortunately, are made even by professionals. That is why most of the article is pure theory based on experience, without knowledge of which it is better not to start practicing. At least, even if after reading the material you refuse to make noise insulation with your own hands, you will have at least an approximate idea of what to demand from professionals who often hack for ridiculous amounts of money.
How does complete car soundproofing work?
Since complete sound insulation is, by definition, a complex undertaking, its effect should be the same. That is, this procedure cannot be aimed at any one goal, for example, to reduce the volume of noise. If you strive only for this, then, most likely, there will be no sense in the work done. Or rather, you won’t be able to adequately evaluate it.
Therefore, before proceeding with complete sound insulation, it is necessary to determine its goals. What exactly are we going to fight? In the case of a car, complete sound insulation allows you to solve the following problems:
- General vibration damping of body metal.
- Reducing noise levels.
- Reducing high-frequency noise frequencies.
- Dampening vibrations and engine noise.
- Same thing with the suspension.
- Preventing squeaks of plastic parts.
- Correct acoustic design of doors.
- Increasing the rigidity of non-load-bearing body elements.
- Weighting the car in order to reduce its sensitivity to sound vibrations.
- Preventing metal corrosion from inside the car.
Already at this stage it becomes clear that it is impossible to achieve all these goals using any one material, or by selectively finishing some body parts. This is the essence of complete sound insulation of a car. Looking ahead a little, we note that only this approach to the matter works, that is, it gives tangible results. All other methods and techniques are pitiful parodies of sound insulation that do not work, but only lead to disappointment and waste of money.
But let's return to our main question - how does complete sound insulation work? How does it help achieve the goals listed above? Let's try to explain this, focusing on the already existing points:
- Vibrations of the thin-walled metal of the body are the main source of noise in the car interior. Vibrations are transmitted mainly from the suspension and engine. Also, some parts of the body vibrate under the influence of oncoming air flow when driving. To overcome these problems, it is necessary to increase the rigidity of the thin metal, as well as dampen the resulting vibrations. This is done using vibration-isolating materials.
- If there are obstacles in the path of sound waves, the structure of which “forces” each wave to frequently change direction, the pressure from them weakens. Accordingly, the noise level is reduced. Felt (usually) soundproofing materials can achieve this.
- Low-frequency noises, roughly speaking, are less irritating to the human ear than high-frequency ones. To reduce the frequency of noise, it is enough to “cut” the high frequencies. As a rule, both vibration-proofing and noise-proofing materials are “engaged” in solving this problem.
- Noise and vibrations from the engine are transmitted to the cabin through the engine shield and front panel. This can only be dealt with comprehensively - with the help of vibration and noise insulation, as well as by preventing squeaks of plastic parts.
- With noise and vibrations from the suspension, everything is the same, although the technology is slightly different. We will return to this later.
- Plastic parts rubbing against each other creak and ring, which generates nasty high-frequency noise. You can easily deal with them using anti-creaking materials.
- Doors make up almost half of the interior in terms of the area of the “noisiest” surfaces. They are given special attention. Proper acoustic design of doors not only means that the speakers built into them will sound differently. The sound of closing doors will also radically change for the better.
- The stiffer the body element, the harder it is to “rock” it and “make” it vibrate. To significantly increase the rigidity of individual areas of the body, a special vibration-proofing material is used, which is applied locally.
- After comprehensive sound insulation, the car becomes heavier, in general, by several tens of kilograms. And as you know, the heavier the body, the less sensitive it is to vibrations.
- Internal corrosion of a car is rightfully considered more insidious and problematic than external corrosion. The main “enemies” here are condensation accumulating on the metal in the cavities of the body. Accordingly, if vibration-proofing material is glued to the surfaces of these cavities, there will be no condensation there. But only if it is properly pasted, but more on that later.
Let's summarize the above. Complete sound insulation of the car - prevents, reduces and dampens vibrations, lowers the volume of noise, changes their frequencies to less annoying ones, eliminates plastic squeaks, improves the sound of acoustics and closing doors, and also partially protects the body from internal corrosion.
About the disadvantages of sound insulation
Possible shortcomings of the work carried out to reduce the noise level in the car are associated with their quality. Unscrupulous work can lead to the opposite result.
- Excessively glued layers of sound-absorbing material can lead to weakening of fasteners and deformation of body parts, which leads to sagging of doors and replacement of their hinges, deterioration of the lock.
- The increase in weight due to the materials used can reach up to fifty kilograms, which reduces fuel efficiency
- There is a risk of improper disassembly and assembly of the car by inexperienced workers and damage to parts of the interior of the car.
- Installing sound insulation on a car under warranty may result in a refusal to repair it free of charge.
- An uncalculated size of the soundproofing part can lead to problems when installing some interior parts.
- The increased floor level as a result of the work causes the edges of the rugs to rise and your feet to cling to them. For the driver, this can lead to problems when pressing the clutch.
- Changing the weight of the trunk lid may prevent it from automatically lifting when the lock is opened, which will require careful closing.
- Layers of vibration and noise insulation in the internal cavities of doors can slow down the drying of water that gets there as a result of precipitation, which can lead to the development of corrosion processes
- Sounds inside the cabin that were not noticeable before, such as rustling things, creaks, etc., can be detected and irritate the driver.
How much does it cost to completely soundproof a car?
If we focus on the most common money in the world, then we can safely say that the average cost of full-fledged sound insulation for a car has not changed for many years. It consists of two components:
- Cost of materials.
- Cost of work.
If you decide to do complete soundproofing of your car with your own hands, then the materials themselves will cost you, on average, about a hundred bucks. This is if you have a standard sedan car. Accordingly, if you have a coupe or hatchback, then perhaps a little cheaper. Station wagons and minibuses like the Vito from Mercedes-Benz will cost a little more. Plus, if you do everything yourself, you may have to buy some tools if you don't have them in your garage.
If you decide to completely trust the professionals, then the cost of their work is usually equal to the cost of materials. That is, the whole thing will cost about two hundred dollars. The advantage here is that you don't have to buy a tool that you won't need in the future. But the most important thing is the time saved, since without experience there is no way to quickly complete soundproofing of a car.
Accordingly, if you turn to professionals, you should not be fooled by suspiciously low prices. Most likely, the attractive prices will hide partial sound insulation, which will be of no use... And the quality of the materials, too, most likely, will not even be mediocre.
Mistake 1: Don’t overestimate your strengths and capabilities
If you do not have the necessary experience and skills in working with soundproofing materials, and rely only on instructions found on the Internet, then most likely you will be disappointed at the end.
Solution: If you are not confident in your abilities, trust the professionals. Otherwise, you will waste money on damaged material, and you will have to pay extra for its dismantling separately.
Calculate the cost of soundproofing your car using a calculator
Calculator
How not to soundproof
Remember a fact that has been tested many times in practice: you can feel the effect only with complete sound insulation . All other technologies are money down the drain. Therefore, we will briefly list the key points on how not to soundproof a car:
- Many try their hand, starting small. As a rule, they install sound insulation in the front doors, do not get any results, and completely abandon this idea.
- Sound insulation itself without other insulation is practically useless. It is necessary to use several different materials, both in name and in thickness.
- Noise insulation cannot be considered complete if you are too lazy to treat the wheel arches or engine shield. Unfortunately, due to the complexity of this work, it is missed.
- If the car is “broken down” in technical terms (dead chassis, tripping engine, doors that don’t close properly, damaged or stiff rubber seals, and so on), then even super-full sound insulation of a hundred layers will not help, and the costs of it will never pay off .
- In the matter of vibration and noise insulation, the thickness of materials is of great importance, as nowhere else in other areas. Saving on this means throwing money away.
- Sound insulation should protect against internal corrosion, not aggravate it. Therefore, you cannot paste over surfaces with materials so that there are voids underneath them. Condensation will inevitably form and accumulate there, which will do its vile deed.
- If you have a choice, it is better to give preference to moisture-resistant sound-proofing materials based on polyethylene foam or something like that. Previously, this was impossible to find, so felt-based mats were used. When moisture entered their structure, they almost completely lost their performance. Today this problem does not exist. There are plenty of moisture-resistant materials.
This concludes the theoretical part of the article. Let's move on to practice.
Even if you order complete sound insulation of your car from professionals, it is strongly recommended that you still read the material to the end. This way you will know what to demand from them for the money they will have to pay for the work done.
Mistake 2. Wrong choice of work location and timing
You must have the necessary workplace and tools, as well as a lot of free time. The likelihood of being left without a car for a long time is quite high if something goes wrong.
Solution: Your time costs money. Professional installers, having extensive experience in performing such work and the necessary professional tools, will complete the work of soundproofing a car much faster.
Preparing the car
This stage can be divided into two steps. The first is “exposure” of the metal. The second is cleaning it. By “exposing” the metal we mean the complete dismantling of decorative and functional elements, under which are the body parts that interest us. In general, you need to do the following:
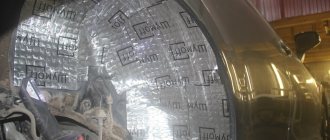
- Doors - cards and “signs” of factory sound insulation are dismantled. Most often, this is a film placed on sealants, pieces of the finest (apparently nanotechnology is at work) vibration insulation. There is even foam rubber.
- Luggage compartment – mats and standard upholstery are removable. Nanotechnological vibration isolation can be left if its quality appears acceptable. Be sure to clear the niche for the spare wheel. It is also very advisable to free all wiring passing through the trunk.
- Salon – ideally you need to remove everything that is being removed. Seats, plastic elements, carpet, headliner. The most difficult part of the cabin is the front part. However, if you are too lazy to disassemble it down to the metal, there will be practically no effect on sound insulation. This is practically the same as patching only one of two bullet wounds.
- Hood – the protective trim is removed.
- Wheel arches are left as they are for now. To get to them, you will have to remove the wheels and fenders. All this can be done after the main work is completed. Well, or vice versa, first the arches, and then everything else.
We won’t talk too much about accuracy. And so everyone understands that for disassembly it is necessary to use plastic devices, and everything that is removed must be marked and not lost in the process.
Low quality factory sound insulation
The goal of any enterprise is to maximize profits and reduce costs. To achieve this goal, car manufacturers have to save money. Often, not only the ascetic interior and “oak” trim, but also standard sound insulation become victims of such savings. It is important for manufacturing plants that the level of internal noise in the vehicle they produce complies with interstate standards, regulations, and GOSTs. It is enough to achieve the noise level at the lower limit and the car will be on the market. Accordingly, to achieve this goal, the cheapest and most outdated solutions are used: felt and fabric processing products, holofiber-like materials, as well as crushed foam rubber residues sealed in bags.
In addition, factory sound insulation is applied pointwise and is not always correct from an engineering point of view. For example, among the untreated surface of a car, it is often possible to identify areas with high vibration load.
Another problem with modern cars is the thinning of metal surfaces. The thinner the metal, the more susceptible it is to resonance and vibration. All this leads to increased noise inside the cabin.
All of the above applies not only to budget brands. Today, even premium cars come for tuning, but the same picture is revealed inside: cheap materials, insufficient sound insulation.
Materials and tools
Let's start with the tools , since everything is simple with them. To completely soundproof your car you will need:
- Construction hair dryer with temperature control.
- A pair of special rollers of different sizes for rolling materials onto metal.
- A wooden block (shaped like regular soap) for smoothing materials where a roller cannot reach.
- Materials for cleaning metal - from ordinary rags to metal sponges and stiff brushes.
- Metal scissors.
- Stationery knife with replaceable blades.
- Roulette.
- Disposable gloves.
- A vacuum cleaner (as a rule, you don’t need to buy it, since everyone has one).
- Straight arms from the shoulders.
Don't forget to buy some degreaser for this set. Experts today recommend using anti-silicone solvents because they are effective and do not harm the paintwork.
Basic materials you will need:
- Rigid vibration isolation for local application.
- Classic vibration isolation.
- Soundproofing material.
- "Anti-creak".
There is no universal answer to the question of how much and what kind of material will be required, since all machines are structurally different. If you find it difficult to figure it out yourself, you can go in three ways. The first is to ask a competent specialist or consultant. The second is to buy a little at a time, and then buy more. The third is to buy a ready-made set for sound insulation, and then supplement it.
Regarding the thickness of the materials. It is quite clear that the thicker the better. And in the case of a car, this rule works like nowhere else better. However, you should understand that it is not possible to fit several layers of thick material everywhere and then successfully assemble the finish back to the way it was. As a rule, vibration insulation can be taken all of the same thickness. But you can use thicker sound insulation on the roof, floor, engine compartment and trunk. For doors, depending on the design of the cards, sound insulation of medium thickness is usually taken.
What is rigid vibration isolation for local application, and how does it differ from conventional one? This is a material that is similar in rigidity to thin aluminum sheets. It is glued locally, and in small pieces, usually about 10-15 centimeters long and wide. It practically does not bend, so gluing large pieces will not work. Yes, and there is no need for this.
Error 6. Incorrect preparation of the surface to be covered with soundproofing material.
When carrying out noise insulation work, many do not pay due attention to the high-quality preparation of the surfaces to be glued. As a result, the adhesive material will simply come off after a short period of time and cease to perform its main function.
Solution: Before pasting with protective material, you should prepare the base as thoroughly as possible. Clean it from dust, dirt, corrosion, and existing sound insulation. Degrease the metal to enhance adhesion. Strictly follow the recommendations of the manufacturer of soundproofing material for surface preparation.
Complete car soundproofing step by step
If you have carefully read everything that was written above, then you practically no longer need detailed instructions. You understand how complete sound insulation works, what it consists of, what materials are used, and where exactly. Therefore, there is no particular point in describing each step in detail. Moreover, the technologically complete sound insulation of a car is very similar from step to step.
In particular, you need to remember the following general nuances:
- all metal surfaces must be degreased;
- Only vibration insulation is glued to bare metal;
- sound insulation is glued only on top of vibration insulation;
- vibration isolation is carefully rolled;
- It’s better to skip stiffening ribs and other areas that cannot be properly rolled;
- overlapping vibration insulation is allowed;
- There is no need to try to stick vibration and noise insulation materials in as large a piece as possible;
- Anti-creaking material is glued between the plastic parts during the reassembly process.
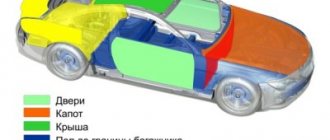
The operating algorithm is as follows:
- Roof . Conventional vibration-proofing material is used, on top of which sound insulation of medium thickness is glued. The stiffening ribs running across the roof are skipped. If the car has a sunroof, make sure that the pasted materials do not interfere with the operation of the mechanisms.
- Motor shield . Vibration insulation layer + noise insulation. This part of the car body, as a rule, has a complex shape, which forces the use of small pieces of vibration isolation. In most cases, together with the engine shield, the part of the floor that is under the feet of the driver and front passenger is also finished in one step.
- Floor . Similarly – vibration isolation + noise insulation. As a rule, the thickest materials are used to soundproof the floor, since this does not complicate reassembly.
- Luggage compartment . Here it is very desirable to use rigid vibration isolation, which was mentioned above. On top there are two classic layers - regular vibration insulation, then noise insulation. Only vibration insulation is glued to the luggage compartment lid. Many people use sound insulation here, but there is no need for it.
- Doors . One of the most difficult steps. A car door is conventionally divided into three surfaces - the inner side of the outer panel, the outer side of the inner panel and the card. So here it is. Vibration-isolating material is glued onto the first surface in small pieces (some people glue Shumka on top, but there is no special effect from this). Vibration insulation is glued to the outside of the inner panel, and the technological holes are skipped. Next comes a layer of sound insulation, which covers everything that is possible. At this stage, it is important to make sure that the operation of the locks and windows is not affected. Door cards are covered from the inside with a thin layer of vibration insulation. Many people make the mistake of using sound insulation at this stage. However, practice has shown that vibration isolation works better here.
- Front Panel . The internal surfaces of the dashboard are finished with vibration insulation. During assembly, all contacting parts are covered with strips of anti-creaking material.
- Hood . The same as in the luggage compartment - only vibration isolation is glued. The stiffening ribs are left as is.
If the wheel arches were left for later, then they will begin to work on them after the complete reassembly of the interior. The technology here is simple. All wheels and fender liners are removed one by one, vibration-isolating material is glued onto the prepared metal and carefully rolled, after which everything returns to its original state. Sound insulation, as a rule, is not used on wheel arches, as this may complicate reassembly.
As an alternative, so-called noise insulation can be used to vibration-proof the wheel arches. It has proven itself well, moreover, it has several advantages over adhesive materials.
Mistake 4. Selecting soundproofing material is a complex issue
Novice amateurs often cannot understand the entire mass of soundproofing material available on the market. Additionally, many materials are simply not designed for use in automobiles. Thus, some use polyurethane foam, furniture foam rubber, various types of insulation , which, when in contact with an aggressive environment (moisture, high temperatures from a running engine, dirt) quickly collapse, release carcinogenic substances, and cause corrosion of the metal elements of the car. And, of course, they do nothing to reduce noise. There are cases of overpayments for materials, and the possibility of buying a fake.
Solution: For maximum effect, it is necessary to use only professional materials that are most effectively suitable for organizing sound insulation of a particular element of the car. In order not to get a negative effect from using this or that material, do not mindlessly follow “bad” advice from the Internet, but consult with specialists in the field of sound insulation.
Do-it-yourself trunk soundproofing
Trunk noise protection reduces the sound of the rear wheels, suspension, and exhaust system. After removing the casing, all elements are subject to insulation: floor, walls, doors. If necessary, the shelf is also processed. It is important that the layers fit tightly - this will determine the tightness and efficiency of the work. Therefore, the main stage that requires concentration is making patterns for all the shaped parts of the compartment.
For a vibration-insulating layer in small areas, materials 2-3 mm thick are used. Thicker sheets are acceptable for the bottom. The noise-absorbing layer for the floor is smooth, or carpet can be used. For the walls and trunk lid, we recommend porous products.
High-quality car audio
After soundproofing the doors, the effect will occur immediately, which will improve the sound of the acoustics. This is easy to explain, because the metal on most cars is thin and it “walks” when the speakers are working. After applying vibration insulation, the rigidity of the car door will be higher, which means the sound of music will improve.
You can achieve good sounding car music not only by purchasing expensive acoustics, but also by using well-made sound insulation. Even simple speakers will sound better.
The disadvantage of sound insulation is excess weight. The weight of the door will become much greater, but not critical. There are rumors that many car enthusiasts have sagging doors and have to change the hinges. Everything is relative here, you shouldn’t put “Shumka” in ten layers, you won’t achieve a multiple effect, and the weight will increase. You need to look for a middle ground, when the weight of the door remains normal and the noise works effectively.
Much doesn't mean better. You need to look for the best option and not chase after pasting each part in several layers and more than one material. This is of little use.