How to repair a heated rear window of a car with your own hands
Heated rear window is actually a mandatory option, as it allows you to get a high-quality view, which is necessary for the safest operation of the car.
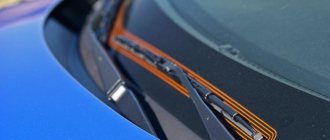
Heating is necessary both in summer (removing moisture from foggy windows) and in winter (it becomes possible to quickly melt ice and snow on the glass). The heating itself consists of special conductive tracks (rear window heating threads) applied to the glass from the interior side.
At first glance, the solution is simple and reliable, but this is not entirely true. Unfortunately, during the operation of the car, for one reason or another, repair of the heated rear window may be required. Next, we will look at how to find the cause of the problem and troubleshoot.
How to find the location of a broken glass heating filament
Now let's talk about how to check where the rear window heating thread has broken. To do this, you will need a voltmeter or ohmmeter of your choice. Do the following:
- Inspect the rear window - sometimes the break is visible to the naked eye: the thread is interrupted and resumes after a few millimeters.
- Turn on the heating and see where the water drops have not dried. Take a magnifying glass and look at this area more closely.
- Let the heating function remain active. One metal rod of the voltmeter needs to be connected to the positive heating terminal, and the second should be drawn along the thread from the side of the clamp with the “-” sign. Keep an eye on the indicators: the break will be where 0 volts is displayed.
- Take an ohmmeter and attach one probe to the common wire (the negative of the battery is connected to it), and carefully lean the other one against the center of each thread in turn. The break is where the resistance jumps to 4-6 ohms.
Operating principle and circuit of rear window heating
As mentioned above, heating can fail on any car, regardless of class, make and model. Moreover, all types of rear window heating are similar to each other. This means that heating the rear window of a VAZ will not differ much from a similar solution on any foreign car.
The general rear window heating circuit includes the following main elements:
- heating switch;
- heater fuse and relay;
- heating threads;
When the driver presses the heating button, voltage goes to the relay winding, then the relay is activated and its contacts close. After connecting the relay terminals, the electric current goes to the heater, passes through the heating filaments (connected in parallel), after which the current returns through the car body to the negative terminal of the battery.
Why doesn't the heated glass work?
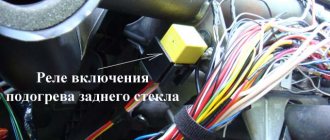
- Safety and button. The simplest and most easily repaired breakdown is the fuse and the power button. It happens that the electric heating itself is absolutely fine, but the problem is a blown fuse or a non-working button. To check whether this is true or not, find in the fuse block the one that is responsible for the operation of this unit and check its serviceability. Pay attention to the power button, it is often illuminated; if the button does not light up, there may be a problem with it. Check the contacts and its serviceability.
- Wiring. Poor contact or poor wiring integrity is always the cause of device failure. Without power or in case of power failure, the electrical appliance will not work. Check the contacts and integrity of the wiring; a multimeter is suitable for this. We turn on the glass heating and measure the voltage at the wiring terminals. We connect one probe of the device to “+”, the second to ground, that is, “-“. If the device does not show voltage, the wiring is damaged. If the positive wire is intact, move one probe of the device to the “+” of the heater filament itself, glued to the glass, and the second to the “-“. It happens that the contacts oxidize or the connection is broken. In this case, there will be a potential difference between them, less than 12 V or completely absent.
- Damage to the heater filaments. In most cases, thread rupture occurs as a result of mechanical stress. This could be a blow, crack, chip, careless installation, or removal of the tint film. It is not difficult to understand where exactly the glass heating breaks; just turn on the heating and look at the glass. After the damaged area, the glass will remain the same as it was. If it was not possible to visually determine the location of the break, we again arm ourselves with a multimeter.
Heated rear window: diagnostics
As practice shows, malfunctions of the rear window heater are often associated with mechanical damage or failure of individual elements. For example, a relay or switch may “stick,” or heating fuses may blow.
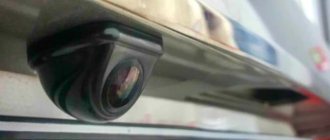
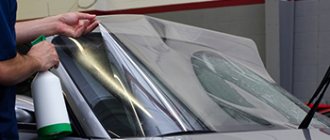
It also happens that the heating filaments themselves are damaged when transporting goods (this is especially true for a hatchback or station wagon type body). Often the heated rear window fails after unprofessional tinting of the rear window or attempts to tint the rear window.
Moreover, on some cars, the rear window heater will only work when the internal combustion engine is started, in order to prevent the battery from being discharged. The fact is that heating is a powerful consumer (current from 10 to 25 A) and car manufacturers take this into account.
- Now about the malfunctions. As a rule, if after pressing the power button the indicator light in the button does not light up, this usually indicates that the rear window heating fuse has blown or the switch itself has failed. If the indicator is on, but the filaments do not heat, then you need to check the relay or connectors for connecting the heater to the network. In such a situation, you need to study the diagram according to the manual for a specific car, then identify the problematic element and replace it.
It also happens that the heating works, but very weakly, the glass warms up slowly. This indicates that there is poor contact somewhere on the connectors, the contact resistance becomes greater and the power on the heating threads decreases.
To check this, you need a multimeter, which is switched to voltmeter mode to measure direct current. The device measures the voltage at the heating and battery input terminals. The voltage difference should not be more than 1 Volt.
It is important to understand that the conductive paths on the rear window are easily damaged; you can only wipe the glass from the inside with a soft cloth. However, if the threads are already damaged, there are three ways to solve the problem:
- rear window replacement;
- installation of a separate heater;
- rear window heating repair;
As for repairs, if the rear window is not tinted, then you can try to solve the problem relatively inexpensively. The main task is to find the damaged area and restore conductivity. Let's figure it out.
How to find a damaged rear window heating area
Repairing the rear window (more precisely, its heating if the filaments are damaged) usually begins with the question of how to find the location of the broken glass heating filament.
In fact, it is not difficult to determine the damaged area if you know the layout and design of the heating itself. You also need to know how to check. First, just turn on the heating, after which you can see which thread is not working. Having remembered which glass heating thread is broken, you also need to find the break point itself. Often the gap cannot be determined visually. For this reason, a DC voltmeter or ohmmeter is required. A voltage indicator will also work.
- So, if one glass heating thread or several threads do not work, but the rest work, you should take into account the design features of the heating as part of troubleshooting.
Let's start with the fact that the rear window heater of a car is designed as follows:
- two conductive bars are glued to the sides of the glass;
- heating filaments are connected to the busbars (resistance about 10 Ohms).
It turns out that each thread is a separate heating element, that is, it does not depend on the others. Due to this parallel connection scheme, the break of one or more threads will not completely disable the heating.
Taking into account the fact that one heater bus is connected to the body, the negative terminal of the voltmeter is connected to the body (it is best to use a clamp-type fastening). To connect, you can use any bolts or screws screwed into the car body, brackets on the trunk lid, etc.
To check whether the rear window heater is heating, just use the “positive” probe to touch the “positive” heating bar, then the “negative” one. On the first bus the voltage is normal +12 V, on the second – 0 V.
On many cars, the tire on the left is ground, while the tire on the right is power. By the way, if the tires are difficult to reach, you can use a feeler gauge to touch any threads at the points where they are connected to the tires and exit the seal. A voltmeter will allow you to determine where the fault is hidden.
- After the first stage of testing, which allows you to determine the quality of the power supply to the heating, you can proceed to searching for the location of the thread break. In fact, the filament is a ribbon resistance of about 10 ohms. This means that in different parts of the thread the resistance is also different (for example, 12 V, 3 - 6 V and then 5 - 0 V).
It turns out that even if it is not known which thread is not working, it is enough to measure the voltage on all threads in the middle of each. Threads with a break will have a voltage of either 12 or 0 V. If the indicator is 12 V, the break is on the left, if it is 0 V, then the break is on the right. Then the probe is slowly moved towards the cliff. Where the tension has changed dramatically, this is the problem area.
Why the rear window heating does not work: reasons, how to check, finding the failure point
If the rear window heating has stopped working or it works but intermittently, this may be due to the following reasons:
1. Vehicle electrical malfunction
.
The search for the fault location should begin with the fuse that serves the heater. If it is in good condition, then check the heater switch (button), relay, and electrical wiring to the heater contacts.
The rear window heating switch button is checked using a multimeter. Its contacts often burn out as a result of high current flow. In this case, it needs to be changed.
One of the most likely places for electrical equipment to malfunction is a break (or rotting) of the place where the contact terminal is attached to the heater. Repair in this case is difficult. Soldering is required using special solders and flux. Gluing with conductive paste is also possible.
Often the electrical wiring is damaged at the junction of the corrugation, where the wiring from the body to the trunk door is located. It is necessary to open the corrugation, remove the wiring, search for the broken conductor and eliminate the break point.
2. Broken filaments
.
Such a malfunction may be associated with the removal of the sun protection film, mechanical scratches on the glass, or natural wear.
Video - how to check the heated rear window with a multimeter:
To find the specific location of the thread break, if it is not visible to the eye, you need to use a multimeter. Its probes should be sharpened or connected to sewing needles. This is necessary to ensure reliable contact of the probes with the heater filaments. First, the faulty thread(s) are identified using a visual or tactile (touch) method. It doesn't heat up. Then the resistance at the extreme sections of the thread is measured.
Typically the resistance is about 2-5 ohms. Next, they begin to move one probe along the broken thread, measuring the resistance. It remains constant until the break point is reached.
After determining the location of the thread damage, it must be marked with a marker.
Do-it-yourself rear window heating repair: glue and soldering
Let us immediately note that there are several ways to repair a heating filament with your own hands. We will not consider some of them due to the low probability of obtaining the desired result at home (for example, galvanization).
- As for available solutions, the simplest and most common method for repairing a heated rear window with thread breaks of no more than 1 or 2 mm is to use a special conductive glue for repairing heated glass or a special paste (for example, Done Deal DD6590).
In short, you need to study the instructions, after which a small amount of conductive paste or glue is applied to the site of the thread break. The loan should be waited until the paste dries.
- The next method is soldering the threads with soft solder to restore the integrity of the threads with breaks larger than 1 mm. This method is reliable and effective, but requires care and consideration of certain features.
Please note that you should not try to clean the thread with fine sandpaper, as this may further damage the tape. The reason is that the thread is only a few tens of microns thick and is simply erased by mechanical action. It is optimal to simply degrease the area that needs to be soldered. To do this, moisten a soft rag in alcohol and gently wipe the thread without pressing.
Next, taking into account the fact that the gap is more than 1 mm, you should prepare a piece of copper wire. This segment will serve as a jumper. Since a current of 1 A passes through the thread, the jumper requires wires with a cross-section of 0.17 mm2 (diameter 0.45 mm). The length of the jumper should be 2 cm longer than the break itself.
Having completed the preparation, the jumper is pressed against the heating filament, after which it is heated with a 12W soldering iron for no more than 1 second. If the jumper holds, you should not check the reliability of the fixation, as there is a risk of tearing off the newly restored thread.
Having soldered one end of the jumper, the other is soldered in the same way, after which the glass should be washed with water to remove any remaining flux. You can also cover the top of the jumper with transparent superglue for additional protection. This glue is relatively heat-resistant, and the heating itself does not heat up more than 70 degrees.
What's the result?
As you can see, if the rear window heating has stopped working, it is important to correctly determine the fault by diagnosing the methods discussed above. It happens that it is enough to replace the relay or fuse, restore contact on the bus, etc.
If the heating threads are torn or broken, the adhesive for heating the rear window has proven itself well if the heating threads of the rear window are broken. With the help of such repairs, as mentioned above, you can quickly restore damaged areas.
The only drawback is that ready-made glue can cost about $20. and higher, and the possibility of producing a high-quality analogue at home in order to save money is questioned by many experienced specialists.
As a result, we add that if you do not damage the threads, the heating works properly for many years. In this case, the main danger to the heating filaments is mechanical damage, as well as common mistakes when removing the tinting film (provided that tinting is applied).
If for one reason or another it is necessary to tint the heated rear window, you must contact only specialists who guarantee the operation of the heating after removing the tint film. However, you should be prepared for additional costs.
The reason is that it is difficult to remove the tint without damaging the heating. Also, the procedure will definitely require more time than regular glass tinting without heating. In any case, for an additional fee, experienced tinters and specialized specialists can quite successfully handle this task, as a result of which, even after removing the tinting from the rear window, the heating remains fully operational.