The braking system of a car certainly cannot be called perfect, so it has to be supplemented with devices that help improve efficiency. One of them is a vacuum booster.
Application and purpose
Today, a vacuum amplifier is in great demand because it is highly efficient. Its tasks are extensive, but the amplifier copes with them all perfectly:
- The degree of resistance of the brake pedal increases;
- Reduces the load on the brake system;
- Acts as a highly efficient auxiliary unit;
- Has a positive effect on the service life of the brake system, etc.
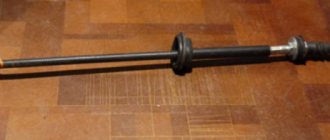
This element has the following components:
- Dense body, for the manufacture of which a high-strength polymer is used;
- The diaphragm, which is also called the collecting node;
- Monitoring or control specialized valve;
- Pusher. It allows you to return the engine elements to their original position when there is no power;
- Main piston rod of the brake system cylinder (main);
- Switch return spring.
The body of this spring has two cellular divisions, which are divided into vacuum and atmospheric. Cells are often called chambers.
- The vacuum chamber is a cell directly connected to the brake master cylinder.
- The atmospheric chamber is a cell located opposite the brake pedal. Its open part of the body rests on the brake pedal.
It is also worth noting the diaphragm, which performs two very important tasks:
- Corrects the position of the piston in space;
- Pumps brake fluid to the main brake cylinders.
Installing a vacuum booster involves a serious change in the sensitivity of the pedal, so it is strongly recommended not to apply a large and sudden force to it in the “first couple”. Pressing should be done carefully and smoothly.
Malfunctions and ways to check them
It is possible that you may need to replace the vacuum booster on your VAZ 2110. The cause may be various malfunctions, the characteristic symptoms of which are as follows:
- When you press the brake pedal, a hissing noise occurs, and at the same time, the engine speed often increases;
- The car starts to shake;
- Spark plugs stop working efficiently;
- Fuel consumption increases noticeably.
Before replacing the vacuum booster on a VAZ 2110, it should be checked. This procedure is performed as follows:
- As with normal bleeding of brakes, with the engine not running, press the gas pedal several times;
- After 5 or 6 presses, keep the pedal in the down position, resting it on the floor, and start the engine;
- After starting, the pedal itself will move forward a little.
There is also a high probability of damage to the diaphragm, which forms a hole over time. You can purchase a diaphragm with a repair kit, the cost of which is no more than 500 rubles.
Replacement
To replace an element, you need to understand the main issue - how to remove the vacuum booster from a VAZ 2110. Directly replacing the old element with a new one will not be difficult, just like the reassembly process.
Therefore, we will tell you about the main thing - dismantling the amplifier. Let's start with the fact that the procedure is not complicated, but it requires accuracy and sequence of steps. If you follow the recommendations, the work will take little time and will not take much effort.
- Disconnect the block with wires, which includes brake fluid level sensors in its design.
- Hold the booster check valve with one hand and carefully disconnect the hose with the other. It is advisable to disconnect the hose with a strong hand, since this will require a lot of force.
- Remove the two bolts connecting the booster and master cylinder.
- Carefully remove the cylinder from the amplifier.
- There is no point in disconnecting the brake lines.
- Give access to the dashboard, which will allow you to unscrew the nuts holding the brake pedal bracket. There should be 4 of them.
- It is recommended to dismantle the bracket and amplifier through the engine compartment, since there is enough free space for such manipulations.
- Remove the pin lock plate. To do this, pry the finger with a screwdriver and squeeze it out.
- Now you can easily disable the brake pedal and booster.
- To disconnect the amplifier and bracket, you will have to unscrew the two nuts on the mount.
- A new one is installed in place of the dismantled old vacuum amplifier, and the reassembly procedure is performed in strict sequence of the dismantling process.
Replacing the master brake cylinder of a VAZ 2110
The main brake cylinder (MBC) is the main element of the brake system (TS) of a domestically produced car of the VAZ-2110 brand. The braking system of models of the domestic automobile industry and foreign cars works almost identically; if there are differences, they are insignificant. Having understood the principle of operation of the main brake cylinder in one brand of car, you can “communicate on a first-name basis” with others.
The GTZ itself is attached to the vacuum amplifier of the vehicle, if available (
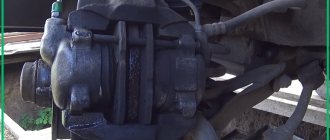
Calipers for VAZ 2110: repair and maintenance
Have you ever wondered what exactly your safety on the road depends on? You can, of course, refer to other road users or the condition of the roads. But it will be much more relevant to talk about the technical side of the issue. The hero of our today's article on the VAZ 2110 is the caliper.
Front brake cylinder VAZ 2110
An incredibly simple mechanism in design and operation, at the same time it is an extremely important part of your VAZ car. A properly functioning caliper can give you those precious few meters of braking distance in reserve, which can protect you from a terrible disaster or damage to your vehicle.
Not every motorist knows how to properly monitor and maintain the brake mechanism, has a vague idea of how to dismantle it and, perhaps, will generally look at his interlocutor with a blank look when mentioning a certain VAZ caliper. But servicing this element of the brake system is quite simple and does not require much effort.
Which master brake cylinder is better for the VAZ-2110
The main brake cylinder of the VAZ-2110 can be repaired, but not always.
Currently, many companies produce analogues of the VAZ-2110 GTZ. Most of them are a higher quality product than recommended by the manufacturer.
Products from Fenox or Kraft are in great demand.
For aesthetes, we can recommend a product from Bosch, which costs three times more. In addition, many manufacturers produce parts with or without a tank.
Fenox
Brake cylinder FENOX T2043C3
For example, the company Fenox GTZ has the following article numbers:
- FENOX T2043C3 – this part is without a tank;
- FENOX T2043.5C3 – with tank.
Since the difference between these modifications is small, it is better to purchase a GTZ with a tank, especially if the old one contains dirt that is very difficult to remove.
Reasons why the brakes might fail
Any problems during the braking process reduce its effectiveness, which can lead to dire consequences for everyone - the driver, passengers, and other road users.
Very often, problems arise simply because the driver uses low-quality brake fluid. If your car suddenly loses brakes, this may be due to several reasons, the main thing is not to blame the master cylinder for all the problems.
Below are the reasons why the brakes on a car fail:
- One of the main causes is usually a leaking slave cylinder. Gradually, slowly or quickly, all the contained liquid flows out of it.
- You should also check the level of brake fluid in the reservoir and the condition of the main brake.
- If traces of smudges are noticeable on the main brake, then this is the reason.
- Another possible cause of brake failure could be that the brake line is torn. For example, rubber brake hoses could fray, partially rot in some places, or get punctures.
- The working cylinders may have jammed;
If it is nevertheless noticed that the main brake cylinder is not working:
- it will show where traces of brake fluid leaks appeared;
- it will be impossible to press the brake pedal;
- on the contrary, the brake pedal can move on its own without the driver making any effort to do so.
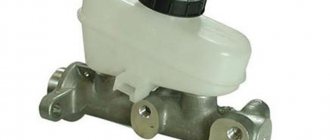
Master brake cylinder with reservoir: 1 — master cylinder body;
2 low pressure o-ring; 3 — drive piston of the “left front-right rear brake” circuit; 4 - spacer ring; 5 - high pressure sealing ring; 6 — pressure spring of the sealing ring; 7 — spring plate; 8 — piston return spring; 9 — washer; 10 — locking screw; 11 — drive piston of the “right front-left rear brake” circuit; 12 — connecting sleeve; 13 - tank; 14 - emergency brake fluid level sensor; A - gap.
Therefore, it is possible to repair the VAZ 2110 brake cylinder, but not always. Most often, if it leaks, a repair kit will help fix the problem and restore the cylinder’s functionality. If the internal mirror in the cylinder is damaged, then, unfortunately, nothing can be corrected, since grinding is prohibited. If everything is not so scary and repairs are possible, you can do it yourself, because the price of the repair kit is quite reasonable, and almost every motorist can afford it.
What tools are required to replace a brake master cylinder?
- key to 17;
- key to 10;
- half-liter bottle of brake fluid;
- syringe;
- brake fluid.
Determination of breakdowns of the GTZ VAZ-2110
You can determine the faulty part yourself; to do this, you just need to know what to look for:
- Leaks in the brake fluid on the vacuum booster at the junction with the main brake cylinder indicate that the cuff in the cylinder is worn out.
In any case, you need to determine for yourself whether it’s worth bothering with disassembling the GTZ and repairing it or immediately installing a new part.
Is it worth buying a repair kit and is it profitable?
Buying a repair kit can save the money spent several times, but it will increase the time costs.
Based on the cost of the GTZ at 1,000 rubles, you need to think carefully about whether it is worth disassembling the brake cylinder for such a sum. Repair kits can be incomplete or complete . In any case, you need to purchase a complete one, since no one will measure the forces on the return springs.
You can also repair the brake master cylinder yourself.
An attempt to save money will result in a long procedure of disassembling, washing and drying all parts. When washing, you need to make sure that no gasoline or oil gets on the rubber parts, as this can damage them.
Therefore, the use of a repair kit can only be justified in the following cases:
- The assembled part is not available for sale.
- Inability to allocate 1,000 rubles for a purchase.
- The desire to understand the brake system with your own hands from beginning to end.
In other cases, it is better to immediately install the assembled part.
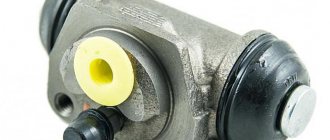
Causes of malfunction of the rear braking mechanism
The hydraulic drive consists of a vacuum booster and a dual-circuit pressure regulator for the rear brakes. The main elements of the brake mechanism for the rear wheel are:
- 4 – brake pad.
- 6 – brake cylinder.
- 5 – guide spring.
- 11 – rear brake shield.
How effectively the rear brake cylinder of the VAZ 2110 will work will depend on the safety of the vehicle on the roads. The article suggests how to replace a brake cylinder with your own hands. The brake mechanism, like any other, is subject to wear, which requires its replacement after a certain period of time. Trade organizations offer a large selection of brake cylinders. When purchasing it, you need to pay attention to the quality of the product and the presence of positive reviews from car owners. So that you don’t have to purchase a new cylinder after the first day of using the car. To check the condition of the rear brake cylinder on the VAZ 2110, you need to remove the drum. The presence of a faulty brake cylinder may be indicated by:
- The efficiency of the brakes deteriorated (see Repairing brakes at home), its pedal became much “softer”, and bleeding the entire brake system and checking the condition of the brake pads did not eliminate the problem.
- Brake fluid leaks from the brake cylinder, as indicated by traces of its leaks on the brake flap, position 11. In this case, the tightness of the system is broken, and its mechanisms will not ensure stopping the car. The wheel pistons will push the pads apart and the disc will stop spinning. The pedal will fail and if an emergency occurs, the car will not be stopped in time. After disassembling the unit and replacing the cuffs, the situation does not improve.
Tools that will be needed during the replacement process
To replace the brake cylinder you will need a tool.
Before starting any repair work, you should prepare thoroughly. Replacing the brake master cylinder is no exception. To replace this part you will need:
- Set of keys. Having a variety of sockets and socket wrenches will be a huge advantage.
- Screwdriver Set.
- Round nose pliers will help when changing cuffs.
- Special “brake” wrench for 10.
In addition, during the replacement process, brake fluid will spill out, which is generally advisable to replace with new one. DOT-4 brake fluid is suitable for the VAZ-2110.
The process of removing the old part
In order to remove the brake master cylinder, you need to open the hood and do the following:
- To get to the part, you will first have to remove the sound insulation. You should not try to tear it off, as it is secured with bolts. Therefore, you should arm yourself with a screwdriver and unscrew all the fasteners. If the sound insulation is not removed after this, it means that not all fasteners have been unscrewed. If you pull the element, it can be damaged. After this, you can start replacing.
We unscrew several screws using a Phillips screwdriver to remove the sound insulation.
Disconnect the terminal with wires.
We disconnect the tubes and put rubber caps on them.
Unscrew the fastening bolts.
Remove the brake cylinder.
At this point, the dismantling process can be considered complete.
Installing a new part
Getting started with installation depends on what part you purchased. If it was assembled with the tank, then this will save the car owner from unnecessary work.
If the new gas turbine engine does not have a tank, you need to install the old tank. Before installation, it must be carefully inspected for cracks, chips and damage. If the tank is in poor condition, you will have to buy a new one. It is for this reason that it is recommended to immediately buy and assemble it.
Further work should proceed according to this algorithm:
- The new part is installed in its place under the hood of the car.
We install the new brake cylinder in its original place.
After all the air has come out, clamp the pipes.
Next you need to carefully tighten the fasteners . At this point, the procedure for replacing the GTZ can be considered complete. You will need to add brake fluid to the reservoir, connect the sensor in the plug and install the sound insulation in the old place.
Video about replacing the master brake cylinder of a VAZ-2110
Replacement without bleeding the brake system
Below are instructions that allow you to replace the GTZ without bleeding the brake system and without a large loss of brake fluid. To carry out repairs, you need to prepare the necessary tools and DOT-4 brake fluid.
When replacing, it is necessary to dismantle the brake fluid reservoir from the old GTZ; when dismantling it, breakdowns of the tank occur; it is recommended that when replacing the GTZ, you also purchase a new TJ reservoir.
Required tool:
- Ratchet with extension and 17mm socket;
- Open-end wrench 10mm;
- Syringe;
- Phillips screwdriver;
Step-by-step instruction
- Remove the hood seal and unscrew the interior heater insulation with a Phillips screwdriver;
- We unscrew the cap of the brake fluid reservoir and use a syringe to pump out the brake fluid into a previously prepared container;
- Using a 10mm wrench, unscrew the fittings of the TJ tubes;
- Using a ratchet with a 17mm head, unscrew the 2 nuts securing the GTZ to the vacuum booster and pull the GTZ towards you;
- We remove the tank from the GTZ (if you haven’t bought a new one). We install the reservoir on the new GTZ, lubricating the rubber seals with brake fluid;
- We install the new GTZ on the vacuum booster and fix it;
- We insert the brake fluid fittings into the GTZ, but do not tighten them;
- Fill the TJ tank up to half;
- We wait for brake fluid to flow out of the holes into which the brake pipe fittings are screwed;
- Then we twist and tighten the fittings of the TJ tubes;
- Add brake fluid between the MIN and MAX marks and close the cap;
The replacement process is complete. With this replacement, bleeding the brake system is not required.
Bleeding the brakes after replacement, should I do it or not?
After the procedure for replacing the brake master cylinder, some inexperienced car owners do not consider it necessary to pump the brakes. If you neglect this procedure, the brakes may fail at the most crucial moment.
It is necessary to bleed the brake system . This procedure is simple, although two people must be involved. The pumping procedure is as follows:
- We need to pump up the brakes. To do this, the pedal is pressed several times, after which it is held down.
- At this time, you need to partially unscrew the brake pipe fitting on one wheel.
- This should remove air from the system. Periodically, an assistant should pump the brakes by pressing the pedal. This procedure must be repeated until fluid sprays out of the tube when you press the brake pedal.
We pump the brakes on each wheel one by one.
This procedure is repeated on each of the four wheels of the car . Before bleeding the brakes on each wheel, you need to add brake fluid to the reservoir. Only after bleeding the brakes can you go out on the road without fear that the brakes will fail at the most inopportune moment.
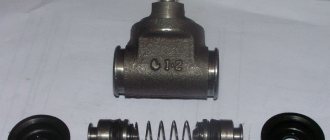
Repair manual for VAZ 2110, 2112, 2111 (Lada 110)
You will need: keys “13” and “17”, hexagon “10”.
1. Remove the corresponding wheel.
2. Remove the brake hose seal from the bracket on the rack (for more details, see “Replacing the brake pads”).
3. Loosen the hose end on the wheel cylinder.
4. Use a screwdriver to bend the antennae of the lock washers and unscrew the two caliper mounting bolts, holding the guide pins by the hexagons with a second wrench.
5. Remove the bolts and remove the caliper assembly with the wheel cylinder.
6. Hold the hose end by the hexagon with a wrench and unscrew the brake caliper from the end. Be careful, brake fluid will leak from the hose. Please note that the tip has a copper O-ring. Replace a badly compressed ring.
7. Clamp the caliper in a vice and remove the two hexagon socket bolts securing the cylinder to the caliper. Remove the wheel cylinder from the caliper.
8. Carefully, so as not to tear the protective cover, remove the retaining ring.
9. Remove the protective cover from the cylinder.
10. After applying compressed air through the brake fluid supply holes, remove the piston from the cylinder.
11. Carefully, so as not to damage the cylinder mirror, remove the sealing ring.
12. If it is necessary to replace the wheel cylinder or the valve itself, unscrew the bleeder valve.
13. Carefully inspect the cylinder bore and the working surface of the piston. If signs of wear, damage or severe corrosion are found on them, replace the cylinder and piston.
14. Replace a damaged, swollen or non-elastic o-ring. It is recommended to replace the ring every time the cylinder is disassembled, regardless of its condition.
15. Install a new sealing ring into the cylinder bore, having previously lubricated it with fresh brake fluid.
16. Insert the edge of the protective cap into the piston groove.
17. Lubricate the cylinder surface and the working surface of the piston with fresh brake fluid. Insert the piston into the cylinder and install the outer edge of the protective cap into the groove of the cylinder body. Install the retaining ring.
18. Install the wheel cylinder in the reverse order of removal. Before installing the guide pins, lubricate them with UNIOL-1 grease. Bleed the brake system.
Reference manual for servicing VAZ, LADA 110 cars.
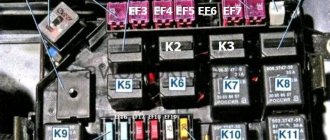
Ignition adjustment 2110. Engine compression for VAZ 2112, immobilizer for VAZ 2111. Valve cover for VAZ 2112, cylinder block gasket for VAZ video. The cost of a generator for a VAZ. replacement of fuses for VAZ 2112, design of the oil receiver for VAZ 2112. oil recommended by the factory for the box of VAZ 2112. replacement of the water pump (pump) for VAZ 2112. Replacement of valve stem seals for VAZ 2110.
Replacing the main brake cylinder on a VAZ 2108, VAZ 2109, VAZ 21099
When should the brake master cylinder be replaced? The master brake cylinder must be replaced if: 1. Various types of through cracks appear on it, as well as deep chips and deformations. In connection with all these malfunctions, the following may be observed: • Brake fluid leaking out of the cylinder, the cylinder in this case will be oily. • A very rapid decrease in the level of brake fluid located in the brake reservoir may also be observed.
2. And to all this, if the brake cylinder malfunctions, the car’s brake pedal, when you press it, can literally fail, and due to this, the effectiveness of the car’s braking system will decrease many times.
Reasons for replacement
Brake hoses are designed to carry brake fluid from the master cylinder, through the brake lines, to the brake wheel cylinders under high pressure and temperature. They work constantly in moving suspension elements, therefore they are made elastic from a rubber compound.
VAZ 2110 brake system diagram
The main reasons for replacing brake hoses on a VAZ 2110 car are:
- the presence of cracks on the outer part during bending;
- abrasions on suspension elements;
- brake fluid leaking from the splined joints of the tube;
- in more rare cases, a defect may occur as a result of a foreign body entering while driving on the road (crushed stone, stones, snow, ice, etc.);
- Also, in exceptional cases, the inner part of the hose peels off (it is not possible to detect it visually), in this case a blockage occurs inside and liquid does not pass through it; it is revealed during dismantling.
This material will help you understand the brake system: