All car owners care about comfortable movement in their vehicle. This is important for the driver and passengers. Whatever the dimensions of the car, its interior should be as free as possible.
As an alternative option for transporting cargo, you can use a car roof rack that you made yourself. This will allow you to transport light and bulky items, while at the same time enjoying a comfortable trip in a spacious cabin.
What are the advantages
- The ability to transport a load weighing about 110 kg, without damaging the smooth roof.
- The price range is significantly lower compared to the same trailer.
- The cargo is securely secured, so there is no need to worry about it.
- You can come up with many other devices.
- Whatever the burden, it will not interfere with looking at the road when moving.
A few years ago, the choice was small; universal roof racks were produced that fit any make of car, both sedans and SUVs, and were attached using a drain.
Now technology has moved forward, therefore, the choice has become more diverse and wider. You can choose a foreign manufacturer if you trust the West more, or you can try to work with domestic production. The taste and color, as they say. Now, first of all, attention is paid to the method of fastening and the materials used. It can be aluminum alloy or stainless steel, as well as plastic, but durable
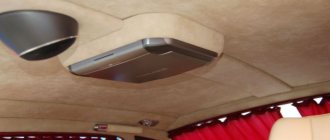
An additional compartment for transporting things can be individual or suitable for all cars.
Peculiarities
The one-piece frame of the element provides significant load capacity. The supports are fixed to the drainage parts, and the trunk itself on the UAZ “Patriot” covers the entire roof of the car and comes complete with 10 racks.
The structure consists of transverse parts with a pitch of 20 cm and can withstand weight up to 150 kg. The top of the side is made of a round pipe, which is also carried along the bottom. In the front part there are fasteners for additional optical elements. Surface painting is usually done using a powder method with anti-corrosion protection.
Types of luggage racks
Personal experience Toyota Caldina 210
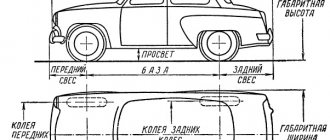
It is imperative to take into account the make of your car, model of the vehicle roof, year of manufacture, body type. Also consider the material the roof bars are made from.
There are two types of materials used to make rods: aluminum or steel.
If you do not plan to use the car rack constantly, then a steel rack is quite suitable for one-time use. If steel fastening systems are used regularly or on a long journey, their aerodynamics decrease, which leads to increased fuel consumption.
Aluminum racks are good for long-term use for the following reasons:
- Stable aerodynamics, which means fuel savings on long journeys.
- Corrosion-resistant coating that will extend the life of the trunk.
In terms of size, an adjustable design would be the ideal solution. Especially for those who prefer universal models. In any case, the maximum size of the structure must be selected to fully satisfy the needs. After all, a well-chosen roof rack can significantly increase the load capacity of even a small car.
It is also important to determine the load level for the vehicle and structure. To withstand a certain maximum weight, roof rails have been developed. They can withstand a weight of 75-100 kg, while not forgetting about the capabilities of the roof of your vehicle
After all, there is no point in having a trunk of 100 kg when the roof of your vehicle is designed for a maximum of 70 kg. You can find out more accurate information about the capabilities of the roof of your vehicle from the operating instructions. This means that before choosing a roof rack, you need to once again read the operating instructions for your car.
The next step is to determine the anchorage pattern and what type of anchorage system to consider on your vehicle. The roof rails tilt on the roof of the car. Do not forget that many cars are not designed to install a trunk.
When the type of roof rack that matches your vehicle has been determined and purchased, it’s time to move on to assembling the structure:
There are several basic installation methods:
First method: if there are rails, select suitable rails
The rails must correspond to the length of the beam, this is very important for the subsequent reliability of fastening the car rack
Second method: if there are no rails, we purchase a set of devices that allow you to attach the trunk to the car.
Note. It is necessary to carefully follow the instructions for installation and operation of the structure to avoid damage to the car body.
What else could I add?
The main function of a roof rack is to save space inside. By installing additional equipment, you can expand its functionality.
- “ ” - lanterns that will illuminate the road even better.
- There is space for a hijack and a shovel in the inner and outer sides. Oh, how the gardeners will be happy.
- If you often drive through overgrown areas, such as forests, you can install branch guards. They will protect the glass from damage.
Don’t forget also that the expedition vehicle protects the roof itself well from dents. As you can see, such a trunk can serve as a good way not only to save space, but also to install useful equipment. In addition, in addition to the racks themselves, other structures can be attached to the roof rails for transporting fishing or hunting equipment.
As you can see, it’s possible to make a trunk with your own hands. Larger Mitsubishi L200s will require a side ladder. For small foreign cars, a reinforced frame will be sufficient.
The SUV from the Ulyanovsk plant is equipped with longitudinal arches or roof rails. But not every UAZ Patriot model is equipped with such a device. More details about roof rails on the UAZ Patriot can be found here (link to website). Today we will pay attention to the roof rack of the UAZ Patriot SUV. There are four types of trunk for an SUV:
- sports;
- tourist or expedition;
- country house or household;
- autobox.
Today we will pay attention to the expeditionary trunk for an SUV. What is it, how is it installed and is it possible to do it yourself at home? These are the questions we will consider in this material.
The expedition trunk is intended, first of all, to be able to transport cargo primarily of an expeditionary nature. Such cargo includes various tools, devices, tents, etc. The expedition version must have a structure in the form of a lattice bottom with sides. Why is this necessary? The lattice bottom will allow you to transport things or objects on it without additional securing them. The sides are also designed to prevent the cargo from falling out of the trunk, so these conditions are mandatory for this version of the product.
Today, car markets are crowded with various options for expedition vehicles for the UAZ Patriot SUV. You can find domestic types, and foreign, and home-made, and factory-made. But which ones to choose? The choice of product should be based on the following criteria:
- the material from which the product is made;
- product shape;
- build quality. If the welds are clearly visible or the steel from which the trunk is assembled is too thin, then it is better not to buy such a unit, as you will suffer more;
- installation method. Based on the installation method, the following options for luggage racks are distinguished: Mounting on roof rails. The simplest and most common installation method. It is enough to install and secure the product. There is no need to perform any additional work: drilling, cutting, etc.
- Installation on gutters. This fastening option is also one of the simplest, but less reliable than the next one.
- Installation in roof mounts. To do this, holes are made in the roof of the car and a trunk is installed. This mounting option is the most reliable, but requires drilling the roof, which negatively affects the structure of the car.
So, fastening to the roof rails is carried out using special brackets. This option is acceptable for those who do not want to spoil the structure of the car and try to avoid drilling the body part. The disadvantage of this type of fastening is the design - the trunk, which is attached to the roof rails, does not look very nice.
Installation on roof rails
Installation of the product on gutters
The UAZ Patriot SUV, however, like many domestically produced cars, is equipped with special grooves on the roof, called gutters. Foreign-made cars have long moved away from such a device, but the essence of these gutters is that it is in this groove that an expeditionary trunk can be completely freely secured.
Fixation is carried out using special L-shaped brackets. This mounting option also does not require disruption of the roof structure, which is why it is also popular. But there is also a downside to this fastening option, which is the unreliability of fastening. That is, the possibility cannot be ruled out that the trunk will not rip out under the influence of a large load. Therefore, it is very important not to overload it.
DIY expedition rack for gutters
If you can’t find a trunk that attaches to gutters or the options for such products are not at all what you imagine, then you shouldn’t despair. You can solve the problem by making the unit yourself. Of course, you will need the help of a welder, but first you should sketch out a rough diagram on a piece of paper. The resulting drawing should be handed over to the welder along with the material. So, let’s not dwell on the type of product itself, but consider what the brackets for an expeditionary roof rack for gutters are.
To begin with, select the thickness of the steel brackets. It is desirable that it be at least 2mm and no more than 4mm. You only need three different elements:
- Base plate;
- Pressure bar;
- L-shaped bracket.
The photo below shows an example of these parts.
Once such parts are ready, you will need to connect them to the main structure of the trunk and install them in the gutters. The result will be this version of an expeditionary trunk for the UAZ Patriot, which is fixed into the gutters.
Everything is very simple, but the only thing that is important to consider when installing it yourself is the installation of rubber spacers between the trunk brackets and the roof. This is necessary in order not to damage the car body.
The most popular version of the “expedition vehicle” is the RIF expedition trunk for the UAZ Patriot, which also has a method of installation using gutters. The quality of RIF is quite high, it even withstands the maximum permissible masses, but as practice shows, gutters fail. The dimensions of the RIF are 1200x1900mm, which perfectly places the product on the roof. Additionally, lighting can be installed on the trunk.
Roof mount
Attaching the rack to the roof of the car is the most reliable option, since there is practically no chance that the product can get lost while driving. The only drawback is the need to drill holes in the roof. If you had standard roof rails, then many luggage racks are designed specifically for these mounts. But if the standard crossbars are not installed from the factory, then the fixing option is solved by making holes with your own hands. This process is simple, but requires removing the roof trim from inside the cabin.
After removing the roof sheathing, holes in the roof of the required diameter are marked and drilled. Holes are drilled from the inside (in the internal frame) using a cutter. This is necessary in order to secure the product with nuts. Before installing the product on the roof, be sure to install rubber spacers at the fastening points so as not to damage the paint and prevent corrosion of the roof.
Disadvantages of expedition racks
So, we looked at the main purpose of this unit for the UAZ Patriot SUV, how it is installed and what mounting options are available. In addition to all the advantages, “expedition vehicles” also have some disadvantages, so driving with it on the roof without use is simply irrational. The disadvantages include:
- Reduced aerodynamic characteristics. The trunk, with its massive structure, is simply an obstacle to the oncoming wind, so it slows down the car and reduces its aerodynamic properties.
- Deterioration of aerodynamics leads to increased fuel consumption. The larger the volume of cargo transported, the greater the fuel consumption.
- If the fastening is done poorly, this leads to deterioration of sound insulation.
- Poor vehicle handling due to improper weight distribution.
Therefore, based on all of the above, it should be concluded that it is best to install the trunk when necessary. Therefore, its fastenings must be mobile, that is, easily and quickly removed. The best mounting options are:
- through roof rails;
- into drainage grooves.
Thus, by making the right decision, you will protect yourself from unnecessary and unnecessary additional costs for gasoline and spare parts.
How often does your Patriot break down?
A car roof rack has a huge number of advantages. The main tasks it performs:
- Creates places for transporting additional things and accessories.
- Provides a base for installing additional lighting fixtures and also protects the roof from damage.
Speaking about the advantages, it is impossible to note the disadvantages of this design:
- The aerodynamics of the car deteriorate significantly, which leads to fuel consumption.
- In some cases, when serious mistakes are made, noise insulation and controllability deteriorate.
Roof rack
Trunk material
5 best car roof rack manufacturers
First of all, after you decide to make a trunk for your car yourself, you will need to choose the source material. As a rule, metal is considered the best option. However, in this case it is necessary to find a material that will have low weight, but at the same time have the highest strength.
These requirements fit perfectly:
- Aluminum;
- Profile tube;
- Stainless steel.
Aluminum is probably the most suitable option for several reasons. Firstly, it is very light. Secondly, it is resistant to external influences and is not susceptible to the negative effects of corrosion. Thirdly, it is very easy to work with it and form the necessary structures.
An alternative to aluminum is a profile tube with a thin wall. In most cases, domestically produced SUVs (UAZ Patriot, Lada Niva 4×4) are equipped with a roof rack made of this material. The cheapest option for a car is a stainless steel trunk. The sheets became very strong and at the same time flexible. However, a significant disadvantage of this type of material is its weight - it is much greater than that of a profile tube or aluminum.
Where to begin
- It is best to start strengthening work from the front side members at the shock absorber mounting location. To do this, reinforcing steel linings (3 mm sheet) are welded onto them along their entire length.
Such actions prevent the formation of cracks after an impact by the suspension and prevent deformation of the body while towing the car, even with the use of a winch.
The fastening of the gearbox and distribution box is also another weak point of the Niva. To solve this problem, it is enough to install steel linings on them, but keep in mind that during operation these 2 units do not move relative to each other
This is important for the correct operation of the intermediate shaft between them. In the case when the wheel arches were cut and an increase in the offset and thickness of the wheels was formed, it is important to weld the arches in time, since they are an integral element of the supporting structure. This is especially true for the rear arches. To further stiffen the body, you can strengthen the sills
To do this, pieces are cut out of a cold-rolled profile (2.5 mm) along the length of the threshold and welded at the bottom, covered with a sheet of metal. In addition, you can weld the stops of the rear shock absorbers (cups) and reinforce them with a sheet of steel, since these elements are subject to a large load while driving along the intersection.
Replace bumpers on channels with oblique bumpers, welding them to the side members to increase body rigidity.
These actions are very useful for cases of towing or when operating a winch; it can be safely installed on such a structure, since the load will be evenly distributed on both side members, and the risk of their failure will be reduced.
- Another good way to strengthen your car is to install additional bumpers and arches on it. They will help push various obstacles such as small trees away from the car. Strengthening the Niva's arches and bump stops significantly increases the rigidity of the body. But don’t get too carried away, because by welding additional elements, you automatically increase the weight of the car, and this will significantly reduce its cross-country ability.
This actually ends all actions to modernize the body of “our” SUV. Do not forget that with proper attention and care, the Niva can give odds to many foreign units. Therefore, do not rush to change it, but rather modify it.
Types of fastenings
- To the drain. This type is most suitable for cars of domestic manufacturers. You can place the trunk in any position, as well as install two small ones on the roof.
- Behind the doorway. This mounting method is suitable for both domestic cars and foreign models with a smooth roof. For fastening, hook brackets are purchased, which are attached to the door opening. It will not be possible to remove them, since when the door is closed, the support is inaccessible.
- Certain places. Some models have special holes for attaching luggage devices. Such recesses help the car look aesthetically pleasing and organic, while allowing luggage to be securely secured.
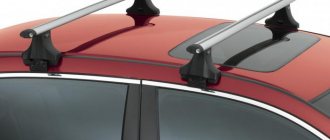
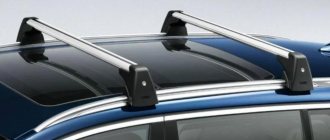
- On the roof rails. If your vehicle has longitudinal arches, and these are station wagons or minivans, as well as some SUVs, then this type of fastener is suitable for you. Cross arches are laid, which allow things to hold well without touching the roof, which helps avoid scratching it. The luggage itself is secured using straps, but you should take into account the center of gravity, which can shift.
- Station wagons or crossovers have come up with a new type of fastener called “integrated roof rails.” They are made without gaps and contain arcs with holes. Keep in mind that the center of gravity here shifts downwards. Opel, Kia, Suzuki models are pleasing to the eye with this fastening method.
- Skids. Attaching the trunk with this type is quite easy, and the arches themselves are located along the roof, which allows them not to come into contact with it and not damage the smooth surface. This type of fastener is very rare; most often Nissan SUVs are equipped with it.
- Magnets. An amazing method, although it is suitable for absolutely any model. However, it is designed for light weight, such as skis.
- Belts. Several belts pass through the interior and secure the inflatable trunk. The downside is that it may be inconvenient for passengers.
Pajero mini
When choosing a trunk, you need to think not about the versatility of transportation, but about safety and comfort. Read reviews carefully, follow the manufacturer’s recommendations and do not make mistakes in choosing the right compartment for transportation.
What you need to know
The frame is painted one day after applying a special primer composition, and it is advisable to use products containing zinc to provide additional anti-corrosion protection. Ordinary enamel can be used as a paint coating.
It is worth noting that the frame can be mounted on gutters or on the roof of the car itself. In the latter case, considerable effort will be required to remove it, although the need for such a procedure arises extremely rarely. Fastening to drainage elements will ensure easy dismantling of the structure.
In order to make a trunk for a UAZ, you will only have to spend money on the materials used. And learning to work with plumbing tools and welding does not take much time. Moreover, the cost of such a frame in a store is several times higher than the cost of making it yourself.
My friend Valery had a problem - a new roof rack, bought at a car dealership along with a UAZ Hunter, fell apart after the first fishing trip! Without stopping by home, Valery threw this “ruin” into my workshop with the words: “Please do it when you have time!” A few days later I examined this miracle of technology and became convinced of its complete stupidity. It was a prefabricated trunk made of rectangular and square pipes. The ears of its side pillars are made of steel sheet only millimeter thick.
The arrangement of the luggage area tubes is longitudinal-transverse, with M10 bolts fastening them together through the main transverse beams, which completely weakened them. The support nodes of the transverse beams turned out to be wider than the places of attachment to the UAZ roof by as much as 20 mm.
In the process of disassembling the trunk into components, I became confident in the need to completely remake it from a collapsible one to an all-welded one...
To do this, I cut off all the threaded bushings welded to the tubes and straightened the tubes themselves. Then I first assembled the supporting transverse beams with racks using welded “tacks” from standard parts, keeping the size between the last 1520 mm, and finally welded the seams. I connected the resulting beams with spars and, having precisely checked the rectangularity of the frame (or base) of the future trunk using “diagonals,” welded one to the other. Having received a strictly rectangular frame, I welded additional cross members between the beams, and along, in the middle between these elements, I also installed spacers using welding.
1 – outer support transverse beam (pipe 40x20x2.2 pcs.); 2 – middle supporting transverse beam (pipe 40x20x2); 3 – additional cross member (pipe 20x20x2.2 pcs.); 4 – spar (pipe 20x20x2.2 pcs.); 5 – spacer (pipe 20x20x2.4 pcs.); 6 — inclined support (pipe 40x20x2, 6 pcs.); 7 – vertical support (pipe 40x20x2.6 pcs.); 8 – high side wall (pipe 20x20x2, 2 pcs.); 9 — inclined stand of the high side wall (pipe 20x20x2, 2 pcs.); 10 – low sidewall (pipe 20x20x2, 2 pcs.); 11 – inclined stand of the low side wall (pipe 20x20x2, 2 pcs.); 12– tailgate (pipe 20x20x2); 13 – rear rack (pipe 20x20x2.3 pcs.); 14, 15, 16 – M10 bolt with flat and spring washers (6 sets); 17 – support rod (circle 5.6 pcs.); 18 – threaded bushing M10 (circle 16, 6 pcs.); 19 – clamp (steel sheet s3.6 pcs.)
I made the side and rear sides from suitable pieces of purchased “construction set”. I welded support rods to the flattened ends of the vertical posts on the side. After the final welding of all the seams, I made a final straightening of the frame and cleaned up the welding seams. The clamps were made without modification, however, they could have been made independently.
In conclusion, the new trunk should first be coated with a gray primer and then painted with silver, but the owner himself took on this work, so the “memory photo” shows the trunk without any coating.
A car roof rack has a huge number of advantages. The main tasks it performs:
- Creates places for transporting additional things and accessories.
- Provides a base for installing additional lighting fixtures and also protects the roof from damage.
Speaking about the advantages, it is impossible to note the disadvantages of this design:
- The aerodynamics of the car deteriorate significantly, which leads to fuel consumption.
- In some cases, when serious mistakes are made, noise insulation and controllability deteriorate.
Roof rack
Design measurements
When you have decided on the type of material that you will use for the trunk, then you next need to move on to making measurements and calculations. This way, you can clearly determine the weight of the future product, the approximate price and, of course, how much and what you need when building a trunk for a car.
It is necessary first of all to determine such indicators as the length and width of the entire roof. Moreover, you can even create a project in the form of a plan and drawings, which will include:
- The supporting panel (the trunk itself, or rather its bottom);
- Frame;
- Jumpers (special amplifiers for the structure);
- Boards.
In addition, you can come up with various additional details at your discretion. For example, this could be a special lining on the front part of the trunk, which will prevent strong resistance to oncoming air.
Making the top base
This part of the trunk should be made strictly according to the dimensions of the lower base. Remember that even the slightest deviation will noticeably distort its appearance. Next, we connect these two halves of the parts using jumpers. Here you can go in two ways - secure everything tightly by welding or leave the upper part removable, which will allow you to use the structure as a platform.
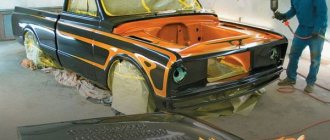
Next, sand the remaining seams and begin painting the structure. If the trunk will be used frequently on the car, you can install selected reflectors, a backup brake light or a reversing light, but this is not necessary.
Of course, all this equipment requires additional holes and wires to connect to the on-board power supply. The design color can be any, but it is better to use either matte black or metallic silver. First, the crossbars should be cleaned of rust, degreased and treated with a primer (preferably in 3 layers, since some of the metal will constantly rub here).
How to make crossbars with your own hands
Making your own roof rack for your car's roof rails can save you a decent amount of money without requiring any special skills.
There are several ways to make crossbars, all of them differ in complexity and practicality.
Profile pipe
The simplest and fastest method. It is necessary to prepare a profile pipe (20×40) and 4 clamps for fastening. The next steps look like this:
- we determine the dimensions of the crossbars and make blanks from metal profiles;
- we drill holes for clamps that will later secure the rail;
- we prepare metal plates, which are also intended for fastening the crossbar;
- cover all parts with heat shrink or paint;
- We mount the structure on the rails.
Profile pipe 20x40 for making railings
It is recommended to use such a trunk only when transporting cargo, since it is not very aerodynamic and will create additional noise when driving.
Furniture profile
A practical option that prevents unnecessary noise. Materials you will need:
- furniture profile with a wall thickness of 1 or more millimeters;
- U-shaped fasteners;
- washers, nuts and bolts;
- rubber about 1 cm thick;
- stubs.
The manufacturing process is simple; the most difficult thing about it is taking high-quality measurements. Stages of work:
- we drill holes in the profile, taking into account the width of the profile and the diameter of the U-shaped fastener;
- paint the crossbars in the required color;
- We put sealing rubber on the U-shaped mount (porous tubes, which are used to insulate pipes, are ideal for these purposes);
- We assemble the structure. We install the fasteners under the rails, put the crossbar on through the drilled holes. Between the crossbar and the rails we put rubber, which will act as a seal and insulator. We clamp the structure.
The main advantage of this type of manufacturing is that the crossbars can be installed at different distances, which are determined by the dimensions of the cargo being transported and the make of the car.
However, it is important to know that the maximum load capacity of such roof racks on roof rails is no more than 60 kg
DIY roof rails
Aerodynamic profile
An option for those who have experience working with a welding machine, and there are special mounting holes in the vehicle's roof rails. To work you will need:
- aerodynamic metal profile;
- metal corner (50×50×4 mm);
- fasteners (washers, nuts, bolts);
- paint and brush;
- welding machine;
- protective mask for eyes and respiratory system.
The algorithm of actions is as follows:
- cut the profile to the required length, taking into account that a corner will be welded on the sides;
- We cut the corner into 25 cm pieces, mark it and drill holes for fasteners;
- We weld the profile and corners;
- We clean the welds and treat the holes with an anti-corrosion agent;
- we paint the finished structure (it is better to do this some time after welding, otherwise the paint will quickly peel off);
- After the paint has dried, you can begin installation.
The whole process takes about 2-3 hours, and installation of finished crossbars takes no more than 15 minutes.
Experienced motorists have calculated that making roof rail crossbars yourself is 2-3 times cheaper than purchasing ready-made ones. And with the right approach, their quality and appearance are in no way inferior to factory devices.
Related publications
How to properly weld a trunk frame
The operation will take approximately 20 hours to complete. The frame pipes are welded together to form the bottom. When working with aluminum, argon welding is used. In the same way, the sides are welded, which can, if necessary, be made from metal sheets.
Argon welding of aluminum
It is advisable to lay a reinforcing mesh or small diameter tubes at the bottom, which will serve as stiffeners. Usually three jumpers are enough, but it is better to make five. The exact quantity can be determined already at the assembly stage. The recommended distance between jumpers is 15 centimeters. The remaining tubes are welded longitudinally to further strengthen the structure.
Some drivers complain of rattling noises when traveling with an expedition rack. To avoid this effect, the mesh is welded in all places where it comes into contact with the metal crossbars. The crossbars are located at a large distance from each other. Therefore, it is necessary to weld sections of the profile in the openings between them. You can use bolts instead of welding, but this fastening is less reliable and the operation takes more time.
To prevent the mesh from rattling while driving, it needs to be soldered to the frame in as many places as possible
The arcs must be made from rolled metal with a round cross-section. They improve the aerodynamic properties of the vehicle. To attach the structure to the car, you can take ordinary corners with holes for bolts. They will be welded to the frame from below, so if necessary, you can remove the trunk at any time. To prevent scratches from forming on the roof rails when they come into contact with metal, rubber gaskets should be glued to the fastenings.
The top frame should have right angles at the front. At the back you need to make edges that will be located along the edges. It is necessary to weld 12 profile sections of arbitrary size to the frame. The height of the future trunk depends on their size. Usually they make a height of 190 millimeters. It is necessary to secure six segments in the corners, and the rest will connect them in pairs.
An upper frame is welded on top of the vertically located profile elements. The next step is the installation and welding of the diagonal element. This part is optional, but can be used to install a branch guard when traveling into the woods. If necessary, you can make fastenings for additional elements:
- Fasteners for spare tire.
- Additional lighting, spotlights.
- Hooks on which the cable will be held.
- Polymer boxes for equipment, such as tents.
- Various types of attachments for tools, such as shovels.
- A ladder that simplifies access to things lying on the trunk.
Making fasteners for a spare wheel is easy. To do this, you first need to choose a place where the spare tire will lie. At this point you need to weld the nut. Next, the stud is screwed into this nut, but not welded. Now the wheel can be put on the stud and secured with another nut. If you plan to attach headlights, they will require waterproof wires.
Any additional elements can be added later, after the basket has been installed. It is also not necessary to make the hooks or ladder yourself. Often they buy ready-made parts and attach them to a homemade trunk. But after welding the frame, it is important to sand all the seams and try on the structure to make sure it fits.
Using roof rails
There are many options for using roof rails, but the most popular are:
- fixing cargo baskets. A practical device that is characterized by a completely acceptable appearance, good capacity and ease of fastening;
- fixing bike racks. An excellent solution for car enthusiasts who are also avid cyclists. It is distinguished by its reliability and the ability to simultaneously secure several bicycles, which is very convenient when planning a collective bicycle ride;
- magnetic and mechanical fixation. Most often used for transporting snowboards, skis and other similar things.
Expeditionary trunk type "basket"
The technology for manufacturing an expeditionary trunk will be much more complicated. In this case, you will need to first draw up a drawing. In addition, you cannot do without a welding machine and the ability to handle metal.
Mesh base - a practical solution for expedition luggageConstruction drawing
Let's take a homemade trunk for a Chevrolet Niva as an example. The length of the trunk will be 163 cm, width - 123 cm. To make an expedition trunk, you will need a metal profile 15X15 (approx. 9 linear meters), 20X20 (approx. 7 linear meters), 25X25 (approx. 7 linear meters) and 30X20 (approx. 6 p.m.).
It’s quite possible to make an expedition rack for Niva using this drawing yourself
Sequence of actions of the wizard:
- We start making the trunk from the base: we cook the perimeter. Longitudinal guides are made from profile 30X20, transverse jumpers are made from profile 20X20.
- We weld load-bearing lintels from a 30X20 profile into the perimeter. For them the platform will be attached to the rails.
- We reduce the distance between the load-bearing jumpers by welding additional transverse ones from the 20X20 profile.
- We make an arc that will be located in front in order to improve aerodynamics: we measure 5 cm from the edges of the profile and cut out a triangular sector, after which we bend the profile. We weld the arc on the outside of the perimeter.
- To increase the strength of the structure, we fasten the jumpers together with sections of 15X15 profile. If desired, non-load-bearing lintels can be replaced with metal mesh or stainless steel sheets.
- We make the sides. We cut the profile into pieces 6–10 cm long and weld it to the base. If desired, they can be mounted on a thread - then the sides and the upper part of the trunk can be removed.
- It was the turn of the top crossbar. It should be the same size as the bottom one, but the side crossbars should be slightly shorter, and the posts connecting them to the base should be angled to improve aerodynamics.
- We fasten the trunk in a manner similar to that described above. An important point: to evenly distribute the weight, the expedition rack should be secured to six points.
If the car does not have roof rails, you will have to make the supports yourself from a piece of sheet metal. You can put it on brackets, but to do this you will have to drill into the body.
The expedition trunk has increased functionality compared to a regular trunk. For example, you can attach fog lights to it - just weld the headlight mounting bracket to the inclined connecting element at the front (see point 7).
In addition, it is convenient to carry a shovel in the expedition trunk. It can be secured using a conventional pipe fastener.
Manufacturing of fasteners
The easiest way to make your own mounts is to remake the clamps for attaching the muffler from almost any car. They look like a flat bracket on one side and an arc going around the pipe on the other. We need to saw off the excess so that we are left with a flat plate. It will fit snugly against the crossbars and roof rails, providing reliable fastening. To prevent the clamps from standing out, it is advisable to paint them the same color as the trunk - the look will be more pleasant.
If you don’t want to be tricky with clamps, then you can use U-shaped brackets with threads for this. And instead of ordinary nuts, use wing nuts that can be quickly unscrewed and tightened. This solution will significantly speed up the process of installing the trunk.
FakeHeader
Comments 28
Are these mosquitoes or midges?
Are there any trunk sizes left?
I also want to get confused, as they say in the image and likeness.
Unfortunately there are none left.
It’s a pity. Can I torment you with questions about the trunk?
Sure, ask!
You have rails between the roof rail and the trunk. Is it a simple square pipe? Is it just welded to the trunk? To the bottom frame or to the cross members?
and also. There seems to be a gap between the roof rails and the rails. Was there something underneath?
and the bottom frame is wider than the distance between the roof rails?
Yes, between the trunk itself and the roof rail there is a profile that is welded to the trunk itself. This is done to strengthen the trunk + increase the space between the trunk and the roof so that you can wash the roof or reach out with your hand to brush something off.
The profile is smooth, and the roof rail is curved, so in the front and back where there is clearance, I installed stabilizer bushings from a Lada. I cut the upper part of the bushing down to the base and simply put it on the trunk rail from bottom to top. Rubber bushings play the role of both a shock absorber and additional support
Editing history
Does it turn out to be standing on four bushings or are the rails on the roof rails tight? Did you put any more gaskets?
The rail lies tightly only in the middle, since it is straight and the railing is semi-arched
I see...I think I’ll start making it even clearer.
Rus, do you have any problems with the guys because of the chandelier? Or because of the trunk?
And what do the trunk and the screws have to do with it? :))
And there were no questions about the chandelier either. I don't use it on the roads. In the forest, in the steppe, off-road...
Even if you use it on a road where there are few cars, it is still not an option, since fuel consumption increases due to the fact that you constantly turn it on/off. Xenon itself does not require much current consumption, but when turned on, the ignition units consume a large current to start.
well, like re-equipment... no?
There were never any questions. What kind of refurbishment is there? These lights are attached to the trunk. The trunk is secured as a load to the factory roof rails.