At night, during rain or fog, special fog lights come to the aid of the low beam. When properly installed and adjusted, such lighting elements become indispensable assistants for the driver in adverse weather conditions.
Thanks to the diffused light, when such headlights are turned on, the roadside is clearly visible, which in turn is a determining factor for safe movement by car in conditions of limited visibility.
How to replace a Renault Logan fog light bulb - photo, video
To fully replace the fog light on a Renault Logan car, it is not always necessary to seek help from qualified specialists from the service center. If your car is not under warranty, or the PTF is not included in the list of parts available for free replacement, you can do the work yourself. It is enough to have with you all the tools necessary for the work, as well as to first familiarize yourself with the procedure for carrying them out.
conclusions
Installation of fog optics in Renault Logan, as practice has shown, usually does not cause difficulties and increased time costs. Adjustment skills will not be superfluous here, allowing you to correctly and quickly “set” the light beam. If problems arise when replacing the PTF light bulb or subsequent adjustment, a reasonable measure would be to contact specialists, which will save time and nerves.
In most cases, they resort to replacing a set of Renault Logan headlights if they are damaged. If there is no such factor, then we limit ourselves to replacing the lamps and, if desired, polishing the working surface (plastic bulb). Replacing the fog light bulb will not only increase the efficiency of the emitted light flux, but also significantly facilitate visibility in difficult weather conditions (rain, fog, etc.).
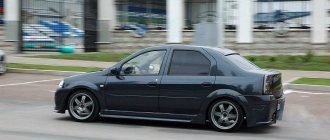
Renault Logan Daytime running lights LED backlight Renault Logan cars appeared on the world market in the fall of 2004. In fact, this car can be described in two words: modesty and modernity. Discreet design, a minimum of frills both inside and outside. But at the same time, the functionality of each element is ensured to the maximum. Roomy interior, excellent assembly accuracy of all components, large three-spoke steering wheel, comfortable driver's seat. Despite the modest and unpretentious design, Logan looks quite stylish and modern.
One of the distinctive features of the product is its ease of maintenance and repair work. Any driver can cope with many of them independently, without turning to a service station for help. Replacing some parts, simple adjustments and debugging - here Logan gives you the opportunity to show your abilities as an auto mechanic.
Source
Fog lights: what are they?
Fog lights are additional lights on a car designed to illuminate the road at night in conditions of rain, fog or snow. Every car enthusiast knows that in such conditions, headlights are practically useless. The beam of light is reflected from drops of fog or rain and blinds the driver, creating a dangerous emergency situation.
Lamps used in Renault Logan
A droplet-air mass of fog, as a rule, hangs over the road at a certain height. And it is in this case that a beam of light from low-lying sources reflects much less from water droplets - it shines below the bulk of the fog. If we talk about snow or rain, then a completely different factor plays a role here - the color tone of the light beam. A highly directed beam of light comes from the fog lamp, passed through special yellow light filters. This makes it possible to provide much better visibility than using headlamps.
Fog lights can be standard or installed on a vehicle as an addition. You need to know that they can in no way replace headlamps, since they have a much shorter illumination range.
However, they can be used as the main light source in moderately limited lighting conditions. They allow you to perceive the road much better. They make the vehicle more visible on the road and do not dazzle oncoming drivers.
Fog lamp. Kit before installation.
If you install them yourself, you need to know that lights that are located too high do not improve, but, on the contrary, significantly distort visibility on the road, since they are reflected from drops of fog. And it should be remembered that here it is advisable to install lights with yellow light filters - they are the most effective.
Such lamps must be installed in pairs. The distance from the side marker lamp along the outer edge of the lens should be no more than 40 cm, and the height from the road surface along the lower edge of the lens should be up to 25 cm. They must be installed no higher than the head lamps.
Bottom line
As you can see for yourself, there is nothing difficult in installing such an important element of outdoor lighting as a fog light on a Renault Logan. The whole process is extremely clear and simple.
When carrying out such work, you will only need to be attentive, careful and follow our instructions as closely as possible. Believe in your strength and you will definitely succeed.
Sources used:
- https://lampaexpert.ru/avtomobilnye-lampy/protivotumannye-fary/zamena-na-reno-logan
- https://carfrance.ru/ustanavlivaem-protivotumannye-fary-na-reno-logan-svoimi-rukami/
How to connect fog lights on Renault Logan
We install fog lights on a Renault Logan with our own hands (photos and videos)
At night, in the rain or fog, special fog lights come to the aid of the low beam. When properly installed and configured, such lighting elements become indispensable for drivers in difficult weather conditions.
Due to the diffused light, when you turn on these headlights, you can clearly see the side of the road, which in turn is a determining factor for safe driving in low visibility conditions.
Types of fog lights for Renault Logan
The Renault Logan technical device allows you to equip your car with fog lights if they are not included in the delivery package. Installation is carried out in special standard places or replaced with a plug.
Important! Before replacing your fog lights, make sure the bulb, frame and phase match your vehicle. The fact is that depending on the year of manufacture, the shape, lantern and installation of fog lights differ significantly from each other.
Stage 1 was installed on first generation Renault Logan cars by 2008, and stage 2. for Renault Logan cars in the second half of 2008.
Therefore, before buying a kit with PTF, you must know exactly the necessary details.
Make a set of PTF
Let's look at an example of installing PTF Phase 2 for Renault Logan.
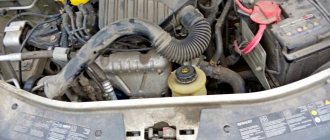
Before starting installation, make sure that there is a special relay and fuse in the unit located in the engine compartment. 15A marked F31 , is located in the protective block on the driver's left foot in the car. But if you look at the passenger side dash, you most likely don't have a cabin filter, it's a mess, most likely install one!
Do-it-yourself PTF installation
Let's look at an example of installing a PTF on Renault Logan phase 2.
Before starting installation, make sure there is a special relay in the block, which is located in the engine compartment, as well as a 15A fuse marked F31, located in the fuse block near the driver’s left foot in the car. But, if you look at the panel on the passenger side, you will see that you most likely do not have a cabin filter, this is a mess, install it quickly!
The relay for the fog lamp is located under the hood of the car and is marked in the picture with a red circle
The presence and integrity of this fuse guarantees the functionality of the entire PTF circuit.
As practice and reviews from most Loganovodov show, installing fog lights is not difficult if you have a little skill, detailed instructions and a set of all the necessary tools:
- PTF set.
- New steering column switch (which has a position for turning on the front fog lights). *
- Frame for PTF (is an auxiliary tool).
- Wiring harness.
- Marker.
- Screwdriver or drill.
- File or sanding paper.
- Knife.
This is how the yellow and blue wires are located before the alteration.
And so they are located after.
You should not connect the PTF in parallel with the low beam lamps, as the load on standard wires, which are not designed for so many sources of current consumption, will increase. Also, low beam lamps will burn out more often due to additional load sources.
Sequencing
- First of all, to remove the steering column switch, you need to move the driver's seat back all the way.
- Unscrew the two bolts securing the casing.
- Having lowered the steering wheel down, first remove the upper trim, then the lower one.
- Then unscrew the two bolts securing the steering column switch and disconnect the fixing plug on the sides.
- Then we carry out work to remake the standard switch or replace it with a new one.
- We check the functionality (without connecting the PTF for now).
We perform assembly in the same order of removal.
Connecting PTF
According to traffic regulations, fog lights can be used instead of daytime running lights, but not at the same time, which is why everything is connected via a relay!
Phase 2
To install the PTF in phase 2, you must first cut out a template according to which you need to make holes for the latches and the headlight itself.
The template must be cut according to the overlay, observing all dimensions.
For maximum strength and fixation, the linings can be covered with double-sided tape or better secured from the inside with plastic clamps.
Phase 1
Next, it is best to remove the front bumper; how easy this is to do is described in this article. Removed the bumper, install parking sensors!
- We mark the places on the bumper according to the template and drill them out using a screwdriver or drill.
- We insert the PTF plug into the drilled holes in the bumper.
- Then we insert the fog lamp with frame into the installed mounts.
- Once the installation is complete, you can begin connecting the electronics. The standard PTF power supply in phase 2 is attached to the side member on the driver's side, to which we connect the newly mounted headlights.
We check for functionality and then install the bumper in the reverse order of removal.
How to install and adjust anti-fog optics?
How are fog lights installed? Before starting the procedure, you should carefully read the existing rules for installing fog lights, which will avoid the negative consequences of illiterate installation and save the owner from unwanted inconveniences. Among these, there is not effective roadside lighting, but banal blinding of oncoming traffic participants.
As an installation procedure, when installing fog lights, you can choose two options for its implementation: by independently performing a full range of manipulations and by contacting specialists from a specialized workshop.
If the owner has chosen the option of installing fog lighting devices with his own hands, then he is recommended to follow the work algorithm below.
- Initially, we check the presence of a special relay in the Renault Logan mounting block, located in the engine compartment. If such an element is missing, then we purchase it.
- We place the car on a fairly flat surface and remove the front bumper with flaps to remove dirt.
- So-called “masks” are initially present on the bumper as seats for mounting fog devices. They look like plastic elements painted black.
- The fog lights are installed strictly in the designated places and are fixed to the surface of the bumper with self-tapping screws (2-3 pcs.).
- We install the Renault Logan bumper and connect the electrical connector to the socket with the lamp inserted into it. We check the reliable fixation of the socket in the housing and the glass of the fog lamp in order to protect ourselves from the unpleasant “rattling” of the light beam (i.e., the lamp) when moving.
- We attach the wiring to the Renault Logan bumper using a plastic clip.
- We install dirt removal shields.
- We adjust the optics.
What is the role of PTF and characteristics?
Logan drivers are often puzzled by the question: are fog lights for Renault Logan really only necessary for driving in foggy conditions? But no! These devices provide significant assistance to the driver when driving at night on suburban highways or in unlit areas. If the factory equipment does not include PTFs, then it is strongly recommended to purchase them and install them in pre-designated places on the bumper. When the optics are of high quality, the ride comfort is guaranteed to improve.
To effectively illuminate the road surface in conditions of increased fog in fog devices, it is necessary not only to install fog lights, but also to install special incandescent lamps with a yellow lighting spectrum. Some owners, wanting to increase the lighting effect, install lamps with increased power in fog lights. On the one hand, this is not bad, but in the absence of the correct approach to this operation, you can end up with “shabby” reflectors as a “reward”.
The design aspects of such an element as the glass of the fog lamp are very close to those of conventional head optics. By using the right choice of lamps and the correct beam settings, you can acquire a useful lighting device, and not just an elegant element of the exterior.
Types of fog lights for Renault Logan
The Renault Logan technical device allows you to equip your car with fog lights yourself, if they are not included in the package. Installation is carried out in special standard places, or they are replaced with a plug.
Important! Before replacing a fog light, make sure the bulb, frame and phase match with your vehicle. The thing is that, depending on the year of manufacture, the shape, lamp and mounting of the fog lamp differ significantly from each other.
Phase 1 was installed on Renault Logan I generation cars until 2008, and phase 2 on Renault Logan cars from the second half of 2008.
Therefore, before purchasing a PTF kit, you should know for sure about the part you need.
The procedure is identical for both the right and left PTF.
The sequence of work outlined here is of a general nature, since for different years of model production the algorithm of actions has its own specifics. If the Renault Logan modification was released before 2008, then the mounting of the fog light has its own features, which are different from the nuances of fixing the PTF on cars of 2009-2010. release.
Adjusting the light beam of fog lights is very important and is not difficult to implement. Let's get started.
- Before direct adjustment, we check the air pressure in the tires and, if necessary, resort to equalizing it.
- Place the front of the car against the wall.
- Make sure the fuel tank is half full or less.
- We apply special markings to the wall surface, where we mark the centers of the headlights in advance. We connect these points with a line and draw a new straight line at a specific distance below the designated line.
- Aspects of adjustment and certain digital parameters are “extracted” from the technical documentation for Renault Logan.
How to install and adjust anti-fog optics?
How are fog lights installed? Before starting the procedure, you should carefully read the existing rules for installing fog lights, which will avoid the negative consequences of illiterate installation and save the owner from unwanted inconveniences. Among these, there is not effective roadside lighting, but banal blinding of oncoming traffic participants.
As an installation procedure, when installing fog lights, you can choose two options for its implementation: by independently performing a full range of manipulations and by contacting specialists from a specialized workshop.
If the owner has chosen the option of installing fog lighting devices with his own hands, then he is recommended to follow the work algorithm below.
- Initially, we check the presence of a special relay in the Renault Logan mounting block, located in the engine compartment. If such an element is missing, then we purchase it.
- We place the car on a fairly flat surface and remove the front bumper with flaps to remove dirt.
- So-called “masks” are initially present on the bumper as seats for mounting fog devices. They look like plastic elements painted black.
- The fog lights are installed strictly in the designated places and are fixed to the surface of the bumper with self-tapping screws (2-3 pcs.).
- We install the Renault Logan bumper and connect the electrical connector to the socket with the lamp inserted into it. We check the reliable fixation of the socket in the housing and the glass of the fog lamp in order to protect ourselves from the unpleasant “rattling” of the light beam (i.e., the lamp) when moving.
- We attach the wiring to the Renault Logan bumper using a plastic clip.
- We install dirt removal shields.
- We adjust the optics.
Sequence of work
- First, the owner needs to remove the special mudguard located on the bumper of the Renault Logan car. It is removed from the side on which the defective light source is located - PTF.
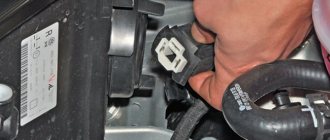
- Once this work is done, the next task is to disconnect the plastic wire retainer. The phase is checked for intermittent operation. This work is done extremely simply.
- The next step is to disconnect the connector from the fog lamp, the phase is turned off. As soon as it is separate, the lamp must be turned counterclockwise.
- Now the fog light can be removed, and the wire on which the phase is located should preferably be put aside.
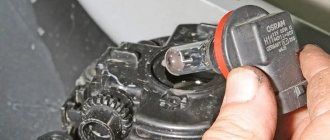
Fog lights do not always need to be replaced entirely. It also happens that you need to replace a burnt-out lamp in which the phase has burned out. After disconnecting all connectors powering the light source, removing the lamp will be possible with a slight movement of the hand.
Attention! If it is necessary to replace only the LED lamps, and not the entire PTF headlights, you need to pay attention to the presence of condensation. If present, it is recommended to leave the headlight without a lamp in a place where there is no high humidity. Ideally, you can leave it in the sun for a while. As soon as the condensation disappears, you can begin installation.
Installation of the fog lamp on a Renault Logan car is performed in the reverse order. Turn the lamp clockwise, and then connect the connector on which the phase is located. Squeeze the plastic wire clamp back and install the dirt shield on the side where the lamp is installed. Check the operation of the new headlight and make sure that the phase is not short-circuited.
What does the replacement sequence look like?
How to change the fog light bulb step by step:
- Replacing a fog light begins with dismantling the mud shield, which is attached to the surface of the bumper on the side where the fog light is to be replaced.
- After this, disconnect the plastic clamp of the wires leading to the lighting fixture.
- We disconnect the electrical connector for the power supply of the socket with the PTF lamp.
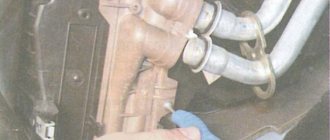
- Using a Torx-20 wrench, unscrew the two screws that secure the fog lamp unit to the bumper.
- Now the headlight can be freely removed, and a new analogue lighting device is installed in its place.
Sometimes it is necessary to replace the fog light, but not the entire one, but only the burnt out lamp. The PTF light bulb is being replaced - it's not difficult at all. After disconnecting the connector, rotate the socket at a slight angle counterclockwise and remove it together with the lamp from the fog light housing.
Regardless of the PTF model and the type of lamp used in it, installation work looks identical and is carried out traditionally in the reverse order of dismantling operations. After completing the assembly, we check the operation of the Renault Logan lighting device and make sure that there are no side effects (flashing of the lamp, etc.).
Installing fog lights on Renault Logan
Below we describe in detail how to install PTF yourself, using Logan phase 2 as an example.
Before installation, we check the presence of the PTF relay in the block under the hood and the presence of the required fuse (F31) in the fuse block located at the end of the dashboard on the driver's side.
We will need spare parts:
- Set of fog lights (FTL);
- Steering column switch (with position for front PTF);
- Frames (brackets) for fog lights (set);
- Connection harness;
- Bumper covers (for Renault Logan phase 2).
To install the steering column switch you will need a Phillips screwdriver and a 20 Torx wrench.
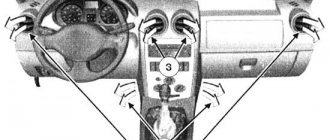
We move the seats back to the maximum, because it is very difficult to get there. Take a Torx and unscrew the 2 screws from below. Then we release the steering wheel height adjustment lever, leave it in this position (for Phase 2) and pull the upper part of the casing (it can be removed without problems). Now the lower one (do not remove it completely, but only lower it a little so that you have access to the bolts holding the steering column, otherwise it will be difficult to put the casing in place later).
We unscrew the 2 bolts of the switch, take it out and disconnect the cable by pressing the side latches. We connect the new one (there will be a click), put it in place and tighten it with bolts. Insert the bottom casing all the way. Next is the top one. And we snap them together. You can raise the steering wheel to the highest position and lock it with the steering wheel tilt lever (for Phase 2). We tighten two screws.
The bumper covers have latches, but to be safe, it’s better to use double-sided tape. Also, before installing the PTF on Logan Phase 2, you can prepare a template from cardboard, according to which holes for the latches of the linings and a hole for the PTF will be drilled.
For Logan Phase 1, you just need to cut out the plugs in the bumper, in the PTF niches.
To install PTF you will need:
- Sample;
- Marker;
- Drill;
- Knife;
- Degreaser;
- Plastic clamps.
We degrease and mark the bumper (Phase 2)/cut out the plugs (Phase 1).
We take a drill and drill holes according to the markings. We clean them with a knife. We remove the debris and degrease it again so that the tape sticks. We install the plugs in the bumper. Press until it clicks and hold for a couple of seconds so that the tape sticks.
Next, you need to install the PTF with a frame on standard plastic ones.
Photo before cutting the holes.
At this stage, a problem arises - standard plugs, which are supposed to attach the frame with PTF to the bumper, are extremely difficult to find on sale. Instead, plastic clamps are used.
The PTF frame has a plastic strip. Take a drill and drill all 4 fasteners on the bumper and 4 holes in the frame. We tighten them with plastic clamps.
Must remain motionless.
The final stage is connection.
We connect the harness to the connector located behind the bumper on the driver's side.
Attention! The cheapest package does not have this connector (you will have to buy it and install it separately)!
The mounting location for the harness on Phase 2 is under the lower grille. (in Phase1 - otherwise).
You can additionally secure the cover with clamps
Connecting the right PTF
Connect the left PTF
Turn it off. We put the bumper in place.
When attaching the left mudguard, make sure that the harness does not dangle in the air. If it dangles, you can fix it with a clamp.
Sequencing
- First of all, to remove the stalk switch, you need to raise the driver's seat all the way.
- Unscrew the two bolts securing the housing.
- With the steering wheel down, remove the top cover first, then the bottom cover.
- Then unscrew the two shift lever bolts and disconnect the locking plug on each side.
After unscrewing the two bolts, press the plug on the sides and disconnect the drain switch.
In such a steering switch, the ability to switch the front PTFs is immediately activated.