The steering system is extremely important for the safe operation of the car, because problems with it can lead to irreversible consequences.
Also, strict traffic regulations requirements are imposed on the serviceability of this system. Therefore, for your safety and the safety of other road users, it is necessary to monitor the condition of the steering tips and carry out timely replacement.
How to change steering tips on a VAZ 2109
There is absolutely nothing pleasant about breaking tie rod ends. Therefore, if such a malfunction is detected, it is necessary to take immediate action to eliminate it.
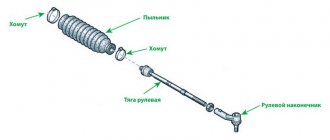
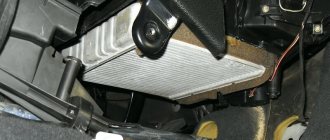
Appearance of elements
It is important to note that the tie rod ends of the VAZ 2109 are in many ways similar to the designs of other representatives of the AvtoVAZ model range. But if we compare, for example, with the VAZ 2110, where the tip is screwed onto the rod, then the VAZ 2109 has the opposite - the tip is screwed into the rod, that is, it has an internal thread.
Why do tie rod ends fail quickly?
The most common defects in steering tips are a breakthrough of the rubber boot, wear of the plastic bushing or spherical surface of the pin, and weakening of the spring.
A damaged boot can cause contamination and wear on the pivot joint.
The main reasons for premature wear of steering tips during operation:
- Aggressive driving style - sharp turns of the steering wheel and active maneuvering on uneven roads.
- Driving on poor-quality surfaces, combined with a turn, hitting high obstacles (curbs, logs).
- Rotating the steering wheel on a stationary car.
- Exposure to chemically aggressive compounds.
- Frequent temperature changes.
Damage to the liner sometimes results from unqualified replacement of the part at a service station. Violation of the integrity of the boot or its displacement due to the destruction of the locking ring often causes contamination and rapid wear of the hinge.
The greatest loads on the steering tips occur when driving quickly on uneven roads with active maneuvering. When turning the wheels of a stationary vehicle, the load on the steering system elements will increase to 1 ton. With a measured driving style on good roads, tie rod ends last up to 100,000 km . With a combination of at least three of the above risk factors, symptoms of faulty steering tips may appear after 20–30 thousand km, and in the case of mechanical damage to the boot cover even faster.
Installing the steering rack
It is better to install the steering rack on the car with an assistant - one starts the rack from the engine compartment, the other directs the universal joint into the shaft splines from the passenger compartment. The universal joint can be placed in only one position - there is a special casting in the spline joint, which must be aligned with the groove on the mating part. Do not immediately tighten the pinch bolt - the universal joint will take the correct position on the splines after the rack and subframe are finally screwed on.
Diagnosis of the problem
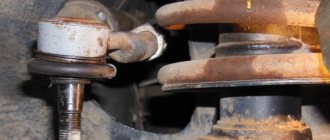
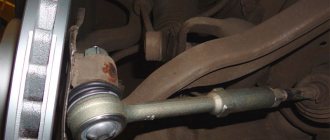
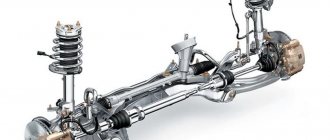
Steering rod mounting diagram
The cause of steering gear malfunction is most often wear of the ball joint of the rod ends. Detecting a problem, as a rule, is not difficult - it manifests itself in discomfort when driving the car and various extraneous noises.
What indicates a malfunction?
Unusual sounds, especially knocking sounds;
Steering wheel vibrations;
Increased steering play;
Tight steering wheel rotation;
Unusual deviations in the vehicle's trajectory while driving in a straight line.
When repairing, all basic requirements must be strictly taken into account. It is not recommended to carry out the so-called restoration of steering rods. This old method is to try to restore them. However, the effectiveness of such repairs is not very high. The best solution is to completely replace the steering rod.
When an external inspection is carried out, the first thing you should pay attention to is the movement of the steering tips along the axis (it should not exceed 1.5-2 mm). You should also check the strength of the clamps and inspect the joint covers for mechanical damage.
Device
A tie rod usually consists of a metal rod and two ball joints at its ends. Each hinge is protected from dirt by a rubber boot. Some tie rods may be adjustable in length. This is necessary to adjust the wheel alignment. Sometimes there are designs that have only one ball joint. Their second hinge is rubber-metal, which does not need protection with a boot.
The most popular in the design of front-wheel drive passenger cars is the rack and pinion steering mechanism. Its tie rods are the same on both sides and most often consist of a rod and two ball joints. The inner hinge is attached coaxially to the rod and is located under the cover of the rack, and the outer one is perpendicular to its axis with its boot. The steering knuckle lever has a tapered hole for attaching a hinge. The surface of the finger mating to it is also made in the shape of a cone. Therefore, it is quite difficult to disassemble the lever-pin connection without a puller.
Troubleshooting
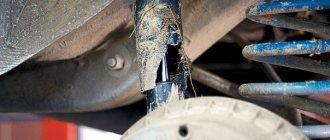
Some signs of steering failure can be identified visually. Their diagnosis begins with an external examination of the anthers and rod.
- The boots should not have ruptures or cracks, and no grease should leak from underneath. Leaky covers need to be replaced if the wear of the hinge does not exceed the permissible limits. Before installing a new boot, remove dirt from the joint and place a little Litol between the ball and the liner.
- If the rod shows signs of deformation from impact, the steering rod must be replaced.
- When it was not possible to determine the malfunction by external inspection, you need to check the degree of wear of the tips.
To check the hinges without removing the traction, place the car in an inspection pit or on an overpass. Stand under the front of the car. Grab the rod with both hands close to the outer joint and rock it up and down. The body of the outer tip can have a free play along the axis of the pin of no more than 1.5 mm. This play is due to the mobility of the conical plastic liner along the axis of the pin. It should not be perpendicular to the center line of the finger. You need to have an assistant check the internal rack and pinion steering joint. He should frequently turn the steering wheel from side to side by 15–20 ◦. Meanwhile, by touch, determine the presence of gaps. If you can feel the play with your fingers, the hinge will not last long - change it.
How to repair
Restoring tie rod ends is not a difficult task. Even a person who is not knowledgeable in auto mechanics can cope with it. Predominantly, it is the restoration of the node that is carried out. In most cases, after such work, the element lasts much longer than when replaced with a cheap duplicate.
Repair kit for tie rod ends
To carry out restoration work, you first need to prepare a repair kit.
You will need:
- jack;
- wheel wrench;
- puller;
- cord brush;
- sets of open-end wrenches and socket heads;
- WD-40 lubricant or its equivalent;
- emery or grinder;
- extruder;
- welding machine;
- chisel;
- hammer;
- metalworking yews;
- compressor;
- electric drill with a large cylinder.
Step-by-step instruction
It is advisable to restore steering ends if the cause of the malfunction is the hinge part. The main task in this case is to eliminate backlash, i.e. free play of the ball pin. Most often this occurs when the polymer liner shrinks. This is what leads to the appearance of a characteristic knocking sound when moving.
Steering rack repair: do it yourself or at a service station?
Repairing the steering rack yourself in the garage is profitable, but not easy. You will need a tool, time and patience.
Specialized car services offer an alternative to repairs in the garage or buying a new part - a complete restoration of the rack.
The specialists themselves will remove the rail, select the necessary repair kit, and restore problematic elements that are not commercially available. If the work described in the article seems complicated, trust the repair of the slats to professionals.
Source
Replacing steering tips for Nissan Qashqai
The main malfunction of the tip is the wear of its ball joint.
The reason is a violation of the seal of the boot. Practice has established that steering tips on our roads last no more than 40 thousand km. If it fails, it must be replaced immediately. Doing the replacement yourself is also highly undesirable. Errors in operation can cause an accident. The worst could happen.
Since traffic safety depends on the condition of the steering control elements, their replacement should only be carried out at a specialized service station.
Removing the steering rack
Removing the rack has its own characteristics for each car, but in general, the procedure is as follows:
Advice: not in every car you can get the rack just like that - the subframe may get in the way. Removing it completely is long and difficult; try unscrewing only the rear bolts and the engine mount, then move the subframe down. Often this is enough and the rail is released.
After dismantling, the rail must be cleaned of dirt and washed.
Main malfunctions of rods and tips: causes
Steering rods are simple in design, have no moving parts and are highly reliable.
The steering tip is also a fairly durable part. However, these elements (steering rod and tie rod ends) still fail for a number of reasons.
Why is the steering rod damaged?
When driving a car, strong impacts when hitting a hole, hitting curbs or aggressive off-road driving can cause the rods to bend or break.
In this case, bent rods lead to the fact that the wheel alignment angles (wheel alignment) are disturbed, the angle of rotation of the wheels changes, the tip boots rupture, and the rod tip can be torn out. Experts recommend periodically checking the steering linkage geometry. By the way, if it is necessary to replace one rod, you need to change the second one (pair replacement).
Steering wheel breakage
Although the tip is highly reliable and wear-resistant (steel pin, liner made of wear-resistant material, anodized body), the structure still collapses on bad roads and under high loads.
Also, the hinge joint fails as a result of the boot breaking. If the boot is damaged, water and dirt get inside, the lubricant is washed out, active corrosion begins, small grains of sand begin to act as an abrasive, damaging the surfaces. For this reason, it is important to monitor the condition of the anthers, as well as pay attention to signs of malfunction of the steering tip.
Signs of faulty rod ends
As a rule, wear and malfunction of the steering can be determined by the following signs: play and knocking, increased vibration on the steering wheel, the steering wheel is too tight or light, a beating appears on the steering wheel.
In turn, faulty steering tips manifest themselves as follows:
- when driving, you can hear feedback on the gas pedal;
- quiet and frequent knocking when turning the steering wheel in the wheel area;
- knocking on rough roads;
- the steering wheel turns too easily;
- wheel alignment is not set.
Reviews on ways to repair the mechanism
And there are actually two restoration technologies - either pour something inside, removing the cover, or completely disassemble the ball, pressing out the bottom. At the same time they screwed in the oiler. Or they simply pressed the outer part. But most often the ball dies from a torn cover, then dirt, sand, water gets stuffed inside, grinding down the bushings, the iron, and the ball. So not every ball joint can be restored. And it doesn’t matter how to restore, fill or disassemble, the main thing is that in principle it is possible.
mogui
https://forums.drom.ru/habarovsk/t1151615673-p2.html
I drove restored ball and steering wheels for two years, I won’t say anything bad, really, and good things too... The owner of the service station (according to him) immediately restores even new spare parts, he says that the restored ones last longer... I’m used to drawing conclusions based on an understanding of the process, but I don’t understand how it’s possible to restore a seemingly non-separable part... Service technicians say: the pin is taken out, the wear on the pin is turned, then it’s polished and filled with plastic.
Zhornic
https://www.land-cruiser.ru/index.php?showtopic=120678
There is no point in pouring openly rusty ones, since the geometry of the finger will already be too disrupted, which will lead to an incorrect shape of the poured polymer, and all that follows from this.
ArxivatoR
https://www.drive2.ru/l/1354317/
Give examples of accidents that occurred due to the fault of restored ball joints, and not due to compliance with the distance or speed limit, for example. I do repairs myself, I’ve seen a lot of restored parts, there are regular customers who have driven more than 50 thousand on restored ones and it’s great, the main thing is to restore them on time! And if you are afraid for your life, then buy new cars, not junk, which in Europe is already sent to scrap, and follow ALL traffic rules. PS: Just because you bought a new spare part does not mean that it is good, especially in our markets. New new discord.
maleid
https://forum.onliner.by/viewtopic.php?t=1118334&start=40
To decide how to repair your suspension, just calculate the cost of restoration. In some cases, it makes sense to buy a new unit; sometimes repairs will be more cost-effective. In any case, a variety of options gives you a chance to save money.
Hello, dear car enthusiasts! Continuing the theme of safe vehicle driving is the timely detection of faults, correct diagnosis and repair of the car’s steering.
In steering, the most vulnerable is the steering drive system, namely the tie rods and outer tie rod ends. These are precisely the elements that are most affected by all the unevenness - the bumpy features of our roads.
Is it possible to cope on your own?
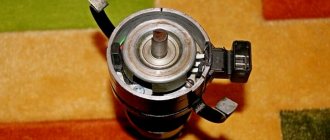
Repairing ball joints on your own is quite difficult. This is due to several factors. First, it is necessary to make an extruder to restore the ball joints. Secondly, the process is quite labor-intensive.
An extruder can be made if you have an old brake master cylinder (MBC). A special lever is inserted into it, which presses on the piston. The design is quite simple and reliable, and most importantly, it is effective. The recovery process is as follows. A small diameter hole is drilled in the body of the ball joint seat. Compressed air cleans the space between the finger and the body. Next, the plastic is placed using an extruder. Do-it-yourself restoration of ball joints has several clear advantages:
- solving problems with backlash;
- low cost of repairs.
But there are also disadvantages:
- the state of the ball remains unknown;
- corrosion is not removed.
In general, this is a rather interesting method that allows you to repair a unit without extra costs. But sometimes it needs to be replaced. For example, if the ball does not stay in the seat due to wear on the hinge. Here restoration will not help, a replacement is needed.
Making a serviceable cover
The blind part of the support body is made removable. At the same time, you can change the plastic inserts many times, each time restoring the functionality of the support. The removable bottom allows for routine inspection without removing the ball joint from the suspension.
Plug: do it yourself
- A hole the size of a finger ball is drilled in the bottom (with a small gap, of course). It is drilled out - it is said conditionally. A milling machine is required. Don’t be afraid to damage the plastic liner when boring, you will still need to change it. The thread is cut inside. This is a rather complicated procedure due to the large diameter. But in any tool shop they will do this kind of work for a nominal fee.
Entrust the work to professionals if you are not one yourself
Tip: To make the plug accurately, use two ball joints. Cut the bottom off one using a grinder and use it as a template for the shape.
Replace on a clean surface, otherwise the meaning of the work is lost.
Important! It is necessary to ensure that the thread is locked, otherwise the bottom may unscrew during operation.
Repair glass: everything ingenious is simple
The principle is the same as in the first case - to make a replacement bottom. Only the execution is different. If the bottom of the support is too thin to make a full threaded connection, it is necessary to make a repair cup. It is turned on a lathe from a steel circle of suitable diameter. The same hole is made in the bottom of the glass and a thread is cut. And finally, the support replacement bottom is made.
Then the bottom of the cylinder is cut off from the ball joint using a grinder or a hacksaw. A repair glass is welded in its place. The method is more labor-intensive, but it does not allow the finger to heat up during the dismantling process.
Scheme for manufacturing a product variant
Further operation follows the same scheme: when play appears, unscrew the repair plug, remove the pin, change the plastic inserts.
It is worth noting that spare parts manufacturers produce many options for repair ball joints. Replacement inserts and new pins are sold for these collapsible housings. However, in our article we are considering self-production.
Welding as an alternative to replacement
The fastest option for restoring a ball joint. The rear (supporting) part of the cylinder is simply cut off. The method doesn’t matter - you can use a hacksaw, or you can use a grinder, but there will still be a temperature effect afterwards.
Having gained access to the cylinder cavity, you can change the polymer liners.
Important! Before installing new liners, be sure to remove any burrs formed during cutting. Torn metal edges will quickly split the liners during use.
After installing the new liners, the bottom is carefully welded. In this case, it is necessary to compensate for the production of metal formed during cutting with the thickness of the seam. Usually it is 1.5–2 mm.
Welding is one of the most painstaking options
Important! Use a welding method that minimizes temperature effects. The polymer liner inside may reach the melting point. Therefore, until it cools completely, do not apply any loads to the finger to avoid deformation of the liner.
Flaring as a repair method
This technology requires professional equipment, so it is impossible to flare a ball in a garage. A crimp ring is cut to fit the diameter of the finger ball.
Turning work will find its place here too
The seat and ball are cleaned of dirt and polished. New liners and a crimp ring are selected or machined from caprolon.
It happens that caprolon is not available, but replacing it with steel is not recommended. It’s better to spend money on this material once than to replace it more often than it could be
After assembly, the crimp ring is pressed in and rolled on a press. When crimping, special inserts-clips are used according to the diameter of the ring.
Inserts can also be found in car dealerships.