Which fuse is responsible for the heated rear window?
- Registration
- Entrance
- To the beginning of the forum
- Forum Rules
- Old design
- FAQ
- Search
- Users
- List of forums AUTOLADA.RU
- “Tenth” family (VAZ-2110, VAZ-2111, VAZ-2112) and LADA PRIORA
Vitaly correctly said exactly the same thing I had.
It warmed up instantly and changed the mounting block very much - everything became normal.
One recommendation: do not turn on the glass heating for more than 30 minutes. heating, IMHO, is not used to melt a thick layer of ice
This means there is a bad contact in the fuse socket and it gets hot.
The mounting block will probably have to be changed anyway, because... The plastic around this fuse melted. By the way, are the mounting blocks all the same? or do dozens of modifications differ?
Vit59
It's not a fact that the fuse burns forward. Because otherwise the plastic wouldn't melt around it. Or because of the short circuit, it first heats up and melts everything around and then burns out?
Surprising? Did you read the link? https://www.zr.ru/a/12353/ A working fuse must:
– do not burn out within 100 hours at a current 1.1 times higher than the rated current (melting of the housing is also not allowed);
– be within the tolerance for voltage drop across the pins (for fuses rated 3.5, 7.5, 10, 15 A this is 150 mV, for 20 A – 130 mV, for 25 A – 125 mV, for 30 A – 115 mV ); – operate on time (with a current 2 times higher than the rated current, the operating time should be 0.15–5.0 s, and with a current 3.5 times higher, 0.08–0.5 s). I understand, we bought Chinese goods and saved 3 rubles. So what surprises you now? I was lucky that the wiring didn't catch fire.
“Only two things are infinite - the Universe and human stupidity, although I’m not sure about the Universe” A. Einstein.
Vitaly correctly said exactly the same thing I had. warmed up instantly and very strongly
I changed the mounting block - everything became normal.
One recommendation: do not turn on the glass heating for more than 30 minutes. heating, IMHO, is not used to melt a thick layer of ice
So. like. There are timers.
Speaking of timers: what’s new in science also applies to cars -
- besides, to ours, including! (I have 12.)
What this timer can do (in a nutshell): - when starting the engine, turn on the heated rear window (mirrors), taking into account the temperature outside (and in the cabin) - any temperature can be set, - turn on the heating for a specified time - from 1 to 60 minutes (you can change independently) both in manual and automatic mode, - detect that the engine is running - heating works only when the engine is running, - delay turning on the heating after starting the engine for 10-60 seconds - so that the engine has time to “spin up”, - turn off the heating for a while severe drop in board voltage (this happens when everything is turned on at the same time: headlights BS-DS-PTF-heater to “3”-heating.) - after the voltage is restored, the timer will continue heating, - work with both a fixed button and a non-fixed one - both manual and automatic modes work fully, - installation in Lada 10-15 takes a matter of minutes - four wires of the timer-controller are connected “a la adapter”, - micro-dimensions of the timer-controller (approximately 1cmx2cmx0.5cm), which itself is temperature sensor.
Posts 1 page 30 of 32
Share116.01.2011 20:58
- Author: Vitaly
- Advanced neon guide
- From: Voronezh
- Registered: 10/31/2009
- Invitations: 0
- Posts: 417
- Respect: +19
- Positive: +29
- Gender: Male
- Age: 38 [1982-08-02]
- Spent on the forum: 21 days 12 hours
- Last visit: 03/31/2017 16:21
The heated rear window has stopped working, tell me where to look.
Share216.01.2011 21:07
- Author: leo just leo
- Club member
- From: Moscow Leninsky Prospect
- Registered: 05/07/2009
- Invitations: 0
- Posts: 3221
- Respect: +212
- Positive: +239
- Gender: Male
- Age: 31 [1989-04-28]
- Time spent on the forum: 4 months 27 days
- Last visit: 07/05/2020 02:03
First, look at the fuses, when the heated rear window didn’t work, the heated mirrors didn’t work either, it turned out that was the problem.. The fuse diagram for Neon-II I think it should look like Neon 1
Share316.01.2011 23:28
- Author: harley-0207
- Neomaniac
- From: Moscow
- Registered: 04/17/2010
- Invitations: 0
- Posts: 4891
- Respect: +305
- Positive: +17
- Gender: Male
- Age: 36 [1984-07-02]
- Spent on the forum: 1 month 30 days
- Last visit: 10/17/2020 15:27
But I have another problem, I insert a new fuse into the place where the block is in the cabin and it immediately lights up, without even turning on the heating button and regardless of whether the ignition is on or off.
Share417.01.2011 10:02
- Author: Ferz
- Neon guide
- From: Saratov
- Registered: 10/06/2010
- Invitations: 0
- Posts: 245
- Respect: +1
- Positive: +3
- Gender: Male
- Age: 34 [1986-09-02]
- Time spent on the forum: 2 days 23 hours
- Last visit: 11/08/2011 22:24
But I have another problem, I insert a new fuse into the place where the block is in the cabin and it immediately lights up, without even turning on the heating button and regardless of whether the ignition is on or off.
There are no options at all - look for where your plus fell to the ground. If hammered, there is a risk of fire.
Share517.01.2011 10:53
- Author: Vitaly
- Advanced neon guide
- From: Voronezh
- Registered: 10/31/2009
- Invitations: 0
- Posts: 417
- Respect: +19
- Positive: +29
- Gender: Male
- Age: 38 [1982-08-02]
- Spent on the forum: 21 days 12 hours
- Last visit: 03/31/2017 16:21
Is there a fuse diagram for 1 neon?!
Share617.01.2011 18:32
- Author: harley-0207
- Neomaniac
- From: Moscow
- Registered: 04/17/2010
- Invitations: 0
- Posts: 4891
- Respect: +305
- Positive: +17
- Gender: Male
- Age: 36 [1984-07-02]
- Spent on the forum: 1 month 30 days
- Last visit: 10/17/2020 15:27
I don't have any diagrams(((
Share717.01.2011 18:45
- Author: masiy
- Neomaniac
- From: Krasnodar
- Registered: 12/02/2009
- Invitations: 0
- Posts: 3635
- Respect: +174
- Positive: 0
- Gender: Male
- Age: 62 [1958-02-15]
- Spent on the forum: 1 month 16 days
- Last visit: 06/04/2020 22:37
There is both a plus and a minus on the glass. Call the minus with omics, and check the plus with a tester. If there is no positive then look at the fuses and wiring.
Share817.01.2011 22:24
- Author: mike
- Moderator
- From: Moscow
- Registered: 05/20/2009
- Invitations: 0
- Posts: 4021
- Respect: +415
- Positive: +368
- Gender: Male
- Age: 52 [1968-06-11]
- Spent on the forum: 2 months 16 days
- Last visit: 10/18/2020 16:33
Vitaly , Look at fuse No. 10 under the hood, 30A.
I have a fuse diagram, I can post it somewhere, but I’m too lazy to translate) There is a translated diagram for Neon-2, who doesn’t know the language at all, can translate it themselves by analogy.
Edited by mike (01/17/2011 10:29 pm)
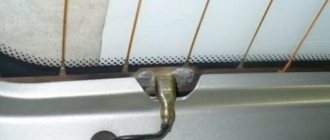
Our Lanos. Repairing the rear window defroster
The device and causes of failure of the heated rear window Lanos
Like any electrical circuit, the rear window heating system on Daewoo Lanos is protected by fuses, and in addition, it is connected to the on-board network via a relay
The rear window heating system on Lanos differs little from similar devices on other cars. It consists of conductive elements fixed to the surface of the glass. On the left side along the direction of the car there is a positive bus, to which 12 V power is supplied, and on the right there is a negative bus, which is connected to ground.
Installation dimensions of glass and heater
The reason for a non-working heating coil can be either a button on the stove control panel or a fuse or heating switch relay. In addition, loss of contact due to oxidation of the negative terminal of the spiral itself, as well as breakage of the heating element filament, is quite common. However, troubleshooting should begin with the most obvious damage, which is what we will do now.
Glass heater connection diagram
Checking the rear window heater on Lanos
For a quality check, we need a multimeter or, as a last resort, a 12-volt test lamp with leads
How to check the heating element on glass
To do this, use a multimeter or a test lamp. First, carefully inspect the conductive strips. It is quite possible that, due to carelessness, one of them was damaged and the supply of voltage to the heater stopped. In any case, press the button to turn on the heater and measure the voltage on the bus on the left side of the car. If everything is fine with the wiring, 12 V should be supplied to the bus. If there is voltage, but the heating element is dead, the problem is in the threads. We look for a break and restore the heater. We'll figure out how to fix the heating element a little later.
How to Check Heater Fuses and Relays
How to repair heated rear window on Lanos
If we checked the wiring and found no burnt contacts in the mounting block, the fuse and relay are in order, but the heating still does not work, we will deal with the heating element
If, after a detailed check, we find no problems with the wiring, we proceed to check and repair the heating element itself.
- We start the engine and turn on the heater.
- We sequentially measure the voltage of each of the conductive strips by placing one multimeter probe on ground, and the second on the strip at different distances from the center of the glass.
- If the voltage on the strip is the same at any point, regardless of the distance from the positive bus, check the contact of the negative bus with the ground (body) of the car.
- If the heating element is working properly, the voltage should drop as the multimeter probe moves away from the positive busbar of the heater.
- A sudden lack of voltage on the strip will indicate a break in the conductive layer. As soon as we have fixed the cliff, we mark this place with a marker or any other way.
Brief information
The car window fuse is just one of a whole list of elements that are somehow involved in raising and lowering the window.
In fact, the most basic component, without which the glass would not move, is an electric motor equipped with a relay. Depending on the direction in which electric current is passed through the motor, the glass can rise or fall. Direct control of the power windows is carried out through a button that can be pressed in one of two positions. Accordingly, depending on which direction the pressure is applied, the glass can move in one of two possible directions, opening completely or partially.
However, like any other electrical circuit, power window wiring and, as a result, all elements present in it can be subject to voltage surges or current, the value of which exceeds the maximum operating threshold of the devices. In order to protect equipment sensitive to voltage surges from failure, a fusible element is built into the power window circuit.
The operating principle of such a fuse is quite simple. A thin thread of conductor is built into its body, which connects opposite contacts to each other. The thread parameters are selected in such a way that when a current exceeding the threshold is supplied, the thread heats up and melts due to its high resistance, due to which the current stops connecting the contacts together.
If this happens, the element must be replaced immediately. The fuse itself costs a penny, but all the equipment, including the motor and relay, retains its functionality and does not fail for quite a long time, if, of course, the current threshold of the fuse element is selected correctly.
Fuses and relays VAZ 2114 2115 2113
VAZ 2113, 2114, 2115 cars considered
Attention! The location of fuses and relays in the blocks may differ depending on the year of manufacture and vehicle equipment. You can see earlier modifications of fuse blocks on this page.
Fuses for the VAZ 2114 injector and VAZ 2115 injector are also described on this page.
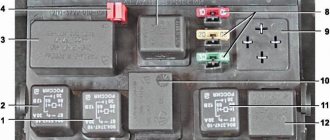
Where are the fuses and relays located?
The main part of the fuses and relays is located in the mounting block of the engine compartment.
To get to the block you need to press two latches and remove the cover
Using pliers installed in the block, remove the fuses
On the inside of the cover there is a diagram of the location of fuses and relays.
Click on the image to enlarge.
Fuse mounting block 2114-3722010-60
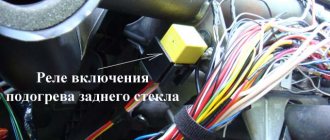
K1 - Headlight wiper relay, K2 - Turn signal and hazard warning relay, K3 - Windshield wiper relay, K4 - Brake light and parking light relay, K5 - Power window relay, K6 - Horn relay , K7 - Heated rear window relay, K8 - High beam relay, K9 - Low beam relay, F1 - F16 - Fuses, F1 - F20 - Spare fuses
Fuse for fog lights VAZ 2114, 2115 - rear fog light lamps and rear fog light indicator lamp
Direction indicators, relay-interrupter of direction indicators and hazard warning lights (in hazard warning mode) Hazard warning lamp
Front interior lamp. Central interior lamp. Luggage compartment lighting. Illumination lamp for the ignition switch. Lamp for monitoring the engine management system. Brake light bulbs. Trip computer (if installed)
Socket for connecting a portable lamp. Relay for turning on the heated rear window (contacts). Rear window heating element
Sound signal. Horn relay. Cooling fan electric motor. Fan fuse.
Electric windows. Power window relay (contacts)
Heater electric motor. Heater fuse for VAZ 2114, VAZ 2115. Electric motor for windshield washer. Headlight wiper motors (in operating mode) Cigarette lighter fuse. Glove box lighting lamp. Rear window heating relay (winding)
Fuse for fog lamps VAZ 2114, 2115 - Right fog lamp
Fuse for fog lamps VAZ 2114, 2115 - Left fog lamp
Side light lamps on the left side. Indicator lamp for turning on the side light. License plate lamps. Engine compartment lamp Instrument lighting switch. Fuse for backlight lamps of switches, instruments, cigarette lighter, ashtray, heater control levers
Side light lamps on starboard side
Right headlight (low beam)
Left headlight (low beam)
Left headlight (high beam). High beam indicator lamp
Right headlight (high beam)
Direction indicators, relay-interrupter for direction indicators and hazard warning lights (in turn indication mode). Reversing lamps. Relay for monitoring the health of lamps. On-board control system display unit. Instrument cluster. Insufficient oil pressure indicator lamp. Parking brake indicator lamp (brake light fuse). Brake fluid level indicator lamp. Low battery indicator lamp. Trip computer (if installed). Generator field winding (in engine starting mode)
Right fog lamp
Left fog lamp
Headlight cleaners (at the moment of switching on).
Relay for turning on headlight cleaners (contacts). Headlight washer activation valve
Headlight cleaners (in operating mode).
Relay for turning on headlight cleaners (winding).
Heater fan motor - heater fuse
Window washer motor.
Rear window wiper motor.
Rear window washer timing relay.
Valves for turning on the windshield and rear windows.
Relay (winding) for turning on the electric fan of the engine cooling system.
Relay (coil) for turning on the heated rear window.
Rear window heating indicator lamp.
Glove compartment lamp
Direction indicators and relay-interrupter for direction indicators and hazard warning lights (in turn indication mode). Turn signal indicator lamp.
Rear lights (reversing lamps).
Gearmotor and windshield wiper activation relay. Generator excitation winding (when starting the engine). Brake fluid level warning lamp.
Oil pressure warning lamp.
Carburetor air damper warning lamp. Parking brake warning lamp.
"STOP" light display lamp.
Coolant temperature gauge.
Fuel level indicator with reserve warning lamp. Voltmeter
Rear lights (brake lamps). Interior lighting
Power windows for front doors. Power window relay
License plate lights. Engine compartment lamp.
Instrument lighting lamps.
Indicator lamp for external lighting. Heater lever illumination display. Cigarette lighter lamp
The electric motor of the engine cooling system fan, and its activation relay (contacts).
Sound signal and relay for its activation
Left headlight (side light).
Left rear light (side light)
Right headlight (side marker).
Right rear light (side light)
Direction indicators and hazard warning relay-breaker (in hazard warning mode).
Hazard warning lamp
Rear window heating element.
Relay (contacts) for turning on the heated rear window. Plug socket for portable lamp. Cigarette lighter
Right headlight (high beam)
Features of operating heated seats
In the cold season, and especially during winter frosts, the presence of a heated seat in the cabin is an excellent help in operating the car, especially if, for objective reasons, it is often left outside (in the yard or in an open parking lot).
While the engine is warming up, it is quite possible to warm up the driver’s seat so that the further trip is as comfortable as possible, especially since the cabin heater will not immediately increase the temperature inside the car.
The problem, as often happens, lies in suboptimal handling of the heating system, due to which it fails earlier than allowed by factory standards.
Heated rear window does not work
| Images |
| My images |
| Upload images |
| All images |
| To the page. |
| Page 1 of 2 | 1 | 2 | > |
| DENGOR |
| View profile |
| Find more posts by DENGOR |
| madmax181 |
| View profile |
| Find more posts by madmax181 |
| lieuten |
| View profile |
| Find more posts by lieuten |
| Zheka_27_region |
| View profile |
| Find more posts by Zheka_27_region |
| DENGOR |
| View profile |
| Find more posts by DENGOR |
| lieuten |
| View profile |
| Find more posts by lieuten |
| madmax181 |
| View profile |
| Find more posts by madmax181 |
| Fedor1 |
| View profile |
| Find more posts by Fedor1 |
| DENGOR |
| View profile |
| Find more posts by DENGOR |
| Airtrek |
| View profile |
| Find more posts by Airtrek |
There is nothing unnatural about this. The button illumination is not directly related to the heating power circuit. The backlight is powered by the a/c-ecu (pre 5 to 7.5a), and the heating circuit is powered by a 20 to 30a fuse.
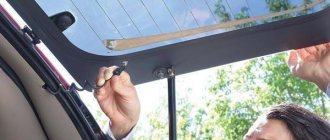
Remove the rear door trim and check what is missing - +12 or ground. Further depending on the circumstances. Perhaps the terminal on the glass heater just fell off, perhaps the wire in the corrugation broke, maybe the relay is acting up.
| DmirtyVS |
| View profile |
| Find more posts by DmirtyVS |
There is nothing unnatural about this. The button illumination is not directly related to the heating power circuit. The backlight is powered by the a/c-ecu (pre 5 to 7.5a), and the heating circuit is powered by a 20 to 30a fuse.
Remove the rear door trim and check what is missing - +12 or ground. Further depending on the circumstances. Perhaps the terminal on the glass heater just fell off, perhaps the wire in the corrugation broke, maybe the relay is acting up.
Today I went to an electrician, he called and said everything was normal. There is ground and 12 volts. The lowest part of the heating is hot, the higher part is cold. And what is the problem now?
Added after 1 minute And then only the lower left part is hot, everything else is cold
Added after 3 minutes Where is the relay located and which one? Or is there no point in watching it, since the heating goes to the lower left part?
| Airtrek |
| View profile |
| Find more posts by Airtrek |
Today I went to an electrician, he called and said everything was normal. There is ground and 12 volts. The lowest part of the heating is hot, the higher part is cold. And what is the problem now?
Added after 1 minute And then only the lower left part is hot, everything else is cold
Added after 3 minutes Where is the relay located and which one? Or is there no point in watching it, since the heating goes to the lower left part?
Strange electrician!
If the lower part heats up, but the upper part does not, it looks like a break in the upper threads of the heating element, but it is usually visible to the eye. It is strange that only the left side heats up! This means that in this place the resistivity of the thread is higher than on the right, i.e. and it is also faulty, because The resistivity along the length of the filament should not change much.
A normal electrician should have told you all this! In the past, the heating threads on Lada cars often burned out (broke), but rarely did anyone complain about the Mitsu. Maybe the rear window was replaced and the heating was damaged during dismantling?
Summary
The window drive fuse is an extremely important element, the functioning of the entire system as a whole depends on its proper operation. If the glass drive for some reason refuses to work, then you should pay attention to it, and only then contact the services of an electrician and find out the true cause of the breakdown.
Sources
- https://portal-mashin.ru/service/electrics/predohranitel-steklopodemnika.html
- https://znayauto.ru/elektrooborudovanie/gde-raspolozhen-predohranitel-na-steklopodemniki.html
- https://smotri-dtp.ru/voprosy-i-otvety/kakoj-predohranitel-otvechaet-za-steklopodemniki.html
- https://automas.ru/vaz/2110/raspolozhenie-predoxranitelej-na-sxeme-dlya-vaz-2110-2111-2112/
- https://vsepredohraniteli.ru/lada/vaz-2110-2111-2112.html
Heated rear window does not work
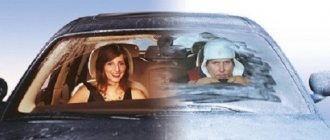
The rear window on passenger cars is often used for visibility, so it must be equipped with a special heating system. Its failure greatly interferes and affects safety - the glass quickly freezes in winter or fogs up in the rain. What kind of failures can be hidden in this system?
The reasons why the rear window heating does not work are almost always electrical. After all, this system has no moving parts, electric drives or other complex things. To understand what is included in the system, let's look at the diagram.
In the classic and simplest version, the glass heating works when the ignition is on. When the button is pressed, power is supplied to the relay control contacts
, it connects the power circuit and current is supplied to the heating filaments glued to the glass. The “mass” of threads is usually connected to the body in the area of the rear pillars.
New mounting block
In order to understand which fuse is responsible for the instrument lighting on the VAZ 2114, you need to know which mounting block is installed on your car. In both cases, this is the F10 element at 7.5 A. But its location on the panel of the old and new samples is different. The new mounting block looks like this:
In the figure, the element we need is highlighted in red, and it is located in the right row, first in line.
Why does the heated rear window and heated mirrors not work on the Niva Chevrolet?
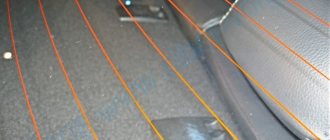
Rear window heating on a Chevrolet Niva consists of electrically conductive parallel threads applied to the surface of the rear window, connected to vertical (on the sides) wires.
How to determine if the rear window heating is broken
Typical glass heating problems are visually noticeable when the engine starts. It may thaw partially or completely fog up.
In the first case, the conductive thread may break with the following consequences:
- The glass sweats when the warning lamp and heating relay are not working. First of all, you need to check the voltage and fuse.
- The glass is not heated, although the control lamp works. The absence of tension cannot be ruled out.
- Condensation appears in places, which is explained by the presence of a broken thread. It is restored with special varnishes and repair reagents.
- Does not defrost, despite the operating state of the system.
This happens when there is severe icing and a possible lack of heating voltage. Ice should be cleared from the surface of the glass.
Troubleshooting
After checking the possible causes, the defect may lie in the switch or its button .
Search for an open circuit in the power supply circuit for heated rear mirrors.
The worst case scenario is that the problem lies in the wiring, which can be fixed by disassembling the dashboard.
The fuse for the heated rear window and mirrors is number 8 in the mounting block. Capacity 25 Ampere. The problem may be there. In the photo, due to poor contact, the seat presumably melted. There could be a fire.
Often the lack of signs of warming up is hidden in the fuse or heating control relay.
There are frequent cases of detection of defects related to the connection of the thread harness to the vehicle’s instrument system.
Checking the fuse box with a tester
The first fault is detected by the tester. The relay is checked by replacing it, albeit a used one, but with a working device.
An available option is to restore possible thread breaks. But often drivers resort to replacing the entire rear window, which is very expensive.
Restoring rear window heating threads on a Chevrolet Niva
Heating thread continuity
There are a number of ways to restore heating yourself. The choice of any of them is tied to the size (width) of the gap and the characteristics of the thread.
The experience of their restoration is based on proven methods.
- Use electrically conductive paste or adhesive, with a gap width of a millimeter . The repair package contains paste, syringe, and glass cleaning items. The use of electrically conductive glue “Elekont” or “Kontaktol”, which is applied to the area where the thread is broken.
Method of galvanic copper deposition.
Video about repairing heating filaments (first method) using glue
When is it necessary to change the power window fuse?
Most often, replacement of such an element is required in the following cases:
The window regulator of one or more doors does not work correctly (the glass does not go up or down completely, it sticks, the action itself is carried out with a significant delay). The windows don't work at all. As a rule, the fuse blows when a high current is supplied, and damage can be recognized visually: the inside turns black, defects are visible on the body. When installing a new element, it is important to choose a variety suitable for the same current strength. In modern cars, power windows are installed on the right and left sides; if the malfunction affects both elements, it is necessary to check and, if necessary, change the fuse, which is located under the hood and corresponds to a current of 30 A. The element may differ for different models.
In addition to replacing the fuse for the power window, it is important to find out the exact reason why it failed, because if there is a fault in the circuit, the problem may recur regularly. For example, if a burnout occurs when the device is turned on, most likely the wiring is “pierced” under the door trim. If the fuse for the power window burns out after the driver turns the ignition key, the problem may be a short to ground. Most often, this phenomenon occurs in the area from the mounting block to the door. Once the problem is identified, it will be necessary to correct the wiring defects so that the window regulators function without failure in the future.
Sources of the problem
When the rear window heating malfunctions, you should pay attention to the main points:
You don't need any special skills to replace them. If you study the instructions and know where the heated relay for the car rear window or front structure is located, the wiring diagram, the fuse mechanism, then you can completely do without the help of a specialist.
System fuse
The element may burn out under certain circumstances, increasing the risk of shorting. As a result, the heating will not turn on because there is no power being supplied to it, because the fuse is a protective mechanism for the heating. To understand the location of the elements, you should refer to the vehicle's owner's manual. Algorithm of actions when the location of the fuse is found:
- Remove the device.
- Inspect for integrity.
- Carry out a performance check separately from the entire device.
- Determine the cause of the malfunction.
- Replace individual spare parts or the entire mechanism.
If necessary, the fragment is replaced with a new part, since it is unlikely that anyone will undertake to restore it - it is inexpensive.
Wiring
After diagnosing the fuse or replacing it, further searches for the malfunction of the rear window defroster (if it still does not function) must be looked for in the wiring. Cause:
As a result, no current flows to the heating poles and the system does not work. You can perform simple diagnostic steps using a multimeter. To do this, you need to turn on the heating, and then measure the voltage at the heater terminals. They are usually located at the bottom of the glass or on the sides.
It is worth examining the entire length of the wiring for integrity and then, if there is a break anywhere, it will be found. Instructions:
- disconnect the terminals;
- clean connection contacts;
- replace wires.
Assembly is carried out after re-checking the operation with a multimeter.
If one or more thread strips are broken, then no current flows through them. Therefore, ice will appear in some areas, which impairs visibility and reduces driving safety. Complete disassembly of the heating equipment will help verify the break. The solution to the problem is to replace faulty elements with new ones.
Heating relay
The relay is responsible for heating the windshield. If the start key does not turn on the device, you should check the relay. It turns off the heating when the car engine is turned off. The element is located in the mounting block. The exact location is specified in the vehicle manual.
Controls
If the device does not start, the reason may lie not in the relay, but in the dysfunction of the power button itself. It is equipped with an indicator light, and if the sensor does not light up, it means that the device is faulty. The problem must be looked for in the contacts of the toggle switch, to which the threads do not conduct current. Solution: replacing the element.
Scheme of work
If at least one element fails, it will lead to the inoperability of the entire system. Heating strips are powered by direct current from the electrical on-board network. They are made of metal, which has low resistance. The number of threads depends on the modification and brand of transport, but usually there are ten. Accordingly, the total current value is on average 10 Amperes - 1 A for each thread. The operating principle of such a system:
- Voltage is supplied to the entire heating element, where the strips are connected in parallel.
- Because the metal strips conduct electricity and have some resistance, they become slightly warm. This temperature does not have a negative effect on the glass, but it can warm it up well.
- According to the methods of applying heating strips, electrochemical option, vacuum deposition or gluing can be used.
Signs of breakdown
The main manifestations of why the rear window heating does not work include:
- complete shutdown of heating;
- Not all strips work;
- periodic performance of elements.
Experienced drivers will immediately notice when the heating is not performing its function sufficiently. In winter, the first sign of incorrect operation is fogged up windows when the heater is running for a long period of time. If the rear window heating refuses to turn on or functions intermittently, it means there is a break in the electrical circuit. All components of the heating device should be checked.